Installing a faucet in the bathroom yourself is quite simple if you follow the instructions and basic installation rules. Depending on the location of the work being performed, there are two options for installing faucets: on the wall surface and directly on the bathtub.
The choice of faucet model (wall-mounted or mortise-mounted) depends on its location. In addition to the design, the length and shape of the spout for draining water, as well as the length of the shower hose, are taken into account. The material of the mixer is no less important - products made of brass and silumin are available on the market.
Faucets made of brass are heavier and of better quality compared to products made of silumin. Depending on the model, the composition of the kit may differ, but its main parts are unchanged: the mixer body, the gooseneck (spout), eccentrics (for the wall-mounted model), gaskets, a hose with a shower head and decorative covers. There may be water supply pipes (for a built-in model) and parts for attaching the shower to the wall.
Mixer installation height
To calculate the installation height of the mixer, take the edge of the bathtub as a reference point. In this case, the following point is taken into account - where the water is planned to be drained (only into the bathtub or also into the washbasin). If only a bathtub is used, it is customary to mount the mixer at a height of 20-25 cm from the edge of the bathtub. There are no strict standards for this value; the design of the model, the availability of various accessories and, most importantly, ease of use must be taken into account. The instructions for a good quality faucet contain recommendations on the height of its mounting.
Note! If a washbasin is added, then the calculation is carried out from its edge. In this case, the mixer is mounted at a distance of 25 cm from the edge of the washbasin.
How we are working?
Some people decide to save money by installing a faucet in the bathroom themselves, but this sometimes leads to leaks and flooding of neighbors living on the floor below. Better not take risks and contact San Remo:
- We will send a specialist to your home who will inspect the bathroom and give useful recommendations;
- he will calculate the cost of plumbing work for installing a faucet;
- if the device has already been purchased, the technician will prepare everything for installation;
- A specialist will install the mixer and check its functionality.
By trusting the professionals of our company, you will not need to worry about anything.
What you need for installation
Before starting work, you should check the completeness and quality of the kit. The threads on the eccentrics and nuts are checked separately. Then you need to pre-assemble the entire mixer.
When replacing the mixer, the eccentrics, if they are in good condition and do not leak, can be left the same. They allow you to adjust the dimensions between the axes of the mixer and the distance between the pipes in the wall.
Bathroom faucet accessories
Necessary tools for installation: adjustable wrench, electric drill with attachments, FUM tape, dowels.
Selecting a thread sealant
Rewinding is only needed for eccentrics.
The quality of installation of the mixer depends on how reliably the threaded connections are waterproofed. For this purpose use:
- Plumbing linen.
- Plumbing thread.
- FUM tape.
Linen is a time-tested material. Despite the emergence of many other methods of waterproofing, it is still popular among professional plumbers and amateurs. The quality of the seal is at a high level. Correct linen winding does not move when screwed in and is not cut by thread. The external bushing with flax winding can be adjusted in space, but by no more than ¼ turn.
To wind the thread, flax is twisted into a braid. Then they are wound tightly in one layer, so as to hide the thread. The tail of the thread must be clamped with the first turn. The direction of the winding should be opposite to the direction in which the part will be screwed. Then the flax will remain in place when connecting the threaded pair.
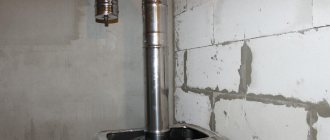
Installation on polypropylene pipes in the wall
The mixer is installed on polypropylene pipes using a plastic strip with an internal metal insert. The strip is secured to the pipes so that the outer edge does not protrude above the surface of the tile.
Note! Typically, the plank is recessed into the wall by at least 3-4 cm, and the standard distance between their axes is 150 mm.
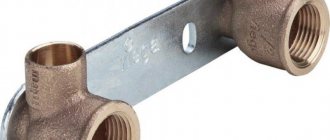
Bar for mounting the mixer on polypropylene pipes
To install the mixer on the wall you must:
- Check the presence of all parts in the kit and clean the bar to which we will screw the mixer;
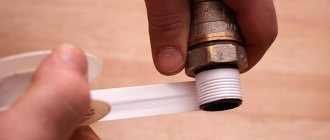
- Install eccentrics. To do this, you need to check their position inside the fittings along the length and then wrap FUM tape (flax) around the narrower threaded part (which will go into the wall). Winding is carried out along the thread with tension, in several layers (usually about 10 turns) to completely hide the unevenness of the thread. It is carried out from the edge of the product in the shape of a cone. After sealing the threads, screw the eccentrics one by one into the outlets in the wall (along the thread) and using an adjustable wrench, carefully tighten them until they stop;
- Attach decorative covers to make sure that the length of the eccentrics is installed correctly, and the length of the remaining thread is sufficient to screw the faucet. The covers should fit tightly to the wall surface, without gaps. After checking, they should be removed;
- Insert gaskets into the mixer body and screw it to the eccentrics - check the accuracy of the position of the eccentrics along the axes. The gasket is placed with the ribbed side inside the mixer, and the smooth side towards the eccentric terminals. Then open the water and check how tightly the connection was installed;
- If water does not leak out, remove the mixer and install decorative covers. Screw the mixer to the eccentrics manually, then fully compress the nuts using an adjustable wrench. Perform the compression carefully so as not to spoil the shiny coating of the mixer and not to crush the gasket inside. For insurance, place a rag between the key and the nut;
- Turn on the water and check how the finished system works.
Bathroom faucet installation diagram
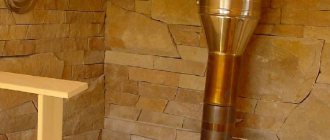
Hidden and open water supply
Typically, the location for installing the mixer is chosen long before work on laying the tiles begins. This makes it possible to secure the pipes in the grooves, making communications invisible. In this case, the connection pipes must be fixed strictly on a common horizontal axis, plus it is necessary to maintain the exact distance between centers. For this reason, installing a mixer with hidden pipes is much more difficult.
In general, both options have a similar installation procedure. It is optimal if the mixer that will be installed is available at the stage of laying and fastening the pipes. Although the distance between the centers of the pipes for the vast majority of mixers is strictly 150 mm, the fixed pipes can move during the process of finishing the walls, after which it will be very problematic to achieve a neat and aesthetic installation. Therefore, it is best to first assemble the installation “cold”, secure it to the wall, and then dismantle the mixer while laying the tiles.
The simplest installation of the mixer becomes when the water supply network is made using polypropylene pipes. The assortment of fittings for them includes products in which two MR couplings are rigidly fixed to a bar with a stop between the center holes. In this case, all that remains is to drill through the plank and secure it to the wall with quick-installation dowels. When installing metal-plastic or PEX pipes, the fittings will have to be fastened manually, for example, onto clumps of alabaster.
Shower installation
The next step is connecting to the shower mixer. To properly connect the shower you should:
- Insert a gasket into the nut at the end of the hose that connects to the shower head and tighten it by hand;
- Another gasket is inserted into the second end, and it is attached directly to the mixer (screwed into the shower hole);
- Mark the mounting location on the wall. To do this, take into account the height of the users and the length of the hose (it should not touch the edge of the bath);
- Screw the shower head holder to the wall. To do this, use an electric drill to make holes and insert dowels into them. Then screw the fasteners to the dowels with screws and insert the shower holder.
Attaching the shower holder
What installation methods are there?
The structure of the devices differs according to several criteria - the length of the gander, the presence or absence of a shower head, and the opening design. All indicators are reflected in the choice of method of mounting the device. There are several methods:
- fixing the device to the wall;
- hidden fastening;
- creation of a separate rack;
- installation in the bathtub.
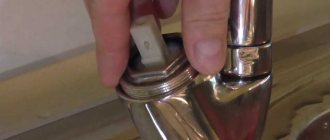
Installation in a sink or shower
This type of accessory is usually located in shower stalls or on the sink. Many models do not have a spout and are equipped with one inlet for the shower hose and two for the outlet of hot and cold water.
Installing a faucet on an acrylic bathtub
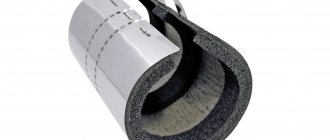
For installation on the edge of an acrylic bathtub, mortise faucet models are used. This design saves space, improves the interior (the shower hose is located under the bathtub), and the bathtub fills with water quickly and without splashing. Built-in bathtub faucets produce two types of jets: laminar (round) and cascade (wide and flat, there are models with backlight). They have a more attractive design and a larger spout capacity.
Note! This type of design requires the choice of a high-quality shower hose, since it is always under the bathtub in a bent state and is the first to fail.
An important point is the quality of the mixer itself - it passes a large amount of water under pressure, which means the load on the structural parts increases.
Bathtub faucet installation diagram
To install a mortise mixer on the side of an acrylic bathtub you need:
- Mark the holes for the mixer, spout for draining water and shower;
- Using an electric drill, drill holes according to the markings, bore them to the specified size and sand down any irregularities. For a drill, a drill in the form of a core cutter is used;
- Wrap FUM tape on the adapters for water supply hoses along the thread. Winding is carried out with tension in several layers to smooth the thread. Screw the adapters into the fittings of the water supply pipes, recessed into the wall;
- Install the nuts on the holes in the side of the bathtub;
- Place the gasket at the base of the drain spout, screw it to the side of the bathtub and crimp it;
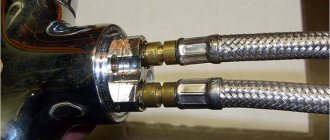
- Connect two flexible tubes for water supply to the mixer (the thinner one first) and also crimp well;
- Wind FUM tape onto the threads of the third tube. This tube is used to connect the faucet to the main unit, which distributes the water supply to the spout and shower;
- Screw a crimp nut onto the mixer from below, install it in the hole and secure it on top with a second nut;
- Fix the shower in the prepared hole and connect its hose to the main mixer block;
- Screw two flexible mixer tubes to the adapters in the wall;
- Turn on the water and check the quality of the installation.
Some bathtub models are already available with faucet holes, which makes the task easier.
Note! When installing a bathtub, it is necessary to leave free access to the faucet structure in case of an emergency. For this purpose, removable plastic screens are used.
Disadvantages to be aware of
Despite all the advantages that are described in detail in advertising brochures, before purchasing a faucet for a rim, you should think about a number of problems, especially if the owner of the house plans to install it himself.
First of all, you should not buy an inexpensive model, since due to the nature of their operation, these plumbing products are subject to high loads. A low-quality faucet will have to be replaced very soon.
The most vulnerable element of such a mixer is the shower hose. Most of the time it is in a curled state, so it gradually becomes deformed. Soon cracks appear on the hose, it begins to leak and requires replacement. Unfortunately, even expensive and high-quality faucets are not immune to problems with the hose.
The shower head hose of the mortise mixer is located in a coiled state behind the bathtub body or behind the false panel. Constant deformation of this element leads to its frequent breakdowns
You will have to come to terms with the fact that the hose needs to be changed periodically. Prudent buyers immediately take a spare hose to perform this simple repair as soon as the need arises. Particularly vulnerable in this regard are faucets whose spout also serves as a shower head.
Amateur craftsmen who do not have much experience in plumbing work should remember that at home it is easiest to install an on-board faucet on an acrylic bathtub. When working with a product made of cast iron or steel, the enamel will almost certainly be damaged, which can cause corrosion. As a result, the bathtub will have to be repaired or completely replaced.
It is better for an inexperienced master to entrust this work to a reliable specialist. Another way to solve the problem is to purchase a bathtub with a ready-made hole for installing a mixer. True, acrylic bathtubs are usually supplied with this option. Of course, when choosing a mixer, you will have to take into account the size of such a hole.
Corners for installing the mixer on the side of the bathtub
One of the innovations in the world of acrylic bathtub faucets is the corners that cut into the side of the bathtub and act as adapters for mounting wall-mounted faucets onto the bathtub. They are made of brass, coated with chrome, and fit perfectly into the interior design of the bathroom.
Adapter corners for mounting a wall-mounted mixer
The use of such an installation kit turns any wall-mounted mixer into a mortise one, which allows you to mount it on the side of the bathtub.
With welded tap
The second option is not to use American connectors, but to purchase a polypropylene ball valve that is welded to the pipes. The welding method is one-piece; the resulting structure cannot be disassembled.
- The main advantage of this design is that there is no need to install additional elements. No adapters or tow are needed, just a crane, pipes and a welding machine. This method is durable and reliable: the seams will not leak, and a high-quality faucet forms a single structure with the pipes.
- One of the disadvantages is the need for welding skills. Inability to operate a welding machine will make the structure unreliable. In addition, it cannot be disassembled: if the faucet breaks down, it is difficult to replace it.
What is the price
| Name of works | Price, rub |
| 1. Mounting the mixer on the wall | 1000-1200 |
| 2. Installing a shower bar | 300 |
| 3. Installing a bathtub faucet with a shower head | 1500 |
| 4. Installation of the mixer on the bathtub (3 positions) | 2000 |
| 5. Installation of the mixer on the bathtub (4 positions) | 2300 |
| 6. Replacing the mixer with shower head | 1200-1500 |
| 7. Replacing the flexible shower hose | 300 |
Do I need to use eccentrics?
Eccentric bushings help level out inaccuracy in maintaining the center distance, but their use hides several pitfalls. The most important of them is associated with the use of low-quality eccentrics, the threads of which become covered with an impressive layer of oxides after 1–2 years of operation. Often these products have thin walls and can simply break off inside a rigidly fixed fitting, which will greatly complicate the replacement or repair of a faulty faucet.
The second disadvantage of eccentrics is that with them it is quite difficult to calculate the required position of the water couplings so that the decorative mixer cups are pressed tightly against the wall after installation is completed. Instead of maintaining the distance between centers, the connecting fittings have to be recessed to an indefinite depth, which is quite difficult to do without knowing where the final finishing plane will be located. These reasons are enough to understand: it is much easier to pay more attention at the stage of laying water pipes, while facilitating the installation of the mixer without the use of eccentrics.
Tools for work
Before actual installation, it is necessary to prepare materials and tools. Standard set includes:
- adjustable wrench - necessary when unscrewing and tightening various connections in difficult places;
- masking tape - it is used to wrap the nuts to prevent them from being damaged when the wrench is turned;
- pliers - tools used to unscrew eccentrics;
- Teflon tape (or other sealant).
Masking tape is needed to protect the mounting nuts. Often the nickel coating is damaged during installation. The key is indispensable when working with plumbing; it is used to dismantle old plumbing. FUM (fumka) is a fairly old insulating material, but it is the one most often used to protect against leaks. If plumbing work is being carried out for the first time, then Teflon tape can be used for insulation.