To connect water heating equipment, toilets, faucets and other plumbing devices, a liner is required that will connect them to the water supply. This element can have a flexible or rigid design.
Most users prefer the first option. This choice is not made without reason - the flexible connection for the mixer is compact, practical and easy to install. Are you planning to purchase and install such a device, but doubt your own abilities?
We will help you solve this problem. The article describes the features of different types of flexible hoses, indicates the specifics of their application and provides practical advice on choosing the appropriate option. In addition, we have prepared detailed instructions for installing the faucet connection.
Connecting a flexible line: detailed instructions
All plumbing equipment is connected to water pipes using rigid or flexible hoses. Rigid hoses are less preferable, as they require higher precision during selection and do not allow the device to be moved in any direction. You can connect a flexible line to a faucet or other plumbing device yourself.
Connecting the mixer with flexible hoses
What is flexible eyeliner?
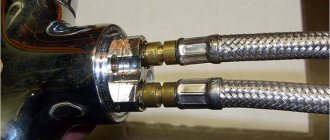
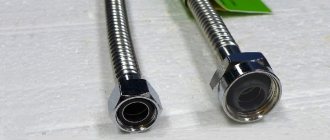
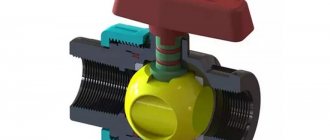
The flexible line is a hose protected by a special braid. On one side of the hose there is a crimp sleeve intended for connection to the mixer. On the other side there is a union nut complemented by a rubber gasket. A nut is used to connect the inlet to the outlet of the water pipe.
Components of flexible liner
The liner hose can be made:
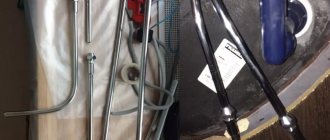
For braiding the following can be used:
- aluminum. Hoses with aluminum braid are designed to pass water whose temperature does not exceed 80ºC. Working pressure no more than 5 atmospheres. The average service life of the product is 5 years. The main disadvantage of aluminum-wrapped hoses is their high susceptibility to corrosion when used in rooms with high humidity;
- stainless steel. The service life of such a product increases to 10 years. At the same time, the flexible liner can withstand water temperatures up to 95ºС and pressure up to 10 atmospheres;
Flexible hose with stainless steel braid
- nylon. The hose with nylon braid has a long service life (up to 15 years). Installation is possible at water temperatures up to 110ºС and pressure up to 20 atmospheres. The cost of such products is higher than other types;
Flexible eyeliner with nylon braid
- galvanized wire. Hoses are characterized by high flexibility and low price, but at the same time they have a short service life;
- one-piece corrugated hose (bellows connection). The eyeliner is quite strong and durable. It is characterized by high cost.
Liner with braided solid corrugated hose
Choice of eyeliner
If you need to replace the flexible hose, then first of all you need to choose the right hose to connect the mixer. When choosing, you need to rely on the following factors:
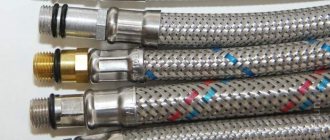
- purpose of the eyeliner. On sale you can find hoses for connecting cold and hot water, as well as universal products. The cold water liner is wrapped with blue thread. For hot water - red thread. The universal eyeliner has inclusions of both blue and red threads;
Connection suitable for connecting both cold and hot water
- hose parameters. When selecting parameters, it is necessary to determine the type of connection of the line to the mixer and water pipe (nut, fitting, etc.), as well as the type and size of the thread. Threads can be internal or external. Thread sizes range from ½” to 1 ½”. At the next stage, the length of the hose is selected. To make the connection as reliable as possible, it is necessary to eliminate the possibility of tension on the hose. To do this, you need to choose a device whose length is slightly greater than the distance from the mixer to drain the pipe;
Selection of eyeliner according to connection type
- material for making fittings and nuts. Brass is more reliable and durable. Connecting elements can also be made of aluminum (over time, the material becomes rusty and becomes unusable) or plastic (highly susceptible to mechanical stress);
- the hose must be sufficiently elastic. If, when holding the hose by one end, the hose assumes a hanging position, then this indicator is normal. If the hose takes a horizontal position, then the elasticity of the product is small;
- there should be no visible damage on the winding, nuts and fittings, which will lead to a reduction in the service life of the product.
When replacement is necessary
It is necessary to change the hose if:
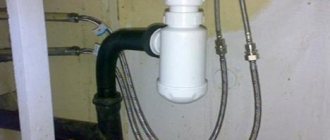
- The flexible line broke. Breakage of the braid or rupture of the internal hose will lead to the formation of a leak and, as a result, flooding of the room. The causes of leakage may be high pressure in the system or mechanical impact;
Loss of tightness of the connecting hose
- A flexible hose leak was detected at the junction with the mixer or water pipe. The causes of leakage may be natural wear of the gasket or a crack in the fitting (nut).
Leak at the hose connection
Flexible line replacement process
To install a flexible water supply to connect a mixer, you must:
- turn off the water supply. This can be done using a tap installed in the apartment;
- open the mixer taps to drain the remaining liquid;
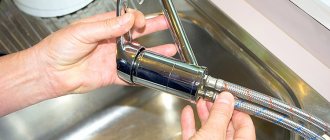
- Using an adjustable wrench or a wrench corresponding to the diameter of the union nut, unscrew the hose from the water pipe. If the connection point is rusty and the hose does not unscrew, then you should not make any effort to remove the liner. In this case, a solvent or WD 40 liquid is applied to the rust, which removes plaque;
Disconnecting a flexible hose from a water pipe
- remove the mixer.
To do this, it is necessary to loosen the nuts securing the device; Places for fixing the mixer to the plumbing equipment
- disconnect the hoses from the mixer with an adjustable wrench;
- connect new connecting hoses to the mixer and install the device in its original place. If the fastening on the hose does not correspond to the connector on the faucets, then additional adapters are installed. When installing the adapter, it is important to take care of the tightness of the connection, which is made using FUM tape or linen thread;
Installing flexible hoses on the mixer
- Attach the supply hoses to the outlet of the water pipe.
- When you turn on the water for the first time, it is recommended to check the flexible hose and connection points for leaks. The average inspection time is 20 – 30 minutes.
The process of replacing connecting hoses is presented in the video.
Replacing flexible hoses yourself is not a problem. The main thing is to choose the right hose that meets all the parameters.
Source: https://vse-o-trubah.ru/podkluchenie-gibkoj-podvodki.html
No, just don't fum!
Let's start with the fact that modern materials for sealing threaded connections, be it fum or a special thread, are not needed in this case. If you think that the fum needs to be wound in any case and it won’t get any worse, then you are mistaken. The thing is that initially any flexible wiring is already equipped with a standard seal, it’s not for nothing that they put it there. And if you wrap foreign material around the threads, it will not reach the end and will not press the seal as intended by the manufacturer.
PHOTO: sovet-ingenera.com So compaction in this case not only makes no sense, but can also be harmful
Flexible connection for the mixer: how not to get confused when choosing
Flexible connection to the mixer is one of the most common elements used for the installation of plumbing fixtures. There are a huge number of different flexible hoses on the market, which makes choosing the right part difficult.
We would like to help you understand the ins and outs of liners, especially if you intend to install the faucet yourself.
Purpose
Connectors made of flexible material are used to connect various plumbing fixtures to water pipes.
By and large, the scope of application of these products is much wider; they are actually seen in arbitrary pipelines:
- gas,
- technical,
- automobile, etc.
But within the framework of our article, we are looking at only the plumbing segment of their application.
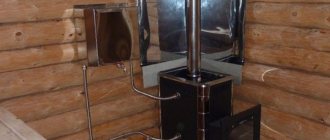
So, a flexible lead is used to connect the following devices:
- Taps and mixers;
- Boilers;
- Shower cabins;
- Washing cars;
- Dishwashers;
- Pumps and pumping stations;
- Gas water heaters and boilers;
- Toilets, bidets, toilet installations.
Why has this type of pipe become so widespread? Everything is quite simple: using a flexible hose, it is possible to connect any device without connecting steel or plastic pipes exactly to the connection point, since for this you often have to not only cut and weld metal, but also tap the walls.
Along with this, each inaccuracy will lead to the fact that the work will need to be redone or the device moved, which is very undesirable.
In addition, quite often the faucet is connected in hard-to-reach areas, especially in small bathrooms with a clutter of pipes and various devices. The use of a flexible supply eliminates all such troubles, since it can be laid virtually anywhere and along the most winding route.
At the repair stage, you just need to remove the water sockets from the wall or floor near the intended installation location of the washbasin. After this, you match the length of the liner and connect the mixer to the pipes.
Note! Hoses are prohibited from being used as a replacement for main and distribution pipes. In addition, it is not advisable to use them in heating systems to connect radiators.
Device and materials
The flexible inlet for the mixer is designed quite simply - it is a rubber tube into which fitting bushings are inserted on both sides. From above, the connection between the pipe and the bushing is pressed with steel crimp. In addition, the product has external reinforcement in the form of a braid of iron or polymer wire.
Couplings with internal threads (sleeve nuts) or fittings with external threads are used as fittings.
- Much more often, a nut-fitting assembly (designated g/w) is used to connect the mixer.
- But on sale it is possible to find a nut-nut version (g/g).
- From time to time, fitting-fitting (w/w).
The most common common nut size is ? inches, fitting - M10.
You often see an option with a 1:2 inch fitting; in addition, you come across a 3:8 inch nut (you have to use an adapter fitting to connect it). Models with a long fitting are common and popular among plumbers, since it is more ergonomic to connect them to the mixer from the bottom of the sink.
In high-quality hose models, the fittings are made of plumbing bronze (Cu Zn39 Pb3). It can be pure or nickel plated. The crimp sleeve is made of stainless steel (GOST 08Х18Н10 or AISI 304).
Note! In modern construction stores, you often see products with fittings made of an alloy of silicon and aluminum (silumin). This is an unacceptable option, which can be destroyed even at the installation stage; therefore, it should not be taken.
It is possible to find out what the nut and fitting are made of simply: if you scratch nickel-plated bronze, the bottom of the groove will be yellow. Silumin will remain monochromatic. In addition, aluminum alloy is much lighter than brass.
The hose itself must be made of ethylpropylene rubber (EPDM), a non-toxic rubber approved for transporting drinking water. This material is elastic and can withstand peak pressures of up to 50 atmospheres.
Here, when choosing, you need to smell the product: if it emits a characteristic unpleasant smell of synthetics, it means that the hose is made of technical toxic rubber, which, moreover, easily breaks and crumbles when bent strongly.
The union nut must be equipped with a sealing gasket, and the fitting must be equipped with one or more rings. These gaskets and rings must also be made of ethylpropylene rubber.
The outer braid in conventional products is made of stainless steel or polymer fiber. Such liners last from 8 to 20 years and can withstand operating pressure of 10 – 20 atmospheres.
But on sale there are models with aluminum braiding, and from time to time the reinforcement is made of simple galvanized steel.
Note! Aluminum braiding will last a maximum of 2 - 3 years, steel braiding can rot in just a few days. As a result, the hose may burst, and petty savings on the quality of the liner will cause you a lot of significant trouble.
The length of the eyeliners in most cases ranges from 30 to 200 cm, but if you are thirsty, you can find virtually any size. In addition, flexible connections sometimes include bellows - tubes made of corrugated stainless steel. They are more durable and reliable, but their price is higher.
Note! There are stripes on the braid. light blue - for cold water, red - for warm water, light blue with red - for universal water, yellow - for gas. Low-quality products may not have similar markings.
Installation rules
Despite the fact that the installation instructions for the products are incredibly simple, when connecting them you must follow certain rules:
- Before connecting, be sure to inspect the product for defects, breaks in the braid, presence of sealing gaskets and rings;
- When choosing a hose, select a length so that it is not stretched , and the turning radius is at least 5 - 6 of its outer diameters;
- During installation, bends are not allowed ; instead, it is better to make rings;
- It is not allowed to twist the tube along the longitudinal axis;
- The threaded connection of the nut and fitting does not lack sealing with tow or FUM tape ; its role is played by rubber rings and gaskets;
- The nut is tightened by hand until it stops , then tightened with a wrench half a turn, to a maximum of 270 degrees. Over-tightening risks cutting through the gasket, which leads to leaks.
Note! Receive only high-quality products made from materials that meet the standards. Saving can be very expensive.
Conclusion
The use of flexible connections allows you to connect various plumbing fixtures to the water supply. When installing faucets, they are often completely indispensable, so choosing the appropriate model should be taken seriously, which the video in this article will help you with.
Source: https://uchebniksantehnika.ru/smesiteli/gibkaia-podvodka-dlia-smesitelia-kak-ne-zaputatsia-pri-vybore.html
Reinforced
The first type of flexible hose is a soft elastic hose, reinforced with wire braid, with connecting elements at the ends (fittings). The tube has a complex structure, despite its simple appearance. It is made from synthetic EPDM rubber or PEX cross-linked polyethylene. It is braided with a thread of wire made of stainless steel or aluminum. The reinforced liner, which can withstand higher pressure, has a nylon braid.
Mr. Build recommends (strongly!): Do not use flexible hose with galvanized wire braid. This is the most unreliable hose that can burst at any moment.
The product is cut at the factory into pieces of the required length. At the ends, metal nipples with fittings or union nuts are inserted into it. Then the braid with the hose is compressed with a steel sleeve around the bushing. Connection to pipes is made through rubber seals.
Flexible water liner has different diameters: 1 and 1/2 inches, 3/4, 3/8.
Installing a faucet on a sink
Faucets that supplied hot and cold water separately are practically a thing of the past. They have been replaced by faucets that mix cold and hot water by changing the location of the device handle. In our article we will talk about the nuances of installing a faucet on a sink.
The mixer is an integral part of the plumbing system
Choosing the right mixer is the key to long-term and convenient use of the product.
When purchasing a mixer, you should pay attention to:
- the material from which it is made;
- sealing parts;
- spout type
High-quality faucets are made from bronze or brass. Their main difference is the yellow spout neck of the device. If the neck is gray, then the mixer is made of silumin. This material wears out quickly due to corrosion.
The sealing elements must be rubber. The mixer kit must include a split spout spacer ring. Some unscrupulous sellers claim that it does not need to be installed. But that's not true. The absence of a spacer ring will cause the mixer to become loose and leak.
As for the type of spout, it is better to purchase a faucet with a swivel spout for sinks. This is explained by the fact that models whose spout does not turn are inconvenient to use. Often the stream of water hits the edge of the sink or flows down its edge. And you won’t be able to wash your face properly when water is pouring into one point.
Mixer assembly
The main elements of a mixer for large sinks (made of stone or cast iron) are:
- 1-2 stud screws;
- a pressure plate having a rubber gasket;
- nuts
If the sink is made of light stainless steel (for example, a kitchen sink), then a plastic support plate is also used. It is attached between the shell body and between the rubber gasket of the pressure plate. The plastic plate will provide the mixer with a more rigid attachment to the sink.
Mixer assembly
The tightness of the lower nut is first checked. It must be done by hand along the entire thread. After tightening it, the faucet should not wobble on the sink. If this does not happen, then you were given a defective product.
A spacer ring is placed at the base of the spout. It should fit into the groove. The ring is quite tight and may not immediately fit into the hole. To install it in place, it should be squeezed with tweezers near the cut, and the lower part of the spout should be lifted slightly. The click of the ring means it is locked correctly.
Attaching flexible hoses to the mixer
A liner is provided to connect the mixer to the water pipe. It can be rigid (copper tubes with a diameter of 10 mm) or flexible (a metal braided hose equipped with a fitting or union nut). Flexible eyeliner is more convenient.
In order to properly connect the flexible hose to the mixer, you must adhere to the following requirements:
- It is forbidden to install the liner in a highly tensioned position.
- To prevent damage and leaks, the connecting elements are not tightened all the way.
- The eyeliner should be positioned in its natural state, without excessive twisting or kinking.
- The diameter of the liner should be 5-6 times less than the bending radius.
- To avoid premature corrosion, it is necessary to connect elements from compatible materials (for example, steel parts are joined to steel products, brass to brass or copper, etc.).
Despite the presence of rubber seals in the fitting, it is necessary to additionally use winding material, which will improve the sealing of the connections. The best solution would be to use sanitary flax and sealant.
Flexible connection to the mixer
Tightening the union nuts should not be accompanied by turning the connection. This process involves holding the crimp sleeve with pliers. When tightening the nuts, you should try to twist the line a little in the opposite direction.
Installation of a faucet on a sink
After fixing the flexible hose, the mounting screws and bottom gasket are installed to seal the mixer. Having done this, you can begin installing the faucet on the sink. The pins are tightened. Depending on the type of construction, a screwdriver or wrench is used. In the second case, the nuts need to be locked.
Flexible hoses attached to the faucet are passed through holes in the sink. Sometimes you may encounter that two union nuts do not fit into the sink hole at the same time. It becomes impossible to lower two flexible hose tubes at once. In this case, one liner tube is passed into the sink, and the second is connected to the mixer through a hole.
The lower fastening of the mixer is being assembled. If the mixer is mounted on a sink with thin walls, then the design is complemented by a plastic support plate. The nuts located on the studs are tightened using an open-end wrench.
The nuts are tightened in such a way as to ensure reliable fastening of the mixer to the sink. It should not move when turning the spout or water handle. But you shouldn’t overdo it with tightening the nuts either, since you can damage the surface of the sink, tear off the nuts and threads on the studs, and also deform the pressure plate.
Connecting a flexible line to the water supply
A completely logical question immediately arises: how can a flexible hose be connected to a water pipe, when tightening the fitting can be accompanied by simultaneous unscrewing of the hose from the mixer body? To avoid this, a liner is used, one of the fittings of which has a left-hand thread (usually it is screwed into the mixer body).
Particular attention is paid to the thread of the water pipe. If it is threaded on a thin or metal pipe that will rust, then a stainless steel protective tip is installed between the union nut and the thread.
Connecting the faucet to the plumbing system
The best solution is when, when connecting the liner to the pipe, the internal thread has a minimum length of within 1.5 cm. The thread should be located on a thick wall, and the elements are screwed in using a winding for sealing.
Sealing rubber gaskets are exposed to hot water, which reduces their service life. But this is not the only reason for their premature wear. During installation, seals must not be turned flat or over-tightened.
The correct assembly of the gaskets is as follows. On one side, the threaded connection of the water pipe is held with an adjustable wrench, and on the other side, the crimp sleeve of the union nut is held with pliers. And only after this the union nut is tightened.
Useful tips
When installing a faucet on a sink, there are a number of nuances that will help carry out this work more efficiently and in a short time. In particular, it can be easier to work with flexible hoses if the hoses have different lengths. During installation work, the fittings on the two connections will not interfere with each other, and they will fit into the hole in the sink one after another.
If a new sink was purchased along with the faucet, then its fastening is carried out on a structure that has not yet been fixed. This will make it more convenient to install the mixer. The sink will be installed with the faucet already installed on it.
When replacing an old mixer, you may encounter the problem of its quality dismantling. Unscrewing the faucet can damage the water pipe, since settled salts often cause tight “sticking” of the connections. This problem is solved with the help of brake fluid, which is used to treat the joint. After 15-20 minutes the mixer will unscrew without problems.
Sometimes it happens when the faucet fastening element has an unsuccessful design. For example, when the fastener consists of a thin pressure plate and a pin, which is shifted to the outer part.
It will not be possible to securely fix such a fastening element, since it will only be properly attached to the sink at one point. As a result, a gap may form in the area opposite this point.
To prevent water seepage, such a gap is sealed with silicone sealant.
about installing the mixer:
Source: https://akvauyut.ru/ustanovka-smesitelya-na-rakovinu/
Specifications
In the plumbing market you can find two different categories of flexible hoses - adapters and extensions. Adapters are ordinary hoses for supplying water to showers, sinks or washing machines. Their length rarely exceeds 0.5 m. Using an extension cord connected to the adapter, water is supplied to those areas that a conventional hose cannot reach.
The characteristics of eyeliners of the first and second categories are similar and look like this:
- the diameters of the outer and inner radius of the pipe are 12 and 11.5 mm, respectively;
- the nominal pressure is 8 bar, and the maximum reaches 10 bar;
- the minimum bending radius is 60 mm;
- maximum permissible temperature of 70 degrees;
- service life is at least 10 years;
- rubber hose hardness 75 Shore;
- The maximum tightening torque for the fittings at the ends of the hose is 50 Nm.
How to install a faucet with your own hands
- Mixer with fasteners;
- 2 flexible eyeliners;
- rags;
- masking tape;
- adjustable wrench.
Turn off the water
‑channel “220 volts”
Before you begin, close the cold and hot water taps on the sink. If there is no separate shut-off valve on the device, turn off the water on the risers.
Place a clean rag in the bowl to prevent accidental falling parts from damaging the coating.
Remove the aerator
‑channel “220 volts”
Remove the aerator from the spout so that it does not become clogged with rust and other possible contaminants from the pipes. To do this, unscrew it counterclockwise using the plastic wrench included in the kit or a regular adjustable wrench.
The jaws of a metal wrench can scratch the finish of the faucet, so it is better to wrap them with masking tape or a rag.
Assemble the faucet
‑channel “220 volts”
As a rule, plumbing fixtures are supplied already assembled. If any of the elements are not connected, install them according to the instructions. Take the mounting pin from the kit and screw it clockwise until it stops into the hole of the appropriate diameter in the bottom of the mixer.
Connect flexible hoses
‑channel “220 volts”
Attach the flexible hose fittings to the faucet by tightening them by hand. First check that O-rings are installed at the ends of the threads. Do not tighten the fittings with a wrench - excessive force may damage the gaskets.
Reinstall the faucet
‑channel “220 volts”
To prevent water from leaking through the body, place the o-ring in the special groove in the base of the faucet.
First thread one flexible hose into the mounting hole of the sink, and then the second. Place the faucet in the designated location.
Secure the faucet
‑channel “220 volts”
Move under the sink. Place a rubber gasket and a crescent-shaped fastening washer onto the stud. Screw the nut on top and tighten it by hand, and then tighten it with a socket wrench.
Before final tightening, make sure that the faucet is installed without distortion.
Connect to water supply
‑channel “220 volts”
Now place the union nuts of the flexible hoses on the fittings of the water sockets or sink taps and tighten them by hand. Tighten the connections with a wrench, but not too much - half a turn or a little more will be enough.
Don't mix up the hoses! According to the standard, hot water should be on the left and cold water on the right.
Check the operation of the mixer
‑channel “220 volts”
To check and flush the system from possible contamination, open the shut-off valves on the device or risers. Run the water and make sure that when you turn the tap, cold and hot flow as expected.
Install an aerator
‑channel “220 volts”
Return the nozzle to its place by screwing it into the mixer by hand in a clockwise direction. Tighten the aerator just a little with a plastic wrench or a regular adjustable wrench. To avoid scratching the chrome plating, the jaws of the key can be wrapped with masking tape.
Try the faucet
‑channel “220 volts”
Take the eccentric couplings from the kit and screw them into the water sockets in the wall. Wrap the fittings four to five turns so that the distance between their centers is 150 mm.
uralsfs channel
Screw the decorative rosettes on top, and then install the faucet and tighten the union nuts by hand. Make sure there are a couple of threads between them and the covers.
uralsfs channel
Check with a bubble level whether the structure is level and, if necessary, adjust its position by screwing in or unscrewing the eccentrics. Measure the exact distance that the couplings protrude from the wall and note it.
Install eccentrics
uralsfs channel
Disassemble the entire structure to finally assemble it with thread sealing. Wind five or six turns of FUM tape clockwise around the thin ends of the eccentrics. Screw the couplings into the wall to the previously measured depth.
Seal joints
uralsfs channel
To prevent water from getting into the gap between the eccentrics and the wall, fill it with silicone sealant. Squeeze the required amount from the tube and gently spread around the couplings.
Install the faucet
uralsfs channel
Screw decorative rosettes onto eccentrics. Install the gaskets into the union nuts of the faucet, and then attach it to the couplings and tighten the nuts. First by hand, then using a wrench about one turn. Check with a level that the mixer is installed horizontally.
Wrap the wrench jaws with masking tape to avoid damaging the coating on the faucet nuts.
Attach the shower head
uralsfs channel
Install the gasket into the union nut of the hose and screw the part onto the corresponding fitting on the mixer. Attach the second, conical end of the tube to the watering can, also not forgetting about the gasket.
Attach the watering can bracket
‑channel “Repair and decoration”
Estimate at what height the shower holder will be located. Apply masking tape in this place, and then attach the bracket and mark the points for the mounting holes with a pencil.
Use a drill to drill holes. First, with a ceramic drill in the tiles, and then with a concrete drill in the wall. Insert dowels into the holes and secure the holder with screws.
Check the operation of the mixer
uralsfs channel
Open the taps on the cold and hot water risers. Make sure the faucet works in all modes, including shower.
Install an aerator
‑channel “220 volts”
After a small amount of water has drained, do not forget to return the faucet nozzle to its place. Screw the aerator by hand and tighten it 10–20 degrees with the special plastic wrench included in the delivery kit. If you don't have such a tool, wrap the jaws of the adjustable wrench with masking tape and use it.
Source: https://Lifehacker.ru/ustanovka-smesitelya/
Common mistakes
For example, some people, trying to make the connection tight, wrap flax around the threads or apply sealant. Under no circumstances should this be done.
The fact is that the eyeliner in its design has special rubber seals. In this case, flax will only interfere with tightening the nut tightly. And the sealant will glue the connection, and in the future will prevent the dismantling of the flexible element.
The connecting nut should be tightened tightly, but not fanatically. Otherwise, there is a risk of damaging the rubber band. It is best to carry out this operation manually and only tighten it a little with a wrench at the end.
When choosing a flexible hose, you need to take into account the distance from the pipe to the plumbing equipment. A hose that is too short will be under constant tension and will not last long. On the contrary, a long eyeliner will twist into rings, which will also lead to a reduction in service life.
Flexible eyeliner, although a universal element, still has limitations in use. For example, it cannot be used in a heating system.
True, I have seen cast iron radiators connected to a flexible hose. I’m afraid to even imagine what this could lead to in the future. You also cannot use the flexible element outdoors at sub-zero temperatures.
In other cases, with proper installation and operation, the eyeliner can last up to 10 years or more. No wonder it is so widely used when installing various equipment.
Operation and care
Bellows connection is considered the most reliable way to connect plumbing fixtures and does not require special care. Damaged connections cannot be repaired and require immediate replacement. In order for it to serve properly for many years, you must follow the following operating tips.
- When leaving for a long time, always turn off the water supply. When water pressure increases, the liner may simply burst. This will lead to flooding of both your home and your neighbors' apartments. It’s better not to take risks and try to avoid unpleasant moral and financial consequences.
- Regularly check the condition of the connections and fasteners. It is necessary to inspect the pipes every 6-12 months in order to prevent future breakdowns. If you notice defects or leaks, you should replace the failed part as soon as possible.
Bellows water connections are the best choice for home and industrial use. You should carefully choose the product and its installation. If questions arise, it is better to seek the help of professionals to avoid future breakdowns.
If you didn’t look right away, don’t cry later
This is an axiom - before installing flexible wiring, check its completeness. Has the gasket fallen out, is the end fitting well crimped, are there any defects on the threads or braid.
PHOTO: static.onlinetrade.ru It’s even better to look at all this in the store, so that later you don’t have to run around with a defect and prove that it wasn’t your fault
And make yourself a simple rule: at least once every six months, find some time and, armed with a flashlight and a paper napkin, inspect your plumbing for digging and leaks. Then there will be no surprises.
And now a little about how to choose the right flexible eyeliner:
If you follow these simple rules and choose the right flexible liner, it will not cause your troubles, but will serve faithfully for many years. On what basis do you choose supply hoses? Have you encountered any problems in their operation? Share your experience in the comments!
Rate this article
Loading…
Pull and pull, tear and drown
Flexible eyeliner is not a clothesline; it cannot be pulled. Constant force will loosen the connection and the connection will begin to leak. With the slightest impact, for example, you decide to move the sink just a centimeter, the stretched hose may even break - and here it is again, the trill of the doorbell under the thick finger of an evil neighbor.
It is equally dangerous to leave a hose with an excessive bend or, even more so, a twist. In this case, the liner may bend and the rubber inside will collapse.
PHOTO: otvet.imgsmail.ru Scientifically speaking, the bending radius should exceed the outer diameter by 5-6 times
There is strength - no need for intelligence
Let’s tighten it tighter and with effort! Many people think this way and make a big and sometimes irreparable mistake. Let's look at this process from the point of view of elementary logic. By tightening the nut, you press the sealing gasket against the sharp edges of the fitting - and, bad luck, they can push through or even tear the gasket. And then the same flood and angry neighbors on the doorstep await you.
PHOTO: remohouse.ru That is, you need to tighten it as gently as you can. First, just with your hands, and then lightly - with a key without force, with your feet resting on the wall
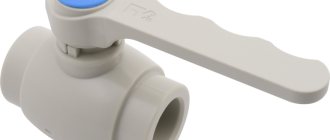
Metal braided rubber hoses
The most common flexible water connection is a rubber hose with a metal braid. It is extremely easy to produce. This is one of the reasons for the relatively low cost of the product. Modern manufacturers use EPDM rubber as the material for the hose. It does not have a strong chemical odor, is non-toxic, and is suitable for drinking water.
Flexible connections are used to connect mixers where there is no possibility of supplying a stationary pipe
Flexible water connections are most often used when connecting faucets. It is usually impossible to connect a stationary pipe to it. The flexible water supply hose can be easily connected to other household devices: toilet (urinal, bidet), washing machine, dishwasher, water heater. It is applicable wherever there is hot and/or cold water supply. The rubber hose for connection is very convenient, simple and practical.
The anti-vibration liner is of improved quality. The hoses of this product have an increased diameter compared to standard ones. They are used when connecting devices equipped with household pumps. The use of a special rubber anti-vibration structure can significantly reduce the level of noise and vibration in the water distribution network.
Good to know! It is not recommended to use rubber hoses longer than one and a half to two meters.