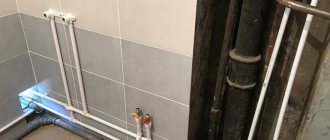
The tap is metal, but you bought a polypropylene pipe, how do you connect a polypropylene pipe to a metal tap?
First, decide what kind of faucet you have.
More precisely, which tap outlet to which the polypropylene pipe is connected, it can be a tap with an internal thread (“female”) or with an external thread (“male”).
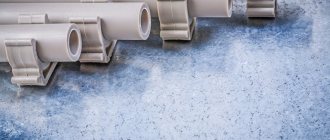
To connect a polypropylene pipe to a tap, you need a threaded fitting.
If the faucet is “male”, then you need this one
If the faucet is “mother”, then you need a combined coupling with an external thread.
You can use these collapsible fittings
Next, fum tape (as an option) is used to seal the thread (sealing).
Fum tape is wound only on external threads.
If the faucet is “male”, we wind the fum-tape onto the faucet; if it is “female”, then the fum-tape is wound onto the combined coupling “male”.
I usually first screw the fitting (coupling, or American) into the tap and only then solder the polypropylene pipe, it’s more convenient.
When screwing the coupling into the faucet, we hold it with an open-end or adjustable wrench; it should not turn, otherwise it will leak and you will have to repack the faucet itself.
The coupling itself can be tightened with plumbing wrenches.
The number of turns of fum tape depends on the thread diameter.
That's it, we screwed the coupling into the tap, and the tap was naturally closed.
Next, turn on the soldering iron for soldering polypropylene pipes and solder the pipe into a combination coupling (or American).
Give time for the pipe to cool.
We open the tap and check this unit for leaks.
You can make everything even easier if you just use (install) something like this
Source: www.remotvet.ru
How to select and install a faucet on a plastic pipe
The emergence of many new materials has led to the emergence of new components and even new ways of connecting pipeline fragments: it is clear that fittings for a metal-plastic product and a polypropylene product will be different. And the installation methods will differ, since the pipeline design requires a different approach.
Taps for plastic pipes must be selected taking into account the characteristics of the material.
Materials and tools used
For this work we will need the following tools and materials:
- an adjustable wrench for unscrewing an old, worn-out faucet;
an open-end or socket wrench of the appropriate size;
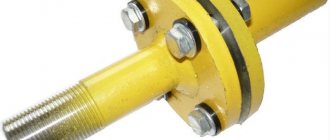
squeegee (a piece of pipe with a thread at one end);
a special device for shutting off water in the riser outlet;
Metal-plastic water conduits
The material is a multilayer composite, where a layer of aluminum foil is located between the layers of plastic. On the one hand, this makes the process of welding a product a rather specific task. On the other hand, it facilitates the connection of shut-off valves to the water supply system.
For metal-plastic water pipelines, metal taps are used. Their installation does not require welding, which greatly facilitates the work. The latter consist of a nut, a collet ring and a fitting (it is located on the body). How to install a ball valve on a metal-plastic heating system?
- Cut the water pipe with a diameter of 25 or 32 mm so that the cut is exactly perpendicular to the axis, and clean the end.
- Slide the nut and collet ring on. Then the product is put on the fitting.
- Unscrew the collet ring at the connection point and tighten the nut. If higher tightness is required, fum tape is wound.
- The docking on the other side is performed in exactly the same way.
Polypropylene faucet is a modern solution for your communications
Faucets made of polypropylene cause distrust among many buyers due to the fact that they consider the material to be unreliable and short-lived. Meanwhile, modern technologies ensure the highest quality manufacturing, thanks to which such cranes are not inferior in properties to metal products, and in some respects even surpass them. This article will discuss the main features of this type of product and the criteria for selecting quality models.
Taps and fittings for polypropylene pipes meet the highest quality standards if they are manufactured in accordance with the technology
Advantages of this product group
Taps for polypropylene pipes can be very different: steel, brass, or made of the same material as the main communications. It is the latter option that we will consider in more detail, especially since it has a number of undeniable advantages:
A polypropylene faucet is an excellent solution for most types of communications
Important! Another important advantage is the fact that the locking mechanism is made of high-quality stainless steel, this guarantees the durability of the structure and its resistance to adverse influences
Features of polypropylene taps
First, you should understand the basic design features, this will allow you to better understand how the system functions.
Device
Products can be made from different types of raw materials, most often the upper limit of heat resistance is limited to 95 degrees. It is best to choose designs from the PPRC brand of raw materials; the size range of products is quite wide, but the most common sizes are 20, 25, 32 and 50 mm, but other options can be found.
Regardless of size, the structure consists of the following components:
In the photo: this is what the structure looks like in cross-section
Housing made from the highest strength polypropylene
It is very important that the assembly is cast with high quality, without any flaws or surface defects.
The closing element is a ball with a hole for water flow. It is best if it is made of stainless steel and the surface is laser polished to ensure the tightest and most reliable fit.
The rod is the axis on which the locking mechanism is attached; it must be adjusted very precisely to prevent even minimal play.
To prevent water from penetrating through the rod mounts, O-rings are used; they must be made of high-quality rubber.
To ensure a tight fit of the ball to the body, two rings are used, which can be used either from fluoroplastic or Teflon.
The mechanism is adjusted using a handle, which is attached with a special screw.
The handles, depending on the specific use, can have very different configurations
Types of products
Depending on the design features, all such products can be divided into several groups.
For example, depending on the type of case, the following options can be distinguished:
- Non-separable options have a solid body, they are easy to use and cost little. But the biggest disadvantage is the fact that in the event of a breakdown, the unit is not repaired, but replaced entirely.
- Collapsible housings are more massive and more complex, but in the event of a malfunction, they can be repaired by replacing worn gaskets or entire parts of the system without replacing the entire assembly.
Repair of a polypropylene tap is possible only if the body is dismountable
Depending on the direction of flow, the following types exist:
- Straight lines through which fluid passes in one direction.
- Angular ones, in which the direction of flow changes, are most in demand when connecting radiators of a heating system and allow you to do without American couplings.
Angle taps are indispensable when assembling a heating system
Advice! Always ask the seller if there is a quality certificate.
Polypropylene tap - a modern solution for your communications
Polypropylene tap: video instructions for DIY installation, features of pipe fittings, made of polypropylene, 20, 25, 32, 50 mm, repair, price, photo
Polyethylene pipeline
A ball valve for a plastic pipe made of HDPE, just like other fittings, is made of plastic. This does not affect the quality, but ensures the overall tightness of the system. Installation is carried out in several ways, which determines the purpose of the pipeline - heating, plumbing and the diameter of the product.
- The push-in ball valve in this case does not have a fitting, so its installation is carried out somewhat differently. The plastic pipe is cut exactly perpendicular and chamfered, then a locking and sealing ring is put on it, and then a nut and collet ring are put on. The remaining steps are similar to the scheme for attaching fittings to metal-plastic water pipelines.
- Rebated - the connection of plastic pipes with shut-off valves is made by bolting through holes in the rebates. In everyday life, this method is extremely rare.
- Welded - usually required for water pipes and heating systems with a diameter much larger than 25 or 32 mm. There is no need to unscrew or put on anything here. The tap and the section of the product are welded with a special soldering iron or connected through an electric coupling. The latter method is more convenient, since it does not require holding the parts in your hands for welding. A coupling is applied to the ends to be connected, current is connected to it, and the products are welded.
How to install fittings on HDPE products is discussed in detail in the video.
Pros and cons of this type of installation
A definite advantage is the large selection of fittings to achieve this goal. PPR pipelines also have such advantages as a long service life and non-susceptibility to corrosion processes.
Disadvantages and various difficulties may arise if the various elements of the pipeline are incorrectly connected.
Most often, the tightness is broken in systems with hot water due to temperature fluctuations at the joints.
It is worth noting that polypropylene products should be connected in the same color and from the same manufacturer.
Polypropylene heating systems
Polypropylene has much greater rigidity and hardness than polyethylene. A PP pipeline is assembled by welding and the installation of valves is no exception. This type of fitting looks like a coupling; installation requires a welding machine.
How to install a tap on a plastic PP pipe?
- Nozzles of the required diameter are attached to the soldering device, the device is turned on and heated to the desired temperature.
- The ends of the joined fragments are cleaned.
- The coupling and plastic pipe are inserted into the heated nozzle and wait until the sections of the product become soft. The time required for this is indicated in the instructions for the device.
- The ends are removed from the nozzle and connected to each other so that the plastic is fused into one whole. Under no circumstances should you unscrew or change the position of the product at this moment. The retention time depends on the material and wall thickness of the product.
- The element is secured on the other side in the same way.
PVC pipe
Ball valves for PVC plastic pipes are a special type of fittings. They are connected using a threaded method. But in order to install the part, you need to glue special tips to the water conduits. The latter are included with the product.
Source: trubygid.ru
Replacing a valve on a gas pipeline
Replacement scheme
Replacing valves in an apartment on a gas supply pipe occurs in the following way:
- preparation of materials. To carry out the work you will need:
- new valve, selected according to all parameters;
- two adjustable wrenches;
- means for sealing joints (linen thread and graphite lubricant);
- plug (required if work is performed by one person);
- Before replacement, it is necessary to shut off the gas supply to the room. To do this, the old tap must be moved to the “closed” position, that is, perpendicular to the pipe. Then you need to remove the remaining gas from the pipeline (for example, burn it using a stove burner);
- The old valve is dismantled:
- if the valve is installed on a thread, then the fixing elements are unscrewed;
- if the valve is installed by welding, then the device is cut out of the gas pipeline;
How to cut threads on a pipe yourself
- A plug is installed at the end of the pipeline. If the work is done by two people, then the pipe can be plugged with a finger;
- the threads are treated with sealing materials. For the strength of the connection and smooth operation of the valve, graphite lubricant is applied over the flax thread;
Thread treatment with graphite lubricant
- A new faucet is being installed.
Installing a new valve on a gas pipe
How to connect a faucet to a pipe
- 1 Metal-plastic or polypropylene
- 2 Fittings
- 3 Installation of ball valves
- 4 Installation of faucets in the kitchen and bathroom
For most owners, the breakdown of plumbing equipment often causes serious concern and the conviction that coping with it on their own is an impossible task. But if you think logically, then many faults can be fixed on your own, without having any special specialized knowledge. In fact, following clear instructions even from a store clerk can be enough to make your own contribution to creating comfort in your home.
Scope of application
Polypropylene taps are used in all areas where the disadvantages of the material do not appear:
- water supply;
- heating;
- plumbing;
- sewerage;
- technical pipelines;
- food processing systems;
- agricultural structures.
In almost all areas where pipe lines are present, polypropylene structures are found.
Tap or valve
A PP ball valve is a convenient type of shut-off valve, but the lack of flow control in some situations is a serious drawback.
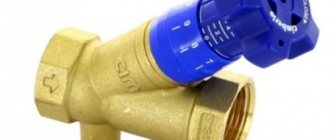
The valves, unlike the ball valve, are made using a control cone. The design is designed in such a way that the valve is not only a shut-off valve, but also a control valve.
In designs where it is necessary to regulate the flow of the working medium, preference should be given to the valve.
Metal-plastic or polypropylene
Connection of polypropylene pipes
Modern plumbing equipment is, first of all, five-layer pipes made of metal-plastic, which have gained particular popularity due to their many advantages over other types of pipes:
- compacted inner layer of polyethylene;
- elastic aluminum layer of the pipe, preserving the shape and configuration specified during installation;
- connecting the inner and outer layers of polyethylene pipe with its aluminum layer using glue;
- durable layer of anti-corrosion polymer;
- It is not necessary to comply with exact calculated dimensions when installing metal-plastic pipes.
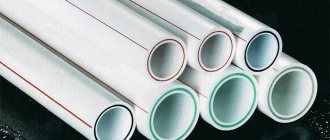
When installing plumbing equipment, another type of pipe is used - polypropylene pipes. Their advantages over metal-plastic ones are economic benefits (polypropylene pipes are at least three times cheaper), as well as ease of installation. They can be connected even to metal pipes without much difficulty.
High-quality connections of polypropylene pipes with each other, as well as durable and reliable connections of polypropylene pipes with metal ones, can be achieved provided that the thickness of their walls is taken into account.
When installing any type of pipes during plumbing work, you cannot do without fittings, which also include all kinds of taps and valves. These can be soldered ball valves, straight or angle valves (with American type). Brass ball valves are used (crimp, with a butterfly handle), which are characterized by good anti-corrosion resistance. When connecting such a tap to a pipe, a split brass ring is used to crimp the pipe; rubber (ethylene-propylene) is used as a sealing material. Similar ball valves are three-way, with external thread, with internal thread, for connecting pipes at right angles.
Connection diagram for a ball valve.
No special tools are required to install such valves.
Which connection method is better?
You should not connect the tap to the HDPE pipe through permanent connections. First of all, this can become a problem when repairing and replacing fittings. Let us remember that faucets, valves and valves have moving parts, the service life of which is much shorter than the pipeline itself. Therefore, when answering the question of how to connect a faucet to a HDPE pipe, a collapsible connection is almost always chosen. The choice of installation method is determined taking into account the following circumstances:
- purpose of the pipeline;
- installation location in terms of access to the work site;
- type of valve - straight through or end;
- pipe diameter, etc.
To install straight-through taps and valves in large-diameter pressure pipelines, flange connections are chosen. They can withstand any load (it is more likely that the pipe will rupture than the flanges will collapse). This connection method requires very precise adjustment of adjacent elements in size. For HDPE pipelines of smaller diameters (up to 110 mm), taps with crimp (compression) couplings are suitable. If you need to put it on a pipe, this installation method will be the best solution.
To install the end (water tap) fittings, the easiest way is to connect the HDPE fitting to a metal tap. Transition fittings from plastic to metal and vice versa can take the form of an angle or a coupling. One of their ends is intended for soldering connections, and the other side is made of metal with external or internal threads - for a regular dismountable threaded connection. Connecting the tap to the HDPE pipe through such adapters is not difficult.
Installation of ball valves
Ball valve
The installation of metal-plastic water pipes in your apartment should begin with the installation of ball valves on the riser.
Select high-quality taps from well-known manufacturers with high operating pressure (for example, 60 atm) and operating temperature within 150˚C.
Installed ball valves
It is these taps that will allow you to successfully shut off the water supply when leaks occur, thereby protecting the room from flooding. The next element after the tap and in front of the water meter should be a filter for deep water purification. Then a fine filter, a pressure reducer, and a manifold for pipe distribution (if necessary) are installed. Cleaning filters are necessary to protect plumbing fixtures by trapping scale, sand and metal particles present in large quantities in risers.
Replacing a tap - instructions
We were leaving for the summer, turned off the water, and when we returned home we discovered that the tap was not opening.
Changing a tap that is under pressure is an extraordinary task, but not that uncommon. The order of work here is no different - the only difference is in the time allotted.
The risk of flooding the neighbors below also increases, since unexpected difficulties may arise: for example, when unscrewing a faucet, it may burst, additional time will be needed for work, but there is none.
If you decide to take part in this event, you need to properly prepare for it.
- Stock up on numerous rags to collect water.
- Prepare the tool so that when replacing it you do not waste time searching for it
- Stock up on water containers and think about how to dispose of them
- Find out the emergency phone number. If the situation gets out of control, specialized help will be needed
Installation of faucets in the kitchen and bathroom
Kitchen faucet installation
If there is a need to replace the faucet in the kitchen, it is also not difficult to cope with this task yourself. When choosing a faucet, pay attention to the presence of the necessary gaskets, without which it is impossible to prevent water leakage.
To install the crane you will need:
- adjustable wrench;
- fum tape for winding the pipe;
- gaskets included;
- couplings (if necessary).
Before replacing the faucet, turn off the water supply using the existing taps on the riser pipes, then open the water supply on the old faucet to make sure the water supply is turned off. Next, the old mixer is dismantled with careful movements using a wrench or an adjustable wrench. In the exposed areas of the faucet, old gaskets and rust on the threads are removed using an ordinary piece of cloth.
Installing a faucet over a bathtub
The bathroom faucet can be connected directly to the pipe. Insert the kitchen faucet into the hole in the sink, having first put on the o-ring that separates the faucet from the sink. The bottom of the sink should be protected by a large rubber gasket and retaining ring, which are secured with a wrench.
Two connecting hoses with nuts on the mixer are connected to the corresponding cold and hot water supply pipes. First, the threads on the pipes should be wrapped with a special fum tape to create a tightness and prevent leaks, and then screw the nut.
Connection diagram for the faucet to the bathroom
The water tap in the bathroom is attached with a key to the pipe using an adjustable coupling on a rubber gasket.
After completion of the work, the system is checked. To do this, turn on the taps on the riser, and then slowly open the water tap in the kitchen (or bathroom) without much pressure. It is worth observing the flow of water from the tap for some time to make sure that there is no water leakage in all connecting places.
Mixer with three outlets
Following the instructions, it is not so difficult to connect the tap to the pipe.
Source: kakpravilnosdelat.ru
Mixer assembly
Mixing devices are sold unassembled. At the time of purchase, you need to check the package contents by checking the availability of parts with the description in the instructions.
Bath mixer accessories
Typically the kit includes the following items:
- main block;
- spout;
- shower hose;
- watering can;
- gaskets;
- decorative cups;
- pipe adapters (eccentrics).
It is also recommended to check the integrity of the threads on all elements during purchase. The assembly process itself is carried out according to the instructions. It is necessary to carefully tighten the nuts so as not to scratch the nickel-plated surfaces.
You can significantly reduce the risk of defects if you wrap the screwed elements of the faucet with electrical tape.
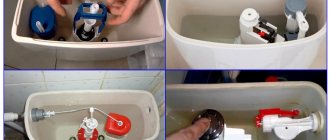
Three options for mounting a ball valve on a polypropylene pipe
Nowadays, the Internet is replete with various tips on any technical issue. Since the topic of construction is in great demand among DIYers, the desire of an unprepared person to obtain information on the Internet is understandable. We all have different professions and cannot be specialists in all areas. But how to understand these tips if they are sometimes contradictory?
Very simple. You just need to be critical of what is written. Let me give you an example:
This is a rather clumsy assembly using polypropylene threaded couplings and an American ball valve. If you close your eyes to the build quality, the option is quite workable. It makes it quite easy to replace the ball valve during operation if it fails for any reason.
And what do they offer us online as an alternative? Here's what:
Ball valve made of polypropylene for welding. The author of this proposal
provides arguments in support of this rather controversial decision:
Dismantling the mixer
If the plumbing fixture fails, you must first dismantle it. This process is carried out in the following order:
- hot and cold water are shut off;
- the remaining liquid is drained from the mixer tap;
- unscrew the plumbing fixture from the eccentrics with a key;
- The threads on the adapters are cleaned, which do not need to be changed if they are in good condition.
When unscrewing the nuts, it is recommended not to press too hard on the product. This will prevent defects from appearing on threads, adapters and even fittings in the wall.
Do-it-yourself installation of polypropylene pipes - how to weld / solder correctly
Polypropylene pipes are widely used due to their low cost, long service life and ease of installation. Anyone can install polypropylene pipes with their own hands; the main thing is to correctly plan the installation work and know the features of welding polypropylene pipes.
Content
Unlike other types of pipes, for installing polypropylene you need to have a special tool - a welding machine for polypropylene pipes and scissors for cutting pipes. It should be noted that, despite the need to purchase special tools, polypropylene pipes still benefit in cost, due to the low cost of the pipes and fittings themselves.
Procedure for soldering polypropylene elements
Review of how to choose and install a toilet installation with your own hands
When all the necessary tools and materials have been prepared, you can proceed to the task. It is divided into two stages: preparatory and direct soldering of fittings for polypropylene pipelines. First of all, you need to prepare a place to work.
The welding machine kit includes a special clamp. It is used to secure the machine, for example, to a table. This mount is very reliable, the device will not wobble. Therefore, it will be convenient to work with him. But in some situations, soldering is performed not at the workbench, but directly next to the water supply. In such a case, the machine has a handle for holding it in weight.
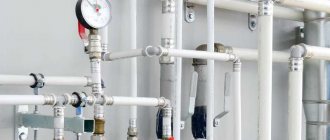
Features of installation of polypropylene pipes
Installation of polypropylene pipes should begin from the riser, gradually lengthening the water supply line according to the diagram and the location of plumbing fixtures. During the installation process, it is necessary to install supports for polypropylene pipes. Also, in the case of a long pipeline, a compensation elbow should be provided.
Since during operation the length of the pipes will change due to temperature expansion. The compensation elbow will relieve tensile loads on the water supply system, thereby protecting it from damage. Also, when crossing pipelines, you can use a special fitting - a bypass.
Of great interest and practical value in installing polypropylene pipes with your own hands is the correct selection of fittings. Using simple fittings such as angles, tees, couplings and plugs is unlikely to cause major problems. The main interest is the selection of fittings for connecting various faucet devices, toilets, meters, etc.
Pipe sealing device
It is probably necessary to briefly describe the design of the device for shutting off the water and its operation. It is a pin, at one end of which a valve made of elastic material is attached - a piece of rubber hose, and at the other end a nut is screwed on. And between them there is a piece of pipe into which the pin fits freely. The length of the pipe should be shorter than the section of the stud from the valve to approximately the middle of the thread, so that after installing the device in the right place, it is possible to tighten the nut on the stud and, thereby, compress the elastic valve, sealing the annular gap between it and the inner wall of the riser outlet pipe.
Connecting bath and sink faucets
Connecting a bathtub faucet can be done using one of two types of fittings: a mounting strip and a water outlet. For connecting the mixer, the mounting plate is more convenient, because it already provides for the correct relative position of the holes for connecting the mixer. However, the water outlet is also suitable for these purposes, thanks to the presence of special holes for mounting to the wall. In the latter case, it is necessary to fix the sockets at a distance equal to the center-to-center distance of the nozzles of the mixer.
Preparation of pipes, valves, fittings
The first step is to study the instructions for the soldering machine.
It contains all the recommendations, as well as restrictions on the use of the machine. The instructions also contain a table from which you can determine the heating time of the pipeline elements. Next, the workplace is prepared, as mentioned above. You need to secure the welding machine with a clamp and connect it to the network. Set the operating mode to 260 oC. The temperature is set on a special regulator.
Now you need to clean the Teflon inserts and put them on the machine. All that remains is to wait for the welding to warm up. The soldering iron must not be turned off during the entire operation. The set temperature regime will prevent overheating of the Teflon inserts. But under no circumstances should you lower the temperature. The resulting connection will be unreliable, will wear out over time and leak.
Now you can move on to preparing the pipes. First you need to make pieces of suitable sizes. All cuts should be carefully processed. The reinforcing layer is removed. Using a scissor cutter, the edge of the pipe is cut off; now you need to chamfer it with a cone-shaped cutter. The surfaces to be soldered should be degreased, cleaned of dirt, dust and uneven surfaces should be removed.
The installation of the valve for polypropylene pipes is carried out at a certain angle so that the handle is in the correct plane. To do this, you need to apply markings for welding on the pipe and coupling. Otherwise, the locking mechanism will be inconvenient to use, and sometimes completely impossible.
Polypropylene taps
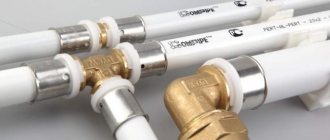
When installing polypropylene pipes, two types of taps can be used: polypropylene and metal. If the entire water supply is made of polypropylene, then it is more advisable to use polypropylene taps, it is both cheaper and more convenient.
If it is necessary to install a valve in the transition between different types of pipes, for example, metal and polypropylene, or on a riser, then it is advisable to use a metal valve and use a detachable combined fitting.
It should also be noted that if we are talking about installing polypropylene pipes in a country house, then it is more advisable to use either polypropylene taps or traditional brass taps, but not ball taps. Quite often there are cases when water gets under the ball of a metal ball valve and when it freezes, the valve ruptures. A polypropylene ball valve does not suffer under similar conditions, because polypropylene is a more flexible material.
What to pay attention to
Nuances of choosing ball valves:
The primary fact is that the diameter of the polypropylene pipes at the attachment point must match the diameter of the ball valves. On sale you can find products with couplings from 20 to 63 millimeters. This range of diameters includes all possible sizes of plumbing systems, so there will be no problems with the choice. Ball valves come in several forms of handles: valves, heads, levers, and so on. For each section of the water supply you need to choose the right product
For example, in some situations it will be impossible to turn the valve tap due to limited access to it, so it is better to use a lever valve and so on. We must not forget about the aesthetic component of ball valves if they are installed on an open section of the pipeline. The shape of the product must fit into the interior of the room, which is also important. In addition, it is worth taking into account what material the product is made of. Plastic taps are cheaper than metal ones. But significant savings will not result if you plan to install a small number of shut-off ball mechanisms
In this case, it makes sense to buy taps made of metal.
Welding of polypropylene pipes
Now that the main points for installing polypropylene pipes have been covered, we can talk about the pipe welding process itself. Welding of polypropylene pipes is carried out by heating the surface of the pipe using a welding machine. The entire welding process consists of heating two parts to be joined at once, then joining them, and after cooling they are tightly connected.
This is the main disadvantage of polypropylene pipes, that if some unit is welded incorrectly, then it is impossible to redo it, it is only possible to assemble a new one. Therefore, the welding process should be handled responsibly so as not to damage fittings and pipes.
However, in some cases it is possible to correct an incorrectly welded element. You can use couplings for this. The photo below shows how to fix an incorrectly welded joint using a coupling.
How to replace a leaking or jammed soldered plastic tap yourself, what is needed for this
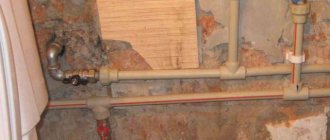
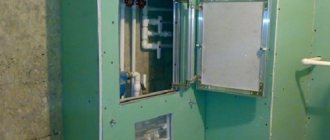
Judging by the drawing, we can note several points that complicate the installation of a new faucet - there is practically no distance between the non-dismountable coupling (metal/polypropylene) tee and the faucet, and the proximity of the wall. All this can be used further in the same form, if only a new (working) one is inserted below the faulty faucet. The old faucet, when open, will be just an attachment (unless, of course, it flows from under the lever.
What to do with a complete replacement. In your case, after stopping the water, I would cut the pipe below the tap. After this, you need to cut the pipe between the coupling and the 90-degree angle, unscrew the coupling (because the wall may not allow you to completely unscrew the coupling at the angle). After this, unscrew the coupling from the thread of the metal pipe.
Now you can use a brass faucet by screwing it directly onto a metal pipe and, in turn, using a collapsible American coupling on it. There are brass taps already with such couplings.
In a very limited space, you can install a faucet like this, which combines a transition from metal to polypropylene, a shut-off block, and a 90-degree rotation.
Another option, after disassembling, again install a non-dismountable coupling, go down at an angle of 90 degrees, and solder a faucet like this to the corner (through a section of pipe), in a vertical position as the old one stood -
And another piece of advice: When soldering polypropylene (where possible), I personally try to avoid joining corners, tees, taps, etc., too tightly to each other. It is better to leave a reserve for at least one more resoldering. This greatly simplifies dismantling and reduces costs, because the vast majority of polypropylene components can be reused by washing and degreasing.
Well, among the tools you will need, of course, a soldering iron (polypropylene welding machine), PP scissors, and the necessary faucet, it is better to have a hacksaw for metal, an angle of 90 degrees, fum tape or flax, and a gas wrench.
How to replace a leaking or jammed soldered plastic tap yourself, what do you need for this?
Judging by the picture, we can note several points that complicate the installation of a new faucet - there is practically no distance between the non-dismountable coupling (metal/polypropylene), tee and the faucet...
How to repair a valve
Main valve malfunctions:
- when closed, the valve lets water through and “flows”;
- water trickles down the stem;
- presence of leakage through the threaded connections of the valve to the pipes.
The causes of these malfunctions, as a rule, are wear of the rubber valve gasket, shell and gap on the edge of the seat, “eaten” threads at the stem, which is why it does not press the valve to the seat, chafed or dried out stuffing box packing, weak sealing of the threaded connections of the valve with pipes.
To replace a failed gasket, you must first of all turn off the water in the pipeline where the faulty valve is located. After making sure that water does not flow through the pipe when the valve is fully open (or only oozes slightly, which is acceptable), unscrew the valve head using a regular or adjustable wrench. After removing the head, replace the damaged gasket or install a new valve.
Often the cause of water leaking through a closed valve is a sink or hole in the edge of the seat. It is not difficult to detect such a shell if you take a thin screwdriver and run its tip along the edge of the saddle. To reliably close a valve with a defective seat, you need to press the gasket against the seat harder than usual, which is why it quickly fails - it is cut through by a sharp edge or chipped by the sharp edges of the shell. Shallow holes and sharp edges can be eliminated with an end mill or using sanding attachments of a suitable shape and size, rotating them manually or with a drill. If you don’t have an attachment and a cutter, use sandpaper: to do this, a circle of sandpaper on a fabric base is glued onto a rubber gasket, which is placed on a three- or four-sided file inserted into the chuck of a hand (not electric!) drill; After several turns of the gasket with sandpaper, the seat will be cleaned. Instead of a needle file, you can use a regular bolt by gluing a circle of sandpaper to its head. To eliminate deep gullies, it is often necessary to completely grind off the seat. In this case, it is better to install a new valve (or just change the body).
If a new valve is not available, you can press a brass bushing of the appropriate size into the hole of the old seat, the protruding edge of which will henceforth serve as a new seat. Such restoration of the valve can significantly extend its service life, but is complicated by the need to turn the brass bushing on a lathe.