A distinctive feature of this canopy is its wide roof with a gentle slope. This structure creates an ideal place for outdoor dining and parties. Under the canopy you can place a large picnic table, a barbecue, and a table for cooking.
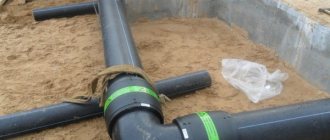
The design of the canopy is simple - it consists of six pillars, three floor beams and nine pairs of rafters. To withstand winds and freezing of the soil, the pillars are dug into the ground to a depth of 1.2 m. To assemble the canopy, only a few bolted connections and metal tie plates are needed. When installing pillars and especially beams longer than 6 m, you cannot do without assistants.
Preparing the foundation.
Using cords (Fig. 1), mark the position of the pillars and drive a peg into each point. The holes are dug by hand or using an auger. To ensure drainage, fill the bottom of each hole with a layer of gravel approximately 150 mm thick.
Installation of pillars.
To protect against rotting, the posts must be pressure impregnated. The posts can then be painted or treated with a tinting primer. When installing, the pillars are centered in the hole, tied with diagonal struts at an angle of 90° (Fig. 2), and leveled. This job requires at least one assistant. After installing the pillars, the pits are filled with mortar so that it is above the ground level (Fig. 3). For a cleaner concrete finish, you can make short cylinders of cardboard and use them as formwork for the base of the posts.
Installation of beams.
After the solution has set, the pillars are cut to the required height according to the marks obtained using a level. Using a chisel or saw, select flat areas on the sides of the posts, place metal saddle ties to seat the beams, and place nails into the bolt holes to secure them. The bolts themselves are not screwed in yet. The three main floor beams are cut to the required length and chamfered or the lower edges are rounded to fit tightly into the “saddles”. Attracting helpers, lift and put the beams in place with the convex side up. Having made the necessary adjustments, screw in all the bolts (Fig. 4).
The last procedure is not easy. It is usually customary to drill a hole on both sides with a drill with a diameter 1.5 mm larger than the diameter of the bolt. However, sometimes the holes do not meet in the middle. Widening the hole rarely brings the desired result - this only reduces the strength of the connection. The way out can be found by bending the bolt under the crooked hole. To do this, the bolt is placed with its ends on two wooden pillows standing on a hard surface, and bent in the middle with a heavy hammer. Try on the bent bolt and bring its bend to such a size that the bolt can pass through the hole.
Making a roof frame.
Cut out one of the rafters with a cross-section of 100×150 mm, as shown in Fig. 5. Having checked it in place, use this rafter as a template for marking and cutting the rest. The rafters are fastened to the beams at intervals of 750 mm with capillary bolts with a wrench head 013x250 mm (Fig. 6). To prevent the bolt from breaking before it is fully screwed in, the threads are rubbed with wax or soap. The holes on the ridge beam are countersunk, and the paired rafters are tied together with metal plates. Then a sheathing of boards with a cross-section of 50×100 mm is sewn perpendicular to the rafters at intervals of 600 mm. The sheathing boards are nailed to each rafter with two nails.
Next, a roof slab made of 15 mm thick plywood or 25 mm thick tongue and groove boards is laid and nailed so that the fibers run perpendicular to the sheathing. Plywood is nailed at intervals of 150 mm along the edges and 300 mm along the area, and boards with a cross-section of 25x150 mm are nailed to each support with three nails. Wind boards with a cross-section of 25×75 mm are installed along the perimeter of the roof, covering the ends of the sheathing.
Canopy
covered with composite tiles according to the manufacturer's instructions. Use roofing nails that do not penetrate the roof slope.
Based on materials from the magazine “Do It Yourself”
13.10.2014
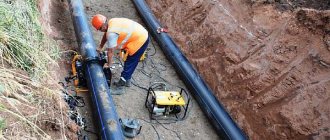
Many of our customers mistakenly underestimate the loads that a polycarbonate canopy has to experience in extreme cases. Indeed, the weight of the roof is minimal. The weight of the canopy frame, made of profiled hollow steel pipe, is also small. Why is there an increased load on the support pillars, and how should the foundation for them be made so that the canopy serves for a long time and reliably.
How does the load on the support pillars of the canopy occur?
Let's first understand the physics of the process. The load on the canopy can occur in two types. The first, and most frequent, impact is wind energy. This phenomenon can occur in any season. A polycarbonate canopy is essentially a wing or sail. It is unable to pass air through itself, which means it is forced to compensate for its energy. Strong gusts of wind can create very serious stress. In relation to the supporting pillars, it can be lateral or directed upward. DO NOT underestimate her. The owners of sheds torn out of the ground by the wind, of which there are many, will tell you this.
Building elements
Before you build a canopy from a profile pipe with your own hands, you need to know what elements it should consist of.
Its design includes:
- Pipe stands.
- Filling pedestals for supports.
- Arches.
- Farms.
- Jumpers.
- Roof.
- Secondary elements in the form of gutters and lighting lamps.
Pipes with a square or, less commonly, round profile are usually used as supports. With the latter section, products are less convenient for fastening.
Farms to build
How to make the foundation of the canopy support pillars
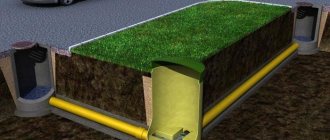
If we are dealing with a gazebo or canopy project with an area of up to 20 m², then we can limit ourselves to direct concreting of pillars in prepared pits up to 800 mm deep. To increase the efficiency of contact between steel supports and the concrete pad, special heels are made at the ends of the pillars. These are sections of profiled pipe welded perpendicular to the supports. The advantage of this solution is obvious - fast and low-cost installation. There is one minus, but a very serious one - in case of an error with the markings, dismantling the support pillars will not be an activity for the faint of heart. In essence, it will come down to the complete dismantling of the foundation.
More massive structures of canopies and gazebos will require much more labor. You can use embedded plates with reinforcement straps. Moreover, the volume of the pillow in this case will depend on the massiveness of the structure. The post itself is welded to the embedded plate and secured with special gussets. With this method of installing support pillars, you have the opportunity to eliminate minor marking defects. Before welding, the pillars can still be moved within certain limits relative to the embedded plate.
Let's summarize. It is very important to accurately assess the degree of extreme load on the roof of a canopy, which may occur in certain conditions: snow, strong gusts of wind. If your canopy has an area of up to 20 m², then Master34 experts advise limiting yourself to direct concreting of the pillars, but at the same time take all measurements and markings of the area as accurately as possible. But for massive structures it is better to use the option of welding pillars to embedded plates. With proper organization of the foundation, your polycarbonate canopy or gazebo will stand reliably and for a long time.
The service life of the erected structures depends on the correct choice of materials for installing canopy posts.
Types of attached buildings
Canopies made from corrugated pipes are classified according to the type of support and rafter systems.
The type of support system depends on the location of the canopy relative to other buildings. There are attached, cantilever and free-standing structures.
We recommend that you read: Which cleaning agent to choose to remove blockages in the sewer system
| Canopy type | Scope of application | Design Features |
| attached | terraces, verandas, open cafes, attached parking lots, canopies over entrance areas | attached to one or more walls of an existing building, have additional supports |
| cantilevered | small canopies over entrances, windows, balconies | has no supports, is attached directly to the wall of the building, additional fixation is provided by a suspension system, also attached to the wall |
| standing separately | outbuildings, canopies over playgrounds, sports fields or individual equipment, private and public parking lots, summer cafes, bus stop pavilions, etc. | rests on one support (umbrella canopy) or a support system of several posts |
Since the roof is the main part of the canopy structure, the complexity of erecting a canopy depends on the shape of the roof.
According to the type of rafter system, single- and double-slope, arched and hipped canopies are distinguished.
| Canopy type | Design Features | Installation features |
| single-slope | one side of the support system is higher than the other, if the canopy is free-standing; for cantilever and attached canopies, the upper ends of the rafter legs are attached to the wall, the lower ends rest on a suspension or support | the simplest type of canopy to implement, which does not require complex calculations and special equipment; any roofing material is suitable; for installing a canopy over a large area, the rafter system is assembled based on trusses in the form of a right triangle |
| gable | the upper ends of the rafter legs rest on each other or on the ridge; additional vertical and inclined elements are required for the stability of the system | if you have the correct calculations and drawings, installation is not much more complicated than a single-pitch canopy; installation of roofing material is complicated only by the need to install a ridge; trusses for installing the rafter system of a large canopy have the shape of an equilateral triangle |
| tent | the rafter legs meet at one point - the top of the tent | the calculation of the rafter system becomes more complicated as the number of roof slopes increases; to complete the roof, precise cutting of the roofing material is required; special roofing elements are needed to protect the joints and the roof top |
| arched | the roof has the shape of a wave, arch or semi-arch; the rafter system is assembled on the basis of arched rafter legs or trusses | independent production of rafters or trusses is only possible if you have a pipe bender and the skill to form equally curved pipes; the roofing material for such a canopy must be flexible; curvilinear canopies are rarely installed with your own hands |
The following can be used as supports:
- Asbestos cement pipes. This option, due to its fragility, cannot be called optimal.
- Monolithic concrete. Such support is energy-consuming and labor-intensive. In addition to the need to construct additional formwork, the solution will need time to acquire the necessary strength.
- Brick or stone masonry. Prestigious appearance, resistance to high loads, durability - all these advantages are offset by high labor intensity and financial costs, which is why such racks are rarely used for canopies.
- Wood. Beam support is only suitable for lightweight canopies, for example those made of polycarbonate sheets. And although installing wood support posts is not particularly difficult, any lumber requires regular biosecurity measures.
- Metal. Of all the options listed, this is the most acceptable from any point of view. As a rule, we are talking about metal pipes.
Depending on the type of structure and its purpose, the customer should also decide on the number and type of supports for the suspended structure. The distance between the piles or the transverse spacing of the supports will also depend on the requirements for the width of the passage. And the presence or absence of standard purlins or massive trusses in the design will depend on the size of the span.
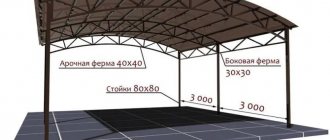
A typical canopy measuring 6x3 m is usually based on two rows of metal poles, which are installed in one and a half meter increments and have a diameter of about 10 cm. In this case, the span will be 3 meters, the number of supports will be 8 pieces. The ideal height of the entire structure is 2.5-3 m, while the size of the racks is 0.5 m longer.
Construction errors that should be taken into account when calculating
The construction of sheds is often carried out with errors. They affect not only the choice of the type of structure, but also the resulting calculation of the metal canopy.
A common mistake is choosing a sloped canopy. Often the structure is built on two pillars and tilted to the windward side. This is far from the best option for permanent use (for example, for parking a car). Danger awaits if the wind changes direction. The canopy in this case can be compared to an airplane wing. A lifting force is generated between it and the ground, which can easily tear down the canopy. Even if there are four pillars, this will not always save you.
Sloping awnings are suitable for situations where the structure is attached to a building. Free-standing inclined awnings must be made with curves. Moreover, the convex part is oriented “toward” the wind.
Standard installation technology
The strength of the entire structure directly depends on how correctly the support posts are secured. Typically, builders have to choose from the following options:
- Driving in. Relevant only for particularly dense soils. Its variation should be considered the installation of screw piles.
- Concreting. This is the most reliable way to install strong supports for your canopy. This technology does not require the use of any complex equipment, because mixing the solution and other work can be done with your own hands.
- Fixation using reinforcing bars. The technology is used in areas that were previously subjected to concreting or asphalting, and whose opening is extremely undesirable. First, pins are driven into the ground to a depth of 90 cm, to which metal poles for the canopy are attached by welding.
Metal supports and their concreting
The technology for installing poles for a canopy outlined below allows you to complete it within 24 hours.
To achieve this, the following activities are carried out:
- Preliminary site clearance.
- Marking the location of future supports: driving in auxiliary stakes in the corners, pulling a rope (thread) between the corners, driving in intermediate equidistant pegs along the string in increments of up to one and a half meters.
- In marked places, holes of calculated depth are dug and filled with a mixture of sand and crushed stone. During the filling process, the mixture is compacted with a tamper.
- The finished metal supports are installed one by one in the holes and filled with a concrete raster. At the same time, they strictly monitor the adjustment of the verticality of the racks using a plumb line or a building level.
Within 7 days after concreting metal piles, they must be ensured complete rest - do not pump or test for strength.
Brick pillars
Brick or stone supports for a canopy involve the parallel construction of a solid concrete foundation. The algorithm of this technology consists of the following steps:
- Marking the location of the supporting elements for the canopy.
- Digging square holes with a depth of up to 60 cm and a cross-sectional area that exceeds the same parameters of a brick support.
- Covering the bottom of each hole with a sand cushion and gradually compacting it layer by layer.
- Installation of formwork and laying waterproofing.
- Installation of reinforcement frame and concrete pouring.
- Stopping all construction activities for a while - the pause will allow the solution to harden.
- Dismantling the formwork and treating it with a waterproofing compound.
- Backfilling and direct laying of columns. If the support posts are finished with facing bricks, they will acquire a special gloss, and such masonry can be strengthened with reinforcing wire mesh, which is recommended to be laid at least every other row.
Wood supports
Wooden poles for a canopy also require a monolithic foundation, immersed in the soil by 50-60 cm. The wooden poles for a canopy are attached to it using special embedded parts. The layer between concrete and wood should be sealed with a layer of waterproofing, and the beams should be treated with an antifungal solution.
Subsequently, the natural wood surface must be coated with an appropriate paint and varnish composition, which additionally protects the wood elements. This technology not only protects wooden parts, but also guarantees high aesthetic and decorative performance.
Aligning the rack
The more vertical the supports are, the more stable your structure will be. The most accurate instrument here is a plumb line, which will accurately determine the degree of vertical position of the racks.
During the process of concreting the foundation, the columns are leveled using supports (metal or wood), which are dismantled after the solution has hardened. Correction is possible only during the first hours of concreting.
To level the pillars in height, experts recommend marking in advance the level of immersion in the ground in their lower part. Such marks will become a reliable guide in further installation work.
- Features of canopy designs
- Construction of a foundation for a canopy
- Frame and roof assembly technology Manufacturing of wooden roofing and corrugated roofing
Making a carport with your own hands is not difficult for a person who is familiar with the basics of construction.
A carport on a dacha or suburban area is an irreplaceable structure that can be used not only for its intended purpose. A canopy performs its function perfectly if you need to hide your car from bad weather. Using this type of structure allows you to save time on parking at lunchtime, when every minute counts. The canopy can be used as a platform for any holiday gatherings and family dinners in the open air.
There are various schemes for constructing carports with your own hands; one of the most common structures is a lean-to carport. This carport design has become popular and widespread due to its simplicity and ease of construction.
Before starting construction work on constructing a carport with your own hands, you will need to prepare a drawing of the future structure and mark the site on which the structure is planned to be erected. After this, in accordance with the drawing for building a carport with your own hands, you will need to calculate how much building material is required and prepare it in advance; in addition to building materials, you will also need to prepare the tools necessary for the work.
How to make a lean-to canopy from corrugated sheets: step-by-step instructions
We already have ready-made drawings, now we’ll tell you in detail how to build a lean-to canopy from corrugated sheets with your own hands. Let's start by choosing a place for it on the site. A canopy, like any building:
- must be at a distance of at least one meter from the boundary and at least five meters from the red line of the roadway;
- placed so as not to shade the neighboring plot;
- if possible, it is installed with a slope in the direction opposite to the prevailing wind in the area.
In addition, if wood or other flammable materials will be used in the construction of the shed, fire safety requirements must be taken into account when choosing a location. Otherwise, there is complete freedom to choose a place.
Construction of the canopy foundation
The area under the future canopy must be prepared before construction. Remove debris, mow the grass, remove at least the top 100 mm of soil around the perimeter and level the soil surface. After this, you can begin marking the foundation:
- Drive the pegs in the place where the corner supports are installed so that you get an even rectangle.
- Stretch a nylon thread or other thin rope between the corner pegs. Make sure it is strictly horizontal.
- Measure the distances to the intermediate supports and mark them, driving in pegs exactly under the nylon thread so that all columns are on the same line. Measure distances not along the ground, but only along the rope.
- Remove the nylon thread.
Features of canopy designs
There are two types of construction of structures of this type:
- permanent building;
- extension to the house.
Attaching a structure to the wall of a house takes much less time than erecting a free-standing structure. If you choose the right building material, then an extension to the wall of the house can organically complement the design of the entire garden or summer cottage. In order to build an extension, you will need to attach one side of the structure to the wall and secure the other side to support posts. To give the structure sufficient stability, the pillars should be fixed in specially prepared holes, filling them with concrete. You can install the pillars on a pre-prepared concrete platform.
As a material for construction, you can use a metal profile or timber beams.
If the design requires it, pillars for securing the structure can be built from concrete, brick or other material.
To erect a permanent structure, the entire structure must be mounted on support pillars. The number of pillars must be at least four. It is better if the pillars are mounted at a distance of 1.5 m from each other. The distance between posts may be smaller depending on the overall weight of the structure. The dimensions of the structure must be selected in accordance with the size of the car that is planned to be placed under the canopy.
The size of the structure is affected by the number of cars that will be located under the structure. If you plan to build a carport for one car, then its length should be at least 5 meters and its width 2.3-3 meters. To calculate the height of the building, you need to take into account the height of the car and the cargo located on the roof rack. The height of the building should not be too high, since in the event of oblique precipitation, the likelihood of precipitation falling under the roof increases. The most optimal height is considered to be 2.5 meters.
Return to contents
Design dimensions of profile pipes
The dimensions of the component parts of the structure for a canopy made of profile pipes depend on the total area of this building.
Profile calculation
According to GOST-23119-78, the following materials are used for the manufacture of pipe canopies:
- For structures up to 5 meters in size, products with a cross section of 40×20×2 mm will be required.
- For buildings with a span of 5 to 8 meters - profile pipe 40x40x2 mm.
- For canopies made of profile pipes with a span of over 8 meters, the structure is made of material with dimensions of 40×40×3 mm or 60×30×2 mm.
- The supports are prepared from a square profile with a cross-section of 80×80×3 mm.
ON A NOTE! In order not to make mistakes in the calculations, you need to find weather reports for several years in a given area, reflecting the level of precipitation and take them as a basis.
Construction of a foundation for a canopy
In order to build a structure, you will need to have minimal construction skills.
There are several types of foundation used for construction. The easiest way to build a foundation for a structure is to use foundation blocks purchased in advance. Support pillars are attached to such blocks using corners.
Another option for laying the foundation for a building is also very simple in design. For construction, holes one meter deep are dug. Pillars are installed in these holes. The installed pillars are concreted using mortar. The area under the canopy should be paved with paving slabs; in addition to the tiles, the area can be completely filled with concrete. If it is decided to fill the site with concrete, then the support pillars should be poured at the same time as the site.
After the concreting process and installation of the supporting pillars of the structure, the site should be kept for some time so that the concrete gains strength. After the concrete has hardened and gained maximum strength, the canopy structure is completely installed.
To construct the frame of the structure, you can use various building materials, such as profile or regular pipe and wooden beams. Before erecting the frame, you should calculate the required amount of building material. During the period of strengthening, it is recommended to water the concrete site to prevent cracks from appearing in the concrete.
Return to contents
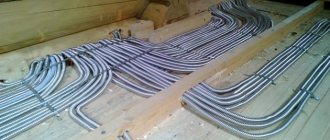
Frame and roof assembly technology
It is best to assemble the frame from a metal profile or wooden beams. To assemble the frame, it is recommended to select a material with a small cross-section in order to reduce the load on the supporting pillars. At the initial stage of installation of the frame, the racks are connected to each other. The transverse beams are fixed on top of the racks. Pre-assembled rafters are attached to the transverse beams, onto which the sheathing is placed.
After installing the frame, the roof structure is assembled. Polycarbonate sheets or wooden boards are used as roofing material; in addition to these materials, slate or corrugated board can be used.
To arrange the roof of a canopy, you can use either cellular or monolithic polycarbonate. The difference between these materials is as follows:
- cellular polycarbonate has internal cavities, which makes this material lighter;
- monolithic polycarbonate can withstand higher loads;
- cellular polycarbonate, due to the lighter weight of the material, can be mounted on thinner supports and frames;
- installation of a monolithic type of material requires a more powerful frame structure;
- The service life of cellular polycarbonate is significantly lower than that of a monolithic material.
After choosing the type of roofing material, you should begin its installation. At the initial stage, the dimensions of the frame are measured. Having measured the dimensions, the polycarbonate sheets are cut in accordance with the data obtained. You can use a hacksaw to cut the material. During the installation of the roof, care should be taken to create canopies around the perimeter, which will provide a certain degree of protection of the space under the canopy from slanting precipitation.
Attaching cellular polycarbonate to the sheathing should be done with self-tapping screws having a rubber sealing gasket. During the installation of polycarbonate, it is necessary to ensure that the sheet channels are positioned strictly perpendicular to the ground.
Every owner of a country estate or house has probably repeatedly thought about erecting a canopy. Such structures are very useful in our time, since they can serve as both a corner for relaxation and a necessary facility for various household needs. It’s hard to imagine that a house or cottage area can do without such a design element as a canopy. The canopy posts are an integral element of this extension. To install any desired frame, you need to know which supports will best serve their purpose, how many of them will be required for the object, and also what needs to be taken into account when installing them.
Single-pitch free-standing shed
The calculation of a free-standing structure must take into account the load carried by precipitation. The design will be as rigid as possible if it is made in the shape of a triangle.
The canopy calculation is carried out taking into account conventionally accepted values. With a polycarbonate sheet size of 2.1 x 0.6 m, the roof width is taken to be six meters and the length is 10.6 meters. The most optimal option: the height of the slope is 2.4 meters and 11 rafter sections. In such a situation, six profiles (standard length of six meters) will be required. Instead of eleven, you can make only two triangles. This will reduce the amount of materials used. This option is suitable for regions with average rainfall.
Types of fastenings, advantages and disadvantages
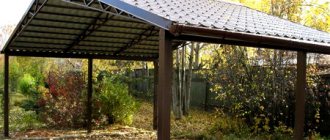
This photo shows a canopy whose supporting structures are wood.
Before you start building a canopy, you need to decide on its location, type, main purpose, design, as well as materials for making the support and roof.
For the manufacture of load-bearing structures, 2 main building materials are used:
- Tree
- Metal.
Building materials such as stone, concrete and marble are not often used to build pillars for a canopy.
Wooden supports made from good grades of wood can last up to 15 years on average, but will require replacement after that. As for the influence of atmospheric processes, they are not so reliable, since high humidity and sudden temperature changes can destroy wooden poles, which implies a risk for the owners and their guests. But wood is an environmentally friendly material and, with proper, professional processing, becomes a very beautiful and elegant decoration for the extension. In addition, using wooden posts and roofs, you can decorate them with herbs and climbing plants.
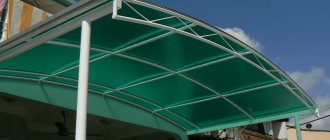
This photo shows metal support structures
Metal structures are stronger and more durable than others, which is why they are most often used for constructing sheds.
Iron supports are universal. They can be cast, prefabricated or forged. In the first case, already soldered poles can be purchased in stores and installed in the desired place yourself. Prefabricated structures refer to individual poles that must be installed and secured directly on site. Forged fasteners are also a ready-made, beautiful, but expensive support for a canopy.
It is extremely rare to find fastenings made of stone, concrete or marble. Most often they are found in territories that belong to wealthy people who are interested in ancient architecture.
Calculation of arched structures
Arched canopies are the most complex structures. The need for material is directly dependent on the convexity of the roof. This means that the steeper the convexity, the more materials will have to be spent.
In this case, you can save only on the rafter system. With the previously discussed canopy dimensions (10.6 x 6 meters), two or three systems will be sufficient (two at the edges, one in the middle). The remaining “legs” will be arcs. It is not necessary to connect their ends. The metal profile used to make the truss is quite durable. It will be enough to provide the necessary rigidity. The main thing is that the truss is firmly attached to the risers.
If you make an arched canopy with these dimensions (for example, for a car), you will need the following materials:
— Six profiles, curved in the shape of an arc, with a length of six meters. The ends of three of them are connected by a jumper. It is also recommended to divide them into several triangles to increase the rigidity of the structure.
— For each arc you need two supports (under each edge). That is, a total of twelve of them are needed (2 x 6).
— Longitudinal beams are attached along the edges, along the pillars and along the roof. In total you will need six of them.