Advantages and disadvantages of metal sheds
A shed made of corrugated sheets is compact, inexpensive and durable.
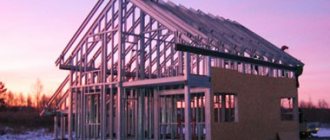
The metal building is assembled from profiled pipes and sheet iron. Corrugated sheets are used more often because, thanks to their textured surface, they are stronger and better able to withstand wind loads.
Advantages of a utility unit made of metal profiles:
- Galvanized sheet iron is used for construction, so the shed does not need to be painted, primed or protected in any other way.
- The building is durable and can withstand high snow and wind loads.
- The barn will last for several decades.
- The utility unit comes in the form of a box; it does not have a bottom, so it can be moved to another place at any time.
- No foundation is needed for construction.
- Prefabricated metal structures cost even less than plastic cottages.
The disadvantages are the following:
- Metal does not retain heat, so the shed must be insulated if it is used in winter.
- The lack of gender can be a disadvantage.
The appearance of the barn is inferior to that of wood. However, the strict utilitarian design of modern structures fits well into the landscape of a summer cottage.
The final touch is the floor
In the most primitive version, the floor in the barn can be left concrete, that is, the foundation can be poured. In this case, you can cross out from the list of works the frame installed on the blocks after constructing the base of the shed. However, such a choice will make the building completely uncomfortable, and the humidity inside it will be unacceptably high. In addition, the conditions for storing the same fertilizers in a barn will be unsuitable. It is better to equip the flooring.
The most commonly used boards are nailed to the frame or fixed with self-tapping screws. They need to be laid end to end, but not too tightly, leaving technological gaps of about 2 mm for the wood to “breathe”. Some craftsmen prefer to use chipboards instead of boards. This is a more affordable option, but it will require laying transverse joists under the floor for fastening individual elements.
After completing the main work, a window is inserted into the barn and doors are hung.
As you can see, building a shed from corrugated sheets with your own hands is not so difficult. However, if you are not confident in your own abilities or are limited in time, you can always hire a team that will quickly and efficiently provide you with a utility unit.
Watch a video on the topic:
https://youtube.com/watch?v=videoseries
Technologies for constructing sheds from profiles
Capital construction with a concrete floor.
A utility block made of corrugated sheets is constructed using 2 main technologies.
- Capital - with floor. They make a platform under the barn and fill it with concrete, which serves as the floor. Vertical posts are deepened into the ground and welded to the lower frame. If you wish, you can make a wooden floor in such a building. To do this, angles or thick-walled pipes are used as the bottom trim. Metal or wooden slats are attached to the frame and sheathed with boards.
- In a mobile structure there is no floor. The lower frame only serves as a base for the frame. Most often, the frame is divided into several sections, which are bolted together. Then the walls of the box are sheathed with corrugated sheets. This option can be disassembled and moved to another place or stored in a disassembled state.
Ready-made utility units of various sizes are classified as prefabricated structures.
Do-it-yourself wooden frame shed: step by step with photos
A frame barn measuring 6*3 meters was built.
The roof is pitched, covered with ondulin. The height of the front wall is 3 meters, the back one is 2.4 m. Operation has shown that with such a difference in height, snow does not accumulate much (Len. region). Standard FBS 600*300*200 blocks were used as the foundation for the barn. They are laid on a sand and gravel bedding 25 cm thick. A cut-off waterproofing is laid on top of the blocks - a layer of roofing felt, on bitumen mastic. A layer of “hydrotex” is also glued on top of the same mastic. This cake was made because the groundwater level was high, and it was necessary to ensure that the building was protected from dampness.
A beam with a cross section of 150*150 mm was laid on the waterproofing (all lumber was processed). Connected into half a tree, nailed - 100 * 4 mm. For those who are unfamiliar with carpentry, you can join the beams end-to-end, nail reinforced corners to the joints from the inside, and a mounting plate from the outside.
In this version, the frame was not attached to the blocks in any way. In regions with high wind loads this is unjustified. You can fasten it using studs: a hole of the same diameter (12-14 mm) is drilled under them, through the beam, into the block. A pin is driven into it, the bolt is then tightened with a wrench. To hide the cap, you can drill a hole for it.
The next step is to attach the floor joists. Installed on the edge of a 150*60 mm board. They are attached to the harness with special brackets of the appropriate size. Attached to 100*4 mm nails.
The logs were aligned along the upper edge of the strapping beam. Everything must be level, otherwise the floor will be difficult to lay. You may have to level it with a plane or redo it.
The frame was assembled using the “platform” technology: first the floor was laid, and the walls were mounted on it. The wall frame or part of it is assembled on the floor. In some cases, they are immediately sheathed from the outside if slab material is chosen for the sheathing. And already in this form (with or without casing) they are lifted, placed vertically and secured.
There is a second technology called “balloon”. The frame is mounted along it gradually: the corner posts of the frame are mounted on the frame or even directly on the blocks. They are leveled in all planes. A rope is pulled between them, along which the remaining racks are then placed. They are also nailed one at a time, fastening them together with slopes and temporary cross members.
In this case, the “platform” technology was chosen and 18 mm thick OSB was laid on the logs. In general, the floor can be made of boards, plywood (moisture resistant), OSB, etc. You will need 20 boards, 13-15 mm plywood, but you need moisture resistant (OSB is moisture resistant by default).
Next, the assembly of the walls began. The frame is completely knocked down: the lower frame, the racks, the top frame. In this form, it is installed exactly along the edge of the strapping beam, aligned, reinforced with safety struts, stops, and slopes. It is nailed through the flooring to the trim beam. The nails were 200*4 mm.
To assemble the frame, 100*50 mm boards were used, the distance between the posts was 600 mm, the rafters were installed with the same spacing. The rafter system was assembled from 150*40 mm.
Window and door openings are reinforced - two boards are nailed, which are nailed together in a checkerboard pattern every 20 cm. The load here is greater, so reinforcement is required. There is a gate at one end for loading/unloading large items. Therefore, in this wall (you can see in the photo) there are only corner posts and reinforced ones - for fastening the sashes.
Since the roof is single-pitched, the rafter system is simple: boards that are selected for the rafters are laid on the edge. Their length is longer, since the roof overhang is necessary. It is usually 30-50 cm on each side. In this option, with a barn width of 3 meters, the length of the rafter legs (taking into account the slope) was 3840 mm.
They were nailed obliquely with nails - two on each side. It can be strengthened by installing corners: this will withstand even significant wind and snow loads.
Next, a sheathing (100*25 mm) is mounted on the roof. The installation step is 40 cm, according to the recommendations. And the roofing material is laid (nails were purchased along with the covering).
The external walls were covered with OSB 9.5 mm thick.
The doors were installed and small steps were made.
The finishing touches were to install the wind board. The barn was then clapboarded and painted to match the rest of the buildings on the site. The barn was built with your own hands on a ready-made foundation in two weekends. Cladding and painting were done much later - almost a month later.
The unattractive foundation is covered with asbestos sheets cut to size. It turned out to be a beautiful barn.
Choosing a site for construction and marking the territory
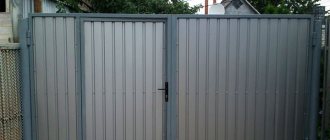
A shed can be attached to a house.
A shed made of corrugated sheets does not have a foundation, which means it does not belong to permanent buildings. SNiP norms are not applicable to it. And since metal is not flammable, the fire safety rules for it are extremely simple.
Requirements for choosing a location are limited to the convenience of the inhabitants of the dacha and common sense.
- You can install a metal block close to the house. But if the box serves as a car repair shop, the noise will disturb the residents. Therefore, it is better to move the building 4 m.
- The distance from the fence is regulated - 1 m. A shed can be built close to the fence by reaching an agreement with the neighbor.
- The area for the shed must be level. The metal structure does not compensate for uneven ground in any way.
- Elevated areas are preferable to avoid flooding.
- The metal box gets very hot in the sun. It is better to install it in the shade of trees.
The barn should not interfere with the free movement of people and vehicles.
Where is it better to put an outbuilding on the site?
A utility block made of metal profiles is a practical, but not the most aesthetically pleasing building. Therefore, they try to do it away from the house so as not to spoil the view. But you shouldn’t place the outbuilding very far away - you need to maintain a balance between the desire to hide it from view as much as possible and convenience. In addition, the place where you are going to install a utility block made of corrugated sheets must meet five requirements:
- The distance to the boundary is 1 meter or more.
- The distance to the red line of the roadway is at least 5 meters.
- The building should not obscure the neighboring area.
- Precipitation flowing from the roof should not fall onto the adjacent area.
- The distance to a residential building, both your own and a neighbor’s, is greater than or equal to the fire safety value for the corresponding class of building. This means that a purely metal outbuilding can be placed closer to the house than a shed with wooden elements.
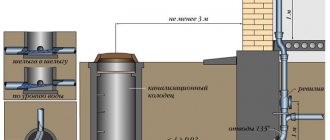
Ideally, the location chosen for the construction of an outbuilding is unsuitable for growing garden plants. For example, due to excessive shade or unsuitable soil. If you are planning to combine a utility block and a shower for a dacha made of corrugated sheets, then think in advance about how to make the drainage.
Top ↑
Required tools and materials
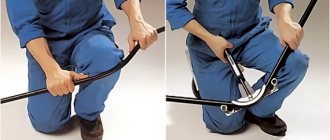
To build a shed with your own hands, you will need a welding machine.
To make a country shed from a profile pipe with your own hands, you will need the following materials and tools:
- profile pipe with a cross section of 60*60 or 60*40 mm;
- corner 4–5 mm;
- profiled sheet - universal, 0.4–0.8 mm thick;
- crushed stone, sand, cement and sand for concrete;
- boards for finishing the floor, if any;
- welding machine;
- hacksaw, grinder;
- screwdriver and drill;
- shovel and trough;
- plumb line, square, tape measure, building level.
If the shed needs to be insulated, the list includes polystyrene foam or penoplex, waterproofing, as well as finishing material, such as lining.
Kinds
I will not describe all types of sheds, because they are built from everything. My topic today is profile pipe sheds. You can use any, but I will describe the most common one. Depending on the type of internal flooring, sheds are found:
- no gender at all;
- with concrete floor;
- with wood;
- covered with sheet metal.
The first option is the simplest; it is suitable for storing equipment and household items: attachments from a walk-behind tractor, watering pumps with hoses. Such a shed is suitable for drying potatoes, root crops, and storing them from possible rains after digging.
Sheds with a concrete screed or a wooden floor laid by yourself are used for storing equipment. Shelves are installed here for temporary storage of harvested crops and any other purposes. In garage-type buildings, it is not uncommon to lay corrugated sheeting or a combination of two types of covering. Keeping animals in uninsulated metal sheds is extremely undesirable, except for birds in the summer.
Sheet metal flooring is much more expensive than all others, but more durable. The metal must be at least 4 mm thick.
According to the complexity of the sheds there are:
- simple, square or rectangular;
- with partitions inside;
- complex design: with windows, partitions, terrace.
Possible roof shape:
- classic, gable;
- straight with a slope;
- arched
I want to describe a simple design of a garden shed. It will fit a walk-behind tractor, a car trailer or other similar devices, as well as gardening tools. Such a barn consists of two sections, where a door is equipped to enter the utility compartment and a gate for the entry of equipment.
Technology for self-construction of a metal shed
Drawing of a shed with a pitched roof
Assembling a shed from corrugated sheets and metal profiles with your own hands is not so difficult, especially if you have a drawing. However, if the block is completed independently, the ability to work with a welding machine is required.
- Mark the area using wooden pegs. The earth on the site is compacted.
- Recesses are made along the perimeter of the site in the corners and along future walls in increments of 1.5 m. The stands for the future entrance are placed closer - at a distance of 1.2 m, respectively, and the holes are dug at this distance. Depth – up to 60 cm.
- Vertical posts are installed in the recesses and concreted. After the concrete has set, the bottom trim is welded.
- If the structure is not permanent, the lower frame is first assembled, and vertical posts are welded to it. In this case, the main load falls on the lower trim.
- The upper ends of the racks are tied together with the upper strapping. Weld the cross members in pre-marked places.
- If a floor is provided, transverse joists are placed on the lower frame: iron ones are welded, wooden ones are bolted.
- Usually the barn is equipped with a pitched roof. To achieve this, walls are built at different heights. Then the logs are welded from the highest wall to the lowest. If they make a gable roof, it is assembled on the ground. First, the trusses are welded. Then they are placed on horizontal crossbars, and then the entire structure is lifted and installed on the top frame.
- After welding work, the metal structure is primed.
The walls are sheathed with corrugated sheets. Install the sheet so that the relief strips are placed vertically - this facilitates water drainage. Screw the sheets with self-tapping screws to the vertical and horizontal crossbars. The flooring is laid out according to the wave.
The roof is laid in the same way.
If you want to insulate a barn for your dacha using metal profiles, do it from the inside. Insulation is attached between the joints of the frame, waterproofed, and then sheathed with clapboard, boards, and plywood.
Installing a metal profile
You start from the roof. Pre-install a waterproofing film on the frame. Judging by many photos and videos on the Internet, the roof must be covered by laying the first sheet on the gable. Lay the next one overlapping, getting into the wave. Do not forget to carefully measure the protrusions and monitor the tightness of the screw. If it presses too much, the material may be damaged; if you apply insufficient pressure, there is a risk of moisture getting in.
You cover the walls almost the same way. Lay the façade elements from the corner, screwing them to the crossbars. Attach the sheets with an overlap, use a profile strip for the corners. At the same time, screw the corrugated sheet into the lower wave, and the corner into the upper one.
Friends, I tried to briefly talk about how to build a shed from a metal profile with your own hands. You can make any additions. It all depends on your desire and financial condition. For example, you can additionally perform internal lining. That's all for now, see you next time! Subscribe to my account. Ask questions.
Sincerely, A.M.
Useful tips and tricks
Roofing corrugated sheeting
In order for the utility unit to last a long time, you need to take into account the recommendations of specialists:
- For the roof, special roofing sheeting is purchased. It's a little thinner so it's easier to install.
- To fasten the profiled sheet, special fasteners are used: self-tapping screws with a rubber gasket that prevent leakage.
- The first sheet is fixed by placing self-tapping screws into the protrusion of the wave.
- If a gable roof is being made, the joint of the sheets is covered with a ridge.
- When joining, cracks often appear at the corners of the building. They are covered with a metal corner. It can serve as a decorative frame.
A metal shed is easy to assemble, durable and does not require special care. Its main disadvantage - high thermal conductivity - can be easily compensated for by insulating the structure.
Household frame
After arranging the foundation, it’s time to build the foundation for the walls. For the frame, the required number of timber elements is cut, calculated according to the drawing. First, the vertical racks are made. The step between them is a maximum of 70 cm. Cross members are attached to the posts with self-tapping screws at a distance of no more than 40 cm. To give stability, the structure is secured with metal corners, which are again fixed with self-tapping screws. All verticals must be controlled using a plumb line or level. The frame is sheathed with any materials you choose. Boards, plywood, and chipboard sheets are suitable for cladding. The elements are fastened with self-tapping screws, ensuring tight joining of the fragments.
Please note: the frame can also be built from pipes. But usually home craftsmen avoid such a step due to a significant increase in the estimate. In addition, when using lightweight corrugated sheeting, there is simply no need for a reinforced pipe frame. Unless you have an abundance of them on your site, and there is simply nowhere else to use metal stands.
Sheathing with corrugated sheets
Foundation
The choice of base design depends primarily on the loads:
- for heavy concrete walls, strip shallow foundations are used;
- for light frame buildings - pile or columnar;
- The foundation slab is universal, combining the base for the construction of a building and the floors.
Ground conditions are also taken into account. On moisture-intensive heaving soils (clay, loams), it is recommended to use strip structures. As a result of frost heaving, columnar ones can warp and collapse. On dry soils with low groundwater level there are no restrictions on the choice of foundation.
Strip foundation
This type of base can be used on all types of soil, including clay and loam. The exception is swampy soils or peat bogs.
To install a monolithic strip foundation you will need:
- crushed stone;
- sand;
- cement;
- fittings;
- boards for formwork;
- waterproofing film.
Construction stages:
- On a marked area according to the size of the shed, dig a trench 50-60 cm deep and 30-40 cm wide.
- Pour a 10-15 cm layer of crushed stone and sand onto the bottom and compact it.
- Install formwork from boards, fasten along the length to protect against deformation.
Place film inside. Place the reinforcement cage in such a way that the thickness of the concrete from the metal to the surface of the structure is at least 50 mm.
Pour concrete evenly, compacting with a metal pipe or rod. Cover the top with film to maintain moisture. Wait 2-3 days, periodically watering the foundation with a watering can or hose.
The strip base can be not only monolithic, but also prefabricated. To construct it, red brick or blocks of heavy concrete are laid in a trench on a layer of lean concrete over a crushed stone-sand cushion. To hold the masonry together, reinforcement with a poppy mesh is used. The seams must be filled tightly with mortar; voids are not allowed.
If the barn is framed, during installation, studs are immersed into the foundation every 1-1.5 m, the threads of which must be wrapped with paper or film. Subsequently, the beam of the lower trim is mounted on them and secured.
Columnar
Free-standing supports can be made from blocks, bricks, asbestos-cement or plastic pipes, followed by filling their cavity with concrete.
For traditional brick or block posts you will need:
- Dig holes 40x40 cm with a depth of 50 cm in the corners of the barn, every 1.2-1.5 m around the perimeter, at the intersection of walls and the installation of partitions.
- Add sand in a layer of 10-15 cm and compact it. Can be spilled with water.
- Place the columns at a height of 50-60 cm.
- Coat the foundation with waterproofing mastic, lay “squares” of roofing felt on top.
- Fill the sinuses and compact them.
Procedure for using pipes as permanent formwork:
- Drill wells to a depth of 0.7-1.2 m.
- Add crushed stone 10 cm high and compact.
- Install the pipe vertically and secure it.
- Place 3-4 reinforcement bars inside.
- Fill with concrete.
The plastic pipe must be frost-resistant, for example, a sewer pipe for outdoor use. The minimum diameter is 150 mm.
Pile
This is a type of columnar foundation, where the following are used as supports:
- Steel rods with a pointed end and blades. They are mounted by screwing into the ground using a hand lever or mechanized installation.
- Drive-in metal anchors. Installed by pressing or driving with special impact equipment.
- Bored piles - the technology is very similar to the construction of pipe columns, but the drilled hole is immediately filled with concrete. On dry porous soils, line the well with waterproofing. It protects concrete from dehydration.
The tops of the piles are cut off horizontally after installation. Metal heads are attached to the top for laying the beams of the lower frame.
How to make a barn with your own hands without a foundation
A very small room can be built without a permanent foundation in two ways:
- Frame posts are used as supports, buried to a depth of at least 80 cm.
- Concrete blocks or curb stones are laid on a flat, dense base, such as a compacted area.
A frame box is installed on top. Its area should not exceed 20 m², and its height should not be 2.5 m. Such a building is lightweight, has a small windage and can easily last for more than one season.
WELDING CURRENT
Most welding machines operate on direct current. The difference between direct current and alternating current is that direct current does not change in direction or magnitude. Thus, it ensures the stability of the arc. The only disadvantage of direct current in the process of joining metals is the possibility of a magnetic blowing effect. It occurs when connecting large structures, when an extraneous magnetic field (from magnetized products) affects the magnetic field of the arc. In this case, the arc begins to “run out” beyond the area where the seam is located and combustion stability decreases sharply. This disadvantage can be combated by
- fencing the work area with special screens that protect from “extra” magnetic fields
- grounding of welded surfaces
- identify possible options for using alternating current
The advantage of working on direct current is a stable arc and the ability to select polarity. Direct polarity is also called electrode-negative, reverse polarity is also called electrode-positive. Reverse polarity occurs when the electrode is connected to the positive and the metal to the negative. With direct polarity, the opposite is true. The difference between the polarities is as follows. The laws of physics say that where the plus is connected, that element heats up more. Thus, with straight polarity, the metal product heats up more. This polarity should be used to join thick parts, since this process requires more melting of the metal to obtain a good weld. If direct polarity is used on a thin product, it will “burn” and the seam will turn out to be of poor quality. For thin metals, reverse polarity is carried out.
The amount of current is determined by the characteristics of a particular welding machine. In modern models, these indicators are indicated in the instructions. If for some reason you do not have instructions, then the current strength can be selected depending on the diameter of the electrode used. It is not allowed to use a current strength that is more suitable for a particular electrode. In this case, the electrode coating used to make the connection will be damaged and the arc will operate unstably. Using an electrode that is too large also has a bad effect on the process of joining metals: the current density decreases, the arc “runs away,” its length changes, and the weld does not turn out smooth and of high quality.
What is a farm
A truss is a structure of rectilinear elements connected to each other at nodes into a durable system of unchangeable geometric shape. Most often, flat structures are found, but in large loaded structures, volumetric (spatial) trusses are used. Almost in private houses, farms are made of wood and metal. Small structures of rafters, canopies, and gazebos are made from wood. But durable and high-tech metal is an almost ideal material for load-bearing metal structures.
For the manufacture of complex structures, rolled solid sections and pipes are used. Profile pipes (square, rectangle) have greater resistance to crushing and bending; small structures for houses are mounted without welding using crab systems, so for farmstead buildings it is most often profile pipes that are used.
Roof
A shed made of corrugated sheets can be equipped with both a gable and a pitched roof. More often they choose the first option - it can be easily insulated if necessary. This is the work plan.
- Arrangement of sheathing. The same timber used for the construction of the frame is used for it.
- Fastening corrugated sheets. If for the walls you can take a sheet of ordinary galvanized steel, then for the roof it is better to purchase material with a polymer coating - the roof is more exposed to precipitation. The corrugated sheet is again attached with an overlap, self-tapping screws, and preferably with a rubber gasket, to ensure greater tightness of the roof.
If the shed is supposed to be equipped with the utmost capital, steam and heat insulation is installed under the corrugated sheet roof, which is covered from the inside with a sheathing made of antiseptic-impregnated plywood.
Barn floor