Often, after repairs or construction, there are excess pipes left, which are usually either thrown away or taken to the dacha and lie somewhere in the barn. It is unlikely that they will be useful for their intended purpose, and it would be a shame to throw them away. But you can find another, rather unexpected use for them, which will appeal to those who like to do something with their own hands.
Making crafts from pipes with your own hands seems impossible, because it is unlikely that you can come up with something creative and original from this material. But it turns out that this is quite possible and even interesting.
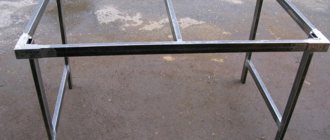
Assembly steps
First, we determine the dimensions of our future rack. Here are some recommendations:
- for storage rooms, the height of the shelf should be at the ceiling, the depth should be at arm’s length (to make it convenient to reach the item);
- if the rack can be approached from both sides, then its depth can be increased;
- for storing tools: height – 2 m, depth – 50 cm, number of shelves – 4, distance between them – 45 cm;
- for storing canned food, the step between the shelves can be reduced (up to 30 cm), and their number can be increased.
Typically the dimensions of the shelf are:
- 180x50 cm – with 4 shelves;
- 200x60 cm – with 3 shelves;
- 180x50 cm - with a high bottom shelf, the rest - in increments of 35 cm.
Of course, these dimensions are not absolute; they can be changed when making them yourself.
When this stage is completed, prepare the drawing. As a last resort, a diagram. But be sure to indicate the dimensions that need to be maintained during assembly.
When this documentation is ready, production can begin.
- Cut the profile into equal sections. If this does not work, bring it to the desired length by grinding the end of the workpiece.
- Clean off burrs and chamfer.
- If the pipes will be connected with fittings, the protective varnish must be removed from the ends of the workpieces. To do this, use sandpaper again. In addition, a rough surface adheres better than a perfectly smooth surface.
- Start assembly with the vertical posts. Then connect them with cross beams. Fasten the parts together in the desired sequence. The method of fastening depends on the material of the workpieces and the type of connections.
- Be sure to use a level - the product must be level. The more often the checks, the fewer errors.
- Using this method, assemble the entire frame.
- Install shelves. If the fastening is through, then the frame is assembled to the height of the lower shelf, which is then placed on the pipes. After this, grow the frame to the desired height.
- If the bookcase is high, secure the top crossbar to the wall with anchors.
- Once the shelving is assembled, paint it. Preferably in several layers.
The structure is ready. Both plastic and metal shelves are assembled using this system. A homemade rack does not have to be rectangular; it can also be made angular. The general assembly technology does not change.
And finally, an important tip. Load both factory and homemade shelves correctly. Place heavy things on the lower shelves, light ones on the upper ones. Periodically inspect the fastening points, because this is where destruction begins.
To learn how to make a shelving unit from pipes in a loft style with your own hands, see the following video.
Canopy
A canopy is made in the same way, for example, for a car. However, in this case it is better not to bend the pipes, but to install them vertically. This way it will be possible to achieve greater stability. Place 4 columns on one side and the same number on the other. Connect them together with crosshairs made of shorter pipes.
Connect horizontally along the top perimeter using pipes and adapters. As a roof, you can use the same awning fabric that is used to create a gazebo.
It is worth noting that such a canopy is only relevant in the warm season. In winter, if there is strong wind, the awning can be blown away if it is not firmly attached to the ground.
Step-by-step instructions for constructing a hanger
Before you start building a hanger, you need to stock up on the tools and materials you will need for the job. In any case, you will need to purchase polypropylene pipes and fittings of the appropriate size, paint, if you want to make the hanger original.
In addition, you will need: a pipe cutter or metal saw, an iron for soldering pipes or special glue for plastic, a screwdriver or drill, and screws.
We will tell you what stages the process of constructing a hanger consists of, using the example of the two simplest designs.
If you don’t have a soldering iron for PVC products, you can use special glue for polypropylene. There are quite a lot of brands on sale, so choosing the right one won’t be difficult.
Option No. 1 – rack for outerwear
This product will definitely come in handy in the hallway, especially if space is limited. In addition, there are quite a lot of advantages of a plastic hanger.
Let's list just a few of them:
- mobility - such a structure can be easily moved from place to place;
- compactness – the product will not take up much space;
- accessibility - the design is made of inexpensive materials;
- ease of execution - even an inexperienced master can cope with the task.
Before you start building a rack for outerwear, you need to decide on its location in order to correctly calculate the size of the product.
To build such a hanger for the hallway you will not need a lot of time and materials. And if there are children in the house, then they will also be able to take part in the exciting process of creating an exclusive item.
So, for work you will need the following set of tools: a tape measure, a hacksaw or pipe scissors, sandpaper, special glue, sand or small pebbles, paint if you plan to paint.
The materials you will need to purchase are:
- polypropylene pipe with a diameter of at least 25 mm (it is better to take 32 mm) - 2.5 m;
- corners for pipes of the corresponding diameter - 10 pieces;
- tees - 6 pieces;
- pipe plugs – 8 pieces.
Having prepared everything you need, you can start working.
In order to simplify the process of assembling the structure, you need to distribute all the parts into groups: blanks for the base, for the branches (hanger arms) and for the rack. The first group will include: 4 elbow connections, 3 tees and 6 tubes of 12 cm each.
To assemble one branch you will need a 15 cm long tube, an angle and a tee, and there are three such branches in total. Tubes of 20, 30 and 80 cm will be used to assemble the rack.
Plugs are placed on the ends of the hanger legs, branches and the top of the rack. After assembling and gluing the product, you should wait at least 24 hours and only then start using it.
As you can see, there is nothing complicated in assembling a hanger rack.
Option No. 2 – hanger for children’s clothes
This product will require a little more materials and time to assemble. But your child will certainly appreciate this design. You can even involve your baby in the assembly.
This is how the children's clothes hanger will look when assembled. It does not have to match the dimensions shown in the photo. Its dimensions must correspond to the height of the child
As with the hanger rack, you will need a similar set of tools. The number of consumables will have to be calculated independently, depending on the location where the structure will be located and its height.
To assemble a children's hanger of the specified sizes, you will need to prepare: a pipe of the selected diameter, as well as appropriate tees, angles, adapters, plugs, glue for PVC pipes or an iron for soldering. To calculate the required amount of consumables, it is advisable to depict the project on paper.
By the way, it is not necessary to fill the base of this structure with sand or pebbles; it turns out to be light and stable, so the child is able to independently move it from place to place.
After waiting about a day, you can start using the product. Here you can hang not only outerwear, but also umbrellas, hats, and backpacks.
Recently, it has become fashionable to collect hangers for everyday clothes. They can not only save space, but also become an original design solution for the interior. Moreover, their creation does not require special knowledge or skills.
We have prepared a series of articles devoted to making various crafts from plastic pipes. We advise you to read:
- How to make a chair from polypropylene pipes with your own hands: step-by-step manufacturing instructions
- Screen made of plastic pipes: types of partitions + step-by-step manufacturing instructions
- DIY crafts from propylene pipes: homemade options for home
Nuances
There are a large number of photos of handmade crafts made from polypropylene pipes on the Internet.
If you have absolutely no skills in properly fastening pipes, it is recommended to pay special attention to the connections between pipes and fastenings to surfaces. Read the relevant literature and instructions for correct connection.
If you ignore this aspect, in the absence of knowledge the structure will be extremely fragile and unreliable. This is especially true for products such as shelves, tables, etc.
Step-by-step instructions for assembling a hanger
To construct a hanger, you need to prepare the following materials and tools:
- PVC pipes, adapters, corners of the required size;
- paint to give a special appearance;
- scissors and soldering iron for plastic pipes;
- fasteners;
- electric drill or screwdriver.
Let’s look at how to make simple floor clothes hangers with your own hands from plastic pipes with drawings, photos and master classes.
Small clothes rack
Assembling the hanger is easy, since the elements do not need to be adjusted. The number of certain parts directly depends on the size of the hanger.
Before starting work, prepare a clean place for installation. The pipes are marked and cut to size. For the item in question, the following pieces of tube are needed: out of 25 mm - 6 pcs. 12 cm each, 1 pc. – 80 cm, 2 pcs. – 20 cm, 1 pc. – 10 cm. Prepare 3 pieces of 15 cm each from a tube with a diameter of 20 mm.
The step-by-step process boils down to the following steps:
- All parts are inspected and, if necessary, the edges are sanded.
- Lay out the elements so that each group contains parts of one of the parts of the hanger.
- Using a tee, the tubes are assembled in pairs so that they are located on the same line. Two more such nodes are made in the same way.
- One of the assembled structures is placed perpendicular to the other two, after which the free edges are placed in the side holes.
- A 25 mm corner is placed on the formed legs. Then turn the edges down - these will be the legs.
- Adjust the central T-shaped structure, directing the free hole upward.
- To install the branch under clothing, a cross, a tube, an angle or a cap are connected into one whole. In the same way, 2 more units are made.
- An 80 cm tube is installed in the free hole of the tee. One of the branches of the product is mounted on the edge. Then one segment is fixed, then another. Having installed the last branch, place the tube at 10 cm. Complete the installation with a cap.
- Adjust the position of the branches, directing them in different directions.
- Plugs are placed on the edges of the legs.
- The hanger is painted outdoors in the desired color with aerosol paint, and then left to dry completely.
For outerwear
Such an item will be an excellent addition to any hallway, especially if the room is small. To correctly calculate the size of the hanger, you need to choose the installation location. When all the points are taken into account and the material is prepared, you can begin assembly:
- All elements are grouped for ease of installation.
- To assemble one branch, you will need a piece of tube 15 cm long, an angle, and a tee. 3 such parts are needed. To assemble the stand, prepare tubes 20, 30 and 80 cm long.
- Plugs are placed on the edges of the legs of the structure, as well as on its upper part and branches.
If a special soldering iron is not available, you can use plastic glue.
To understand the process of installing a tube hanger, you can refer to the video example.
For children's clothing
A children's hanger requires a little more time and materials, but your child will surely love it. The product uses the same tools as in the previous version. The number of required elements must be calculated independently, based on the installation location and dimensions of the product. For ease of material calculation, it is recommended to draw the drawing on paper.
Assembly is carried out by analogy with the design above. To make the hanger stable, it is not necessary to pour sand into the tubes: it is already quite stable. The light weight of the product allows even a child to move it to another place. If glue is used to connect elements, you should wait a day after assembly. This hanger can be used not only for outerwear, but also for hats, backpacks and umbrellas.
Hanger in several levels
In addition to the simple designs considered, there are options with larger dimensions. You can make a hanger yourself that will fit one person’s entire wardrobe. The following elements are prepared for construction:
- PVC pipes with a cross section of 25 mm;
- corners;
- T-shaped elements;
- shelf panel;
- aerosol paint.
The hanger is installed as follows:
- The pipes are marked, after which they are cut into blanks and sorted.
- The elements begin to be connected from below. To do this, fix the pipes in the tees, then in the turning corners.
- The tees are installed on the longitudinal pipes, and a transverse element is fixed on them, which will represent the first level of the product. Afterwards, the longitudinal pipe and the upper cross member are mounted in the same way.
- They put a panel for the shelf, which can be used for shoes or accessories.
- The finished structure can be painted if desired.
If the hanger is painted, the layer may fade over time. Therefore, the product should be updated periodically.
Alcove
If there are sufficiently long and thin pipes, then you won’t even have to fasten anything. You only need 4 pipe fasteners that will be driven into the ground to ensure the stability and strength of the structure.
You will also need thick awning fabric. It will serve as a roof. In fact, this will complete the construction. Please note that the distance between the fasteners is selected individually.
But at the same time, it should be sufficient that the height and width of the gazebo could accommodate garden furniture such as a table and several chairs. If desired, you can create walls by making some adjustments to the design. This will be somewhat more difficult and will take more time and effort.
Small floor hanger made of PVC pipes
But light weight can be a problem. If you hang a heavy bag or coat on the device, the hanger may simply fall
Therefore, before making a drawing, it is important to provide a reliable support base. It must be wide enough or made of heavier, and therefore resistant material
Although there is a way to make the plastic base of the hanger stable - fill it with sand, sealing it with end caps.
The method of assembling a floor hanger from PVC water pipes is absolutely simple.
Of course, you can strengthen the joints with glue, but if you refuse to do this, then over time you will be able to assemble another practical and original product from the parts of the hanger.
Materials and tools:
To make a floor hanger from PVC pipes, you should prepare:
- PVC pipe with a diameter of 25 mm and a length of 200 cm.
- PVC pipe with a diameter of 20 mm and a length of 50 cm.
- Angle bends with a diameter of 25 mm – 4 pieces.
- Angle bends with a diameter of 20 mm – 3 pieces.
Then mark the plastic pipes and cut the parts to the required size. The 25 mm pipe must be divided into elements of the following sizes: 6 pieces of 12 cm, 1 piece of 80 cm, 2 pieces of 20 cm, 1 piece of 10 cm long. From a PVC tube with a diameter of 20 mm, prepare 3 identical parts of 15 cm each.
Manufacturing instructions
- Before assembly, inspect all parts for roughness and sharp parts at the cut points. Sand such edges using sandpaper.
- Distribute the workpieces into groups. Each should include parts for a specific part of the hanger. The stand will be assembled from 4 corners, three T-shaped connectors, and 6 tubes with a diameter of 25 mm, 12 cm each. For 1 branch of the hanger (there should be 3 such units in total) you will need: one T-shaped connector, a plastic adapter from 25 mm to 20 mm, a PVC pipe with a diameter of 20 mm, a length of 15 cm and an angle with a diameter of 20 mm. It is advisable to close the hole of the latter with a special plug-cap for pipes. One PVC tube 80 cm long, two tubes 20 cm each, one 10 cm and a cap will go to the stand.
Let's start assembling the hanger.
- Using a T-shaped connector, assemble 2 tubes in pairs so that they are located on the same line.
- Make 2 more of the same knots.
- Place one of the three identical structures perpendicular to the other two. Insert the free ends into the holes on the sides.
- Place an angle bend with a diameter of 25 mm on the ends of the resulting 4 legs. Turn the loose ends down - these are the legs of the hanger.
- Adjust the position of the center T-piece so that the free hole faces upward.
- To assemble branch pieces that can be used to hang clothes or other items, connect together a T-piece, tube, elbow, or cap (whatever works best for you or you have in stock). In order not to be mistaken, look at this detail in the photo below.
- In the same way, make 2 more of the same blank nodes.
- Place a tube 80 cm long into the free hole of the central T-shaped connecting piece. Install one of the branches of the hanger onto its free end. Next, continuing the vertical line, attach a 20 cm long PVC pipe. Then another branch and again a 20 cm pipe. Next, install the last branch, followed by a 10 cm piece of tube. Complete the assembly of the structure with a cap at the top point.
- Adjust the position of all three branches so that they point in different directions. This will add aesthetics to the entire structure, allow you to conveniently place things, and even distribution of the load will ensure the stability of the hanger.
- Place plugs on the ends of the 4 legs and branches.
- If you think that the structure is not strong enough, apply glue to the joints of the parts. After this, immediately check the position of all rotating parts. Once the glue dries, it will be difficult to correct mistakes.
- Paint the PVC pipe hanger with special spray paint. Leave the product until completely dry.
Organizers and shelves
Desk organizer
A simple organizer made from glued and painted PVC pipes looks cool and helps get rid of clutter on your desk.
Bathroom organizer
Toothpaste, brushes, comb - with such an organizer everything will be in its place, and you won’t have to look for anything.
Shoe compartments
With such a budget organizer made from PVC pipes, shoes will not be lying around in the hallway and getting under your feet at the most inopportune moment.
Wine shelf
If you love wine and like to stock up, this wine cabinet with PVC pipe shelves will keep all your supplies organized and safe. It looks great and is quite easy to make.
creative wine rack
If you need a stand for a maximum of four or five bottles, you can make a PVC creative like this. It's easy to do and looks great.
Notebook Stand
A simple and convenient stand for working with a laptop.
Multi-level pipe hanger
In addition to simple options for creating hangers, there are also larger models. In this case, we are talking about a product that will accommodate the entire wardrobe of the average person.
During the manufacturing process you will need the following:
- plastic pipes with a diameter of 2.5 centimeters and length: 100 centimeters - 4 pieces, 65 centimeters - 2 pieces, 48 centimeters - 4 pieces, 20 centimeters - 6 pieces, 5 centimeters - 8 pieces;
- connecting crosspieces – 10 pieces;
- corners for tapping - 6 pieces;
- plastic panel for shelf;
- spray paint.
Manufacturing process: step-by-step instructions
Step one: you need to mark the length of the pipes and cut them with a pipe cutter or saw. Next, all the parts should be sorted to make it easier to assemble the structure.
For convenience, you can place sheets with written dimensions next to the pipes.
Step two: assembly should start from the bottom, similar to the previous options. It is necessary to attach crosspieces to the pipes, and rotating angles on them, until the base of the frame is formed.
Hanger with compartments for shoes
Step three: next you need to install the crosspieces on the longitudinal pipes, and then attach the transverse part to them, which will be the first level of the hanger. Then the longitudinal pipes are again installed on the crosspieces, and then the upper transverse one.
The hanger is quite durable
Step four: then you should install a plastic panel down, which will serve as a shelf for shoes and other items.
The panel can be cut to your size at a hardware store
Step five: at the end the structure can be painted, but this step, as in previous cases, is not mandatory.
When spray painting a hanger, be sure to wear gloves.
Over time, the paint may fade a little and lose its original appearance. Therefore, it is recommended to periodically touch up the hanger using aerosol paint. This way the product will always look neat.
Partition
The principle of this polypropylene craft is exactly the same as in the previous case. Except for the unnecessary need to select pipes of a specific, identical diameter. Absolutely any will do, but preferably a medium diameter in order to accommodate as many parts as possible.
Initially, you need to take the pipes and make appropriate markings on them. The marking is done in such a way that in the future it will be possible to cut even round pieces of equal thickness. The resulting large number of parts, each about 1 cm thick, can begin to be connected to each other.
Regardless of the required shape of the partition, all parts are connected to each other using glue, leaning against each other edgewise. This creates a beautiful, translucent partition.
This solution can be used as zoning to isolate a certain area from the rest of the room, to designate shelves with books, etc.
Decoration
Unusual design can transform anything, even an ordinary one at first. To ensure that the furniture has a classic design, it is enough to cover it with artificial, natural leather or a substitute. In the case of wooden structures, you can preserve the original design of the material, making it more expressive with the help of stain or clear varnish. It is permissible to tint coat hooks with silver, gold or bronze paint, and cover the hangers with satin or velvet.
To decorate in a country style, it is permissible to use additional decorative components, for example, carving horns from wood. In order for the product to be made in a retro style, its color can be aged. When they want to decorate a hanger in a Provence style, they use decoupage techniques. Images of birds, flowers and landscapes are glued to the product. The final design depends only on your imagination. It’s not difficult to come up with something original yourself using glue, sequins, beads, ribbons, cords, etc.
Tips for installing structures made of PVC pipes
When making a hanger or other products from plastic pipes, it would be useful to familiarize yourself with the recommendations of specialists:
- The connection of plastic pipes is carried out with a special glue, but it is not cheap and you have to spend a lot on large products. However, such glue can be replaced with a similar substance, which is intended for connecting plastic parts;
- most products do not stand out for their complexity, but a pre-made drawing will make assembly easier;
- When using glue to fix plastic elements, you should use gloves to protect the skin of your hands, as well as a mask. In addition, the assembly process is recommended to be carried out outdoors;
- The choice of plastic pipes today is quite wide and they all have different characteristics, which you should familiarize yourself with in advance. To increase the strength of the hanger, you can buy pipes with a metallized layer;
- to give the pipes different bends, they are heated in certain places, and then the desired shape is achieved. For this, for example, a hair dryer or hot water is suitable;
- To give stability, the pipes are filled with sand. If the product is large, fittings are sometimes inserted inside the pipes.
To minimize the number of scraps, check the marks several times before cutting a solid pipe.
Having understood the design and familiarized yourself with the drawings, photo examples and master class, it becomes clear that there is nothing complicated in creating a floor clothes hanger with your own hands from plastic pipes. The main thing is to set a goal, choose from a variety of ideas the option that suits you and turn it into reality, which is completely within the capabilities of anyone.
Recommendations
DIY crafts made from sewer pipes can be used not only in the interior of your home, or in the garden on your property. You can do this for sale, creating unique, beautiful, designer products. You can also make a unique and useful gift in this way, which will remind you of the giver for a long time.
Website about the dacha
01/11/2019 admin Comments No comments
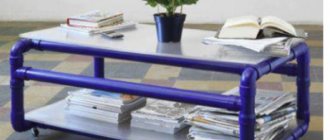
Homemade products from PVC pipes
It is unlikely that PVC pipes, which are used mainly for drainage and sewerage, are somehow connected in your mind with creativity and creative ideas. But it’s time to start thinking differently, because with their help you can improve your storage system, organize your workspace, decorate your home before the holidays, decorate a wine bar, make a frame for a bed, and even make a table lamp.
Homemade products from plastic pipes are easy and simple to make. But all sorts of useful little things last for a very long time, because plastic is not subject to corrosion and is resistant to various types of influences.
Shelves and racks are quite easy to assemble:
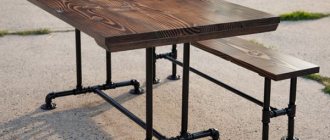
Country tables and chairs for outdoor use
Many people have a question: “is it possible to replace PVC pipes with polypropylene pipes?” You can use polypropylene pipes, only in this case we will also need a soldering iron.
Advantages of PVC pipes: - snow-white color; — pipes can be connected to fittings using glue, or without it at all; - if you do not use glue, the structure will be collapsible, and like a LEGO constructor, you can use fittings and pipes to assemble other structures. Of course, polypropylene pipes are deprived of these advantages
Camping folding chair
The author of the idea, who is very respectful of music, as well as art in general, proposed creating original furniture from scraps of plastic pipes and other building materials. So, using pipes in the form of legs and fixing glass on top, he got a magnificent coffee table. The basis for the chair was also parts of pipes folded in the shape of an organ, combined with a soft top made of dense bags with foam-paste crumbs inside. And how exclusive the bed turned out to be.
What about a crib? In my opinion, this is simply brilliant!
Children's 2-tier bed
The playpen can be filled with balls and the baby will have no limit to his joy. And the material for making this playpen is ideal - because the polypropylene pipes are soft and the child will not hit himself if he accidentally falls on them.
Basket for trash and dirty laundry
Clothes dryer made of PVC pipes.
Tell me, where do you dry your laundry and clothes at your dacha? And if you also have a swimming pool, then this design is absolutely necessary for drying towels. Tight ropes are somehow a thing of the past. A little work and here you have a clothes dryer made from scrap materials
holder for small items
Embroiderers are also not forgotten: an embroidery frame and a machine.
Please have a minibar at your service
Lovers of creative lamps outdid everyone:
Our smaller brothers are not forgotten either:
And here the sewer pipes came into use. And the cat can mouse at any time.
DIY bird aviary made of plastic pipes
Hanging swing for a summer house
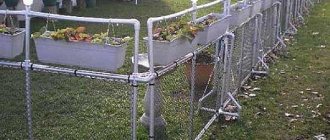
Fences and enclosures made of plastic pipes
A trellis for grapes made of plastic pipes that will always have a pleasant appearance.
You can make hydroponics from plastic pipes; you can use any pipes (including sewer pipes)
Collapsible outdoor tents and tents made of plastic pipes
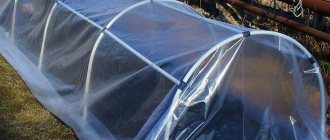
A greenhouse made of PVC pipes will serve you for many years, it does not need to be painted, and it will not rot or rust, as usually happens with greenhouses made of wood and metal.
It is most advisable to make a greenhouse from PVC pipes, giving them an arched shape, since this design eliminates sagging of the film and increases its service life. A homemade greenhouse made from PVC pipes can be covered with either polyethylene film or polycarbonate. Such greenhouses are not suitable for all-season use, but they are quite suitable for early spring and late autumn growing of berries, vegetables and herbs
Or make a pen for chickens
By attaching the wheels, we get very convenient carts.
Children's car made of plastic pipes
Carports made of plastic pipes
As you can see, plastic pipes can be used in any industry (and not just for their intended purpose), and where exactly to use them depends on your imagination.
Garden arch
One of the simplest products that can be made from pipes. Photos of such DIY crafts made from PVC pipes can be viewed on the Internet. In fact, the whole craft consists of creating an appropriate frame. Its complexity depends on the original idea. You can create an extremely simple arched arch with sections.
Next, these sections can be filled with artificial flowers, creating a very beautiful and colorful arch, where the frame will not even be visible. You can complicate the design by adding decorative elements, creating a more complex and beautiful arch.
The base of the arch must be tightly secured. To do this, fasteners for plastic pipes are driven into the ground, onto which the arch is subsequently installed. In this way, it is possible to achieve resistance to weather conditions.