It’s easy to make a durable and reliable rack from pipes for a garage or other household purposes.
You can make a garage rack from various available materials; pipes are especially suitable for this. To assemble a storage system from them, it is not necessary to have a welding machine.
Next, we want to share with you several technologies that will allow even a beginner to make a rack from pipes with their own hands.
Material Information
So that you understand what I’m talking about, I’m laying out the characteristics of the materials that you will be working with and, most likely, you have already encountered them personally. This is the material of metal-plastic windows with PVC window sills or water pipes, for example.
PPR and PVC
Polypropylene (PPR) pipes for water supply are marked as PPR, but then there are always two numbers indicating the diameter in millimeters, for example, PPR32. In addition, such material is classified by strength, taking into account the thickness of the walls and the presence of reinforcement - this is denoted by the abbreviation PN with two numbers. There are four classes in total with numbers 10, 16, 20 and 25. The first two pipes have no reinforcement and are intended for cold water, and the second two are reinforced with aluminum foil - they are used for hot water supply and/or heating. There are also pipes with fiberglass reinforcement: they are equal to PN25 and are labeled PEX.
sprint.editor/ba3/920_1000_1/ba394159d6aea8e20d1911d126559d94.webp">">sprint.editor/ba3/920_1000_1/ba394159d6aea8e20d1911d126559d94.webp">">sprint.editor/ba3/ 920_1000_1/ba394159d6aea8e20d1911d126559d94.jpg"> sprint.editor/ba3/920_1000_1 /ba394159d6aea8e20d1911d126559d94.webp» loading=»lazy» alt=»PPR pipes and fittings» title=»PPR pipes and fittings»> Source olx.ua
By their structure, polyvinyl chloride window sills are not afraid of temperature changes (even sudden ones) in the range from -40˚C to +60˚C, and these are only the limits stated by the manufacturer - in fact they are higher. PVC has 100% no water permeability, which is ideal for damp rooms. The thickness of the window sill with inclined and/or vertical bulkheads is 40 mm. Such a plane will withstand not only the weight of conservation, but also stronger loads and even impacts.
What you need for work
Materials and tools:
- pipe PPR32 RN20;
- PPR fittings: tees, crosses, couplings;
- PVC window sills 1500x500x40 mm;
- soldering iron for polypropylene;
- grinder with cutting disc;
- tape measure, pencil.
First of all, check the floor level to avoid complications later. I did not include a level and a shovel in the list of tools, since some of the cellars have a concrete screed. If it is not there, then in the place where the structure will stand, level and compact the soil, leveling it strictly horizontally. Polypropylene welding can be partially carried out outdoors, if the weather permits, of course. For example, solder racks, which you will assemble into a single frame in the cellar.
Advantages of plastic over wood or metal
It is not difficult to make a rack from plastic parts: for this you need to stock up on material and the following tools:
- Metal-plastic sections or a coil of the required length (before assembly, calculate the total length of the structure and the length of each section);
- Carpenter's cutter or ordinary knife;
- Tape measure, marker, two wrenches – 19 x 22 and 22 x 24, for tightening fittings;
- In fact, fittings are straight connections (couplings), turns (corners) and tees. The quantity depends on the configuration of the shelf or rack;
- Plugs for fittings on the lower sections of the structure, which will serve as the legs of a shelf, shelf or rack.
Tools and materials for shelves made of polypropylene or metal-plastic:
- Soldering iron for soldering the shelf;
- Pipes in coils or scraps;
- A hacksaw or grinder;
- Couplings and other fittings for connecting and turning when assembling PVC shelves with your own hands;
- Roulette, marker.
Assembly process
sprint.editor/518/920_1000_1/5187b79e03591b251a993898319f9364.webp">">sprint.editor/518/920_1000_1/5187b79e03591b251a993898319f9364.webp">">sprint. editor/518/920_1000_1/5187b79e03591b251a993898319f9364.jpg"> sprint.editor/518/920_1000_1 /5187b79e03591b251a993898319f9364.webp» loading=»lazy» alt=»Stages of PPR welding» title=»Stages of PPR welding»> Source terman-s.ru
To begin with, it won’t hurt to familiarize yourself with the rules for welding polypropylene, since here you will definitely have to take into account some nuances. We will work with PPR32 PN20, and according to SNiP 3.05.04-85 and other specifications, the PPR heating time is 8 seconds, the holding time during joining is 4 seconds, the cooling time is 4 seconds at a soldering iron temperature of 260-280˚C. Please note the 20˚C gap - this should be applied to weather conditions. That is, in hot weather, set the soldering iron thermostat to 260˚C, and in cool and cold rooms – 270-280˚C, respectively. The immersion depth of the pipe during welding is 20 mm. Install the appropriate nozzle on the heating part of the soldering iron (in our case it is 32 mm), wait until it warms up - this will take no more than 5 minutes - and get to work.
sprint.editor/3ba/920_1000_1/3ba9e15d0ff36aea7ca1b3362ac9efe7.webp">">sprint.editor/3ba/920_1000_1/3ba9e15d0ff36aea7ca1b3362ac9efe7.webp">">sprint.editor/3ba/920_1000 _1/3ba9e15d0ff36aea7ca1b3362ac9efe7.png"> sprint.editor/3ba/920_1000_1 /3ba9e15d0ff36aea7ca1b3362ac9efe7.webp” loading=”lazy” alt=”Right frame block” title=”Right frame block”> Source youtu.be
">youtu.be ">youtu.be ">youtu.be">youtu.be">youtu.be">youtu.be">youtu.be">youtu.be">youtu.be">youtu.be ">youtu.be">youtu.be">youtu.be">youtu.be">youtu.be
First you need to solder two identical blocks (left and right), and then connect them into a solid structure by welding the racks and jumpers between them - this will make it much easier to calculate the dimensions. For me, for example, the width of the left and right parts turned out to be 400 mm each, and the inserts in the middle had to be made 5 cm larger, but this inaccuracy is not even noticeable upon inspection and also did not affect the strength.
First, for each block, cut pipes of the same length according to the sizes suitable for your case and begin assembly, devoting at least 4 seconds to warming up and at least 8 seconds to cooling. To avoid mistakes when choosing a fitting, be guided by the fact that there will not be a single branch of the tee or cross protruding along the outer perimeter of the frame. You'll get the hang of it quickly: to get the hang of it, you'll only need to weld one block.
sprint.editor/fdf/920_1000_1/fdfa58b0e75323009908533338e722df.webp">">sprint.editor/fdf/920_1000_1/fdfa58b0e75323009908533338e722df.webp"> ">sprint.editor /fdf/920_1000_1/fdfa58b0e75323009908533338e722df.png"> sprint.editor/fdf/920_1000_1 /fdfa58b0e75323009908533338e722df.webp" loading="lazy" alt="Part of the block" title="Part of the block"> Source youtu.be
">youtu.be ">youtu.be ">youtu.be">youtu.be">youtu.be">youtu.be">youtu.be">youtu.be">youtu.be">youtu.be ">youtu.be">youtu.be">youtu.be">youtu.be">youtu.be
It will be very nice if someone assists you. For example, your wife can become such an assistant, even if she “doesn’t understand anything at all except her kitchen.” The fact is that when welding assemblies above the floor, you will have to hold a soldering iron in one hand and a pipe in the other, so someone will have to hold a part of the structure or even create an emphasis on it. When working, it is very important that all the pipes are at right angles to each other, otherwise the frame will turn out uneven. This once again indicates that you can’t do it without an assistant, especially if you have no experience in soldering polypropylene structures.
When you finish soldering the frame, turn the structure upside down and weld a coupling onto each pipe, this will significantly increase the support area. In order not to make a mistake in the level of the plane, measure 20 mm from the edge of each leg and make marks with a pencil or marker. This way you can see how far the pipe should enter the nozzle when heated, therefore, the plane will not be disturbed. If in some place you make an error of 1-2 mm, do not be upset - this design has some elasticity, therefore, the error will be compensated.
sprint.editor/aa9/920_1000_1/aa93898df8404826470aa4440965c2bb.webp">">sprint.editor/aa9/920_1000_1/aa93898df8404826470aa4440965c2bb.webp"> ">sprint.editor /aa9/920_1000_1/aa93898df8404826470aa4440965c2bb.png"> sprint.editor/aa9/920_1000_1 /aa93898df8404826470aa4440965c2bb.webp" loading="lazy" alt="Fragments of the window sill under the legs" title="Fragments of the window sill under the legs"> Source youtu.be
">youtu.be ">youtu.be ">youtu.be">youtu.be">youtu.be">youtu.be">youtu.be">youtu.be">youtu.be">youtu.be ">youtu.be">youtu.be">youtu.be">youtu.be">youtu.be
When you are finished with the frame, proceed to marking and cutting the window sill, taking into account that there should be no gaps between the tabletops. You will need to cut rounded grooves for the pipe risers: place the window sill on the top of the frame and simply make marks with a pencil, tracing each pipe. This way you can make markings for all levels, because the pipes are strictly vertical, therefore, all the countertops will be the same. To cut PVC, it is best to use a construction knife - the blades are sharp and even if you break two or three pieces during cutting, it’s not a big deal.
After marking and cutting the window sills, you will definitely have scraps left that can be used to increase the area of the support posts. To do this, simply cut out squares of about 100x100 mm for each leg, as in the top photo. If there is a concrete screed on the floor, then such additional space is not necessary, but if the pipe rests on the ground, then under the load from preservation it will certainly sag.
sprint.editor/8e3/920_1000_1/8e36e9707ab48eca9ba8218c24480b1b.webp">">sprint.editor/8e3/920_1000_1/8e36e9707ab48eca9ba8218c24480b1b.webp">">sprint.editor/8e3 /920_1000_1/8e36e9707ab48eca9ba8218c24480b1b.png"> sprint.editor/8e3/920_1000_1 /8e36e9707ab48eca9ba8218c24480b1b.webp" loading="lazy" alt="Shelves installed" title="Shelves installed"> Source youtu.be
">youtu.be ">youtu.be ">youtu.be">youtu.be">youtu.be">youtu.be">youtu.be">youtu.be">youtu.be">youtu.be ">youtu.be">youtu.be">youtu.be">youtu.be">youtu.be
When you install the frame and distribute the tabletops in places, check the structure for stability - it should not wobble. If there are unevenness on the floor, this can be easily compensated for with stands. Just don't make them from wood that will rot in the cellar - you'll have plenty of plastic waste for that.
Rules for assembling shelves from plastic products
assemble a rack from pipes with your own hands in just a few hours if you have all the tools and materials, and it doesn’t matter what products you will use - PVC or metal-plastic. The main task is to make the correct drawing, calculate and indicate all dimensions, and prepare the material without errors.
to make complex bends for a shelf made of PVC pipes , so the entire structure will be rectangular. Products made of metal-plastic are bent by hand, and such a furniture structure can be made shaped, with curved transitions between tiers. For example, load-bearing legs can be bent into shapes, and to attach shelves in suitable places, cut the leg and insert a tee into the cut location.
The difficulty is in the space between the shelves - there you need not a tee, but a transition with 4 outlets. But, since there are no such transitions in metal-plastic, you will have to dodge and add an extra segment onto which the next tee will be screwed. Or make pipe jumpers for shelves not on 4 sides, but only on 2 - the shelf will lie on 2 pipes just as firmly.
PVC sections are connected at all intersection points to fittings using soldering. These can be tees and crosses, couplings and turns. The presence of PVC crosspieces especially simplifies the work of assembling a shelf or rack - this design allows you to do without unnecessary parts and connections on the shelf fastenings. It is better to strengthen legs made of propylene sections by soldering couplings or plugs onto them.
So that the legs of the rack or shelves do not move apart under enormous loads, they can be fastened with segments in the same way as the places for the shelves, then there will be no need for soldering plugs.
Other posts by the author
- 3
44
How to properly dye fabric with different dyes
- 05 August 202105.08.21
- 56
- 1
44
Wood crafts - drawings, photos and explanations
- July 26, 202126.07.21
- 54
- 2
44
Cardboard chest: I tell you how to make it yourself
- July 26, 202126.07.21
- 151
- 44
Varnishing wooden surfaces: how to properly prepare and do it
- June 18, 202118.06.21
- 44
Children's room with photo wallpaper: showing ideas and design methods
- May 12, 202112.05.21
- 44
Floor lamp: how to make it yourself
- 07 April 202107.04.21
Show more
Peculiarities
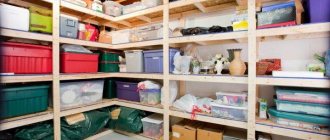
A distinctive feature of the rack is the complete accessibility of the contents. Finding the right item is not difficult, so bookcases are ideal for storing tools, books, documentation and everything that may be needed at any time.
At the same time, they are also good for long-term storage of things - thanks to their strength and stability, the shelves can withstand a large weight. The shelf can occupy the entire height of the room, and the space is fully used.
This leads to the main disadvantage of purchased models – their standard sizes. It is not always possible to find a rack with the required dimensions, so it either does not fit into the niche, or the useful volume of the room is lost. But such a purchase also has other disadvantages:
- unpredictable quality - even without exceeding the load, the material can crack, especially at fastening points;
- if the product is certified, the price will increase;
- you need to wait until the rack is delivered;
- and then assemble it yourself anyway (or pay again for assembly).
Therefore, it makes sense to make the bookcase yourself. This way, reliability is guaranteed, and the dimensions will be accurate. And it will cost less - rolled metal and PVC pipes are very affordable.
The work is easy - even a beginner can handle it. And the result is obvious - complete order in the warehouse. Therefore, making a rack yourself is also a pleasure.
We recommend
- 44
New post
- September 20, 202120.09.21
- 5
- 1
44
Installation of a septic tank in a private house with a high groundwater level
- September 19, 202119.09.21
- 13
- 44
In the fall of 2021, the rules for building houses have changed in Russia
- September 17, 202117.09.21
Show more
Interesting posts
We will send the most popular posts once a week
Exhibition of houses Low-rise country
- House projects
- Exhibition
- For partners
- To the authors
- Contacts
- 0
Plastic rack
Recently, pipelines in houses and apartments are most often made from polypropylene pipes (PP), so this material may be at hand in the garage. It is also quite suitable for making furniture.
Of course, a rack made of PP pipes has a slightly lower load capacity. However, in most cases its strength is quite sufficient. It can easily withstand various tools and other small items that are usually kept in the garage, or preserved in the cellar.
PP PIPE RACK
The process of manufacturing a plastic shelving includes the same three stages:
- Design;
- Preparation of materials;
- Manufacturing.
Diagrams, mounting procedures, sketches and photos of pipe racks
Pipe racks are an excellent solution for storing things, both at home and in utility rooms. There are many options for assembly and placement.
Choose which one is best suited for your interior
Pipe wall shelf
This shelf is attached to the wall. The design uses 4 types of metal parts (Washing machine. photo). Assembling and installing the shelf is not difficult; see how it is done in the step-by-step photos below.
Simple DIY pipe rack
Sources:
https://stroy-podskazka.ru/stellazh/iz-trub/ https://1pogarazham.ru/obustrojstvo/stellazhi/541-stellazh-iz-trub-svoimi-rukami https://novamett.ru/polki/stellazhi -svoimi-rukami-foto
How to bend a pipe
Products made from this material look unusual. They will look even more interesting if they consist of curved parts. For example, a table with curved legs. In addition, various decorative elements are made from pipes, which come in different shapes. In such cases, bending the pipe is simply necessary.
For this you will need:
- funnel;
- sand;
- scotch;
- plate;
- metal containers;
- gloves;
- saw (hacksaw);
- knife (scissors);
- sandpaper;
- a device for bending pipes (there are different types, mostly improvised materials are used).
The process looks like this:
- cut a piece of the required length;
- cover one end with tape;
- using a funnel, pour in as much sand as will fit;
- heat a measured amount of sand in a metal container;
- put on protective gloves for safety, carefully pour sand into the pipe through a funnel;
- Seal the other end with tape, then the sand will not spill out during the bending process;
- leave it for a while, it will warm up from the inside;
- when it warms up, start bending;
- give the pipe the desired shape;
- at the end of the work, tear off the tape and pour out the sand;
- When the pipe cools down, it will be in the required shape.
Design recommendations
There are general rules that must be followed when preparing a sketch.
At the initial stage, determine the dimensions of the building and calculate the size of the boards required for the work. Next, determine the height of the room, since the rack is usually built from floor to ceiling.
It is better to make markings on the wall, which will make working on the sketch easier.
In order to store jars or books, the width of the shelves is sufficient from 25 to 40 cm.
In order to conveniently place items, the depth of the shelves should be up to 50 cm, their thickness should be at least 2.5 cm.
It will be optimal if the height of the shelves ranges from 30 to 60 cm.
Design
Having decided on the type of structure, you can begin to develop design drawings. They are done on a blank sheet of paper with a simple pencil. It is recommended to make a drawing to scale, which will allow you to more accurately calculate the required amount of wood and consumables in the future.
Product type
The choice of design style, shapes and lines of structural elements depends on the purpose of the room in which it is planned to organize the storage system. Laconic designs without pretentious decoration are suitable for utility rooms. When developing such a product, the focus is solely on functionality.
When arranging a living area (living rooms, bedrooms, playrooms, children's rooms), designers often offer a storage system in the form of a rack. With the right approach, a piece of furniture not only solves the problem of free space, but also becomes a real decoration of the interior. Such products can be made in a laconic design or contain decorative elements. The main thing is not to overdo it with them.
Design features
When creating a project, you need to take into account the design features.
• Frame products are assembled on the basis of a frame, to the elements of which shelves are subsequently laid. This is the simplest way to create storage and features a discreet design.
• Beam structures have some similarities with frame products. The difference lies only in the special strength of the frame, which allows increasing the load-bearing capacity. Installation is a little more complicated, and the purchase of beams requires more money.
• Modular storage systems are individual elements that can be interchanged to create the desired storage design. First, boxes, gratings, and ladders are assembled. Then the fragments are connected using hardware. Products are installed with wall mounting and without additional fixation.
• The cantilever design allows for the installation of decking to the rear wall. In this case, there are no side elements. This type fits well into the interior of living rooms and hallways.
• Rope products vaguely resemble a ladder. The rack is a set of horizontal elements held by a rope at a certain level. The supporting part of the structure acts as a support. There are no sidewalls in this product. This option is appropriate for children’s rooms and bedrooms, where the interior is decorated in a marine style.
• Cantilever structures are distinguished by their broken shape and original design. Such products are rarely installed due to their low load-bearing capacity. They mainly perform a decorative function.
• The load-bearing racks of the bridge circuit are easily recognized by their A-shape. The shelves are placed between the supports. The assembly of the structure is simple, but the popularity of products of this type is low due to the small usable area of the storage system.
Sketch
Before creating a working sketch, you need to decide on the parameters of the rack. The best option is a design that reaches the ceiling surface. For convenience, you can mark the wall along which you plan to install the storage system.
Competent construction of drawings is carried out taking into account the following information:
• how many household items are planned to be placed on the shelves, their sizes;
• the length of the shelf should not exceed 1.5 m, as the risk of the flooring sagging under the weight of things increases;
• the ideal material for shelves is boards, the thickness is selected taking into account the expected load;
• larger luggage is usually placed at the bottom of the structure;
• the height of the shelves for books is 20-30 cm, these parameters are also suitable for conservation.
Reference! When developing a project, you need to distribute the load evenly across all shelves and their sides. This will give the structure stability.
DIY wooden book stand
Anyone who can cut out the component elements from a wooden board and connect them can make a wooden holder. To get started, you need a main board measuring 34.5 cm by 20 cm, 2 cm deep and four wooden elements to support the book from the front and form the legs. Grooves are made on the main board into which a small element is inserted to hold the book horizontally, then the legs are attached. All elements are firmly glued to each other. The dimensions of the components can be changed at your discretion; you can make the stand in both horizontal and vertical orientation.
Creative people will love the idea of a curly wooden stand made with their own hands. To build such a stand you need a jigsaw, glue and paint. First you need to come up with the shape of the product. For example, you can make a cow or an apple. Having chosen a silhouette, you need to draw it on the board. To make the task easier, print and cut out an image that needs to be attached to the board and traced along the outline.
After which, using a jigsaw, the intended shape and an additional horizontal shelf are cut out to support the book, which needs to be glued to the main product. A do-it-yourself book stand can be decorated taking into account personal imagination and taste. You can paint the shelf one color, or you can apply an original ornament. A product decorated with glued buttons, coins or other improvised elements will take on an interesting look.
The simplest option for a wooden book stand is an A-shaped shelf made of two boards. To implement this method, it is enough to connect the elements at the ends, forming the shape of a gable roof or the letter A, by gluing. You can add a horizontal element to the stand to support the book, however, the book will be stable even in the absence of this element.
Video with detailed instructions for making a wooden stand
DIY book stand made of cardboard
There are several simple ways to build a holder or shelf using regular cardboard. Each of them involves a creative approach to the task. A nice stand for holding a book on a table, it could easily be made from a large cardboard box. To do this, you should cut out the corner part of the box so that the bottom plane becomes the legs of the product, and the corner becomes a supporting plane for the book. The side walls can be connected to each other by an additional horizontal element installed in the cut grooves. This stand will be quite durable if you use thick cardboard boxes. If desired, the product can be decorated by painting or pasting.
The second option involves using flat cereal or breakfast cereal boxes. This DIY book stand made of cardboard will be an excellent attribute for organizing books. To create a stand with three compartments, you will need three boxes, a ruler, scissors, double-sided tape and decorative materials.
After marking, the upper horizontal parts of each box are cut off and large side walls are cut off, following the example of office trays for storing paper. Next, the walls of the boxes are glued together with double-sided tape, forming a single container with three compartments.
Further processing can be done in a variety of ways. For example, you can cover the stand with wrapping paper using existing double-sided tape. Additional elements can be glued to the walls of the resulting product for hanging office supplies. By analogy, you can build a shelf with more or fewer compartments.
What stand design did you choose and what did you get, share your photos and.
Original and functional little things for interior decoration
Our review of interesting ideas opens with the simplest products made from plastic pipes, which even novice DIYers can make. In addition, such crafts will require a minimal amount of material, and in some cases even the shortest scraps can be used.
From scraps of large and medium diameter pipes you can make a convenient and practical organizer for your office or workshop.
There are two possible execution options here:
- fastening with self-tapping screws to a wall or table, for which one end of the segment is cut off at an angle - a stationary option;
- gluing segments together to form a stable figure - a portable option.
The pieces can be left white or gray, or they can be painted in your favorite color. This organizer is indispensable for schoolchildren and people involved in creativity and handicrafts. With it, everything will always be at hand, and there will be perfect order on the table.
Additional comfort on the desktop will be provided by a drawing tablet and a laptop stand, which can be made from small-diameter polypropylene pipes.
Bookshelves are a special element of the interior. Their presence in a certain way characterizes the owner of the home. A corner shelf in a high-tech style will not go unnoticed.
From numerous short scraps of different diameters you can make a patterned frame for a mirror or photograph. It is enough to glue the cut rings together according to a pre-prepared layout, which can be applied to a sheet of cardboard. It could be floral patterns or something abstract. The dimensions of the frame will depend on the amount of suitable material.
Large-diameter scraps can be used to create a convenient shoe shelf with numerous compartments. This design will not take up much space in the hallway and will ensure proper storage of shoes and quick search for the right pair. The elements are connected using glue or self-tapping screws. To secure the shelf to the wall, you can use a plywood sheet to which the assembled shelf is first glued.
Some crafts made from PVC pipes will really appeal to lovers of fresh flowers. This reliable flower stand is easy to make and looks nice.
Small scraps of sewer pipes are well suited for making flower pots for replanting or propagating indoor pets. Showing your imagination, such pots can be decorated with colored paper, paint or bright stickers.
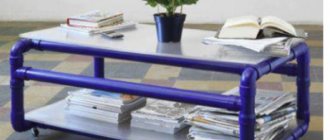
It is easy to make a stylish vase for artificial flowers and dried flowers from elongated cylinders of medium diameter. If you approach the implementation of this idea creatively, you may end up with an original gift for a significant event.
Another extraordinary idea for the interior is homemade lamps in techno style. There are a lot of design options, but they all adhere to the principle of minimalism: no unnecessary details.
Using unused scraps, you can also make useful things for the hallway or corridor: a hanger for clothes and bags and a holder for garbage bags.
From PVC pipes you can make many crafts for children's entertainment in the yard: an educational mat, a playpen, a swing, a sled, a football goal, a playhouse, an outdoor shower and a theater screen.
A very useful design for kids is a playpen made of PVC pipes.
Children will be delighted with the lightweight swing, which instantly dries out after a warm summer rain.
For winter walks, a homemade sled will be the most reliable and fastest. The design turns out to be quite complex, but with the help of practical videos you can figure it out.
For active games in the yard, you can make safe football goals from leftover plastic pipes.
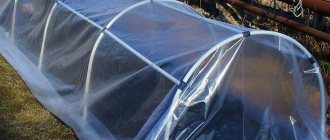
Many children often dream of their own castle in miniature. Making childhood dreams come true is quite simple and not at all expensive. The frame is made very quickly. All that remains is to select a beautiful dense material for the roof and walls, and the house is ready!
The following structure will help you cool down on a hot summer day. Such an open shower will be a joy not only for children, but also for adults.
You can make a theater screen from polypropylene pipes. It is enough to collect 3 frames, connect them together and cover them with beautifully decorated curtains. Home theater develops children's creative abilities and creates good conditions for an exciting pastime.