Buyers are increasingly choosing polypropylene-based pipes.
The products are in high demand, providing performance characteristics, no installation problems, and an affordable cost.
Manufacturers say they last at least 50 years. Minimal skills are enough to do a job such as laying a water supply system from polypropylene pipes in the ground.
QUESTION No. 2. Does ultraviolet radiation affect polypropylene?
ANSWER. UV radiation “breaks” the molecular structure, creating new random bonds. For this reason, the material becomes glassy and brittle. In this case, the pipes continue to hold pressure, but become sensitive to mechanical stress and loads, for example, to bending. Small cracks appear at the point of thinning, as the material loses its ability to stretch and compensate for emerging stress areas. Unfortunately, the process is irreversible, and it is difficult to calculate the rate of destruction of polypropylene. In this regard, special attention is paid to the storage conditions of propylene pipes until sale. They are placed in closed warehouses, where direct sunlight is excluded.
Autonomous water supply in the country
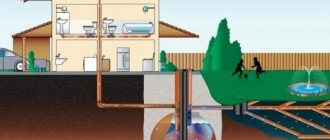
Since in rural areas there are often power outages, and any pump can only work if there is electricity, it would be a good idea to have a reserve supply of water in case of a power outage. This may be a container installed in the attic or in a separate area. Water can be pumped into it using a submersible pump from a well, well, or river. And the pumping station will “pull” water from this tank.
Autonomous water supply system from a tank. Approximate diagram with a reserve water supply in the tank
Plumbing at the dacha from a tank is convenient because it can also collect rainwater, but you need a good filter system: first coarse filters, then several fine filters. And be sure to also install a filter and a check valve at the inlet of the suction pipeline from the pumping station. The filter is for insurance - the equipment is demanding on water quality, and the valve is so that when the pump is turned off, the water is not dumped back.
The presence of a tank in the water supply system of a dacha is also good for plants: in the summer, if it is installed outside, the water will heat up. It is known that plants watered with warm water grow more actively and bear fruit better.
If desired, you can organize drip irrigation - assemble a pipeline from pipes, insert tees in the right places, to which you connect hoses for drip irrigation.
A drip irrigation system can be organized even when you are making water supply at your dacha with your own hands
Here's what it looks like schematically. Raise the tank to a height of at least 1 meter. You pump water into it from a well, a well, or a river. Its level is controlled by a float mechanism (like those found in waste tanks). From the bottom of the tank there is distribution to the beds. First there is a solid water pipe, and a drip pipe with holes comes off from the tee.
How to make a water supply system in a country house for watering from a barrel
QUESTION No. 3. What types of polypropylene pipes exist?
ANSWER. Polypropylene pipes, depending on the pressure and water temperature that they can withstand, are divided into the following types: PN10 - used for organizing cold water supply and underfloor heating systems, as they are able to withstand temperatures from +20°C to +40°C.
The nominal working pressure is 1 MPa. PN16 - used for organizing hot and cold water supply, as they can withstand temperatures up to +60°C. The nominal working pressure is 1.6 MPa. PN20 - used for organizing hot water supply, as they can withstand temperatures up to +75°C. The nominal working pressure is 2 MPa. PN25 - are reinforced and are used for organizing hot and central water supply, as they can withstand temperatures up to +95°C. The nominal working pressure is 2 MPa.
Laying water pipes in the ground
How to determine the depth of laying water pipes
The parameters for laying pipes in the ground are standardized and enshrined in SNiP 2.04.02-84. Separate standards SP 40-102-2000 for polymer water supply were introduced later and supplement the specified regulatory document.
Both documents use a value of 0.5 m below the level at which the ground cools to zero temperature in winter. The specified value is calculated to the bottom of the pipe being laid. The depth to which the ground freezes to subzero temperatures depends on two factors:
- geographic latitude and climate severity;
- soil composition.
Average indicators of the depth of the earth at which the temperature can drop to 0 degrees C:
- southern regions - 0.85 m;
- central regions - 1.6 m;
- regions with harsh climates - 2.75 m.
In turn, the composition of the soil can cause fluctuations in freezing values by 0.6 m.
Correction: These standard values were adopted in 1984, when the global climate was in the next phase of cooling. Therefore, these values are of a limiting nature: i.e. at these depths the ground is guaranteed to never freeze, even in the harshest winters.
Let's consider the temperature of the earth at a depth of 1.6 m in winter and spring in the central region using the example of the Moscow region and in a zone with a harsh climate using the example of the Khabarovsk Territory.
Table 1. Indicators of ground temperature at a depth of 1.6 m for Moscow
| Months of the year | Earth temperature, degrees Celsius |
| December | +5 |
| January | +3,8 |
| February | +3,2 |
| March | +2,7 |
| April | +3 |
Thus, at a depth of 1.6 m, the soil temperature in the winter and spring months approaches 0 degrees, but does not turn into negative values. The water supply can be laid at this depth without additional insulation.
Table 2. Indicators of ground temperature at a depth of 1.6 m for Khabarovsk
| Months of the year | Earth temperature, degrees Celsius |
| December | +3 |
| January | +0,3 |
| February | -1,8 |
| March | -2,3 |
| April | -1,1 |
| May | -0,4 |
| June | +2,5 |
In Khabarovsk, the ground at a depth of 1.6 m has a negative temperature for four months of the year. The water supply is laid deeper and additionally insulated.
In practice, it is rare that homeowners install plumbing to such a great depth. You can often see insulated pipes running above ground. At the same time, everyone knows that the water in them does not freeze. So why dig so deep? The fact that current winters are relatively warm does not mean that this will always be the case. For example, in the central region, temperatures can remain below -20 degrees throughout the winter; in the absence of snow cover, the zero temperature drops into the ground to 1.5 meters.
Yulia Petrichenko, expert
Which pipes are suitable for laying in the ground?
Historically, water pipes, including those laid in the ground, were made of steel as the most durable and weather-resistant material. In industry and main water supply systems, preference is still given to steel pipes, including due to the lack of an alternative when transporting large volumes of hot water.
Households are gradually switching to pipes of various chemical compositions, which in everyday language are called “plastic”: polyethylene, polyvinyl chloride, polypropylene. Of these, the most reliable are polypropylene products, which are quite durable and can be used at large temperature differences: from -5 to +140 degrees C.
It should be taken into account that the earth exerts external pressure, which increases with additional ground loads, such as the passage of people and the passage of vehicles. Reinforced polypropylene pipes are used for underground communications.
Laying polypropylene pipes
Before planning work, you should keep in mind that polypropylene becomes brittle at subzero temperatures.
The level of occurrence of pipes can be increased by insulating them. Today, there are options for heat-insulating materials: polyurethane foam, polyethylene foam, polypropylene and others. It is important that the material does not wrinkle or absorb moisture - otherwise it will lose its heat-insulating properties. In a temperate climate, provided that the ground at the location is under snow, a sufficient installation depth for insulated pipes is at least 1-1.2 m.
How to lay a pipeline in the ground:
- Dig a trench. The width of the trench is at the discretion of the builder. Water supply lines must be located at a distance from other utility lines - at least 0.5 m.
- Pipes to be laid are welded using a special apparatus.
- A 10-centimeter layer of sand is placed at the bottom of the trench. This layer compensates for possible soil movements.
- Lay insulated pipes in the trench. This is done with a slight tilt (2-3 cm per meter of water supply) in a vertical plane towards the house. This creates the correct pressure in the pipe as it enters the house.
- Installation of communication entry and exit nodes from the ground. These are the most vulnerable areas for frost. Close attention is paid to their insulation; wells are built in these places.
- After connecting all sections, the performance of the water supply system is tested during the day. They look at how water is supplied to the house, whether the pressure is good, and whether there are any leaks from the pipe. Increase the angle of the water supply if necessary.
- If the testing is successful, a trench is dug. Start with another 10 cm layer of sand. It turns out that the pipes lie in a compensating layer of sand. Next, they are covered with soil in layers.
Laying steel water pipes
Today, steel pipes are rarely laid. They are cumbersome and labor-intensive. In addition, steel is susceptible to corrosion. In fact, organizing water supply using steel structures does not have any advantages over polypropylene.
QUESTION No. 4. What are the advantages of polypropylene pipes?
ANSWER. Polypropylene pipes have a long service life (up to 50 years).
Over time, no corrosion or deposits form on the surface that is constantly in contact with water. The material does not affect the quality of water at all, as it is chemically resistant and non-toxic. The thermal conductivity of a polypropylene system is lower than that of a metal system, which allows you to save heat by 10-20% when transporting hot water. In addition, polypropylene pipes have good sound absorption.
Features of trenchless laying
Trenchless installation provides owners with several advantages.
- There is no need to destroy buildings or plants that stand in the way.
- The harm caused to the environment is minimized.
- Time and financial costs are reduced.
There is more than one method.
- Sanitation. This means that old pipes are replaced with new ones. The work is carried out in two ways:
- Relining. New polypropylene pipes are laid inside the old pipes. The main thing is to inspect the existing pipeline in advance. The main thing is to make sure there are no foreign objects or debris. It is also important that the diameters match each other.
- Renovation. A new pipeline is being laid and the old one is being destroyed simultaneously. It is carried out in situations where the initial diameter is insufficient.
- Piercing. Relevant for diameters over 150 millimeters. The work has several stages.
- Two pits are being dug on both sides of the object under which we will conduct communications.
- Placing a hydraulic jack on one side. He pushes a polypropylene pipe with a steel tip inside.
- The pipe gradually increases in volume, and then polypropylene products are introduced into it.
- Connection to all systems.
But the latter method is suitable only for those who are interested in laying short sections of water pipelines.
QUESTION No. 6. What types of pipeline laying are there?
ANSWER. There are the following methods for laying a pipeline:
- Open. In this case, the pipes are mounted on hangers, brackets and supports.
- Under the plaster. In this case, sufficient space must be created for the movement of pipes, while preventing mechanical damage. For this purpose, insulation, for example, polyethylene foam, is usually used.
- In mines/canals. In this case, the pipeline is laid in non-through and through channels, inside building structures, furrows, and shafts.
- In the ground. In this case, the pipeline is laid directly into the ground on a sandy base.
Preparatory installation work
Work on laying polypropylene pipes underground begins with the development of the project. In this case, it is necessary to pay attention to the condition and type of soil, its looseness, and the area where the pipe will be laid.
After this, according to external conditions, a laying method is selected, which can be traditional trench or trenchless. The first method is used most often; for such installation it is necessary to mark the territory, dig a trench of the appropriate length, width and depth.
The tools needed for this are the simplest: a cord for marking, a shovel (if the pipe is laid over a short distance).
After digging, the bottom is covered with sand, then it is compacted.
The trenchless method is used when there are buildings or paths on the site that cannot be damaged. There is a method that allows you to simultaneously lay pipes while removing old ones, but they all require the use of additional construction equipment. We'll talk more about this modern method below.
The trenchless method is used when there are buildings or paths on the site that cannot be damaged.
QUESTION No. 7. Why and how is pipeline insulation performed?
ANSWER. Pipe insulation is carried out when installing a hot water supply system in order to reduce thermal losses. When installing a cold water supply, insulation helps protect pipes from condensation and heating above 20°C, thereby maintaining hygienic water standards. The type and thickness of insulation are determined depending on the air humidity in the premises, the difference between the temperature of the water in the system and the ambient air. The thermal resistance of the material used for insulation is also taken into account. The pipeline is insulated along its entire length, including fittings and fittings.
Organization of water supply at the dacha
It is possible to organize a water supply at the dacha only using a pump, but it can be supplied in two ways: from a storage tank or from a hydraulic accumulator.
When using a scheme with a storage tank, you have a supply of water equal to the volume of the tank, but the pressure in the system is low. It is created by a difference in heights: the tank is installed at a height - in the attic of a summer house or the roof of an outbuilding. The main condition is that its bottom must be located above any water intake point. Then there will be water in the taps.
The second method, with a hydraulic accumulator, is more convenient in that pressure is created and automatically maintained in the system. If the hydraulic accumulator is supplemented with a pump and automation (pressure switch), the entire assembly is called a pumping station. The trick here lies in the hydraulic accumulator. This is a cylindrical container divided into two parts by an elastic membrane. Gas is pumped into one part under low pressure, and water is supplied to the second by a pump. As it enters, the water compresses the gas more and more, which is why pressure is created in the system (about 2 Atm).
Organization of water supply at the dacha from a well with a hydraulic accumulator
When the tap opens (household appliances turn on or watering starts), water is supplied from the accumulator. The pressure in it gradually decreases. Its value is controlled by special relays. As soon as the lower threshold is reached, the pump turns on, restoring its set value. The highest threshold is monitored by a second sensor, which turns off the pump.
A similar country water supply system can be implemented in both winter and summer versions. The difference is where to install the equipment and how deep to bury the pipes.
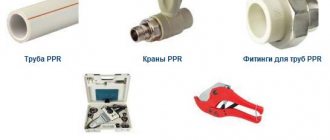
QUESTION No. 8. How is polypropylene pipe and fitting welded?
ANSWER. At the beginning of the work, a piece of pipe of the required length is measured and cut at a right angle using scissors. The top plastic and middle aluminum layers (for the reinforced model) are removed with a stripping device. Before welding, the fitting and the end of the pipe are cleaned of dust and degreased. A mark is applied to the pipe at a distance less than the depth of the fitting by 1-3 mm. The elements are then placed on the nozzles of the welding machine and subjected to heating. After this, the products are connected with a uniform movement without turning along the axis and to the entire depth to the mark. The cooling time of the connection depends on the outer diameter of the pipe and averages 3-5 seconds.
Conditions of conduct according to regulatory documents
The laying of any pipeline, be it polypropylene or steel, is determined by standards. It is SNiP that regulates many technical issues that allow all work to be completed efficiently, ensuring safety. To lay polypropylene pipes, the following requirements must be met:
Diagram of the advantages of polypropylene pipes over other materials
- It is imperative to take into account the freezing point of the soil. Usually it is at a level of 1.4 meters, so if the pipeline is at a lower level, then in winter the water in it will simply freeze and it will be impossible to use the pipe. Therefore, during installation it is necessary to accurately calculate such moments; in the future this will only be beneficial.
- The laying of pipes largely depends on what buildings are located on the site, whether there are nearby roads and highways, communication and other utility networks. If you are not sure where exactly the pipeline can be laid, it is better to contact specialized construction companies.
- When laying underground, we also take into account the characteristics of the relief and soil; in some cases it is necessary to protect the pipe with the help of special casings.
The polypropylene pipeline is laid subject to the following steps:
- First you will have to prepare a trench for laying, which should be larger than the diameter of the pipe. So, for 110 mm pipes you will need a trench with a width of 600 mm. The minimum distance between the pipe wall and the trench should be 20 cm. The burial depth should be 50 cm greater.
- The bottom is sprinkled with sand with a cushion thickness of approximately 50-100 mm, after which the sand is compacted.
- The laying starts from the building; when installing sewer pipes, the socket should face the end of the pipe going outside;
- A special lubricant is used to connect individual elements.
- When laying sewerage, you must remember that a slope of 2 cm must be maintained for every meter of the route.
- After installation, the pipeline is covered with sand and compacted only from the sides. If necessary, before this the pipe is wrapped with a heat-insulating layer;
- At the very end, polypropylene pipes are connected to a common highway, treatment plant, etc. This must be done using polypropylene solder.
What problems may arise during installation?
When laying polypropylene pipes underground, some problems may arise:
- the structure of the soil does not allow digging to the required depth;
- in winter, the soil freezes strongly, which can cause damage to pipes;
- There is a building on the site that is not possible to get around.
In this case, there are several ways to solve these problems:
- If the soil is too loose or hard, it is recommended to make a puncture, in which a steel pipe is first laid, and a polypropylene pipeline is inserted into its cavity.
- When the ground freezes, it is recommended to lay a heating cable along the entire route. This requires significant costs, and expenses in winter may exceed those planned, but in any case, this option is cheaper than constantly repairing burst pipes.
- If there is any structure or object along the route that cannot be damaged, it is recommended to use trenchless construction methods, that is, puncture. In this case, you can not only lay the pipeline, but also protect it with a steel casing. When laying such networks, it is necessary to carefully look at the layout of communications on the site so as not to damage existing ones.
QUESTION No. 11. What types of fittings for metal-plastic pipes exist?
ANSWER. Fittings are designed to connect several pipes and connect to various devices, for example, water meters, heating radiators, filter devices, water heater pipes, etc. For metal-plastic pipes, collet (compression) options and press fittings are used. The first ones are the easiest to install. Wrenches are used to secure them. After dismantling the pipeline, such fittings can be reinstalled. Press fittings are used for any type of connection, but are only suitable for one-time use. To secure such elements, special hydraulic or manual press machines are used.
Connection to the central pipeline
If we connect to the central pipeline, then we dig a trench from the well to the house:
Related article: Which collector to choose for water supply
- and lay the pipe:
The trench is dug from the well below the freezing depth of 0.3. 0.5 m, preferably with a slope of 0.03 (3%, i.e. 3 cm per meter) degrees towards the well. Shut-off valves are installed in the well, the type and diameter of which are indicated in the technical specifications. The connection to the central water supply is made by Vodokanal. And you can do the wiring in the house yourself.
To pass a pipe under the road, a water pipe is inserted into a sleeve - another pipe, but of a larger diameter, for example, polypropylene into steel or steel into asbestos, etc.:
For the sleeve, you can take a used pipe. It is necessary to clean the sharp edges of the pipe sleeve with a file, removing burrs.
If the pipe is laid below the freezing depth, then there are no more problems.
What to do if it is not possible to lay a pipe below the freezing depth, for example, due to close groundwater? The next article is about this, the link to which is at the bottom of the page, but still read this article, because otherwise the technology for installing an external water supply is the same for any groundwater level
.
QUESTION No. 12. How are metal-plastic pipes connected using a press fitting?
ANSWER. A metal-plastic pipe of the required length is cut at a right angle using special scissors. If the cut was deformed or the internal diameter was narrowed, the edge is calibrated using a calibrator and a chamfer of at least 2 mm in depth is removed. Then the press sleeve is put on the pipe until it stops. It is necessary to ensure that the edges along the entire diameter are in close contact with the sleeve, as this guarantees a tight connection. After this, the fitting is inserted into the pipe until it stops. The elements are crimped using press jaws.
Factors affecting backfill depth
In order to correctly lay the communication, it is necessary to take into account the depth of soil freezing. The optimal depth in this case is 1.5-2 m. Digging a deeper trench increases the cost of the water supply system. Other factors that change the backfill depth include:
- groundwater level;
- an indicator of the ring stiffness of the pipe itself;
- depth level of the well - caisson;
- the presence of a heating system or thermal insulation of the water supply system;
- Features of the location of the communication entry point into the house.
Factors that increase depth
Factors that can increase the depth of the trench under the pipeline include:
- location of the well - the pipe is led from its bottom to the level of the outlet of the neck of the shaft or main;
- the point of entry of the communication branch into the house - the lower the level of the tie-in into the foundation, the deeper the water supply will run;
- ring stiffness - the higher the indicator, the higher the strength of the reinforcement will be, so some systems are buried at 12-16 m (if using HDPE pipes), others at 5-8 m.
Factors that reduce depth:
- the presence of a heating system or thermal insulation neutralizes the effect of soil freezing;
- groundwater - the higher its level, the smaller the trench needs to be dug.
QUESTION No. 13. What are metal-plastic pipes made of?
ANSWER. The metal-plastic pipe is an aluminum base, which is extruded and coated on the outside and inside with a layer of special glue and high-density polyethylene. Thanks to the outer layer, protection against mechanical damage and corrosion is created. Aluminum imparts high strength, provides oxygen impermeability and reduces the thermal deformation of polyethylene by more than 7 times. Aluminum edges can be joined end-to-end using laser welding or overlapped using ultrasound. The inner layer of heat-resistant polyethylene forms a smooth surface and guarantees protection of aluminum from corrosion. The polyethylene used for production does not contain harmful chemicals, so the pipes can be used to organize a drinking water supply system.
Laying a water pipeline under the road
It is not always possible to dig a trench from the water source to the house in order to lay a pipeline. Maybe there is a road in the path of your pipe, and it is not allowed to break the asphalt. Then horizontal drilling is used. This is what we are talking about.
Vodokanal has special equipment, but this service costs a fair amount, so you can do it yourself if you have the opportunity and desire.
How to do horizontal drilling yourself?
What tools are used for horizontal drilling?
For horizontal drilling, a drill is used - the so-called. “spoon” is a drilling tool whose cutting part is shaped like in the picture:
Below is also a drill for the same purposes, only of a different shape, popularly called a “glass”, this drill is hollow inside:
You will also need a rod to which the drill is attached. The rod has a threaded connection so that new pieces can be added to the rod, making it longer than the area to be drilled under. A rod is a regular steel pipe with threads at each end so that several pipes can be connected with couplings. A drill is screwed to the first pipe on one side.
How to do horizontal drilling?
Horizontal drilling for laying pipes under, for example, a road is done in the following sequence.
The area under which to drill must be approached on both sides by trenches.
The drill is screwed onto the rod.
The drill is driven with a sledgehammer to a certain depth from the trench under the road.
If it stops clogging, it means the “glass” is full of earth.
They pulled out the bar and knocked the earth out of the “glass.”
And then we repeat the same steps, adding the length of the rod as necessary.
The diameter of the “glass” should be such that a case for a water pipe can then be inserted into the punched hole. For example, if the water pipe is 25 mm, then the pipe case is 32 mm, and the diameter of the drill is 40 mm.
QUESTION No. 14. What technical characteristics do metal-plastic pipes have?
ANSWER. The outer diameter of the metal-plastic pipe can be 16-32 mm.
The wall thickness is usually from 2 to 3 mm. The thickness of the aluminum layer can vary from 0.3 to 0.45 mm. The water capacity is 0.113-0.531 l/m. Operating temperature – up to 90°C, operating pressure – up to 10 Bar. The minimum bending radius of a spring can be from 80 to 160 mm. The pipes can withstand a maximum short-term temperature of 110°C. Subject to operating conditions, the service life reaches 50 years.
Pipe passage through the foundation of a house
This is the most dangerous place, because here the water often freezes. Even if the pipe is below the freezing depth - due to the fact that concrete attracts moisture.
Where the pipeline passes through the foundation, it is advisable to make a “case” from a larger diameter pipe, plastic, asbestos or metal:
The “case” has a larger diameter than the pipe (if the pipe is 32nd, then the “case” is 50th).
We enclose the pipeline itself in thermal insulation. And packing is done to prevent groundwater from entering through the foundation under the house. How is stuffing done? We hammer a braided rope into the middle, and fill the space from the edge of the foundation to the rope with clay; clay is the most ideal waterproofing material, no matter what manufacturers of artificial materials advertise. We dilute the clay with water until it is slightly thicker than sour cream... however, if you wish, you can use modern waterproofing materials: sealants, mounting foams, etc.
Here I want to dwell on one point, which seems to have no direct relation to the water supply system, but is quite important. It is correct to insert the pipe into the house THROUGH the foundation - it does not matter whether it is above or below ground level, and NOT under the foundation! After pouring the foundation, no digging under it is allowed! - unless, of course, your goal is to destroy the house in such a sophisticated way.
When the pipeline passes through the wall of the well ring, it is also necessary to make a seal if the groundwater is high. To perform such sealing there are special parts:
The water and sewerage inlets into the house must be no closer than 1.5 m from each other (according to SNIP).
Preparing a communication diagram
To know which pipes to install where and how, first draw a water supply diagram. You need to understand what is better for your home: hidden installation or external installation? Also, you need to decide how to install communications: in series or in parallel? All this must be reflected in the diagram, and then calculate how much materials will be spent on the chosen option.
For example, with hidden installation, when pipes are hidden in the walls, more materials will be required, including finishing materials. But everything will look more aesthetically pleasing. Also, with parallel installation, more pipes will be needed than with serial installation. But for each tap the water pressure will be the same. In addition to pipes of suitable length and diameter, you will need components - for example, fittings for connection and clips for fastening.
What mistakes to avoid
There are the most common mistakes that should be avoided when installing polypropylene water pipes. For example, due to the plastic-like material of the pipes, some people believe that they can be bent. Alas, this is not so: for places where the pipe turns, it is necessary to use special corners. There are also those who, when welding, insert one element into another, try to rotate it. This also does not need to be done, since the strength of the connection is impaired. Finally, when installing on a wall, it is best to place the cold water pipes above the hot water pipes. This makes it possible to avoid the appearance of condensation during operation of the water supply system.
Conclusion
Polypropylene products, which replaced metal pipes, greatly simplified the installation of water pipes. Now you don’t need to have the skills of a welder to independently assemble the necessary circuit for cold and hot water supply, as well as heating, on a country plot or in an apartment.
You just need to follow the instructions and perform the work carefully, taking into account the recommendations presented above. The video in this article will give you the opportunity to find additional information on the above topic.
Installation of an external pipeline: step by step
1. Extracting a trench to a depth of 0.3 – 0.5 m below the freezing level.
2. Add 7-10 cm of sand cushion, pour water and tamp (once, instead of sand, due to its lack, we used broken tiles; today - 2015 - the water supply system has been working properly for 16 years).
3. Laying the pipe itself. Which pipe should I choose for entry? You can use polypropylene (it’s stiffer), or you can use 25 or 32 mm polyethylene (15 mm is not enough). however, this has been said above and sufficiently justified.
4. Hydraulic testing of the pipeline with a pressure 1.5 times greater than the operating pressure (tests can be carried out with air).
Related article: Installation of a water supply system in a private house
5. Fill with sand in a layer of 10 cm with careful (!), not very strong (!) tamping.
6. Backfilling the trench with soil.
A few parting words in case you (and most likely) entrust all or some of the listed work to any contractor that has a license or certificate allowing such work (connection to a central water supply, hydraulic tests, installation of a meter).
You can take on the task of digging out the trench, adding a sand cushion and backfilling, thereby saving some money.
Be sure to familiarize yourself with the estimate, which indicates the length of the pipeline, the volume of excavation work and the soil category (often they put category II or III, which corresponds to stony or rocky soil, which may not be the case in reality), since at these points contractors can “stretch “The estimate is in your own favor, of course.
In the next article we will look at installing an external water supply system if groundwater is close.