Without a clear idea of how to properly organize the supply of water to the house, the risk of shortcomings and subsequent inconveniences increases significantly. This may entail not only unnecessary financial costs, but also subsequent maintenance of the system.
In this article we tell you how to properly supply water to a private home and how to save on equipment without harming the performance of the system:
- Where to place the water inlet
- Installation of a water supply entry point into the house
- What pipes to use for water supply
- How to properly dig a trench with your own hands
- Diagram of pipeline entry into a private house down to each fitting
- Insulation of pipes at the entrance to the house
- Do I need a heating cable and which one is better to use?
- Unobvious mistakes when laying pipes
- How to order water supply to your home and how much it costs
Correct location of water supply to the house
In the vast majority of cases, water in a private house is supplied from three sources: a well, a well and a central water supply. In this case, the passage unit of the foundation and floor does not change significantly, but what immediately follows it changes: with a central water supply, an automation unit and a hydraulic tank are not required, but one of the frequent requirements is the installation of a meter.
There are two methods for constructing a well: with a caisson and with a well adapter. If there is no bathhouse or garage on the property, and you do not plan to share water with your neighbors, then an adapter is an ideal option. You can read more about the advantages of the adapter in this article. When considering the question of where to install water supply in the house, you need to take into account where the hydraulic tank, pressure and dry running switch will be located, if necessary, and you should also not forget about water filtration and water treatment. When constructing a well with a caisson, automation and filters can be placed in it.
If you want a well, then there are 2 options for how to bring water into the house: if there are space restrictions, then it is better to install pumps with built-in automation. Grundfos SBA or Dab Divertron well pumps are perfect for this. If your house has a separate technical room, then you can consider the option of a pumping station. However, it should be taken into account that the difference between the station and the water level in the well should not exceed 8 m.
Typically the entry is made near the wall. The input unit (conditionally this can include a filter, a pressure switch, a dry-running relay, a half-faucet outlet to the street, a hydraulic accumulator) occupies a width of about 0.5 meters on the wall.
Advice! At the design stage of your residential building, make room for the boiler room. In the technical room you can place equipment, carry out all communications, and also eliminate the noise of the pumping station.
Decide in advance on the location of the well or well on the site in order to minimize the distance from the water supply source to the entrance to the house. This will not only reduce the amount of excavation work, but will also make it possible to understand in which direction to lay the foundation in the foundation.
Solving organizational issues
Before obtaining permission to connect to the water supply, you need to register a new consumer.
This is largely in the interest of the developer - the presence of the project in the general database will help shift responsibility for damage to underground communications to those who did it. In addition, the potential consumer is given a set of documents that constitute the technical specifications for the project. This includes an image of the pipeline route, its laying depth and distance from main landmarks, pipe material and diameter, other local conditions and notes. To receive this set, you need to write an application addressed to the head of the local water utility department or the person replacing him on this issue.
The received technical specifications are the initial data of the project; on their basis, a set of working documentation is compiled, including:
- calculation of water consumption and waste volume;
- wiring diagrams in axonometry;
- floor plans of the water supply system and arrangement of bathrooms;
- drawings and diagrams of water metering, distribution and treatment units;
- reclamation scheme and list of irrigation equipment, if available.
An example of an axonometric diagram of a house's water supply system
The consumer himself can study the requirements for the design of water supply systems and draw up a project himself, but in this case he will have to indicate as the compiler a certified specialist with SRO approval for design of this type, a copy of which must be attached to the project. The project serves as the basis for concluding an agreement between the water supplier and its consumer.
After payment, everything, as a rule, depends on the contractor. But you can also take the technical side of the issue into your hands, even going as far as plugging into the system yourself. It is important to carry out the work in strict compliance with regulatory requirements, otherwise your connection will not pass inspection.
Introducing water supply into a house under the foundation
It is necessary to think in advance, at the design stage, about the location of technical holes in the foundation. Typically, such holes are needed for the following:
- water supply
- sewerage
- for electricity
- backup
Sooner or later you will need a reserve hole to provide household amenities: for example, the outlet of a water supply pipe for a newly built bathhouse or garage, for the outlet of an external lighting cable. An additional hole will slightly increase the cost of the entire job, but will significantly save time and effort in the future.
If you do not take into account the location of technical openings for communications in advance, then the builders will do this at their own discretion. As a result of this, the node may be located not near the wall, but, for example, in the middle of the room. Not only is this inconvenient, but in the future it will require additional financial and physical costs to redo everything.
To prevent this from happening, it is necessary to mark the location of technical holes at the design stage, taking into account the width of the walls, including the interior decoration.
Slope
Type of sewerage connection to the house
For a pipe measuring 110 mm, it will be 2 cm per meter. This slope value is guaranteed to ensure efficient movement of wastewater. If you make a hole in the foundation with a smaller slope, then the movement of water will be slow. A large slope will cause the water to drain too quickly, and the solids from the drain will remain in the pipe.
If the pipeline must turn, it is necessary to use smoother contours. If the length of the system is more than 15 m, then each turn must be equipped with a special inspection.
Dependence of the pipeline input device on the type of foundation
Slab foundation
An embedded pipe with a diameter of 110 mm must be installed under the water supply inlet. Usually a sewer pipe for external work (red) under the 32nd HDPE pipe is used. Accordingly, this should be taken care of in advance. The pipe must be removed from under the foundation at a depth of about 1.5 m - this value is relevant for the Leningrad and Moscow regions, depending on the region. Below we will tell you how to determine the laying depth for your region.
Strip foundation
Strip foundations can be divided into 2 types:
- Non-recessed (shallow) strip foundation
. In this case, it is not necessary to lay the sleeve in advance, since it is possible to dig under such a foundation. However, a sleeve under the tape will still be required, since the foundation may damage the water pipe during settlement.
- Recessed strip foundation
. If this type of foundation is located below the frost depth, then it is better to install the mortgage before pouring. For this you can use a sewer pipe with a diameter of 110 mm. If the pipe is not laid, then diamond drilling of this hole in the foundation will be required in the future, for which you need to call a specialist. His work will cost you an additional 6,000 rubles.
Advice! Always leave access to the underground for the strip foundation and a height of at least 40 cm from the ground to the subfloor. In case of an emergency, you can climb into the basement and work there. In this case, the sewerage installation can also be done under the floor on a suspension.
Foundation on screw or reinforced concrete piles
A columnar foundation can also be included in this category. Most often used for frame houses or houses made of timber. At the construction stage, we recommend laying a 50 mm pipe for the water supply.
Entrance to the ground floor
One of the most difficult options, provided that groundwater passes close by. If the pipe fits below the freezing depth, then the pipe does not need to be buried or insulated. In this case, the input must be waterproofed. This requires insulation for the input of communications. It has a special composition that does not lose its tightness when the foundation and pipes move (and they will definitely happen). The solution is elastic and has good adhesion to both concrete and plastic.
Waterproofing foundation passages is a separate and broad topic, we will talk about it in the following articles. It is worth mentioning separately that, based on our experience, it is better to use sealant for cable glands, FST-250 or VBH SS-11. The second option is to combine bentonite cord with a non-shrinking solution.
Thus, simply sealing the inputs with polyurethane foam will not work. Waterproofing must be taken seriously and all manufacturer's instructions must be followed. Otherwise, even a small leak will flood the basement of the house along with all the equipment that will be installed there.
We strongly recommend calling one of our MEP specialists before pouring your foundation slab. With an engineer, you will be able to make the necessary calculations: the location of the well, at what depth, and in which direction to lay the embedded pipes, as well as the most competent placement of water supply and sewerage systems (septic tank) on the site.
Requirements
The rules for installing life support systems (electricity, water supply, sewerage) in cottages built on a slab foundation are regulated by established standards under SP No. 31-110-2003, No. 31.13330 and No. 32.13330. At the same time, practicing engineers recommend paying special attention to the maintainability of communication lines.
According to the current rules in construction, holes in the hardened monolith are not punched for utility networks, but places for laying sleeves are organized at the stage of formwork construction.
The following factors must be taken into account during the process:
To lay the “warm floor” system and water supply lines, pipes with a diameter of 16 to 20 mm are used. For sewerage installations, polyvinyl chloride pipes with a standard diameter of 110 mm are used. If, according to the project, the house has a lot of plumbing fixtures, the sewer line is long, or there is no provision for a pit, then pipes with a diameter of 160 mm are used.- The minimum permissible sleeve size is 5 cm.
- When seasonal temperature changes occur, linear expansions occur in the soil, so when laying engineering systems, special compensators are used.
- Water supply lines are laid below the freezing level, otherwise heating cables are run in parallel or polystyrene shells are used.
- The electrics are placed in sleeves with a bending radius of 0.3 to 0.7 m. This position makes this communications unit repairable in case of damage. The power supply lines are routed to a panel, which is usually located next to the house.
- It is forbidden to introduce a gas pipe into the house through the thickness of the foundation; for this purpose, a hole is made in the outer wall and a sleeve is inserted into it for protection. All places where pipes are connected must be located in such a way that the contact point can be inspected at any time and repaired if necessary.
Under the base area of a monolithic foundation, in the body of which heating pipes (for example, USHP) pass, the soil cannot freeze, which will allow the developer to further save on heating the utility lines.
What pipes should be used to bring water into the house?
Pipes with a diameter of 32 mm HDPE (low-density polyethylene) - according to GOST, are marked with a blue stripe and this means that they are for use under water, excellent for small country houses. For large cottages we use pipes with a diameter of 40 mm. However, if central water supply is used, the administration may impose its own restrictions on the diameter of the pipes, for example up to 25 mm.
To connect pipes, we most often use compression brass fittings for HDPE pipes Tiemme or Itap: they look more aesthetically pleasing and are more reliable than plastic ones. Unlike, for example, electric welded fittings, these fittings can be installed manually, with minimal use of tools. They can also be used indoors or in summer water supply. Plastic fittings are not suitable for heavy loads. Using them to secure pipes that are buried to great depths—and especially a pump—is out of the question.
Materials for sewerage installation
In order for the construction of the sewer system to proceed strictly according to the planned schedule, it is worth calculating the quantity in advance and purchasing the necessary materials and tools. To do this, prepare a detailed plan of sewer pipes and risers, horizontal pipes, external pipes and septic tanks, indicate the dimensions of all sections, joints, turns, so that you can accurately calculate the number of pipes, fittings and accessories.
For the external sewage system, cast iron, metal, asbestos-cement, concrete and plastic types of pipes are used. The most durable are cast iron pipes, but due to their high price and labor-intensive installation, they are practically not in demand in private construction. Polymer pipes are widely used: polypropylene (PP), polyethylene (PE) and polyvinyl chloride (PVC). External sewer systems are constructed from orange plastic pipes with a diameter of 110 mm. The orange color indicates their purpose - for the external sewerage system, in contrast to gray pipes for the internal water supply, they are of higher quality and durable, resistant to corrosion, destruction and, if laid with the correct slope, do not become clogged, thanks to the smooth surface of the inner wall. The maximum depth of such pipes in the ground is 3 m.
Double-layer pipes made of polyethylene or polypropylene, corrugated on the outside, are resistant to high loads and are laid at great depths or under the roadway.
The pipes are connected using fittings:
- Bends and couplings with a diameter corresponding to the cross-section of the pipes.
- Tees of suitable styles for branching the system.
- Reducers or adapters for joining pipes of different sections.
- Plugs for sockets to seal holes.
- Fasteners for fixing pipes.
For plumbing work you will need sealant - silicone in tubes and a special gun.
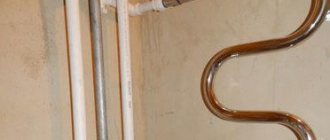
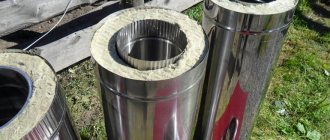
Insulation of pipes at the water supply to a private house
We insulate pipes using insulation and heating cable. We install the food grade heating cable inside the pipe because it is quite easy to replace. With this installation, the cable transfers 100% of the heat to the water and does not heat the air around it. Insulation will help you use a heating cable of lower power, for example, 10 W, and save on electricity.
Heating cables are resistive and self-regulating.
- Resistive
- have constant power along the entire length. At the point of overlap, the cable overheats, which causes rapid wear and destruction.
- Self-regulating
— its temperature does not exceed 65°C, which eliminates overheating. As a result, it is fireproof and more wear-resistant. For the same reason, it can be installed overlapping, and this will not cause local overheating.
The cable is selected according to power. As a rule, 16 W/m is quite enough for HDPE pipes with a diameter of 16 to 32 millimeters when installed outside. If the cross-section of the pipe exceeds 32 millimeters, then you should choose a cable with a power of 24 W/m. We, in turn, use and install about 3 meters of food cable with a power of 10 or 13 W.
It should also be noted that a self-regulating heating cable does not require an additional thermostat, unlike its resistive counterpart. It is quite simple to install and plug into a power outlet.
To install the cable, you will need a tee (we use a 90° tee), which is installed on the pipe in the house.
The cable enters it from above. Set of heating food cable for laying inside a pipe with a water gland, 3 m.
For additional insulation of the pipe, we use 2 layers of 13 mm thermal insulation made of foamed polyethylene. We use 4 whips of 2 meters with a diameter of 34 and 54 mm. Foam insulation is relatively inexpensive, so you will not feel any special financial costs.
Thermal insulation of foamed polyethylene pipes
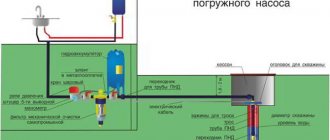
Diagram of the water supply unit to the house
A similar scheme is used by our company in most cases when supplying water to a private house from a well or from a well with a submersible pump.
Designations:
- Insulation 34 mm
- Insulation 54 mm
- cable tie
- HDPE pipe 32 mm
- Fitting 32/1" HP
- Brass tee 1"
- Brass fitting 1”-½”
- Pump cable
- Self-regulating heating cable kit (supplied with gland)
- 1” fitting with transition to pipe. Inside the house, we switch to polypropylene or metal-plastic pipes.
- Watering tap outlet (installed before the filter)
- Oblique filter (dirt filter)
- Fine filter (retains particles from 5 to 25 microns)
- Dry running relay (if the pressure drops below 0.5 bar, it turns off)
- Five way connector
- Pressure gauge
- Hydraulic accumulator
- Tap leading into the system
We use HDPE pipes 32 mm (4) with seals 54 mm (1) and 34 mm (2). We install the fitting - transition from 32 mm HDPE to 1” external thread (MS) (5). Next, install a 1” brass tee with internal thread. We screw a 1”-½” fitting into the tee from above. And then we screw in the sealed lead-in to insert the heating cable inside (8). We seal all connections (we use only flax with sealing paste).
Next comes a set of self-regulating heating cable (8), which is inserted inside the pipe along with a special seal (gland, included with the cable).
Install the outlet of the watering tap (11). Since it does not require much filtering of water, we install it before the filters. There are 2 taps installed on it: 1 with a fitting outside, the other inside the room. In winter, the tap is turned off inside the house, and the outside one remains open to drain the water (the pipe is laid through the wall at an angle).
Then we install an oblique filter, or mud filter (12). It can be placed before the watering tap - it doesn’t matter.
Fine filter (13) - retains small particles from 5 to 25 microns. Needed for protection against fine sand and is installed optionally. Dry running relay (14), to which the cable from the pump (8) is connected. If the pressure is below 0.5 atmospheres, the relay turns off, after which it can only be turned on manually. This helps protect the pump from running dry if for some reason the water does not have time to fill the well (for example, seasonal changes in the well's flow rate). Dry operation for the pump is dangerous due to overheating, since it is cooled by transient liquid.
We do not use a dry-running relay when supplying water from a well, since well pumps are equipped with built-in automation with appropriate protection (as in Dab Divertron) or a float level sensor (Grundfos SBA and Belamos KF). Five-way connector (16) on which the pressure switch is installed and pressure gauge (15). It also comes with a connection to the hydraulic accumulator (17).
The valve in the system (18) is installed strictly after the automation. What usually happens: Somewhere in the house a faucet turns on. The pressure gauge records the pressure drop in the tank, after which the pump turns on to supply water. If the valve (18), installed incorrectly, is closed, then a water hammer will occur, which will disable the entire system, and the pump will simply burn out.
Also, do not forget that in addition to the water pipe, an electric cable is brought into the house from the pump in the HDPE pipe.
How to make a water pipe with your own hands?
You can assemble your own water supply according to our diagrams. To do this you will need tools:
Equipment you will need for self-installation
Construction hairdryer.
If you have a well or well with a caisson, the cable from the pump is extended using a heat-shrink sleeve. In order for shrinkage to occur successfully and the connection to protect the contacts from water, the coupling is heated with a hair dryer.
T-shaped installation key.
Screws into adapter with connected pump. The cost is about 1000 rubles. You can also make the key yourself from metal or polypropylene pipes.
Set of bimetallic crowns.
Diameter - up to 44 mm. Needed for the hole when installing the downhole adapter. And also for drilling holes in ceilings and walls, including at the entrance to the house. Twist drills can be used for these purposes.
Soldering iron
Or an “iron” for soldering polypropylene pipes. The average cost is about 3,000 rubles. Soldering tips are consumables and need to be changed periodically because the Teflon coating peels off.
Advice! Consider how long it takes to heat the pipe: there are special tables on the Internet. Overheating is dangerous because the melt closes the internal passage of the pipe. Underheating threatens weak adhesion and poor pipe connections.
Press jaws.
Press fittings are installed on metal-plastic pipes using special pliers. Unlike compression fittings, such connections are non-separable, but more reliable: such connectors can be poured into the screed and used for hidden installation, for example in floors. But we recommend installing a pipeline with compression fittings in plain sight, because the nuts need to be tightened regularly. Press pliers can be manual or electric. Power tools are more expensive, but they do all the work for you. For small installations, a hand press is sufficient. Manual press pliers cost from 6,000 rubles. Electric - about 50,000 rubles.
Adjustable wrench for fitting fittings.
"Swede".
With the help of a “swedge” you can grab and hold pipes and fittings that do not have turnkey surfaces.
Sealant.
Necessary for sealing threaded connections. Beginners often have a question: what is the best way to seal threaded connections? Now there are many options: fum tape, glue-sealant, and flax with paste.
Advice! We recommend using plumbing flax or paste (simply putty), for example, from Unipak. We strictly do not recommend using fum tape or any other analogues.
We dig a trench to bring water into the house with our own hands
According to SP 22.13330.2011, for Moscow and the Moscow region the freezing depth for clay and loam is 1.1 m, and for fine sand and sandy loam - 1.34 m. For St. Petersburg and the Leningrad region - 1.0 m and 1.2 m, respectively.
In the middle zone of the Moscow and Leningrad regions, the depth of the trench ranges from 60 to 150 centimeters - depending on the depth of soil freezing (we always lay the pipe below the freezing depth!). At the same time, we do not consider the territories of our country with permafrost. The summer water supply option is 30 - 40 centimeters.
The width of the trench must be at least 30 centimeters. This is necessary for the convenience of laying the pipe, so that a person with an ordinary build can fit in the trench and be able to work in it.
We do not recommend skimping on trench depth. At the optimal pipe depth (about 1.5 meters), we use about 3 meters of heating cable per input. In rare cases, we can use a cable length of up to 6 meters: usually when the pipe entry is not made at the outer wall, but at a distance from it. Thus, this length will be enough for us to warm up the water at the pipe exit from the house (if the house is on stilts or on a strip foundation, then approximately 0.5 meters), as well as at a smooth exit to a depth below the freezing level (about 2 meters).
However, if the depth of the trench is higher than the freezing depth, then the heating cable will have to be laid along the entire length of the pipe, and this, in turn, is quite expensive: the cost of the cable, the cost of electricity. Also, when the cable becomes unusable, and to replace it you will have to dig out the entire trench.
For our clients, we always dig below the freezing depth, and use a heating cable to heat only the area where the pipeline enters the house.
The nuances with which DHW is supplied
Typically, electric or gas boilers, water heaters or boilers are purchased for this purpose. The equipment can operate on solid, liquid fuel or gas. Each option has its own advantages and disadvantages; it is worth focusing on what is most often chosen in the region.
Three non-obvious mistakes when laying a water pipe and introducing it into the house
Often, home owners are faced with the fact that the water supply unit is skewed, which can cause a pipe collapse.
This can happen for several reasons:
The trench was dug incorrectly.
This usually happens if the entrance to the foundation is made at a right angle. The pipe must be placed on solid ground. The trench must rise smoothly (there must be a slope) so that the turning radius is sufficient and the pipe does not break. Also, the soil sags over time, the pipe goes down and pulls the assembly along with it, breaking it out of the connection, both in the house and at the well adapter, caisson, at the well.
Right angle in the mortgage.
Typical mistake: builders, when pouring a foundation (monolithic slab), install an embedded pipe with a diameter of 110 mm and move from the vertical section to the horizontal section at an angle of 87°. In this case, we make a smooth turn from the vertical section, for which we use 2 angles of 45°, or 3 angles of 30°. The same smooth turn should be used when installing a sewer outlet - at least 2 bends at 45°. If you try to insert the HDPE pipe at a right angle, it will break.
If such a mistake has already been made, then there are 2 options.
pass a corrugated stainless steel pipe, such as Neptun, through such an outlet. They are expensive - a 32 mm pipe costs about 400-500 rubles per linear meter, plus the cost of fittings.
If the mortgage is located near the outer wall of the house, you can dig under the foundation and redo the incorrectly made mortgage.
The pipe is laid incorrectly.
The pipe must be laid in such a way that due to linear expansion it does not lose its tightness and does not damage the connections. To do this, our specialists lay the HDPE pipe in a “snake” pattern, thereby leaving a margin for the contraction and expansion of materials when the temperature changes.
Case from practice. The usual situation: laying takes place in the summer. Black HDPE pipe heats up in the sun. It is laid out on the bottom of the trench in one line and quickly covered with soil. The pipe in the ground cools and narrows.
There is no need to sprinkle HDPE pipes with sand throughout the entire laying, as many advise. Nothing bad will happen, it's just extra costs.
It is clearly visible that the pipe is being pulled down. The reason is soil subsidence near the input .