Your own dacha or cottage, like any residential building, must provide its residents with maximum amenities, i.e. it cannot be done without a water supply. Therefore, the water supply to a private house from a well must be designed taking into account all water intake points not only in the building, but also in the local area, which may contain: a bathhouse, a summer kitchen and a tap for watering the garden.
To properly install water supply from a well, you will first need to equip the source itself, make a caisson, install a pump, dig a trench and lay a pipeline in it. In the house itself it will be necessary to install a water treatment system, install a boiler and install pipes.
Setting up a water supply on your own is quite a difficult task, however, if you act consistently and according to a clear scheme, the installation will turn out to be quite doable.
Main components of the water supply system:
- Source of water intake (sandy or artesian - depends on the depth of the aquifer).
- Pump – submersible or surface pump.
- Storage tank (500 l for a family of 3 people).
- Equipment (coarse and fine filters).
- Boiler.
Types of wells for water supply to a private house
Well on sand
Water is pumped from the surface sand layer. The depth of such a well is 20-40 m. A sand well has low productivity (up to 1.5 m3/hour) and is suitable for a small private house. During installation, the water supply system must be equipped with an additional filter to remove sand from the water.
Well for limestone (artesian well)
Water is taken from a deep limestone layer. The well depth reaches 200 m. Thanks to this, it has high productivity (up to 10 m3/hour) and is suitable for water supply to several areas or even a small village. In this case, the water from the limestone soil comes out clean and does not require additional treatment.
Drilling a limestone well is expensive. And you also need to obtain a license to use artesian waters, since they are the property of the state.
The choice of well type depends on the depth of the aquifer. Before constructing a well, test drilling is done to calculate the depth.
Abyssinian well
It is a stainless steel pipe with a tip and a mesh filter. The pipe is driven into the ground to the aquifer, 10-15 meters. A hand pump is connected to the outer end of the pipe. The Abyssinian well is rare, so we will not dwell on it in detail; we are more interested in water supply with a submersible pump.
Main characteristics of the well:
- Well depth.
Equal to the depth at which the aquifer lies. - Static level.
The highest level to which the well is filled. - Dynamic level.
The lowest level to which the pump can pump water. The water does not fall below it. - Well flow rate.
Well productivity, that is, its filling in 1 hour (m3/hour).
The characteristics of the well are indicated in the data sheet; they are necessary for selecting water supply equipment.
Water for autonomous water supply
First of all, it’s worth figuring out what kind of water is suitable for an autonomous water supply device.
If you imagine everything simply and easily, then there are three types of groundwater.
- Verkhovodka . Something that has managed to seep into the soil, but has not yet become a stable aquifer. The weakest water quality. It’s easy to recognize - the water level fluctuates greatly depending on the season. Not suitable for drinking water supply.
- Groundwater . More stable aquifers. The depth ranges from several meters from the surface to several tens. They are mainly used for autonomous water supply.
- Artesian water . The deepest and oldest water carriers. The depth of occurrence can exceed a hundred meters. Water is most often suitable for drinking purposes, but may be too hard and saturated with various minerals.
Water obtained from an autonomous source must undergo a cycle of comprehensive studies at the SES or another organization accredited to conduct water analysis.
Based on the results of the analyzes, conclusions are drawn about the possibility of its use as drinking or technical.
A diagram simulating a hydrogeological section without respect to scale demonstrates the principle of occurrence and distribution of groundwater
The organization that carried out the water analysis can recommend the optimal treatment scheme if the technical option can, after filtration, acquire a drinking category.
Casing pipes for water supply wells
For wells, pipes made of plastic (HDPE, PVC) or metal are used. Plastic pipes are used more often because they are more cost-effective, do not corrode and are easier to install. However, plastic is subject to deformation and the pipe can be compressed by soil, so for wells longer than 60 meters metal pipes are used.
The most common sizes of plastic pipes:
- 113 mm (5 mm wall) is suitable for installing a 3-inch pump together with an adapter.
- 125 mm (7.2 mm wall HDPE and 5 mm PVC) with 3" pump and well adapter or 4" pump with head
Metal pipes for water supply can be welded or threaded. It is better to choose pipes with a welded connection, since the threads become loose over time under soil pressure. Metal pipes are durable, but they are more expensive than plastic ones, are susceptible to corrosion and are more difficult to cut out the inlet hole for the pipe - the bimetallic crown must be cooled with water all the time.
Metal pipe sizes:
- 89mm with 2" pump.
- 114mm with 3" pump.
- 127mm with 3" pump and adapter.
- 133 mm (once such pipes were used everywhere, today they are rare). Suitable for installation is a 4-inch pump, both with a head and in the version with an adapter.
Choosing pipes for water supply
- Products made of copper are considered to be the best, as they do not rust, have high strength and a long service life. The main disadvantage of copper products is their high cost.
- Metal-plastic products have also gained great popularity. This is due to the fact that such pipes are made of corrosion-resistant aluminum, coated on both sides with a thin polyethylene film. This multi-layer system makes it possible to guarantee high corrosion protection and tear resistance. In addition, the internal polyethylene coating is more resistant to deposits than metal products.
- Polypropylene is characterized by maximum durability and ease of installation. Also, one of the advantages of such products is their low cost and equipment. For example, the price of a simple soldering iron, with which you can lay water pipes throughout the house, rarely exceeds 800–1000 rubles.
Methods for organizing water supply from a well
There are two arrangement schemes: with an adapter and a caisson. The most profitable option is to use an adapter with a 3-inch pump. It is installed quickly and simply: below the freezing depth, a special device (adapter) is cut into the casing, through which water enters the supply pipe 32, and then into the house. To arrange this, pipes with a diameter of 113 mm or more are selected for the well.
Fig.3. Installation diagram of water supply from a well using an adapter
Construction of a well with a caisson will cost much more. On our website, the price of a plastic caisson starts from 39,000 rubles. However, in some cases, a well adapter cannot be used on a site, only a caisson. For example, when the water supply needs to be connected not to one building, but to several objects - to a bathhouse, a guest house or a neighboring dacha.
Fig.4. Scheme of well arrangement with caisson
Operation of water supply
- After checking the functionality of all components, it is necessary to perform several test runs of your pumping station. Moreover, it should be turned on with minimal load.
- Do not forget that at first, when drawing water from a home well, it may be quite cloudy, and it must be given several hours to clear.
- It is necessary to adjust the pump capacity so that it matches the calculated capacity of the aquifer.
- When operating the pumping station, try to avoid short-term switching on in order to extend the life of the pump.
- Annual scheduled inspection and check of the technical part (filters, tanks, pump and the caisson itself).
Borehole adapter, installation of water supply from a well without a caisson
The adapter is a small connecting device. It allows you to insert the water supply pipe directly into the casing, without a caisson. Roughly speaking, this is an insertion into the casing below the freezing depth.
Downhole adapter device
Fig.8. Water supply diagram from a well to a house with a well adapter
Advantages of a water supply system with a well adapter:
- Low price. The cost of installing the adapter is 4,500 rubles. For comparison, installation of a caisson with a slab and anchoring costs from 25,000 rubles.
- Installation is less labor-intensive than in the case of a caisson. When installing a caisson, it is necessary to pour a concrete slab, anchor the container, sprinkle the central heating system, install the coupling hermetically and remove the pipe.
- Does not take up space on the site, unlike a caisson.
The adapter is not suitable if you need to supply water to several objects at once (sites or buildings on the same site). In such a situation - only a caisson. Besides:
- The adapter occupies approximately 2.5 cm in the pipe. This must be taken into account when selecting a pump by diameter.
- It is difficult to install. Both parts of the adapter need to be connected correctly on both sides of the casing, this requires skill.
More details in our article: caisson or well adapter.
How to install a borehole adapter:
— A hole is made in the casing pipe with a 40-44 mm bimetallic crown;
— One part of the adapter is screwed onto a metal rod, lowered into the pipe and inserted into the hole.
— The second part of the adapter is inserted into the pipe from the outside and screwed to the first through a sealed rubber ring.
— The third part with the pump connected to it is lowered into the well and inserted into the already secured threaded part of the adapter.
Video: Installing a Downhole Adapter
If you are interested in how to conduct water from a well using an adapter, use our guide to installing a well adapter yourself. Also, if you don’t want to do it yourself, we can install the well using a turnkey adapter.
General recommendations
When installing a water supply in a private home, the following rules should be followed:
- Usually, a submersible pump is a fairly powerful consumer of electricity. Therefore, it is better to connect it through a voltage stabilizer;
- when laying a water pipeline, you need to take into account the depth of soil freezing - it differs in each region;
- the system must necessarily include a hydraulic accumulator or a tank with a large capacity;
- the pipeline must be laid with a slight slope and the possibility of complete drainage of water must be provided in the caisson.
To ensure water supply to a private home, you need to know how to install a well in your dacha with your own hands and how to select and connect the equipment correctly. In fact, this is a rather complex set of works, so it is advisable to at least consult with specialists.
Previous articles Next articles
Related Posts
- 05.03.2017.
Self-repair of drinking wells
- 05.03.2017.
How to drive a water well yourself: work order
- 22.02.2017.
Where is it better to drill a well: at home or outside?
- 22.02.2017.
Selection of a pump for organizing water supply from a well
For water supply from a well, submersible pumps of small diameter are used - 2-4″ (50.8-101.6 mm). The Zagorod company most often installs Belamos TF centrifugal pumps with a diameter of 3″ (76.2 mm) in water supply systems.
Advantages of Belamos TF-3 well pumps:
- The body is made of high quality stainless steel and brass.
- There is a thermal protection system that turns off the engine if it overheats.
- Special seals allow the pump to be lowered 80 m below the water level.
- The pump operates with solids content up to 180 g/m³.
The water supply pump is selected taking into account the diameter of the casing pipe and the installation method. If a PVC pipe with an internal diameter of 107 mm (OD 125 mm, wall 9 mm) is used, then a 4 inch (101.6 mm) pump can be lowered into it. This option is suitable when installed through a caisson. When installed through a well adapter, it takes up approximately 1 inch (25 mm) inside the pipe and a 4-inch pump cannot be lowered into it, so a pump with a 3-inch diameter is installed.
Other popular pumps for water supply to a summer house or country cottage
Grundfos SQ-3.
Pump housing made of stainless steel. Diameter 3". Can pump water containing sand up to 50 g/cu.m. m. Built-in check valve and dry-running protection relay.
Fig. 10. Well pump Grundfos SQ 3-55
Belamos TF.
The body is made of stainless steel. Diameter 4″ (97 mm). Can pump water from a depth of up to 150 m, depending on the model. There is a built-in check valve. A pump with an optimal price-quality ratio.
Fig. 11. Well pump Belamos TF-25
Pumping stations for wells
In addition to submersible pumps, we install surface pumps (pumping stations) for wells. But there are nuances:
- The pumping station lifts water from a depth of no more than 8 meters.
- The pumping station is not used with a drain valve. When installing a caisson, this is not a problem; it can have a separate tap for draining water.
- To start the pumping station, there must be water in the system. It is filled through the station.
- The station creates noise during operation. It is better to install it in a dry, warm basement or in a separate technical room or in a caisson.
Important! Do not use the pumping station if the dynamic water level drops below 8 m. The station will not lift water from such a depth.
The Zagorod company provides water supply with Belamos and Grundfos MQ pumping stations.
Belamos Stations
already come assembled with a hydraulic tank and pressure switch. If the station overheats, it automatically turns off.
Grundfos MQ pumping stations
are equipped with a check valve, a pressure switch and a dry-running protection relay. They also have a built-in hydraulic tank, but it is small, so a hydraulic tank of the required volume is usually installed with the station.
How does a surface water pump work?
Surface pumps are divided into several types. Each type is designed to take a specific volume of water. The operating principle of such pumps is similar to each other.
If you need water for watering beds or to fill a barrel, it is better to use a surface pump with low capacity. If you are going to constantly take water from a well, then it is better to opt for self-priming surface pumps.
The operating principle of such pumps can be divided into several stages:
- Installing a pump in a water source: river, lake and well;
- Turning on the pump;
- Taking water from a source through a hose;
- The pump stops if it is raised higher than 8 meters from the water source.
The operating principle of the pump is not fundamentally different from the operating algorithm of other pumps. The principle of operation is the same - taking water from a source and transferring it through hoses to the right place. When choosing a surface pump, consider the purpose and volume of water you want to pump from the source.
Automation for water supply wells
Downhole automation is conventionally divided into three generations:
First generation.
The simplest automation. Consists of a hydraulic accumulator, pressure switch and dry running relay (optional).
Second generation.
Control unit and electronic sensors. A hydraulic accumulator is not required.
Third generation.
Programmable systems allow you to control the pump up to adjusting the voltage supply to the motor.
Read more about automation systems for borehole pumps in our article automation for pumping equipment.
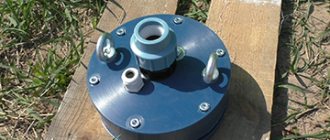
The Zagorod company installs first generation automation. It is simple, but inexpensive and reliable. The devices are mounted through a five-pin fitting (five-pin). The following is connected to the connector terminals:
- Pump.
- Internal water supply pipe.
- Pressure gauge.
- Hydraulic accumulator.
- Pressure switch.
Fig. 13. Scheme of water supply from a well with a hydraulic accumulator
Question! Is it possible to do without a hydraulic accumulator in a water supply system?
Yes, you can. To do this, it is necessary to install the appropriate automation (unlike well pumps, well pumps do not have built-in automation). However, comfortable conditions - with a standard of 20-30 starts - can only be achieved by using a hydraulic accumulator. Without a hydraulic tank, the pump will turn on every time the tap is opened, and the automation will not protect against water hammer.
The pressure switch turns the pump on or off when the pressure changes. At the bottom of the relay there is a metal membrane. When the taps are closed, the pressure increases, the membrane bends upward and moves the spring to a given range. When displaced, the circuit opens and the pump turns off. When the tap is opened and the pressure drops, the membrane returns to its original position. The spring opens and closes the circuit. The pump turns on. If there is water in the hydraulic tank, it enters the pipes and compensates for the pressure drop. The pump does not turn on, its working life is saved.
Do-it-yourself connection of a pressure switch in a water supply system from a well
Fig. 16. Electrical diagram for connecting the pump automation
Draining water from a well for the winter
To drain water for the winter, a drain valve is installed in a caisson. If an adapter is installed, an automatic drain valve is installed on the pipe in the well. Important: when using a surface pump (pumping station), the drain valve is not used.
Fig. 17. Operating principle of the drain valve
Watering tap
You can also remove the watering tap. When piping through an adapter, the tap is removed from the house. If a caisson is installed, then the output is made from the caisson. In summer, the tap is used for watering, in winter - for setting up a skating rink or slide on the playground.
Fig. 18. Removing the watering tap from the caisson
Fig. 19. Removing the watering tap from the house
Practical tips for installing piping around the house
For year-round operation of a water supply system from a well, you should use the following tips:
- The ideal home plumbing is done in such a way as to prevent pipes from passing through the walls of the premises. But, since the lining leads to a significant increase in the cost of the system, the pipeline is laid inside the walls, but using a protective metal cup, which protects them from deformation caused by shrinkage of the building.
- It is necessary to ensure a minimum gap of at least 20–25 mm between parallel pipes and building structures. This will greatly simplify future repairs. If you do not want to leave the wiring in plain sight, you should hide it in pre-prepared grooves, insulating them at the same time.
- If the water supply system is equipped with drain taps, they should be installed at the lowest points of the system so that water can flow through the drain tap by gravity.
- The easiest method for attaching pipes to walls is using plastic crabs. The distance between them should not exceed two meters with a pipe diameter of 16–20 mm; with a larger size, the distance between the fasteners should be smaller. A well-organized and executed water supply system has the following features:
- Has a minimum number of welded joints. This makes it possible to significantly increase the reliability of the units, while a less powerful and therefore cheaper pump can be used to pump water.
- All joints are made in full accordance with the installation diagram for this particular type of pipeline (series or parallel connection).
- Shut-off valves are installed in all important sections of the water supply system.
- Keep a minimum number of unreliable hose connections - it is advisable to connect even the flush tank on the toilet with a plastic tube rather than a hose.
House water supply unit
Entry is made in a technical room or bathroom through a 1” tee and a “1” ½ fitting. Then screw in the gland and clamp the cable. The seal is necessary to ensure tightness.
The input kit is usually three meters (the distance from the tee to the freezing point). In most cases, this is enough even if the house is on stilts.
Water treatment for a private home
Groundwater may contain excess chlorine, iron, manganese, calcium and magnesium. Special filters have been developed to purify water.
A water treatment system is a set of filters with different functions:
- Aeration filters remove iron. It oxidizes and precipitates;
- In filters for mechanical cleaning, large suspensions, sand, and rust particles are deposited;
- Activated carbon filters retain chlorine;
- In ion exchange filters, water is softened;
- pH filters even out the acid-base balance.
Before selecting equipment, you need to determine the chemical composition of the water, that is, find out what it needs to be purified from. It is recommended to immediately do a water analysis after pumping the well. If you buy a water treatment system from our company, we can take the water for analysis. It takes several days. After this, we will select equipment for water treatment. You can do the wiring of the filters according to the diagram yourself; it’s not difficult. We recommend ordering commissioning of the system from us.
Laying water pipes around the house
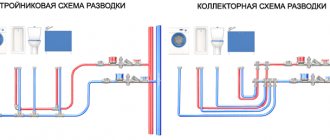
Collector wiring
They install common collectors (combs) for cold and hot water, from which pipes are drawn to each plumbing fixture. Thanks to this, you can use the bathtub, sink and kitchen sink at the same time, without any pressure surges.
Important! There are often errors in diagrams from the Internet. For example, in this diagram, the oblique filter is installed with the mesh facing up. This cannot be done: dirt will not get into the filter, and the pipe will become clogged over time. This must be taken into account when installing yourself.
When to use:
- If there are many water points in the house, you can shut off the water for each point separately.
- If pipes need to be hidden.
This wiring is most popular in cottages from 100 sq.m. made of aerated concrete or wooden frame. In large cottages it is easier to allocate space for collectors, and in the walls and floors of frame and aerated concrete houses it is easy to hide large quantities of pipes.
For collector wiring, pipes made of cross-linked polyethylene or metal-plastic 16 mm are used. Our standard option is a hidden collector distribution with metal-plastic pipes.
Tee wiring
Tee bends are installed on the pipes to the water collection points.
Applies when:
- There is little plumbing in the house.
- If the pipes cannot be laid hidden.
This wiring is cheaper and the system takes up little space. Ideal for houses and cottages with a small number of residents. The peculiarity of this wiring is that if you turn on the water at one water intake point, the pressure at subsequent ones drops.
For tee distribution of water supply, 20 mm polypropylene pipes are used. If there are more than 3 water supply points on one branch, then it is preferable to take a 25 mm PP pipe.
Pipeline installation indoors
- The installation of the pipeline should begin after approval of a detailed plan for its passage through the building and the surrounding area. During its development, you can easily identify difficult areas and carefully work them out in advance, because it is easier to solve difficulties at the development stage than to lay a new trench. In addition, a detailed drawing will make it possible to draw up a more specific estimate, which also contributes to significant savings and reduction of unforeseen expenses.
- When laying a pipeline inside walls in grooves, remember that the cold water pipe must be below the hot water pipe. This prevents condensation from entering and prevents heating.
- Installation of a water supply system begins with laying a cold water line, starting with connecting the pipe to the inlet into the house. After this, it is connected to the hydraulic accumulator, then through a tee it goes to the water treatment system and then to consumers.
- The pipe from the coarse filter is led to the bathroom, where it is connected to the toilet cistern. There it is connected to the system through a tee and an additional shut-off valve, then the water is distributed sequentially among all users. Also with shut-off valves at each drainage point.
- The installation of a hot water supply system is carried out in exactly the same way; the only difference is the presence of a larger number of points for attaching the pipe to the walls to prevent sagging.
- After laying the lines and securely fastening them to the walls, you can begin to install plumbing equipment: sink, shower, washbasin.
- After installing all the equipment, it is highly advisable to perform a pressure test of the entire system and check the operation of the drain.
Hot water supply from a well to the house
To heat water for autonomous water supply, an electric heating boiler (water heater) is used. Such heaters have a storage tank of 50-200 liters. When selecting a water heater, pay attention to the volume of the tank and the power of the unit. The higher the power, the faster the water heats up. Standard power is 1.5-2 kW. With it, 100 liters will heat up in 3 hours.
When installing a boiler, it is imperative to provide for water drainage; for this, a drain valve is installed at the cold water inlet.
If a gas main is laid to the cottage or dacha, then it is beneficial to purchase a gas water heater for hot water supply.
You can also make a water supply from a heating boiler. For example, from a double-circuit gas boiler. But in this option there is a limitation of up to 12 l/s, which is enough if there are up to 3 points in the house where it is supplied. If you need more, you need to use an indirect heating boiler; in this method, you can circulate hot water
Finding water for a well on the site
About a quarter of users complain that drilling did not lead to the desired result. That is, after the drill went deep to a depth of 30 meters, water suitable for consumption in terms of quality or quantity did not appear.
In order not to join the ranks of those who have thrown money away, you need to approach the search for water responsibly. After all, in order to reduce drilling costs, it is necessary that the aquifer lies as close to the surface as possible.
Ways to determine the presence of water:
- Biological signs. Plants can show how deep the water lies. So, for example, cattail grows where water is no deeper than 1 m from the surface, wormwood - up to 7 m, yellow alfalfa up to 15 m;
- dew. The closer the water is to the surface, the more dew will be on the plants in that area;
- silica gel. It needs to be wrapped in cloth and buried to a depth of 1 m. After a day, see how much moisture it has absorbed. The more, the closer the water;
- dowsing A frame made of vines and wire also gives very accurate results and is the most popular way among users to determine the depth of an aquifer;
- test drilling. Gives 100% results, but requires high costs.
Do-it-yourself water supply at home from a well
What will you need for self-installation?
Hot air gun.
If water supply is installed from a well or from a well with a caisson, then the pump is connected through a heat-shrinkable sleeve. To make the clutch seat, it is heated with a hairdryer.
T-shaped installation key.
It is screwed into the adapter with the pump connected. You can buy it at a hardware store for 1000 rubles. or make it yourself from metal or polypropylene pipes.
Mounting key for lowering the adapter with the pump into the well.
You can make it yourself from metal pipes.
L-shaped mounting wrench.
You can also make it yourself from metal pipes. The end must have an external thread.
Bimetallic crown with a diameter of 44 mm.
For drilling a hole when installing a downhole adapter.
Soldering iron (“iron”).
Needed for soldering polypropylene pipes. Average price – 3000 rub.
Apparatus for welding polypropylene pipes.
Press jaws
. Connections through press fittings are one-time, permanent, so they can be hidden under the screed. For installation, special presses are used, manual or electric. Manual press pliers cost about 6,000 rubles, electric ones cost about 50,000 thousand rubles. This must be kept in mind if you plan to install it yourself.
Fitting.
For installation of metal-plastic pipes, crimp or press fittings are used. Compression fittings are tightened with a compression nut. The nut must be tightened from time to time, so the pipeline with such fittings must be visible.
Adjustable wrench.
Required for installation of fittings.
"Swede".
With its help, pipes and other elements without edges are captured.
Sealant.
To seal threaded connections, it is recommended to use plumber's flax and paste (putty), for example, Unipak. Fum tape and other similar materials are highly discouraged.
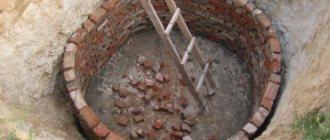
Caisson
There are different options for constructing a caisson: a metal welded box or large-diameter pipe, concrete well rings, brickwork, plastic.
Monolithic concrete on formwork is the most reliable, although complex. It allows you to make a structure of any configuration and depth. You can even install brackets for lowering and lifting into the walls, provide space for a storage tank and freely place all the necessary equipment.
When arranging a caisson, it is necessary not only to take care of reliable protection against precipitation getting inside, it is necessary to waterproof and insulate the walls. The hole can be dug with a margin around the perimeter so that the remaining gap can be filled with a mixture of sand and crushed stone - this will protect the structure, both as drainage and as a means of “squeezing out” in heaving soils.
Installation of plumbing system components
Second step
Install the pump. Deep-type equipment is lowered into a water supply source. Surface pumps are mounted next to a well or well. The pump is installed in a heated room or in a caisson.
Pumping station
Third step
Connect the water pipe to the installed pump. Attach the free end of the connected pipe to a fitting with five terminals.
Fourth step
Installation of a water supply system
Connect a storage tank, a pressure gauge, and a pressure switch to the free outlets of the fitting. The volume of the storage tank can reach 400-500 liters or even more. Thanks to this device, optimal pressure in the water supply system will be ensured. In addition, you can store water in the storage tank in case of unforeseen situations.
Fifth step
Connect a pipe to the remaining free fitting outlet, and then run the line along the pre-leveled bottom of the dug trench straight into the house. You also need to lay a protected cable along the bottom of the pit to connect the pump and accumulator.
It is important that the outlet intended to power the above-mentioned units is properly grounded
Sixth step
Installation of water supply at the dacha
Install a shut-off valve before the pipe enters the building. It will allow you to shut off the water supply if the need arises.
Seventh step
After making sure that the external pipeline is working correctly, fill the hole and begin installing the internal wiring.
Regardless of the chosen source of water supply, it is strongly recommended that the water supply system be equipped with cleaning devices
Perform internal wiring in accordance with the previously prepared diagram. At this point, be guided by your preferences. Do everything so that in the future it will be convenient for you to use the connected water supply.
Installation of internal water supply at the dacha
Finally, all you have to do is arrange water intake points by connecting faucets, appliances, etc.
Financial instruments
In the Russian Federation there are a large number of Federal and regional target programs directly or indirectly aimed at modernizing the water supply and sewerage system.
- Clean Water Program for 2011 - 2021
- “Housing” program for 2011 - 2015
- Subprogram “Modernization of municipal infrastructure facilities”
- Program “Development of the water sector of the Russian Federation in 2012-2020”
- Other federal and regional programs.
Also, at the moment, European financial corporations and banks are actively working on the territory of the Russian Federation, for example, for objects related to reducing the negative impact on the ecological state of water resources, it is possible to attract preferential European loans and free grants from international financial organizations such as NEFCO and the EBRD, as well as European environmental funds such as NDEP, cross-border cooperation programs are actively developing, European and already Russian banks are introducing preferential lending programs and leasing agreements for production modernization projects aimed at reducing energy costs.
The legislation of the Russian Federation, with appropriate justification, makes it possible to temporarily stop imposing penalties for violations of environmental and sanitary legislation of the Russian Federation and use these funds to modernize technological processes.
With a joint, comprehensive analysis of all financial instruments, taking into account their target indicators, as well as a combined approach on the scale of municipal districts when considering the problems of water and sewerage facilities, it is possible to build a comprehensive investment program for the modernization of water and wastewater facilities, which would allow targeted distribution of funding for programs between “Waste and wastewater facilities” and fulfill all the conditions of the Target Programs: ensure the fulfillment of the required target indicators, optimize the financial burden on the municipal and regional budgets, and most importantly, provide the population with quality services in the field of water and wastewater services and give a significant impetus to the development of agriculture and production. See the concept of the Program Distribution Scheme above.
Equipment selection
When the water supply scheme or project is ready, it’s time to start selecting the necessary equipment. If the work is carried out by a design organization, then the project, as a rule, indicates not only the type and performance of the equipment, but also its brand. Very often, the consumer chooses equipment from another manufacturer, which may be more expensive and of better quality, or vice versa.
The most important unit from which the home water supply begins is the pump. It must be chosen from well-known and time-tested manufacturers. One main supply pump is installed directly in the well and creates the necessary pressure in the line. One or two small-capacity pumps can be additionally installed in the water supply system to ensure the operation of various equipment. The pump performance is selected to be 10-15% lower than the amount of water that the well can produce per unit time in order to avoid dry running and premature failure.
The rest of the equipment that will make up the home plumbing is selected based on the best price/quality ratio.
System assembly
After the well and caisson are ready and the storage tank is installed, the water supply system can be assembled.
A check valve is attached to the pump and connected to the HDPE pipe and the power cable passed through the head of the casing neck.
The pump is lowered using a galvanized cable in a plastic sheath attached to an eye on the housing. As it is lowered, every 1.5-2 meters, the pipe and power cable are fixed to the cable with clamps. After the pump has reached the bottom, it is raised 0.5-1 meter and attached to a bracket at the bottom of the head, and it, in turn, is attached to the casing. After 10 minutes, after filling the pump with water, it can be started to test operation.
The pump operation is best controlled using a float sensor in the storage tank. It must be set to two levels: minimum to close the power supply circuit by the pump and maximum to open it.
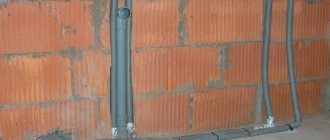
The water supply to the house is laid in a trench below the freezing level of the soil.
A sand cushion is poured onto the bottom, and it is better to wrap the pipe in insulation - glass wool, mineral wool or a foam “shell”. The last option is considered the most reliable and stable.
After the pipe is brought into the house, it is connected to a storage tank. And from it there is already a wiring to the irrigation system and the cold water supply purification system.
Kinds
The main feature of a pressure tank system is the tank, which is placed at a high height and thereby creates pressure in the system. An attic can be used for these purposes, but if one is not available, a pressure tower is built. The container can also be installed on a nearby high hill. In the future, wiring is done from this tank to all water intake points in the house.
The operation of a pressure tank system can be described as follows:
- Water is pumped into the tank from a well or borehole using a pump. The water level in the tank is controlled by a float, which turns off the pump when it is filled, and turns it on again when it is empty.
- The height of the pressure tower determines the pressure in the system. The higher it is, the greater the pressure. This feature allows you to provide water to all water intake points without using a pump in constant mode.
The pressure tank system has several serious advantages:
- Energy savings, since the pump only works to inflate the pressure tank, where its power is used to its full potential.
- Even if there is a power outage, the tank will provide water in the tap. If there is a hill nearby or the house is located on its slope, you can install a large tank, which will make using the hydraulic system as energy efficient as possible.
This system also has its drawbacks. If the tank is located low above the water intake level, the pressure will be low. This indicator is also affected by the number of simultaneously open taps. In such conditions, some household electrical appliances may not function, for example, an automatic washing machine, electric water heater, dishwasher, autonomous heating, etc.
If the tank is located on the roof of the house, then if the automation fails, there is a chance of the building being flooded with water. To reduce damage, an emergency drain system is used, whose operating principle is similar to a drain in a bathtub or washbasin - a pipe is welded at the top of the container; When the container is filled with water to its level, all excess flows into the pipe. They can drain into the garden or sewer
It is important to come up with a system that signals when the tank is full in order to know about a breakdown
The system with a pump and hydraulic accumulator has a feature - constant pressure, which can be adjusted at your discretion. The pump is used in the same way as in the first option, but it pumps water not into a pressure tank, but into a hydraulic accumulator, which serves as an indicator for the operation of the automation. Such a unit is usually called a pumping station. A hydraulic accumulator is a container divided into two parts by an elastic membrane, with gas on one side and water on the other. When the tank is filled with water, the membrane stretches, puts pressure on the gas, it contracts and creates pressure in the system.
Briefly, the operating principle of this system can be described as follows:
- The pump pumps water into the accumulator. When it is full, the sensor turns off the pump. Due to the compressed gas, pressure is maintained in the system, so you can safely use water.
- When water begins to be consumed when the tap is opened, its level drops and along with it the pressure in the system. When the specified minimum is reached, the sensor turns on the pump and restores the water supply in the accumulator.
The system with a hydraulic accumulator has its advantages:
- easier to install and less dependent on circumstances - a large tank at a height, as in the first system;
- pressure can be adjusted at will;
- higher water quality, but this is a double-edged sword.
This system also has its disadvantages:
- more funds are needed for the arrangement;
- higher energy consumption;
- higher requirements for water quality;
- it is necessary to use a filter;
- a pipeline with smooth walls and a more powerful pump are needed to ensure uninterrupted water supply and the required pressure;
- when the lights are turned off, the system does not work;
- if a well is used as a source, it must have a good flow rate - the rate of filling with water, for this reason such a system is often used in conjunction with a well.