Drilling a well is only the first step towards creating an autonomous water supply in the house.
After completion of the main work, the time comes to install pumping equipment, conduct power supply and install a ground structure that will protect the well from the external environment.
An important stage in the final work is to install the well head with your own hands. What is it and is it needed at all? What does the marking on the head mean, how to install it and what is the price of the issue.
When do you need a well head?
Is a header necessary at all? Many people simply cover the pipe with film, a plastic bottle or a piece of rubber.
In fact, this approach is unprofessional and only serves so far.
A well needs a header just like a computer needs an anti-virus program: it may be possible without it, but everyone understands that it’s better with it.
For example, melt and flood waters are a serious threat to the quality of drinking water; they should not flow into the well! It would be possible to secure the water supply by making a high pipe, but if the water goes into the house, it will freeze in winter. Therefore, on the contrary, wells are made in pits and small concrete wells below the freezing level. Such a well can be protected only by tightly closing it.
The head performs the following functions:
- The main thing is protection. Dust, sediment, dirt, melt water, insects, mice, etc. can get into drinking water, and it must be perfectly clean.
- Aesthetic. The well head looks finished and neat.
- Simplifies the mounting of pumping equipment. Everything is thought out, hermetically sealed, and done quickly and easily without the use of welding.
- Increasing the flow rate of a well (flow rate is the amount of water that a well can produce per hour).
When the pump pumped out some of the water, an empty space was created. It must be filled with something and, as a rule, it is filled with air, and water again flows from the aquifer slowly. If a sealed cap is installed, a vacuum occurs, which contributes to the “pulling out” of groundwater.
Maintenance and operation
The installed head at the dacha must be protected from the negative effects of the environment. Especially such measures should be taken when metal is used.
Important! Regardless of the material used - metal, aluminum, polymer sand, plastic, etc. - it is still necessary to protect the lid from negative external influences.
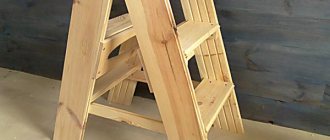
First of all, the structure is protected from sudden temperature changes. For winter operation of the well, you can build a heat-insulating box. It can be assembled from boards or plywood. It must be insulated with foam plastic or other heat-insulating material. You can put straw or dry leaves inside. They have excellent thermal insulation properties.
Device and installation
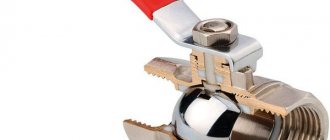
The head is a sealed “lid”. Essentially, two plates with a seal, which provide fastenings for the pump and holes for the hose and wire.
Design
Here are the 5 main elements of the head design:
- Top cover.
- Rubber ring.
- Flange.
- Carbine.
- Fasteners
The top cover contains holes for the pressure pipe and power cable.
The rubber ring is a seal that ensures the tightness of the system. The flange is needed to attach the head to the well pipe. And a pump on a cable is easily attached to a reliable carabiner.
Eye bolts with the rings facing up are useful if the total weight of the equipment turns out to be impressive and installing it manually is problematic. Then the head is suspended by eye bolts from a winch or other auxiliary device and lowered into the well with its help.
A caisson for a well is used to prevent the water in the well from freezing in winter. Caisson - types and installation for a well with your own hands.
We will consider methods for purifying water from iron from a well here.
And here https://aquacomm.ru/vodosnabzenie/zagorodnyie-doma-v/avtonomnoe-vodosnabzhenie/istochniki/tehnologiy-bureniya-skvazhin.html let’s look at the features of water well drilling technologies: rotary, hydraulic drilling and other methods.
Installation
Step by step instructions:
- Prepare the pipe. If the edge is uneven and jagged, cut off the top with a grinder. Clear. It would be a good idea to prime the metal pipe to avoid corrosion.
- A cable is attached to the pump, and the cable is attached to the head with a carabiner.
- An electrical cable and a pressure pipe are threaded into the corresponding holes in the top cover (its other end goes to the pump). There is no need to clamp them yet.
- To make it more convenient to lower all this into the well in the future, the pipe, pump cable and cable are tightened with clamps every 1.5 meters.
- The flange and rubber ring are installed in the well pipe.
- The cable with the pump, pipe and cable are lowered into the well to the required depth. During operation, you need to hold the system by the cable.
- The top cover is secured with bolts (the holes on the flange and the cover must match). They need to be tightened evenly to avoid distortions. The rubber seal should fit into the groove on the cover and flatten slightly. It is important not to overdo it, otherwise you may damage the ring.
- The cable is finally clamped, and the pressure pipe is tightened in the collet chuck.
If the rubber ring is difficult to move along the well pipe, it can be lubricated with scrap or oil.
Well protection from freezing
For year-round use of the well, it will need to be insulated. There are several ways to protect it from winter frost:
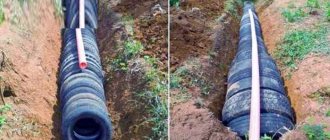
- Place the top of the well inside the caisson. To do this, a hole is initially dug around the exit of the casing pipe, the walls and floor of which are reinforced with concrete, brickwork or timber. A lid is placed on top, which is carefully insulated. The pipe is cut so that its edge is above the bottom of the pit. Only after this the head is installed.
- Insulate a pipe protruding above the ground with the head already installed. This can be done by wrapping it well with insulation and wrapping it with film or burlap on top. You can also build a small heated room around the well, or simply put together a box and fill it with sawdust.
- Another option for protecting wells and street water pipes from freezing is a self-heating cable. It appeared relatively recently, and consists of wires enclosed in an insulating braid. This cable is used in a spiral to entangle the street pipeline and the hose inside the well to a depth of several meters. If the water supply freezes, you just need to plug the cable into the network, and it begins to heat up, defrosting the pipes and hoses.
Main types of heads and their markings
Heads can be attached:
- on the pipe;
- inside the pipe.
In addition, they are made from different materials:
- plastic;
- cast iron;
- become.
Borehole head for use in the warm season
Since the head needs to withstand a certain weight, the first option is applicable only in the case of small-sized equipment (total weight should not exceed 200 kg). Durable cast iron or steel can support any equipment (up to 500 kg).
Marking
The heads are marked with a series of letters and numbers that carry important information about the device.
Example: OS 140-160/40 P. This data is decrypted as follows:
- OS – borehole head;
- 140-160 – diameter of the well pipe (in mm);
- 40 – diameter of the water intake pipe, which can be connected to the head;
- P – the material from which the head is made (plastic).
The last letter for metal heads can be indicated - “Ч” or “С”, but more often they are simply skipped. If there is no “P”, then the material is metal, and which one should be specified in the product description.
Most popular models
| Model | Advantages |
| "Gilex" | They are made of cast iron and plastic. The outer diameter ranges from 90 to 160 mm. |
| "Aquarius" | Due to the plastic filling, this model has certain limitations. Relevant for shallow wells. Capable of handling weights up to 200 kg. |
| Merrill | This is a representative of American production. Made from cast iron and plastic. Sold fully assembled and ready for installation immediately. |
| "Aquarobot" | Russian production. Creates a tight connection. Allows you to securely secure the pump. It is made of plastic and is designed for a weight of up to 200 kg. |
It is important to know! On sale you can find some models designed for a two-pipe or one-pipe system. The choice will depend on the features of your plumbing system.
How to make a well head with your own hands
To make a well head yourself, you need to stock up on:
- sheet of metal (10 mm steel);
- 6-8 bolts;
- thick wire or eye bolts;
- thick rubber or several layers of thin rubber;
- drill or drilling machine.
To cut a perfectly even circle, it is better to use a lathe rather than a grinder. It will also help mark the axes of the holes.
DIY headband
Progress:
- A flange (metal ring) is cut from a sheet of metal. It will fit on the pipe, so the diameter of the internal hole should be slightly larger than the well.
- The top cover (metal pancake) is cut out to the same size as the flange.
- The two parts are folded together, clamped with yews or clamps, and holes are drilled into them.
- Two holes are drilled in the cover: for the cable and for the fitting for the pressure pipe. The fitting is welded.
- If the pump is heavy, you can weld a thick wire loop on top (to make it easier to lift). If the equipment is household and light, this is not at all necessary.
- The pump mount is welded on the inside of the cover (this can be an eye bolt, a wire loop or a hook).
- A ring is cut from rubber exactly to the size of the flange.
- The depth of the well is measured. The length of the cable is selected (the pump is a meter from the bottom).
- All parts are attached: cable, pressure pipe, wire.
- Every 1.5 m, tighten the cable, pipe and wire with electrical tape or plastic clamps.
- The rubber seal is located between the flange and the cover. Everything fits onto the pipe.
- The three parts are evenly bolted together.
This design will be maintained due to the fact that the rubber plate will increase in size, and the weight of the pump will pull down.
Tips and useful video
Finally, we will give some tips regarding equipping a well with a head.
- Before purchasing, carefully determine the technical parameters of the device. Measure the diameter of the casing, the depth of the well, and calculate the approximate weight of the pumping equipment with cable and hoses.
- When installing the head yourself, carefully follow the device assembly algorithm.
- If you plan to use the source in winter, you need to take care of its insulation in advance.
As you can see, installing the head with your own hands does not present any technical difficulty. It is quite possible to produce it even for a person whose occupation is far from technology.
What else needs to be considered
- The cable for attaching the pump can be made of high strength polymer or stainless steel. A regular cable cannot be used. Sooner or later it will rust and may break.
- Borehole pipe inclination . You need to check the pipe for verticality before purchasing a pump. If the device is equipped with a centering sliding bearing (and most manufacturers in the CIS and Chinese countries install it), it is not suitable for a pipe with an angle - it will simply break. There are usually no such problems with European models.
- Pump fork . To thread the electrical cable into the head, you need to remove and then reassemble the plug. If it is collapsible, no problem. But if the plug is solid, cutting the wire will void the warranty on the pump!
So. Factory-made heads look solid, securely fix all elements and cost from 2 to 4 thousand rubles. When starting to create a homemade version, you need to take into account that it is not so easy to make connections, especially electrical cables, airtight. A skilled craftsman can do everything, but the costs may not be justified.
Drilling a well is an expensive undertaking, but if you need a shallow well, you can handle drilling it yourself. For this you need a special tool. How to make a hand drill for a well yourself and how to use it? Read on.
We will consider the main characteristics of centrifugal pumps and the principle of their operation in this article.
Design
The standard head is equipped with the following components:
- Lid. It is a disk with edges protruding beyond the inner ring. The edges rest on the end sides of the casing pipe. In the center of the cover there are holes for fastening a plastic pipeline, bolts and an electrical cable that powers the pump in the well.
- Flange. A ring with holes for mounting bolts that fits over the casing. Fixes tightly with the lid.
- Carbine. Secures a cable with a pump suspended on it.
- Seal. A simple round rubber ring fits under the cap, seals the joints and restrains the movement of the head on the pipe.
- Eye bolts. Fasteners with ring heads designed for the installation of large heads and pumps.
- Cable entry. In this case, a thermal coupler is used, which isolates power from the surface of the cover.
- Collet clamp. This piece of equipment is located in the center of the head and serves as a fixator for the casing pipeline.
- Terminal box. Used as an addition to the product. Electrical wiring is attached to the block, connecting it to the network electrical wire stretched from the house.
- Fastening bolts. The products clamp the lid, flange and seal for a stronger fixation.
Kinds
Today it is easy to find several categories of well heads on the market.
Their device is almost the same and consists of a flange, a cap, and a rubber ring. The difference lies in the material that was used to create the head, as well as in the additional operating properties of this part. First of all, the difference between metal types and plastic lies, at a minimum, in the weight of the equipment that is suspended. A plastic head can withstand a weight of up to 200 kilograms, and a steel one - up to half a ton. When choosing a head material, you should take into account the depth of the well, as well as the weight of the equipment that will be attached to it.
For example, for wells whose depth does not exceed 50 meters, the weight of the equipment will not exceed 50–100 kilograms. At the same time, for deep wells, in which it makes sense to use a powerful pumping unit, as well as several tens of meters of steel cable and wires, and the total weight of the equipment can exceed a quarter of a ton.
The well head also has a number of options, because manufacturers are trying to maximally satisfy the requirements of all their clients. For this reason, well heads are equipped with the following parts:
- eye bolts;
- cable entry, which is necessary for the electric drive;
- a fitting for the pipe from which water will fall;
- a set of carbines;
- bolts for fastening.
Now some elements are worth talking about in detail.
- An eye bolt is a regular bolt, the upper part of which is made in the form of a ring. These elements are usually used for hanging equipment, attaching cables, and so on. As a rule, they are placed on the head so that the lid can be lifted easier and from below so that the pump can be suspended.
- A cable gland is an excellent thing, the presence of which virtually eliminates the possibility of accidental damage to the electrical cable. As a rule, such an input has a special spring, which provides reliable fastening and allows us to say that the head is sealed.
Plastic
Plastic well head.
The advantages of this type of plug include the presence of a removable area in the top cover. It allows you to move the pump into a water-bearing well without removing the fastening elements. In addition, plastic products are equipped with a terminal box through which electrical wiring is connected.
Metal
This type of device is resistant to temperature changes, has high strength, and has a long service life. At the same time, these elements are susceptible to corrosion. Before use in a humid environment, products are coated with anti-corrosion agents.
Metal head for a well.
The following metal plugs are available on the market:
- cast iron;
- steel.
Steel models have a simple and reliable design, but if the protective coating is damaged, they quickly rust. Their cost exceeds the price of polymer analogues.
Cast iron devices are characterized by their large mass. The anti-corrosion properties of the material are imparted by a zinc or galvanic protective layer. The disadvantage of the products is considered to be low resistance to impact. In terms of price, cast iron products are comparable to steel samples.
Both types of plugs are used when constructing deep wells. The maximum weight of the equipment can be 500 kg.
Buy or make your own
The well head is selected in the store. Standard models are offered, the installation of which is carried out according to the instructions. Products are made from plastic, steel or cast iron material.
The do-it-yourself well cover is made from the following materials: stainless steel or aluminum.
Each option must be airtight.
Professional and homemade designs have advantages and disadvantages:
When making it yourself, you choose available materials. When purchasing, you can choose products made of metal or plastic
The metal well cover is durable, and the plastic elements are corrosion resistant. When creating a structure on your own, it is recommended to pay attention to the tightness of the product. In professional production, the reliability of the element is tested. A do-it-yourself well head has the advantage of a low price. The disadvantage is errors during the creation and subsequent maintenance of the device.
Instructions on how to make your own well head
The cost of a purchased product is formed from several components: material, manufacturer, casing pipe size and seasonality. These products become more expensive during the summer season.
Installation technology
The installation process itself is carried out without difficulty, since there is no need for welding. But the work must be done in stages.
The head should be mounted using special technology
Namely:
- The first stage is to prepare the upper cut of the siege pipe for installing the head. To do this work, you need to clean the top edge of the pipe and its side walls from all kinds of dirt and rust. And then coat the pipe with a primer and thus protect it from possible corrosion.
- The second stage consists of unwinding the head into the main parts and then putting it on the pipe. When performing such work, you must make sure that there is a gasket on the lower and upper flanges. It should fit into its groove with force. To make it easier to put on the gasket, you can use solid oil.
- After this, fastening elements for the equipment are attached to the cover. To prevent them from corroding, it is better to install eye bolts and pipes made of plastic for these purposes, and the cable for securing the pump should have an anti-corrosion coating.
- At the last stage of installation, it is necessary to lower the pump with a winch and connect the flanges. To do this, bolts are used, which must be tightened one by one.
But with such tightening, it is important to know when to stop and not overtighten the bolts, as this can lead to breakage of the plastic, which will damage the casing structure.
Installing a well head is not a labor-intensive task. If you follow all the rules, expert advice and adhere to technology, then you can install such a device yourself. But you still need to first get acquainted with the basic nuances of installation.