A DIY stepladder made of wood is a functional, lightweight and mobile ladder that will not be superfluous in any household. With the help of a stepladder, you can easily do both repair work (paint the ceiling or walls upstairs, glue wallpaper) and perform household tasks - replace a light bulb, clean the mezzanine, wash a chandelier.
If necessary, you can take a folding stepladder with you to the dacha to collect crops from trees or carry out other manipulations that require a stable, high stand under your feet.
DIY stepladder made of wood
Assembling a stepladder yourself is not difficult, especially if you choose wood as the material for manufacturing. The main thing is to understand the principle and basic nuances of making a folding ladder, and then you can make a stepladder according to your size and needs.
Drawings and dimensions of parts
Before constructing a step-stool with your own hands, you need to study in detail the drawings and dimensions of the future craft. There are several types of this design:
- transformable chair;
- high step stool;
- ladder chair;
- step stool with a spiral module.
The first model is a transforming chair. When it is folded, it cannot be distinguished from a simple chair with a backrest. To make a stepladder, you just need to lay out the elements of the product. If this chair is well designed, it will look beautiful in different interior designs. If the stepladder has an unfolded or folding appearance, then it will consist of three steps.
The second model is a high step stool. In its design, it has a high chair and a retractable module, which, if possible, can be pushed under the seat of the stool. A variation of the step stool is the ladder chair. It comes with or without a back.
There is another type of step stool - a stool that has standard dimensions. From under the seat of this stool, steps can be pulled out in a spiral. This chair has many functions; it is unusual in its appearance both when unfolded and when folded. If you need to make a transforming chair, you must first develop a diagram. It is possible to use prepared drawings with dimensions or to make drawings yourself, having examples of constructing a suitable model.
If you rely on the standards, then the seat should be located no less than 41 centimeters from the floor. The base of the stepladder chair should be at least 41 centimeters deep. Now you need to decide on the height of the structure. You can use the standard characteristics or add 11-16 centimeters on top. To make the product more stable, you can use a wide base.
All drawings of a step-chair indicate the dimensions of the following parts:
- front and rear sides;
- strips for the back of a chair, seat, steps, etc.;
- supports that fold either sequentially or smoothly.
The future design must have at least 3 steps. The dimensions of the legs should guarantee the quality of the product in various positions. The shape of the supports is similar to the letter “A”, since the planks should be located in an inclined position and connected by a crossbar. In order for the structure to be stable, you need to know that the angle of inclination of the frame and legs is 80 degrees. The steps should have a distance between each other of no more than 21 centimeters so that the stepladder chair can be used comfortably. The design has a seat that should be divided into 2 parts, the division is based on the placement of the central supports.
Once the dimensions of the model and methods of fastening the parts have been determined, the diagram must be transferred to a piece of paper with millimeter markings. It is necessary to carefully draw all parts of the product and follow the order of installation of the parts. Having all the relevant sketches, you need to prepare a pattern for the blanks. Using carbon paper, you can transfer the image of the future structure onto a piece of plywood or wood.
Building a classic version of a step stool
In order to make a transformable stepladder chair with your own hands exactly according to the drawings, you will need a minimum set of power tools:
- Jigsaw with a set of saws for wood;
- Manual electric router with 25 mm and 30 mm end mills;
- Drilling machine or drill with a device for precise vertical drilling;
- Polishing machine with wood attachment;
- Screwdriver;
- Set of carpentry clamps.
Since this design, in addition to the functions of a staircase, will also be used as a piece of furniture, it is best to choose a design with elements of carving and decor.
For the most part, a step stool will be used as a piece of furniture, so it makes sense to make it as beautiful and attractive as possible. In this case, decorative elements are practically not used; windows are made on the sidewalls in order to make the structure lighter and give it a more elegant look.
Structurally, each part of the step-chair consists of two sidewalls, between which four transverse steps are glued. One of the steps serves as a seat, the rest are used only for climbing stairs.
Initially, you will need to transfer the contours of the side posts of the stepladder chair to the boards. This can be done in two ways. In the first case, the contours are transferred by drawing lines using carbon paper. The second method allows you to do the work much faster - you can simply print out the outlines of the parts of the future step-chair and stick the paper on a wooden blank.
At the first stage, you need to make longitudinal grooves or cuts on each side of the large and small parts of the step stool, as in the photo. The grooves must be made for two reasons: firstly, they will be necessary for further processing of the workpieces. Secondly, the step boards will be inserted into the grooves. If you fasten the steps only with self-tapping screws, the rigidity of the step-chair will be very small, and the entire structure will quickly fall apart under the weight of a person.
Next, you need to make several through holes with a drill and cutter, preferably at the corner points of the internal contours. This must be done in order to be able to cut out selections along the openwork thread with a jigsaw.
Following the inner contours, we cut out the outer lines of the sidewalls in the same way. After all four sidewalls have been cut out, two for the larger part of the stepladder chair and two blanks for the smaller one, you will need to calibrate the dimensions, as in the video
https://youtube.com/watch?v=oQq1OMXHA1Q
To do this, two side blanks are folded in pairs and cut on a router. This allows you to make both elements of the step-chair absolutely identical in shape and size. At the same time, we remove chamfers and burrs, and treat the surface with a grinding and polishing attachment.
The steps for a stepladder chair are best made from oak boards, 15-20 mm thick. For the large swivel part of the chair, you will need to make three steps, all three of different sizes. For the smaller stationary part, you will need to cut two steps, also of different sizes. The step blanks, cut to size, are carefully glued to the sidewalls. To do this, you need to coat the gluing areas with wood glue or epoxy glue and insert the blanks into the grooves. To maintain the geometry of the step-chair, gluing is best done with fixation in carpentry clamps.
After the glue has dried, the steps of the step stool must be reinforced with carpentry screws. At this stage we have two small structures, one looks like a short chair, the second looks like a stool. To make a full-fledged folding stepladder out of them, you need to connect the two parts with a furniture or piano hinge.
Attention! To ensure that during use the vertical load on the step-chair does not deform or tear off the hinge fastening, special stop pins are used in the design.
The last element of the chair is the back. It must be made and a stepladder installed on the chair without fail. Otherwise, the front supports of the ladder will be unstable and will quickly fail.
The step-chair is almost ready for use; you need to finish the exterior with stain or varnish.
The result is a nice design that can not be hidden, but rather installed in the kitchen or hallway, where there is always work for such devices.
Design Features
Since you are planning to make a stepladder yourself, you must first consider the design of such a staircase. At its core, this is a more advanced model of an attached design. Its type and purpose may vary. The simplest stepladders are only suitable for reaching the upper tiers, but nothing more.
There are more advanced models. For example, if you are going to make a stepladder, there is no better option than a transformer. It can be used as a folding ladder or a regular ladder. The transformer also has a spacious upper platform, which serves to provide convenience for construction work at height, that is, it plays the role of a scaffold.
The undeniable advantage of a stepladder is that this design is very compact at its level of convenience and ergonomics. That is why it is so successful to this day.
The design of the stepladder is essentially two connected ladders
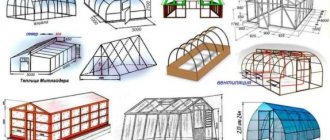
Typical drawings of various stepladders
The examples discussed above and the recommendations outlined will allow you to independently calculate the dimensions of a stepladder and understand the technology of its production according to any scheme.
How to make it yourself
Making furniture requires some skills when working with tools, the ability to work with drawings, and know the basic requirements for the quality of work performed.
Required tools and materials
To make a wooden product, you need available tools for cutting, sanding, drilling, fastening, and painting. A set of tools for carpentry work:
- hacksaw;
- Sander;
- screwdriver;
- hammer;
- electric drill;
- paint brushes;
- clamps.
If the design contains parts with a complex configuration, then you will need a jigsaw. The presence of an electric jointer and a circular saw makes carpentry work easier and improves the quality.
Consumables (adjusted depending on the model):
- drill;
- wood glue;
- self-tapping screws;
- screws;
- dowels;
- sandpaper;
- varnishes and paints;
- loops.
The choice of solid wood depends on the preferences of the manufacturer.
You can make a wooden step stool from the following types of wood:
- pine trees;
- birch;
- linden;
- acacia;
- nut;
- oak;
- beech
The most budget option is to use multi-layer plywood. A sheet thickness of 2-3 centimeters can withstand a weight load of up to 80 kilograms.
Preparatory work
You first need to decide on the type of product, find or make a detailed drawing yourself, which indicates the dimensions and number of parts.
Based on the project, a calculation is made:
- by the amount of wood;
- Supplies;
- components.
The manufacturing technology and the tool required for this are determined.
Procedure
According to the drawing, you can prepare patterns for the figured parts of the staircase furniture.
Sequence of operations (can be adjusted depending on the selected step stool model):
- The necessary parts are cut out from solid canvas or blanks.
- The blanks are sanded, including the ends (for plywood cutting, the edges are cut).
- Carpenter's glue is applied to the ends of the step blanks, joined and secured in clamps until completely dry.
- Markings are made on the legs for drilling holes for fastenings.
- Drill holes for connections.
- They do the assembly.
Assembly begins with the guide sides, to which the legs and steps are attached. The top step is installed last.
An example of manufacturing a stool with a screw module
Unedged boards or used building materials are used as the starting material. The surfaces of the boards are leveled on a machine and cleaned of deposits. Markings are made for sitting and cutting. The inner edges of the parts are treated with wood glue, joined into one mass and clamped with clamps. After drying, the canvas is sanded on all sides and ends.
The legs for the seat (4 pieces) are cut according to patterns or markings. Polished. Then two drawers (plank connections for the legs) are cut. Connect the drawers with the legs: glue and with self-tapping screws (2 per leg). The seat is attached to the drawers with self-tapping screws (8 pieces on each side). The main frame is ready.
The legs of the steps are cut in pairs of different lengths. Grinding. They are connected with drawers: long with short (with screws and glue). Holes are drilled in the short legs to install hollow wooden tubes. The crossbar is installed and secured using recessed screws.
The short legs of the step are attached to the legs of the stool using self-tapping screws screwed into hollow tubes. The height at which the short legs are connected to the legs of the stool should match the height of the long legs of the step. Two lower drawers are installed on the legs of the stool. The product is ready for finishing.
When the product is completely ready, the decorating process begins. The corners at the ends of the legs, seats and crossbars are first cleaned with sandpaper. Depending on the texture of the wood, the surfaces are tinted and varnished in 2-3 layers. Make sure the varnish is completely dry before applying the next coat. The plywood is painted with oil paint in 2 layers and varnished.
Required tools and materials
Before we start talking about the necessary tools and materials, let’s say that the list of necessary things will vary depending on which option it was decided to implement. That is, it may happen that the materials needed to create a wooden version will turn out to be completely useless if a steel ladder or stepladder is made from polypropylene elements.
If it was decided to make a stepladder from wood, then to implement the idea we will need a hacksaw for working with wood, which will have a tooth thickness of about 3 millimeters. In addition, you need to have a screwdriver, medium-grit sandpaper, drill bits and a hammer on hand. It should be said that ordinary drills will not work. You need special ones for wood, with a diameter of 3 and 12 millimeters. Their peculiarity is that the length of the part for work will be 0.5 centimeters. Self-tapping screws are used as fasteners and must also be made for wood. You also need 4 bolts of the M10 model, the length of which is 1.2 centimeters.
Before forming such a thing from wood, you should prepare specially designed chains with a length of at least half a meter, which will then turn out to be a kind of clamp. Each link should be made of 1.5-2 mm thick wire, and the length of the link itself should be no more than a centimeter. And you will also need 4 semicircular staples to secure the chain.
In the case of another design, we will need to have on hand:
- hammer;
- drill;
- tape measure for taking measurements;
- saw.
In addition, you will need wooden blocks and so on. But also when implementing the metal option you will need:
- metal profile;
- metal pipes;
- rubber pads on steps;
- loops;
- shoes;
- rubber feet;
- Bulgarian;
- welding;
- square;
- electric drill;
- marker;
- hardware fasteners;
- belts;
- tray.
And you can find out when you have such a thing as drawings on your hands.
Types of stairs that can be made from profile pipes
Profile pipe is the most durable material for creating frames for buildings of any type, including stairs.
From the profiles the following are performed:
- A flight of stairs is a structure of two beams located at the same level, on which steps are installed. Beams or stringers support the steps from below. The staircase can be single-level or two-level, when it consists of two rows in one flight.
- Spiral staircases consist of one stringer, around which steps are attached, secured on the other side with railings. The complex design is steep and not very convenient, which few people can decide to do on their own.
- Bolts - stairs, the steps of which are attached to a solid wall with bolts or bolts. In this case, only one stringer beam from the profile is used.
- A stepladder is an attached mobile ladder for performing certain tasks: performing any actions at a certain height. Such a ladder should be stable and, preferably, light, so that it can be easily moved to the right place without exerting extra effort.
Types of stepladders
The stepladder can be one-sided, or it can be made of two parts. Stability in the first case is achieved simply by the wall, which serves as a support.
In the second case, the stepladder does not need support; both parts are installed at a certain angle of inclination and fastened together with a canopy that holds both parts. In addition, for fixation, the ladder can be secured with an additional belt, which prevents the parts from changing the angle of inclination, i.e. moving apart. Both parts can be the same, or one of them can be made simply as a support, without steps.
The first type is the simplest ladder, consisting of two parallel supports, between which rungs are attached. This device is lightweight, although it is quite durable and quite simple to make. A double-sided stepladder is not much more complicated, so making such a structure with your own hands does not seem difficult.
Preparing to make a stepladder
A folding stepladder may be needed for various purposes. If you are assembling a ladder for use in a garage, some utility room or for a large house, then its dimensions should not be small. It is worth considering that a person must not only reach the top point he needs, but also be able to freely do the work. Accordingly, the first thing you need to do is calculate the height of the future structure.
The optimal height for a regular household stepladder is about 1.5 – 1.7 meters. Taking into account the average height of ceilings in houses and apartments, an adult will be able to reach the very top, even standing on the penultimate step.
Don’t forget to add the average height of a person to the height of the stepladder
If you plan to reach higher from a stepladder - for example, to the tops of fruit trees or the roof of a private house, then the recommended height of the ladder should be from 2.5 to 3.5 meters. It is not advisable to make a longer stepladder - the product will turn out to be bulky, and the excess consumption of materials will cost a pretty penny.
Examples of the height of stepladders and the number of steps in them
Another important parameter that needs to be calculated is the tread. A tread is the width of one step. For ordinary stairs used in an apartment, the tread can be made within 25-30 centimeters. If the stepladder will be used for repairs, or for harvesting or regularly lifting and lowering loads, it is better to increase the tread to 30-35 centimeters. Please note that a stepladder needs steps not so much to climb them, but to perform some actions at height, so the support should be as wide as possible.
Mini stepladder with comfortable steps
As for the length of the steps, it changes for a stepladder - the higher the step, the shorter it is. The classic design is assembled according to the principle of a truncated pyramid. We recommend making the longest steps about 55 centimeters in length, and the top ones – 35 centimeters. Such parameters will be enough to make it convenient to both climb and descend the stairs.
The last nuance is the number of steps. You can decide this yourself so that you can feel comfortable using the stepladder. Typically, a distance of about 20-25 centimeters is maintained between steps. You should take into account the overall height of the stepladder and the angle at which its “legs” will move apart—the steepness. If the whole number of steps does not fit, then the interval between the penultimate step and the working platform must be reduced.
The final product should be comfortable, first of all, for its owner
Manufacturing instructions
As noted, the procedure for making a stepladder directly depends on the type of material chosen.
Made of metal
To create a metal folding ladder, you need:
Cut a metal profile with a cross-section of 20x40 millimeters into 4 equal sections, from which the support posts will be made in the future. Drill holes at equal distances on the sides of the guides for fastening the steps. Cut metal steps of appropriate length. Attach the guides like a wigwam using metal hinges. Using bolts, secure the steps to the guides. To increase the strength of the structure, it is recommended to weld each part to the support posts
At this stage it is very important to maintain the level of the steps.
At the end of the process, you also need to secure the limiters, as indicated earlier.
Made of wood
To make a simple folding ladder, you need to prepare bars of the following sizes:
- 2 meters - 4 (for support);
- 59 centimeters - 2;
- 50 and 50.4 centimeters - one each;
- 45.5 centimeters - 1;
- 41 centimeters - 3.
You also need to prepare 2 fastenings with loops. After this you need to do the following:
- Apply markings to 2 support posts at a distance of 40 centimeters. The lower step must be mounted at a distance of 10 centimeters from the floor.
- According to the applied markings, cut grooves on the support posts.
- Cut tenons on the edges of the bars that will be used as steps.
- Insert the tenons of the steps into the cut grooves and secure the parts with self-tapping screws or nails.
- The two remaining supports are connected to each other by planks, which are fastened in the form of the letter Z (two planks are installed horizontally, and the third is installed at an angle to the first).
- Connect both support structures together using metal hinges or other mechanism that allows you to fold and unfold the stepladder.
At the end of the work, it is recommended to attach rubber pads to the legs, and treat the entire structure with an antiseptic and varnish (paint).
Wood selection and preparation
Separately, I would like to say a few words about wood
It is very important to think in advance what the wooden staircase should be like. After all, the quality of the wood used, its thickness and the degree of additional processing will depend on this.
Therefore, you need to make a sketch of the stepladder.
The thickest pieces of wood should be on the side strips. The planks are a little thinner, but larger in width it is advisable to use them as steps. In this case, all wood must be qualitatively treated with special antifungal compounds and drying oil. This way the stepladder will last much longer.
If you need a decorative small wooden staircase for your home, which will stand in a visible place most of the time, then you need to make sure that all the wooden elements used are the same color and do not have any roughness or nicks.
Finishing of the product
To make a step stool comfortable to use with your own hands, you will need to perform surface treatment. Requires grinding, priming and puttying of elements. Plastic or wooden plugs that match the design are used as plugs for self-tapping screws.
The product must be decorated; decorative finishing is done with paint and then with translucent varnish. It is recommended to apply at least 3 layers. After each protective coating, the product is thoroughly dried.
To create a bright decor, you can use paint in contrasting shades for the seat and back. Translucent varnishes are optimal for products with a classic design or decorated in the English style. A stepladder chair for Provence style rooms must be painted with a white color. Designs for a country-style apartment do not require careful processing and can be rough; you only need to emphasize the beauty of the wood with the help of clear varnish.
Stages of work and their features
DIY folding chairs made of wood: drawings and job description
Scheme of a wooden stepladder.
Before you start making a stepladder, you should sketch out a rough sketch for its manufacture. You need to put all the dimensions on it at once. Only a highly qualified master can afford to work without a sketch. You should not think that a stepladder with your own hands is an object that requires a superficial attitude. Firstly, the safety of those working at height depends on it, and secondly, it is very convenient when you don’t need to constantly measure workpieces, you just need to look at the sketch.
Next, the wood is cut. You will need 4 pieces, each 175 cm long. Basically, the length is determined by the height of the work being done: if a stepladder is needed in the garden, then you should proceed from the size of the trees, but you can’t climb it too high either, other means will be needed. To work on the roof, a type of ladder called a ridge stepladder is used. It is distinguished by the fact that the second half of the folding bed is thrown over the roof, and bars are nailed to the tops for stability.
Then the stair blanks are cut with a grinder. It is better to use a metal profile for this rather than round elements, again for the safety of the worker. A foot on a flat profile will be much more stable than on a narrow cylinder. The blanks should be in the same quantity for both sides of the stepladder - factory ones are made only on one side, but this model will have two working ladders. This is convenient if the work requires two people or hard-to-reach places need immediate access.
Drawing of a stepladder with dimensions.
The length of such elements depends on the distance between the long side bars. The upper ends should be 40 cm apart from each other, and the lower ends should be 60 cm apart. You should get two pieces 57, 52, 47, 42, and 37 cm long. That is, the distance between the steps is approximately 27 cm.
Then holes are drilled in the long elements according to the diameter of the steps if the elements are round, and metal corners are attached for flat ones. The drilling depth should not be less than 2 cm. In the same way, holes for the knitting needles are made slightly lower. Then the structure is assembled without the use of bolts in order to see all the flaws and correct them immediately. All elements are processed, because the material may be damaged by mold or mildew.
Assembling stairs. To do this, epoxy glue is poured into the recesses, and round steps are driven in with a wooden hammer. Then, using fasteners, the spokes are mounted, which are tightened with nuts on both sides. The profile steps are secured with a wrench. After assembly, the glue takes time, so the blanks are put aside for a day. If the installation went without it, then it’s time to start working on the plates.
One part of the elements is attached to the tree, and then the metal ears of the structure are fastened together so that it can freely fold or open. Plates from the mechanism of an old sofa are perfect for this task.
Types of stepladders.
Next, you need to take care of your own safety - the metal chain is cut into two parts with scissors and screwed at the ends to opposite elements. It will prevent the stepladder from unfolding completely if the legs begin to slide along the surface. Naturally, this is done at the bottom of the stairs. The owner will decide at what distance, but usually this is the length of the entire chain, that is, when unfolded, the legs form a regular square with a side of 60 cm. It is advisable to “put shoes on” the legs, otherwise there is a risk that the ladder will slip on a particularly slippery or wet surface. Installation is complete.
For storage, you can soak it with used machine oil so that the ladder intended for garden work can stand all winter untouched by mold or mildew.
Main types of stairs
A stepladder is a ladder that can stand on its own using any suitable support (a wall, for example).
The stepladder can be one-sided or two-sided. The structure has a frame to which the steps are attached, and the additional elements that the stepladder is equipped with are handrails and legs.
The height of such a structure made from a profile pipe is calculated by determining the interval between the floor and the last step. The calculation is made based on an interval of 20-25 cm. Due to the presence of various functional features, a stepladder can be:
- Classical;
- Universal;
- Transformer.
Designs belonging to the universal type combine the functionality of a regular ladder and stepladder.
The frame of such products can be folding or telescopic. The presented stepladder has a frame consisting of several sections, with each section consisting of 5-7 steps.
Telescopic structures differ in that their sections can be pulled out gradually. They are fixed using special latches or hooks.
The transformable stepladder can work in several positions. Such products made from profile pipes are very compact, lightweight and can easily fit even in the trunk of a car.
Almost finished stepladder
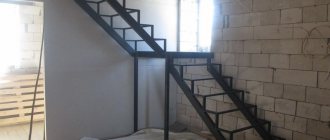
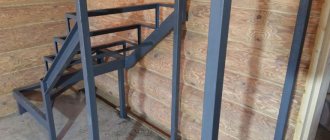
The frame of staircase products is assembled using metal profile pipes that serve as load-bearing posts; the steps can be made of wood or a material less durable than the frame.
All connections of the structure made of profile pipes are connected to each other using bolted connections.
This allows, if necessary, to quickly replace any damaged element. Some stepladders made from metal profile pipes can be made non-removable - welding is used to create them.
It is worth noting that the most common and practical material for creating the structures described is aluminum or duralumin alloy. A finished staircase, assembled with your own hands, will have the following advantages:
- ease;
- reliability;
- ease of use.
How to extend the life of finished products: protection features
To make a wooden step stool resistant to external influences, the product should be impregnated with a special composition - stain. This product acts as an antiseptic, prevents rotting, as well as the appearance of mold on the surface of the wood.
To protect wood, stepladders use stain, paint, drying oil, and other antiseptic impregnations.
On a note! Structural elements should be treated with stain before assembly. This will make it possible to significantly extend the service life of the product.
First of all, the wood must be treated with an antiseptic impregnation, which will provide reliable protection against rotting and create a film with a water-repellent effect. The optimal solution is varnishing. In this case, it is better to try not to touch the attachment points. As for paint, it will not always be appropriate, but will only be suitable as a last resort option. If everything is done correctly, the stepladder will delight you for many years.
Based on the above recommendations, we can conclude that getting the product into working condition is not at all difficult. Using exactly the same principle, you can construct a stepladder from a profile pipe using a drawing with your own hands. The difference between it and a wooden staircase lies only in the materials, as well as the devices necessary for the work and the method of connecting the parts of the structure.
Thus, making a ladder or step stool with your own hands, the drawings of which have been prepared in advance, is not difficult. The main thing is to take into account all the existing nuances of the further operation of the structure and correctly select the dimensions of all parts. Above are methods for manufacturing several of the lightest and most accessible products for design. By creatively approaching the process of processing them, you can get an original and incredibly beautiful design.
Fishing chair on three legs
An original three-legged stool can be easily made from the following parts:
- three round leg rods (length about 60 cm);
- a triangle made of thick leather or dense fabric;
- Mounting screws (one loop, the other long);
- three locking washers and three finished washers, as well as two nuts.
Preparing parts and assembling the chair is carried out in several stages:
- measure 25 cm on the bars and drill and also make holes in the top cutouts to support the saddle;
Tip: If you don't have round stones to make chair legs, cuts from a shovel or other gardening tool are ideal.
- On the leather part we punch holes in the corners, and on the canvas seat we finish the corners with metal blocks;
- Attach the two legs with a long bolt and insert a second eye bolt between them;
- Fix the third leg with the intermediate bolt and adjust the tension so that the tripod can be folded down easily;
- Screw the prepared seat piece to the upper ends of the legs;
- Attach a long strip of leather to the chair so you can carry the folded product over your shoulder or attach it to a backpack.
Having mastered the manufacture of a folding chair for fishing, you can begin to create a more complex model - an armchair or a comfortable chair with a backrest.
How to make a boat chair with your own hands. PVC Watch the video, okay?
Page 4
When it comes to children's furniture, first of all it is necessary to take care of comfort, reliability, durability and safety, including environmental protection.
The best thing is a wooden high chair. Of course, the modern wooden chairs on offer are of great value if they are made from truly valuable and high-quality wood.
Why don't you make your own baby chair? This article will help you choose the best materials for chairs, get detailed instructions and recommendations for making and decorating them.
Making a wooden stepladder for the home
A stepladder is a tool that is needed quite often: both for gardening work and for repairs. It’s even more convenient to screw in a light bulb while standing on the stairs. Today it doesn’t seem like a problem to find drawings of a stepladder, then look at a photo of the finished structure, and also pick up a video with detailed instructions.
How to make a stepladder?
Why made of wood? Still, this is the most accessible material and working with it does not require a large number of special tools. The only drawback of a wooden stepladder is the significant weight of the structure. Although, if you look at it from the other side, the stability is much better.
Preparing to make a wooden stepladder with your own hands
To begin, you should find the following materials and tools:
- two boards, one 6 meters, the other 3, 15 centimeters wide and 5 thick,
- metal corner - 2 pieces,
- two bolts and nuts for them,
- twelve wood screws,
- Circular Saw,
- plane (preferably an electric plane - the work will go faster),
- drill,
- knife,
- roulette,
- axe,
- hammer,
- mallet,
- nails,
- awl,
- marker,
- square,
- hacksaw.
Having prepared all these tools, you can sketch out a drawing, look at photos of each stage and start building a stepladder with your own hands.
Manufacturing of structural elements
To quickly and correctly make a staircase with your own hands, you need to develop a drawing or at least a sketch of it.
To work you will need:
- Wood hacksaw,
- Meter ruler or tape measure,
- Square,
- Electric drill,
- Locksmith's hammer.
A wooden stepladder is made with your own hands in the following sequence:
- Four elements for the bowstring are cut from the timber. Two - for supporting the steps, two - for the supporting part of the stepladder,
- Grooves are made on two bowstrings, the depth of which is 2 cm and the height of 2.5 cm across the entire width of the beam. The center of the first upper groove should be located at a distance of 12.5 cm from the top of the bowstring. The rest are cut in increments of 290 mm,
- Three grooves of the same dimensions are made in the support posts for jumpers. One is placed at the height of the first step of the stepladder, the second at the level of the top, and one in the center,
- The edges of the racks located on top are rounded, sharp corners are removed,
- The lower ends are cut at an angle so that the wooden stepladder is as stable as possible, and are covered with rubber,
- The steps are made according to the drawing. In each of them, spikes are made on both sides, with a diameter of 25 mm and a length of 20 mm.
Assembling the stairs
Instructions for assembling a stepladder:
Steps are inserted into the grooves of the racks. To do this, it is better to first lubricate the tenons with wood glue,
Advice: The grooves in the bowstrings should be made so that the tenons of the steps fit into them very tightly, which will prevent the structure from becoming loose.
- The spikes of the steps are driven into the grooves of the racks with a hammer. After installing all the steps, they are secured at the end of the string with nails,
- When assembling a stepladder from boards instead of bars, the steps are slightly different. In this case, grooves are not made due to the small thickness of the board. The steps are attached to steel corners with wide shelves screwed onto bowstrings,
- To increase reliability and durability, the bowstrings of the working part are additionally fastened with pins. In this case, holes are drilled under the grooves. After installing the steps, studs are inserted into the holes and tightened with bolts on both sides,
- After assembling the supporting and working parts, they are connected to each other by hinges or brackets,
- Lastly, at the bottom of the stepladder, a fixing chain is attached, which will prevent the supporting and working parts from moving too far apart.
To better imagine how wooden stepladders are assembled, you should carefully watch the video in this article.
In the case of using hard rubber rubber - only glue fitting. It will not be possible to press the head into such rubber, therefore, it will no longer be the legs of the stepladder that will scratch the floor, but the fastener itself. You can do it like this, from scrap materials.
It is advisable to attach a pair of hooks to the side parts of the stringers (at the top, closer to the site). On them you can hang a bucket of paint, dishes for collecting fruits, a bag of tools, and the like. It is obvious that a stepladder with such devices will be much more convenient to use. It’s a good idea to secure at least one piece of pipe at the top. Better - plastic. The result is a practical case in which you can place a hammer, a long screwdriver or anything else you constantly need in your work.
To ensure that the “legs” of the stepladder do not accidentally move apart while a person is on it, a so-called “limiter” is attached to approximately ½ of the height of the stringers. Home craftsmen often neglect this device, but an installed cord (chain or long hook) in most cases protects against falling from a mini-ladder.
In principle, it is not difficult to make a stepladder with your own hands according to any drawing. The main thing is to take into account all the nuances of its further use and select the correct sizes of all elements.
Good luck in designing and assembling a folding ladder yourself!
Key points about the most interesting part of the manufacturing process
When creating a wooden stepladder with your own hands, to achieve a reliable connection of all elements, bolts are used, special hinges are used to give mobility to parts of the product, and to fix the position, limiters or spacer mechanisms are used that prevent the legs from sliding on the surface.
It is necessary to prepare all parts of the stepladder and sand them thoroughly.
How to make a stepladder yourself? The installation process should begin with connecting the crossbars and the bowstring. To do this, self-tapping screws are placed at the ends, at the mounting points of the steps, by screwing them in. It is necessary to treat all joints with wood glue. The steps must be parallel to the floor when the ladder is unfolded. If the structure is equipped with a platform, it is necessary to install additional support.
The moving elements of the stepladder must be connected by means of hinges. In this case, you need to take care of the presence of a travel limiter, which should be secured to the end parts. This element is the key to the stability and reliability of the product.
If the steps of a folding stepladder are fastened using glue, to increase the strength of the structure, the strings are tightened using metal rods. They are placed under the steps: under the first, in the middle, and also under the step located at the top. The rods help give strength to the stairs.
In order to protect the stepladder from rotting, an antiseptic agent should be applied to the wooden parts, which forms a film with a water-repellent effect. In addition, you can coat the product with a varnish composition without touching the metal elements of the structure.
It is recommended to connect the parts of the future stepladder using self-tapping screws and a screwdriver.
By following the above recommendations, you can easily create a stepladder with your own hands. Following step-by-step instructions is the key to success.
DIY stepladder: how to choose the right material
As a rule, folding structures are made of wood or metal (aluminum alloy or steel). The choice of material depends on the purpose of such a ladder, its size and the load it must withstand.
Stepladders made of light and durable aluminum alloys are very popular
If you are planning to make a transformer, then you should pay attention to aluminum materials. Structures can be assembled from one type of material, or you can combine several different ones.
For example, a garden folding ladder or a reliable stepladder for construction and repair work can be made from steel pipes (stands) and wood (steps).
To make a portable ladder, the first step is to choose a building material. Considering the conditions of its operation, it must have a high degree of wear resistance.
For these purposes, mainly coniferous wood is used, which combines strength and low cost. However, professionals advise spending money once, but buying high-quality oak or maple beams. Their service life is much longer than coniferous ones.
To work you will also need a small set of tools and materials:
- saw;
- self-tapping screws;
- screwdriver;
- roulette;
- antiseptic;
- wood glue;
- rubber shoes for support.
The degree of reliability of the entire structure, as well as its service life, directly depend on the raw materials that were chosen for its manufacture. Even if you draw up drawings of a wooden stepladder in the process of creating it yourself, if low-quality material was used, the ladder is unlikely to boast high strength and reliability
This is why it is so important not to make mistakes in the process of selecting materials.
To make a reliable and durable item, you must use only high-quality materials.
In addition, the wood chosen for construction must be thoroughly dried. The permissible humidity level should not be more than 12%.
Note! The use of wood that is too wet will lead to deformation over time and then to destruction of the structure.
The wood for the stepladder must be well dried.
The diameter of the beams also plays an important role. Even if the stringers are very long, the cross-section should reach 4x4, 6x6 or 3x5 cm. This will not greatly affect the weight of the structure, but the reliability of the staircase will be fully ensured. As for the exact dimensions and types of lumber, it makes sense to talk about them only if the dimensions of the future structure are known.
Additional amenities
Assembly diagram for a wooden stepladder.
To make working with a stepladder convenient, you can make additional structural parts of the wooden stairs. For example, several hooks nailed to the ends of long elements will allow you not to hold the bucket in your hands, but to hang it nearby, thereby freeing yourself from heaviness and increasing the speed of work.
Next, you can make a wide step at the top to place this bucket or stand with both feet, reaching especially high places. Then a handle should be attached to the stepladder for greater safety.
High step stool
To obtain a high chair, separate chairs and steps are required.
The design of the chair consists of the following elements:
- 4 large legs (1.9 x 10 x 72.5 cm);
- 2 cross beams for the lower part (1.9 x 10 x 42 cm);
- 2 cross beams for the top (1.9 x 3.8 x 18 cm);
- Kings: 2 top (1.9 x 12.5 x 34.5 cm), bottom (1.9 x 10.5 x 34.5 cm);
- 2 plywood side covers (30.5 x 17 x 25 cm);
- Top step (1.9 x 27 x 44.5 cm).
To perform operations, prepare workpieces with these parameters:
- 4 medium legs (1.9 x 10 x 47 cm);
- 2 cross beams (1.9 x 10 x 40 cm);
- 2 small legs (1.9 x 10 x 21.5 cm);
- 3 front pins (1.9 x 9 x 22 cm);
- 1 rear Zarga (1.9 x 10.5 x 30 cm);
- 2 steps (1.9 x 18 x 29.8 cm)
Working steps:
- For a high chair, all parts must be properly sawed and prepared; each part must be sanded to perfect smoothness.
- To maintain the stability of the chair, your legs should be parallel to each other at an angle of 10 degrees to each other. Make sure the ends of the crossbars and the plywood sheathing are separated.
- If wrenches are chosen as fastenings for the central legs, make grooves for them (scales are inserted into the holes).
- The ends of the stems should be cut at an angle of 80°.
- When cutting the bottom step, make two 3.8 x 3.8 cm cuts so that it will line up properly with the smallest legs.
- The large legs and top bars are connected with screws, as are the royal gas and the top step.
- The middle legs are mounted using weights, the rods are fixed. All these parts are attached together with the rear and front bolts.
- Using screws, connect the small legs and crossbars, attach the front Zarga, steps.
- Place the stool and steps so that they are ready, unscrew the guide. If there are no errors during installation, dismantle the structure in the reverse order and connect all the parts with glue. Collet clamps are used to hold workpieces.
Sliding aluminum staircase
Sectional or sliding structures are especially convenient because it is possible to adjust the height within any limits. It can easily replace a regular platform. The product can be secured to the shelves to make it more stable.
The maximum load capacity of a sliding aluminum ladder is up to 150 kilograms. Depending on the models, each section can have from 8 to 9 steps. Such models are easily stored in any convenient place. The use of aluminum alloys allows the weight of the structure to be kept to a minimum.
Requirements
First you need to understand why exactly a sliding aluminum staircase is purchased. The choice even depends on whether it will be used for a long time, or whether it is needed only for one time
Here are just a few factors to consider:
- Is there a certificate and guarantee confirming quality?
L-shaped aluminum sliding ladder
– the best option for those who want to save money. It must be unfolded each time before you start using it. The cost depends on the working height. The lowest options are the cheapest.
Any kit must consist of elements that prevent accidental opening when folded. These are usually safety ties, shackles or restraint straps. Special anti-slip plugs only add stability. The steps are covered with a corrugated coating to prevent slipping. Reliable rolled fasteners will allow you to fix the steps in any position.
Main varieties
- Scaffoldings
are platforms located horizontally. The platform itself is fixed between two pairs of guides. The maximum height is 5 meters.
Inspection of the structure
When inspecting such structures, it is necessary to establish:
- Reliability of fastening of landings, their condition.
Application of sliding aluminum stairs
Electrical installation, finishing and any type of construction work - almost everywhere aluminum products can become indispensable assistants. They are needed even in supermarkets and warehouses with high racks.
The versatility of three-section structures is their main advantage. Such options are useful both for the industrial sector and for home use. Stepladders will be indispensable in everyday life, for any work and operations at low heights.
Rules for working with the structure
Several rules must be followed to ensure maximum safety:
- Ladders are only used in a vertical position.
Before assembling and after finishing work, the ladder must be cleaned to extend its service life. Storage is prohibited in places with high humidity and temperature changes. The main joints require periodic checks for strength.
The main thing is to choose stairs based on light and durable aluminum profiles. This will be the key to high quality. Thanks to this, the equipment will be light in weight, but will cope well with any load. Mechanical damage and corrosion are not dangerous for aluminum.
For work at the same height, the most practical option would be a single-section ladder
. Wide stabilizers add reliability to any design. The products are absolutely safe, regardless of height.
Types of children's high chairs
What chairs are available for children? Modern manufacturers offer a wide range of chairs for children of all ages.
They may differ in purpose, design, material and other criteria.
Many models can be produced independently of each other.
The most common and practical types of high chairs are the following:
- A simple high chair is a regular high chair with a backrest, as described in this article.
- The reclining chair is a versatile chair with rich functionality. It should be possible to change the angle of the backrest, adjust the steps, attach the tabletop, etc.
- Rocking chair - the name of the chair speaks for itself. All children, without exception, love to swing on such a chair. Modern models offer the possibility of using the rocking chair as a rocking chair.
- The Transformer is a set of chairs and tables that can be set up and used in a variety of ways. When assembled, the transformer serves as a comfortable high chair; when disassembled, it serves as a simple high chair and table, standing separately.
Some models have adjustable leg height and backrest position, and the high chair “grows” with the child.
If you have little experience in carpentry, it is better to limit yourself to making a regular high chair without additional functions. The main thing is to understand the basics and operating principle, and in the future you will be able to create more complex models of chairs.
When making a chair, it is recommended to use environmentally friendly materials with high strength. In most cases, the following materials are used:
- Natural wood;
- Plywood;
- Chipboard.
The production of children's furniture (chairs, beds, tables, etc.) from plastic pipes is very common. After assembly and decoration, you get very attractive and unusual designs, but their reliability and durability are very questionable.
It is recommended to choose wood, plywood or wood. Chipboard Since these materials are absolutely safe for children, they have a long service life and other positive characteristics. With the help of this article you can make a high chair out of wood.
The following structural elements must be prepared for the construction of the chair in accordance with this drawing:
- 1 - top rod (1.9 x 4.1 x 16.5 cm);
- 2 — two rear legs (3 x 3 x 55 cm);
- 3 - carved beam (1.4 x 4.1 x 16.5 cm);
- 4, 6 — stripes in the middle and bottom (1.4 x 2.9 x 16.5 cm);
- 5 - Double-sided seat (1.4 x 10.5 x 26.3 cm);
- 7 - two kings and two slats on the sides (1.4 x 2.9 x 17.7 cm);
- 8 - two front legs (3 x 3 x 30.5 cm);
- 9 - two handles and two front stripes (1.4 x 2.9 x 19.5 cm).
For the feet, it is recommended to use pine stones with a cross-section of 3 x 3 cm.
The legs of the chair should gradually be as follows: The back legs should be up to 1.9 cm from the center of the chair, and the front legs should be up to 2.4 cm from the center of the chair.
Tip: To make assembling the bands and kings as easy as possible, only reduce the outer edges of the pieces. This ensures that the inner edges are parallel to each other.
Basic tips for arranging cabins
When arranging dacha cabins, we recommend that you adhere to the following tips:
When arranging indoor wiring in temporary dacha cabins, it is recommended to cover them with plastic or metal sleeves, which will make the wiring more reliable. Think through the arrangement of your shed in advance down to the smallest detail, since you will need to take care in advance of strengthening the walls in places where you plan to hang heavy objects (cabinets, air conditioners, etc.)
You can strengthen the wall by installing an additional crossbar, which will take on the main load of the hanging object. Particular attention should be paid to the area where the bathroom is planned to be installed. Internal walls must be lined with moisture-repellent material
It is recommended that in cabins not to install a stationary toilet with sewerage, but to use mobile dry toilets.
For summer cottages, it is advisable to install a water tank made of dark material on the roof. In summer, the water in it will be heated by solar energy and supply you with warm water. For winter cabins, it is recommended to install a boiler. It is recommended to insulate country houses with mineral wool, polystyrene foam, penoplex and other lightweight insulation materials. When arranging a two-story change house, a reinforced foundation is recommended. A mid-deep strip foundation is used as the foundation for such a building. The staircase in a two-story change house is equipped with an external one to save internal space.
A two-story change house allows you to redistribute the functional load of the internal premises in such a way as to place common rooms (kitchen, bathroom, hallway, etc.) on the first floor, and bedrooms on the second floor.
So, two-story change houses are temporary houses of increased comfort. Often they fully replace two-story country houses. With the right approach to their construction and use, the cabins will be able to serve faithfully for quite a long time.
And if necessary, they can be moved or used for other purposes: as an outbuilding (poultry house, barn, pigsty, etc.) or as a bathhouse with rest rooms and utility room.
guest house with bathhouse
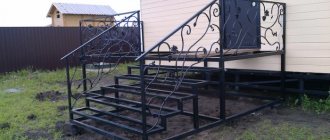
Step-by-step instructions on how to make a stepladder with your own hands
Drawing of a step stool.
The simplest option will be considered: making a classic stepladder with two ladders made of wooden parts. You can also use a metal base. Then the ladder will be heavier and more durable. You must choose the height of the staircase yourself, based on the purpose of the future staircase. The height of the staircase is determined by the length of the stringers, and the width is determined by the length of the rungs (steps). The length of the stringers can be from 50 cm to 8 m. The width of the crossbars is usually no more than 50 cm. The optimal distance between the steps is 30 cm.
To make stringers, pre-prepared pine beams are taken. It should not have any cracks, chips, protruding knots, or dents. The cross-sectional size of the stringer should be approximately 60 by 100 mm. The crossbars are made from dense, smooth wooden blocks, rectangular or square in cross-section.
There are several ways to attach the crossbars to the stringer.
Diagram of a step stool with a table.
In the first method, at the junction of the step and the stringer, the steps are drilled to prevent splitting of the wood and secured to the stringer with self-tapping screws or nails. This fastening method is used to make temporary stepladders, because the steps can easily come off or bend.
There is another method of fastening: the step is slightly recessed into the stringer, secured with self-tapping screws at angles to the stringer and at an angle of 90 degrees. But the cuts make the structure less strong, so it is necessary to use thicker timber for the stringers and not make the stairs very high.
The most reliable fastening method is when holes are made in the stringer, where the crossbars are inserted, glued with glue and secured with self-tapping screws. The steps for such a staircase are made in a rectangular shape with a thickness of no more than 40 mm. To strengthen the crossbars, metal spokes are fixed under each step using nuts and bolts.
In order to make a stepladder, you need to cut the timber into pieces: we make 4 pieces longer, and then we prepare pieces of different lengths, two pieces each. Before sawing, do not forget to measure the required length on the beam, mark it, and only then cut. We attach rubber feet to one end of the stringers using screws so that the ladder does not slide on the floor. All prepared parts must be carefully sanded and treated with an antiseptic. To prevent the ladder from sinking into the ground if you have to work in the garden, you can attach shoes (pieces of pipe) with a crossbar, usually made of wood, to the base. In addition, a wooden block at the base of the stairs can save lives when working with wiring.
A stepladder is made from two ladders that are connected using metal plates. In each of them it is necessary to cut off the protruding parts, and also drill a hole in the middle of the wide part and a hole for fastening to the ladder itself. The ends of the chain are attached to the stringers at the same height using nuts and bolts so that the stepladder does not move apart.
You can make two small ladders with shoes so that they can be inserted into each other. To do this, you need to drill holes in the stringers that will coincide with the profile on the second staircase. To make a long ladder, you will simply need to bolt two ladders together.
If you work with a ladder in your garden, you can very easily make a stepladder out of it. To do this, you just need to attach a support made of a metal profile to the stairs. You can attach a piece of wooden beam. A corner is attached to the end of such a profile or beam. In order not to break the steps of the stairs, the corner must be attached to an additionally made crossbar.
If you want to use a ladder to pick cherries, for example, you can attach a strong ribbon to it. A tarpaulin or towing sling is suitable for the tape. The tape is attached to the stringers with metal plates. You can fold the sling in half under the pads. This will increase the service life of the tape. Attach hooks to the top of the stepladder so you can hang the bucket.
Thus, the question of how to make a stepladder with your own hands from scrap materials was resolved. Even a novice builder can make such a staircase.
Homemade stepladder: a few words about components
By making the structure yourself, it can be improved by adding individual elements. For example, metal spokes are designed to provide more reliable fixation of steps.
They are located under the step in special holes and attached with nuts and bolts. The length of these elements directly depends on the size of the tread (the width of the steps) and the degree of thickness of the stringers. However, their diameter should not be less than 8 mm. Otherwise, they will bend under the weight of the load. It is thanks to the spokes that the permissible pressure increases, which the steps of a wooden stepladder can subsequently withstand.
Nylon cords or iron chains serve to connect the supports and the main part on both sides, while simultaneously preventing them from moving apart.
Protective “shoes” for stepladder legs should be made of hard rubber.
Protecting the floor covering from scratches and preventing slipping is the main task of the so-called “shoes”. They are made of rubber, and ideally it should be hard, since soft nozzles have a short service life. In addition, the design can be supplemented with hooks for buckets and other accessories for tools. It all depends on the needs of the user.
A simple stepladder made of timber
To make a simple garden stepladder, you will need 13-14 meters of timber with a section of 60×40 mm. For support posts you need 2 m beams (4 pcs.).
It wouldn’t hurt to make extra bars for the stepladder.
The following bars must be prepared for steps and crossbars:
- 590 mm (2 pcs.);
- 545 mm;
- 500 mm;
- 455 mm;
- 410 mm (3 pcs.).
The same markings are applied to the two support posts to which the steps will be attached. The distance between the steps is 400 mm, the first (lower) step is no less than 100 mm from the edge. According to the markings, 5 grooves with a depth of 15 mm are selected.
Markings for steps.
To assemble the main part, the support posts are placed with the grooves up and aligned. The distance between the upper ends is 400 mm, between the lower ends is 600 mm. The steps are placed in grooves and secured with self-tapping screws or nails. An additional crossbar is mounted at the top on the reverse side.
Cut grooves for steps.
The support does not have steps, so its supports are connected by crossbars only at the bottom and at the top. The design is complemented by a jib
It is important not to make a mistake with the distance between the upper ends - it is equal to 300 mm
The rear support of the stepladder can also be secured in this way.
Having assembled both parts, all that remains is to connect them together. The support is installed so that its “horns” are between the top step and the additional crossbar of the main part. This design will not require fasteners at the top, and the lower ends can be moved to a suitable distance, choosing the most stable position.
Stepladder ladder drawing.
Multifunctional option
It happens that a stepladder, being an absolutely useful device, spends most of its “life” idle. But you can build a stepladder with your own hands, the scope of which will be much wider than usual. A table, an easel, a gazebo and a bed are what can be made using the design described below.
So, to make supports, take one and a half meter boards, 60 mm thick, 180 mm wide. The steps are also made from boards. You need to select grooves in the supports for attaching the steps. The support is equipped with a crossbar; additional holes are drilled to allow its rearrangement. A special feature of this design is the hinged connection. The edges of the support boards are sawed off at the required angles, and the support boards are screwed to the upper ends. The lower edges of these boards are connected by a piano loop. With this design, the stepladder does not need additional devices to protect its supports from moving apart. The piano hinge with support boards is guaranteed to hold the unfolded stepladder in the working position. The staircase drawing also contains schematic drawings of structures obtained on its basis.