Despite the fact that welding a metal staircase is more difficult than making a wooden one, many owners of private houses choose this option. The plasticity of the material allows you to create beautiful designs of any complexity. With even a little experience in welding, you can make an elegant staircase to the second floor with your own hands.
Advantages of metal stairs
The popularity of metal structures is explained by their advantages:
- high reliability;
- ability to withstand significant loads;
- resistance to negative influences;
- quick installation;
- ease of care;
- the welded staircase does not creak;
- no repair costs during operation;
- possibility of harmonious combination with various materials;
- large selection of shapes and types.
There are not many disadvantages of metal stairs and they can be easily eliminated:
- The noise made when walking is eliminated by using rubber or wooden pads.
- Corrosion may appear where the coating is damaged. The problem is radically solved by using chrome steel.
- Custom-made iron stairs are more expensive than their wooden counterparts. Self-production and avoidance of complex decorative elements will reduce costs.
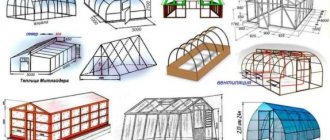
Types of frame
In metal structures there are only two types
- open;
- closed.
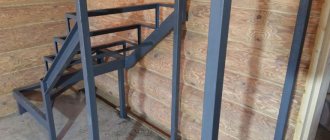
The first, after assembly and installation work, remains open. This type of frame requires special care in welding and finishing. All seams and rust are carefully sanded, after which painting is carried out.
The closed one is less demanding in terms of appearance because after installation, the frame is finished with additional material. Such structures are usually made from a simple channel and angles. After finishing, such stairs cannot be distinguished from those made entirely of one material, for example, wood.
Choosing a design
Most often, marching variants are built. They consist of an inclined support to which the steps are attached. Depending on the height, they are made single or multi-flight. Installed in houses where there is no need to save space.
Varieties of marching structures are manufactured:
- on stringers;
- on bowstrings;
- on pain;
- screw.
The easiest way is to make a metal staircase on stringers with one flight.
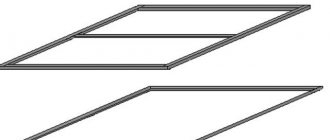
The bowstring structure consists of two beams fixed parallel in an inclined position. Supports are often made from channels or rectangular pipes; corners are rarely used. The steps are attached to their inner surfaces using corners.
The bowstring structure consists of two beams fixed parallel in an inclined position
When making stairs on stringers, the same materials are used as in the version on bowstrings. But the distance between the support beams is less than the width of the flight, so the ends of the steps remain visible. To fasten them, elements (fillies) made from corners bent or welded at an angle of 90⁰ are used.
On one stringer
Design on two stringers
The bolt version is mounted without a frame. To install the steps, pins fixed in the load-bearing wall are used. The structure appears to be floating in the air. Despite their apparent fragility, they can withstand up to 200 kg.
The bolt version is mounted without a frame
Spiral staircases, made in the form of an ascending spiral, look beautiful and do not take up much space. The diameter of the structure is 1 - 2 m. A central support is used for fastening. But installation on stringers or bolts is possible.
Spiral staircases look beautiful and do not take up much space
Marching stairs can be of a rotating design with an L, U or T-shaped change in direction. They are made straight or rounded at an angle of 90, 180, 360⁰. To make it yourself, you will need special tools.
Regardless of the type, stairs are made open or closed. In the first case, the frame remains visible. In the second, it is hidden under the facing material.
Hide or reveal?
A hidden frame means that it will not be possible to see it, since it will be covered with steps; if your budget is limited, pay attention to this view. The material used for such frames is very cheap channels with corners, and is also not particularly beautiful. If you accurately calculate the strength, then such a design will be very reliable.
If money is not a factor, the best option would be an open frame; they look very attractive. Naturally, if the welding was performed by a professional with extensive experience.
Structural requirements for stairs
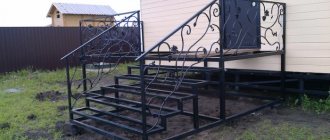
In a private house, the width of the flight between the railings is set to at least 90 cm. The height distance between the steps is 15 - 18 cm, the width is from 25 cm. The height of the passage along the flight must be at least 2 meters. The optimal angle of inclination of the stairs is 30˚, but depending on the installation conditions it is allowed to change it within the range of 27 - 45˚.
It is recommended to install 3 - 18 steps on the march. It is recommended to choose an odd number of them, since it is more convenient for a person to start ascending or descending from the same leg. The width of the upper and lower platforms is made at least 80 cm. Their strength, like marches, must be at least 300 kg/m². If children will run up the stairs, the distance between the balusters is set to 12 - 15 cm or a mesh is attached. The fence must withstand 100 kg of lateral load.
Results
The last stage of processing is the primer, which is applied in a dense layer without gaps, in one layer with a spray gun or brush. For proper drying, you need to wait at least a day. Most often, GF No. 21 soil is used for priming, which has a brown and sometimes grayish tint. If you process all the metal of the frame in the correct sequence, you can ensure a long service life and protect yourself from further expenses for another treatment.
Welding a simple ladder
To weld a staircase from a profile pipe, an inverter, an angle grinder, and a tape measure are sufficient. In order for one person to carry it, the length should not exceed 5 m. The optimal profile section is 40×15 mm. The length of the crossbars is chosen within the range of 45 - 80 cm, the height between them is 15 - 35 mm. The first step should be located at a height of no more than 40 cm. If the ladder is intended to be used for work in the garden, a crossbar is welded to the bottom. To prevent sliding on a hard surface, a rubber pad is screwed to it with self-tapping screws.
If there is no profile, you can choose round pipes to weld the stairs yourself. It will weigh more, and to securely attach the crossbars to the bowstrings, you will have to make semicircular cutouts at their ends. For racks, pipes with a diameter of 50 - 60 mm are selected, for steps - 25 - 30 cm. To protect against dirt and moisture getting inside, plugs are welded to the ends.
The process of making stairs on stringers
First you need to choose the type of stringer. It can be made from a strip of iron 8 - 10 mm thick with teeth cut out on one side for attaching steps. But more often they are used by channels and I-beams with welded fillies (elements for fastening steps). If the staircase is made with one stringer installed in the middle, it is better to use a profile pipe. Its symmetrical shape looks prettier than a channel.
To work you need to prepare:
- welding machine, electrodes;
- grinder with cutting and grinding wheels;
- drill with drills;
- vice and adjustable clamp up to 80 cm;
- primer, solvent;
- metal brush;
- tape measure, ruler, square.
To weld a ladder with two stringers you will need to:
- cut workpieces;
- make fillies;
- install and secure stringers;
- weld the fillets and connect them with crossbars;
- install steps and railings;
- clean welds and surfaces;
- degrease, prime, paint the finished staircase.
After determining the procedure, they begin making fillies, two for each stage. They are made from a corner or rectangular profile. The blanks are cut at an angle of 45˚ and welded in the shape of the letter G.
The distance between the stringers is chosen slightly less than the width of the march. On a concrete floor, the lower part is installed into it, and the upper part of the stringers is welded to a beam attached with anchors to the interfloor ceiling. If the structure is mounted next to a wall, the stringer running along it is additionally attached to it to increase strength.
After marking, the fillets are welded on the stringer. In this case, the thickness of the finished floor should be taken into account; the first step is installed at a height of 18 cm from it. The relative position of the fillies horizontally is checked by a level. Then they are connected in pairs with corners, profiles or reinforcing bars on which the steps will rest. They are fastened by welding or bolts, if metal ones are chosen, and wooden ones - with self-tapping screws.
The railings are installed so that the width of the flight does not decrease. After painting, decorative overlays can be installed on the steps and handrails.
We weld the ladder on bowstrings
To weld a metal ladder on bowstrings, the same technology and materials are used from which the structure on stringers is made. The difference is that the steps are attached directly to the supporting beams, and not on top. Installation is carried out in two ways:
- if the strings are made of sheet metal or channel, the steps are bolted through holes in the side walls of the beams;
- when the frame is mounted close to the wall or the strings are made of rectangular pipes, corner shelves are welded to the beams to attach the steps.
Sheathing installation
Before starting work, you should decide whether additional fasteners will be required. This may be required if there are turning steps.
Installation is carried out in two ways:
- The first involves laying steps on top of the corner, after which they are fastened in such a way that the corner remains under the board.
- The second method is based on fastening to the corners, which are welded to the channel. After that, two more corners are installed so that a frame is formed in which the steps are laid.
Stages of work:
Installation of steps on stairs
To prevent the formation of chips, you can round the edges of wooden tread blanks.
Before installing the stairs, it is necessary to strengthen the metal frame
How to weld a spiral staircase
To create a reliable and comfortable spiral staircase, the following requirements must be taken into account:
- The height distance between turns must be at least 2 m.
- A gap is left in the upper part between the edge of the ceiling opening and the stairs. If the march is made 80 cm wide, the diameter of the structure must be at least 2 m. Reducing the dimensions to 60 cm and 1.4 m is allowed for stairs that are rarely used. For example, in the attic.
- To ensure reliability, the central pipe is selected with a diameter of at least 50 mm.
- The width of the trapezoidal steps in the middle part is at least 20 cm, the distance between them is 20 - 26 cm.
- The angle of inclination of the stairs is no more than 45⁰.
To weld a spiral staircase you will need:
- thick-walled pipe for the central support;
- a pipe for sleeves with a diameter slightly larger than that of the support;
- a round or square pipe of small diameter for connecting the steps to each other;
- corner for step frames.
The ladder is mounted in the following sequence:
- From the pipe with the largest diameter, sleeves are cut with a length equal to the distance between the steps.
- To prevent them from dangling on the central pillar, sealing rings are welded inside.
- From the corners, using a template, the frames of the steps are assembled and welded to the sleeves.
- The central support is installed. Sleeves with frames are put on it and secured. Installation on a wooden floor is carried out with anchor bolts and radial fastening. A recess is made in the concrete floor into which the stand is placed and filled with mortar.
- Having arranged the steps in a fan-shape, they are connected to each other by sections of small cross-section pipe.
- The joints of the sleeves are boiled.
- Railings are being installed.
- The welds are cleaned and the structure is painted.