Good afternoon, dear reader! Many garden crops are grown by seedlings. But to obtain a rich harvest, the seedlings must be healthy, with a well-developed root system and a strong stem. I can't grow one in open ground.
The conclusion suggests itself: I need a greenhouse made of a profile pipe at my dacha. With my own hands I will grow in it not only seedlings, but also early vegetables and other heat-loving crops. In this article I will describe in detail the entire construction process.
Kinds
You can create structures of various configurations with your own hands from profiled metal, but I want to highlight several basic forms of frame greenhouses.
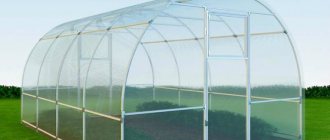
Arched
In greenhouses of this type, the lower parts of the wall frame elements are vertical, and the upper parts are bent into an arc, closed by an arch. These elements are connected to each other into a single structure by horizontal ties. Arched greenhouses (pictured below) are more resistant to wind loads and can be quickly assembled with your own hands. They let a lot of light into the interior space, so they are more suitable for growing light-loving crops.
Lancet
The cross-section of a lancet greenhouse has the shape of a slightly curved arch, elongated in height and pointed at the end. A correctly calculated structure of this type is resistant to deformation like a classic arched greenhouse, but due to the elongated shape of the upper part it better resists snow loads. Snowdrifts do not accumulate on the ridge: the snow quickly rolls down under its own weight.
Pyramidal
A pyramidal greenhouse is a compact, unusual type of greenhouse with a lot of advantages. It is a structure whose walls are triangular in shape, inclined inward at a slight angle and converge at the top at one point.
The pyramid greenhouse is very stable. It will withstand strong gusts of wind and snowfall. Snow simply will not stay on its surfaces.
Due to the inclined position of the edges, the greenhouse has a special system of natural lighting. The sun's rays are almost not reflected from their surface in the morning and evening, but penetrate inside. During the midday heat, on the contrary, they reflect their direct hit, protecting plants from overheating.
Which type is better to choose
For year-round use, it is better to build an arched greenhouse with your own hands. Thanks to its streamlined shape, natural precipitation does not accumulate on its surface. It is resistant to gusts of wind, well lit, and has fewer connections. In addition, this configuration allows for better heat retention to additionally install doors and vents for ventilation.
A gable greenhouse with a house is more convenient for use in the spring and summer. It provides enough light, but in winter its roof needs to be cleared of snow.
Advantages and disadvantages
The advantages of a homemade greenhouse made from a profile pipe are obvious:
- They are able to withstand high mechanical loads.
- Well lit, transmit enough light to grow a variety of crops.
- Durable. The service life of such a greenhouse is at least 30 years.
- Fire resistant.
- Mobile. They can be moved, quickly disassembled with your own hands and reassembled, reduced or added to the number of sections.
- Metal profile is an affordable material. It can be purchased at many hardware stores.
- It is easier to attach communication elements from inside the building to a profile pipe, for example, automatic watering systems, additional heating and lighting.
But such designs also have disadvantages:
- High cost of profile rental.
- The weight of the frame is quite large, which requires the construction of a solid foundation.
- Poor flexibility.
Other cladding materials
The greenhouse can be covered with any other covering material. It can be film or non-woven material. They are cheaper than polycarbonate, but will also last much less. The only thing you can’t protect polycarbonate from is heavy hail. But here you need to rely on your desires and financial capabilities.
film will only last one season, no matter how strong it is, you will have to buy it and fix it every year. But it is easy to do.
Non-woven material is good because it perfectly allows air and moisture to pass through, and this is necessary for plants in particularly hot summers. Depending on the density, the service life of such material is up to 5 years. It is removed for the winter and attached to the frame again at the beginning of the season.
Which pipes are suitable and how many are needed?
Profile pipes are produced with a protective coating of polymer paint or zinc. Painted ones are cheaper, but over time the paint may peel off and the steel profile will begin to rust. Galvanized profile pipes are more resistant to corrosion and temperature changes; they are more suitable for building a greenhouse with your own hands, inside which a high humidity regime is initially expected.
The lower frame and frame arches of a small homemade greenhouse measuring 6 by 3 m can be welded from a 20x40 mm profile pipe, the lintels can be welded from a square profile with a section of 20x20 mm with a wall thickness of 1.5–3 mm.
Features of materials
What to make a greenhouse from? Of course, from proven and long-proven materials on the market. This is a profile pipe for the frame and polycarbonate for the coating. Let's pay attention to their production features.
The greenhouse can be made by welding or using bolted connections. This depends on the choice of profile pipe, galvanized or uncoated pipes.
Galvanized
This material is good because it is not susceptible to rust, is not afraid of sudden temperature changes, and does not require additional processing. But it also has significant disadvantages:
1) It is not suitable for welding in domestic conditions, since the galvanization on the seams quickly burns out, causing the metal to rust. Therefore, bolted connections are used for assembly. But they do not provide such strength and reliability as welded structures.
2) It is not advisable to bend galvanized pipes, as this violates the integrity of the protective coating. But what if you need an arched greenhouse? Therefore, only pitched structures can be made from them.
3) They are more expensive than uncoated pipes, which is not practical for the family budget.
Uncoated pipes
This is an inexpensive and pliable raw material, unlike the previous one. They can be welded and bent with confidence to any bend radius.
The only thing they need is additional treatment against corrosion. To do this, the finished frame is cleaned of scale and other roughness, then degreased, primed, and painted. Children or a wife can come to help with coloring, and then the working family process will delight all participants.
Choosing polycarbonate
When buying polycarbonate, pay attention to the presence of a protective layer against UV radiation. Trying to save money can only harm yourself. Cheap material without a protective layer will fall apart in 1-2 years. Why redo something and spend money when you can do it once for many years to come and enjoy your vegetables every season.
How many meters of professional pipe are needed for a 6-meter greenhouse?
When calculating the amount of profile for the construction of an arched greenhouse, you need to take into account that the arches are installed in increments of 1 meter. Thus, you will need:
- For the base of the frame: 3+3+6+6 =18 m.
- Vertical parts of the walls (0.75 m) taking into account the depth (0.25 m) into the foundation structure: (0.75+0.25) * 14 pcs. = 14 m.
- Arc-shaped wall elements. The circumference is determined by the formula c = 2πr. The radius of the circle is equal to the difference between the height of the greenhouse (2.1 m) and the straight section of the walls (0.75 m). The length of the arc-shaped elements from the profile pipe will be half the circumference. The total number of profiles for the manufacture of all arcs will be: (2.1-0.75) * 3.14 * 7 pcs. = 29.67 m.
- Horizontal guides: 6*4 pcs. + 2.8*2 pcs. = 29.6 m.
- Spacers: 1.5*4 pcs. = 6 m.
- Doors at two ends: (0.95*2+2*2)*2*2 = 23.6 m.
Total for assembling the frame with your own hands, the total length of the rolled profile is 18 + 14 + 29.67 + 29.6 + 6 + 23.6 = 120.87 m. Considering that the length of the rolled product is 6.05 m, you should buy at least 20 whips.
Instructions on how to build a greenhouse from corrugated pipe with your own hands
If you are planning to build a greenhouse from a profile pipe with your own hands, then calculate its cost in advance and specify the types of work. This way you will be sure that you have enough finances and skills to complete the project.
Choosing a site for construction, marking the territory
The criteria for choosing a location for a greenhouse made from corrugated pipe should be the following factors:
- Geological composition of the soil. The design of the foundation depends on it. It is good if it is sandy soil in a dry place on a hill. The clay composition of the soil in the lowlands usually accumulates excess moisture, which significantly accelerates corrosion processes in the load-bearing elements of the profile pipe frame. Excess moisture in the soil also negatively affects plant roots: they can rot.
- Relief features. It is advisable to choose an area with a flat surface. On a flat area it is easier to ensure the stability of the structure and uniform distribution of light inside.
- Illumination. One of the long sides of the profile pipe greenhouse should be turned to the south. This arrangement allows for greater penetration of sunlight into the building. This may be a remote place where the greenhouse will not be shadowed by trees, a residential building or outbuildings throughout the day, and if there is, then only in the first half of the day.
Drawings, diagrams with dimensions
Do-it-yourself construction of even a small-sized greenhouse from a profile pipe must begin with design. The diagram will help you more accurately calculate the required amount of material.
In this case, special attention should be paid to drawing up a drawing of the end part of the greenhouse. There is an entrance door in it; it is desirable that its width is sufficient for the entry of a standard garden cart. In the example, I presented a design project for an arched greenhouse made of profile pipes.
End drawing:
Required tools and materials
To build a greenhouse from profile pipes with your own hands, you will need a set of equipment:
- measuring instruments: tape measure, square, building level, marker;
- welding machine;
- Bulgarian;
- screwdriver;
- clamps;
- shovel;
- paint brush.
To assemble the frame with your own hands, you need to prepare:
- A profile pipe with a cross-section of 20×40 mm for the manufacture of a support frame and arches.
- Profile pipe with a cross section of 20×20 mm for horizontal connections.
- Self-tapping screws for metal.
- Door hinges and latch handle.
- Primer and paint for exterior use.
You can use polyethylene film, glass or polycarbonate as a covering material. To build a foundation with your own hands you need crushed stone, sand, concrete, reinforcement, roofing felt, bitumen.
How to bend profile pipes for a greenhouse
To bend the profile pipes that make up the greenhouse frame with your own hands, you can use different methods:
- With preheating. For pipes with a diameter of more than 100 mm. To avoid profile deformation, the pipe cavity is filled with sand. To heat the pipe bend, use a blowtorch or gas torch.
- Cold bending. Used for bending thin profile pipes.
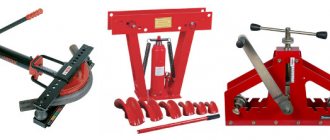
Regardless of the bending method you choose, you will also need a radius template and one of the following tools or fixtures:
- Pipe bender To bend profile pipes of small cross-section size with your own hands, you can use a mechanical manual pipe bender. This is a design of rollers arranged in the shape of an isosceles triangle. The workpiece is placed between the rollers and secured with a clamping screw. To bend profile pipes of large cross-section, you need a hydraulic or electromechanical unit that does not require the application of excessive muscular force.
- A thick spring. It must be of such a diameter that it can freely enter the cavity of the profile pipe.
- Metal or concrete bending plate. The plate has special holes into which bolts with attachments are inserted to adjust the bending radius. The bolts serve as stops for bending the profile pipe with your own hands.
You can also use a grinder. With its help, you need to make several cuts on 2/3 of the pipe section on the future arc. The cuts should be at the same distance and equal in depth. The profile pipe is bent along them, and then the cuts are welded.
Step-by-step construction technology
For those who have decided to build a small greenhouse from a profile pipe on their own site with their own hands, I offer step-by-step instructions.
Step 1. I called it “Site Preparation and Structure Marking”. Clear the selected area of debris and stones, uproot the stumps and level it. The site must be strictly horizontal or with a slight difference, but no more than 10 cm. You can do the markings yourself using wooden pegs and rope.
Don't forget to check if the diagonals are the same size.
Pegs need to be driven into the ground at the corners of the structure, a rope must be pulled between them, thus marking the perimeter of the greenhouse. Then you need to remove a layer of turf from the marked area, dig it up, carefully breaking up the clods, and level the surface with a rake.
Step 2. At this stage we will build the support structure with our own hands. For a greenhouse made from a profile pipe, the best option would be a reinforced concrete strip foundation:
- Dig a trench around the perimeter of the building, 40-50 cm deep, 30 cm wide, and compact its bottom.
- Fill the bottom with crushed stone to a height of 10 cm, and on top 10 cm with sand, pouring water and layer-by-layer compaction.
- Lay a layer of roofing material or film on top of the sand cushion. If this is not done, the sand will draw water from the fresh concrete and prevent it from gaining the required strength.
- Assemble the formwork. It should protrude 15–20 cm above ground level.
- Tie the reinforcement cage into the formwork.
- Pour concrete M150 or M200 into the formwork. In the places where the arcs are attached to the concrete, before it hardens, insert embeds made of reinforcement or a 40x40 mm steel profile.
- After about a week, when the concrete has gained its initial strength, cover the top of the foundation along the perimeter with waterproofing material. Coat the side surfaces with hot bitumen.
- Fill the trench with soil.
It will take 28 days for the concrete to dry completely, after which you can attach the arches with your own hands.
Step 3. The next step is to install the frame:
- Make arches: bend the arches, weld vertical sections to their ends. Mount the door frame on the end arches.
- Set up a support frame from a profile pipe with your own hands and weld it to the mortgages in the foundation.
- Attach the end arch to the frame first, checking the verticality with a plumb line. For fastening I use a welded or bolted type of connection.
- Then sequentially put the remaining arches in place, connecting them together with strapping elements, starting from the top crossbar.
- The last to be mounted diagonally are two end jumpers. The lower corner of the door is connected to the upper strip of the side trim. This will strengthen the load-bearing capacity of the structure.
Now you can weld the hinges and hang the door, install a latch handle on it.
Step 4. After installing the greenhouse frame, it is sheathed with polycarbonate or polyethylene. First, cover the end arches with polycarbonate with your own hands, cutting out doors and vents, and then the rest of the structure.
The sheets are overlapped so that the joints rest on the profile.
Please note that the polycarbonate sheet must be:
- Installed towards the sun with a protective coating against ultraviolet exposure.
- Curved in a direction perpendicular to the channels. This technique will avoid plastic creases.
- Placed in such a way that the hollow channels in its structure are in a vertical position. This is necessary so that moisture does not accumulate in the pores of the panels and mold does not occur.
To attach polycarbonate to the greenhouse frame with your own hands, use self-tapping screws with a rubber gasket. The hole in the casing is drilled larger than the diameter of the fastening element itself, thus leaving a gap that compensates for the thermal expansion of the polycarbonate. The ends of the sheets should be sealed with sealing, perforated tape, and special end caps should be installed at the edges. Upon completion of work, the protective film must be removed from the polycarbonate.
You can watch the video to see how to properly cover a greenhouse made from a profile pipe with polyethylene film:
Possible errors during construction and ways to correct them
The main errors occur when bending arched elements. Therefore, it is better to buy ready-made arches and mount the rest of the frame with your own hands.
- Incorrect installation of polycarbonate, due to which the transparency of the material is lost and condensation accumulates on its inner walls. Such a sheet must be removed from the frame made of a profile pipe, the cells must be blown with compressed air or washed from dirt with a soap solution. After it dries, install it in place, gluing the ends with sealing tape.
- To protect a structure with a gable roof from heavy snow loads from the inside of a profile pipe greenhouse, you need to additionally place supports under the ridge and side walls.
Why a profile pipe?
When choosing a material for construction, a profile pipe will be the most optimal solution.
Naturally, you can use wooden slats, but you will have to use maximum protection measures for it, since this material is subject to rotting, shrinkage and deformation.
A steel profile pipe is an advantageous solution because it is easier to attach any covering, including polycarbonate, to it. On such a frame, covering elements are more easily joined than on a round pipe.
However, if you use plastic film for covering, please note that it will have to be changed annually, as it deteriorates under the influence of sunlight, wind and frost.
It is worth considering the fact that protection includes a primer and high-quality paint.
But even after treatment, it is worth constantly monitoring the frame and responding to the slightest defects and eliminating them in a timely manner in order to maximize the service life of the structure.