The procedure for connecting a shower cabin to the water supply and sewerage system with your own hands consists of several stages. First of all, you should understand the features of different types of models and the nuances of their installation.
Then you need to choose a location for the booth and prepare the necessary tools. After this, you can begin the process of connecting the shower with your own hands.
First, the base is installed or poured, then a direct connection is made to the sewer pipeline, water supply system and electrical network. It is also important to remember to follow the recommendations of professionals.
Connection to water supply
Supplying water to the shower stall is not very difficult if the water outlets are installed correctly in the wall.
When using shower boxes, hot and cold water is usually supplied to the back panel, which does not completely reach the corner; two water sockets are pre-installed in this free space on the wall. Their height and relative position do not play any role; they will be hidden behind the walls of the shower stall and not visible. In a private house or country house where water is heated through a water heater (boiler), the pipeline is also hidden in the wall or under a screed so that it does not interfere with the tight fit of the cabin to the cladding surface.
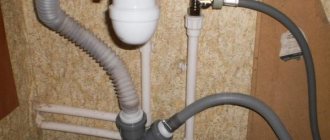
Connecting a closed cabin to the water supply system consists of several operations:
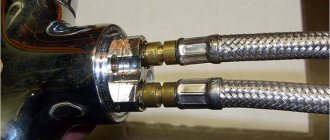
- For ease of connecting hoses, corner adapters with external threads are first screwed into water sockets, using FUM tape for sealing.
- Next, flexible rubber hoses in aluminum braiding or bellows sleeves are screwed to the adapters; the “American” connection has a rubber gasket and does not require additional sealing.
- The hoses are connected to two threaded fittings on the corner panel, marked with red and blue dots. Internal wiring is carried out using flexible water pipes included in the kit; they are fixed with metal clamps.
- The shower box is connected to the electrical network in accordance with the electrical diagram; usually the control unit with electronic circuits is located on the back wall and a plug comes from it, which is plugged into a pre-installed socket.
Before connecting the shower stall to an open-type water supply system, two water sockets with 1/2-inch internal threads are installed on one of the bathroom walls in the right place according to the instructions in the drawings.
How to install a heated towel rail yourself.
Connecting the shower to water sockets
It should be borne in mind that they are designed for use with a specific type of cabin, which must be purchased in advance. Next, the connection is carried out in the following order:
- Using FUM tape, adapter couplings are screwed into the water sockets, onto which decorative plates are then screwed, sealing the connection to the walls with silicone.
- They place the mixer, screw the shower tube to its upper part, level it, and mark the mounting points with a pencil on the wall.
- Drill the tiles with a cone-shaped drill with a diameter of 6 mm, drive in dowels, install the shower head and attach it to the wall with self-tapping screws.
- Upon completion of installation of the shower, the siphon is connected to the sewer, the pan is put in place and sealed, and the guides on which the door is held are attached to the walls.
Standard cabin sizes
After purchasing any type of shower cabin, its assembly, installation and connection to the water supply does not cause any particular difficulties for the unprepared homeowner if the water outlets and sewer outlets are correctly located. But usually such work is carried out by specialists who perform the most difficult part of all work - assembly, using a large amount of silicone sealant and a special tool (screwdriver). Therefore, this type of operation is carried out with one’s own hands quite rarely and only with the simplest designs of open shower enclosures, assembled independently.
Advice from experienced plumbers
No matter how reliable the factory assembly of the shower panel may seem, the nuts of the connected pipes, hoses and pipes should be checked and tightened with a wrench. After installing the shower in place, all connecting nodes will be invisible.
What will happen there behind the blank panels is unclear. There is no point in bringing things to a flood. Tightness and tightness again. No pipe connections should leak a week or a month after the connection and installation of the shower is completed.
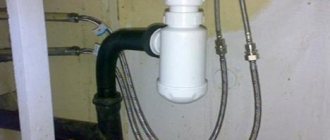
If the drain hole of the shower stall is too far from the sewerage inlet, then you will need to install a waste pump. It will not be possible to organize gravity flow through pipes here. This unit operates silently and is just the right size to be placed under a pallet.
A bathroom with a shower cabin installed must have good ventilation, this is especially important if there is a “steam bath” function.
All pipelines must be located at a slight slope. Gravity flow is needed for both sewerage and water supply. Sewer pipes are laid inclined towards the riser, and water pipes are laid from it to the shower stall, so that when shut off, the water completely flows out of the system.
In overly budget models, the drain can be made of silumin alloy. This drain will last a maximum of two to three years. It’s better to immediately spend money and replace it with a stainless steel analogue, which also comes with a normal siphon made of high-quality plastic.
Water pipes laid to the shower stall should be equipped with ball shut-off valves and dirt traps. Water in centralized systems is not always perfectly clean. If the holes in the watering can are not yet clogged with grains of sand, then the nozzles will definitely stop working. Filters with valves can be placed directly at the riser or at the ends of the inlets near the booth.
If you want to know how to repair a shower box, you can read one of the popular articles on our website.
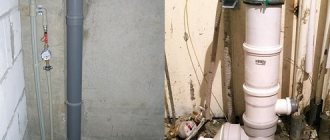
How to connect a shower stall to the sewer
Do-it-yourself connection to the sewer is made at the time of installing the shower tray, since it is necessary to select pipes that are suitable in diameter and connect them correctly to prevent leaks.
Usually a siphon is included in the package, allowing you to connect to the sewer pipe without additional problems. Otherwise, you will have to select the appropriate design and size of the siphon yourself.
Then you need to place the pan at the intended installation location and measure the height from the bottom point of the pipe to the floor, which will be accessible for installing a siphon and communications for draining water into the sewer.
Most manufacturers of shower stalls leave enough space for installing a siphon, but in some cheap models the space may be close to each other and it will not be possible to ensure simple drainage of water by gravity.
That is why, in order to do the installation yourself, it is not recommended to purchase any plumbing devices and materials in advance.
The following types of siphons exist:
- Bottle. It is a cylindrical container with water drainage at the end just below the level of the inlet pipe.
The bottom of the cylinder has a removable cap to remove accumulated solids. The advantages include ease of installation and maintenance, as well as good protection against pipe clogging.
However, the design is quite large and cannot always be installed under the cabin tray.
In addition, it is necessary to ensure unobstructed access to the siphon, which is not always provided for by the design of the pallet.
- Knee. It is a corrugated pipe, bent in the shape of the letter U or S.
It has a simple design and is easy to install even in a minimum amount of space.
But as the clogging progresses, the drainage speed, unlike the previous type of siphon, will deteriorate, which can lead to some discomfort during operation.
Corrugated walls will promote the accumulation of hair and grease on the walls, so additional cleaning by chemical or mechanical means will be required.
- Drain ladder. A structure that is a cubic or other shaped volume for drainage water, which is mounted at floor level or in a special technical opening.
It has increased compactness and ease of execution. There is no additional protection against overflow and therefore the height is up to 80 mm.
Installation is carried out on flat pallets. Allows you to install a shower stall even if there is a minimum of space in the bathroom and under the tray.
The design of the siphon should be with a minimum number of joints and connections. This is due to the fact that over time the seals wear out and leaks can occur.
When choosing a siphon, you should take into account that up to the drain point you need to ensure a pipe slope of 30 mm per linear meter for pipes with a diameter of up to 100 mm.
Therefore, in order to reduce the cost of connecting to the sewer, you will need to organize a gravity system by reducing the distance to the connection point to the main pipe.
Otherwise, you will need to install a sump pump to organize forced pumping of water.
Connecting the shower cabin to the sewer is carried out in the following sequence:
- Before installing the pallet, turn it upside down.
- We screw a siphon with a flexible hose onto the drain hole.
- We install the pallet in its place, set the position according to the level, and fix it to the floor.
- We select the height of the siphon so that its lower part is 50-70 mm below the entrance to the sewer pipe. The higher the height, the higher the drain rate.
- We connect the drain hose to a tee or sewer pipe. In this case, we carefully seal the connection with a special compound or silicone sealant.
- We check for leaks by pouring approximately 10 liters of water into the pan.
Pallet installation
It should be noted that the installation technology for different cabins may differ. For example, quite often the connection points for water supply and sewerage differ. Therefore, before starting work, it is advisable to carefully study the technical documentation for the purchased model.
The first step is to install the pallet, if it is part of the structure. It is mounted on special support legs, thanks to which you can adjust the height from the floor surface. The horizontal position of the side is also leveled with their help using a level. It is important that the base touches the wall tightly, and that there are no even small holes in the floor, then water will not accumulate.
If the functionality requires the presence of electrical appliances located under the pallet, then it is recommended to place them on an additional metal frame. Leaving them directly on the floor of the room is prohibited by safety rules.
The pallet must be installed in a strictly horizontal position. During its manufacture, the manufacturer specially creates a slight slope to ensure gravity flow of drainage liquids into the sewer. If during installation this element is not very evenly positioned, then the water will not be able to drain away on its own, and after drying, marks will remain on the floor.
Watch the video
Make a podium for the shower stall part 1
Some open-type models do not have a tray, so you should make one yourself. In most cases, a concrete podium with tiled or mosaic cladding is built on a small elevation with a drain ladder. The procedure consists of the following steps:
- The perimeter of the base is laid out. The most commonly used type is a ceramic type of solid brick.
- A drain is located at the required height, which must then be connected to the sewer.
- A concrete screed is made with the obligatory creation of a slight slope towards the drain.
- The tiles are laid using waterproof adhesive.
- The joints must be sealed using a water-repellent agent or sealant intended for plumbing work.
To prevent subsequent soaking of the base, you can add PVA or liquid glass to the cement solution. This will significantly increase the water-repellent properties of the structure. It is also advisable to cover the floor, side walls and the resulting concrete base (before laying the tiles) with a special waterproofing agent.
The diameter of the drain pipe for the drain is standard - 4 cm. If you choose a smaller diameter, the likelihood of clogging will increase. With a larger cross-section, it will be difficult to fit the pipe into the small space under the shower stall.
Preparation
When the type of shower and the location for it have been chosen, preparations for installation begin.
Wall requirements
The area where the cabin will be installed will be damp and damp due to frequent contact with water. Therefore, the walls near which it will stand must be made of water-repellent material. The best choice for this purpose is tiles secured with water-resistant material. Covering with PVC panels, brick, and stone is also suitable. If it is not possible to completely change the material of the walls, you can sheathe them with moisture-resistant plasterboard and additionally coat them with a waterproof compound. This will help completely prevent rotting and the proliferation of fungi and bacteria. In addition, the coating must be easy to wash and not deteriorate under the influence of cleaning agents.
In addition, ventilation and electrical conduction must be provided.
Open communications can be covered with plaster, and the wires can be placed where the importance is minimal, that is, as far as possible from the shower itself
Doors or fencing
When choosing what to install as shower doors, you also need to focus on the size of the room.
Drawing of swing doors
For larger spaces in your home, you can opt for fixed fencing. This way the shower will be open, looking beautiful, aesthetically pleasing and modern. Sometimes a rotating fence or screen is additionally installed - this advantageously combines a classic shower box and a modern open shower. With this solution, splashes will certainly fly away, and only one person can use the shower at a time.
Doors are a classic solution that will suit any shower stall. They can be matte or glossy, with different opening options. For cramped bathrooms in a private house, those doors that take up as little space as possible are suitable - sliding, folding and so-called “in-swing”.
Size calculation
The dimensions are also planned taking into account the area of the bathroom and your own needs, but you need to start from standard measurements. The minimum size of a cabin that can accommodate an adult of average build is 80x80 centimeters. But in such a space you can forget about comfort. It is better to install a cabin with dimensions of 90x90, 100x100, 90x110 centimeters, depending on the capabilities of the room. The most comfortable size would be 1.2-1.4 meters on at least one side.
Drawing of the communication line to the shower stall
In city apartments, the height of the shower is determined by the height of the ceiling. In any case, this parameter must be calculated so that a person can enter the cabin at full height, easily reach the mixer with his hand, and so that splashes of water fall on the ceiling as little as possible.
Tools and materials
Before building a shower, you need to prepare all the necessary tools:
- drill;
- putty knife;
- brush;
- roulette;
- level.
You also need to prepare materials:
- brick;
- cement;
- waterproofing mixture;
- film and mesh.
Once the materials are ready, assembly can begin.
Problems with the installation of a sewer system
Old pipes
During sewer installation work, you may encounter a number of problems. For example, at the stage of dismantling work, you may encounter old pipes “tightly” fixed to the wall. This is especially true for residents of old apartment buildings. In this case, you need to carefully remove the old finish so as not to damage the elements of the general sewer system.
Correct slope
When laying new pipes, the slope that we have already mentioned must be observed. But the fact is that during installation work, the created structure is subject to slight displacement. To prevent this process, you should use hanger clamps with latches.
Leaks
Another problem is the presence of continuous leakage as a result of testing and reconnecting the pipe to the fitting. In this case, an adhesive-based sealant is used. It is applied to the joints. The pipe with the rubber band is inserted into the fitting. After drying, the sewer system is tested again.
Smell
A fairly common problem in the bathroom is an unpleasant odor. It can be caused by various reasons:
- lack of water in the water seal;
- damage to the sewer pipe;
- deterioration of the tightness of pipe and drain connections;
- accumulation of debris at the bottom of the siphon.
Lack of water in the water seal
The first reason for the lack of water in the water seal may be a poorly installed pipe in the siphon. The pipe simply does not reach the water, and the smell passes by it. This problem is solved by lowering the pipe 2-3 cm into the water.
Sagging corrugated pipe.
This defect could occur if the pipe is not secured with spacers or tape.
Prolonged non-use of the bathroom is also one of the factors causing unpleasant odors. The water in the siphon simply evaporated. To remove the unpleasant odor, turn on the water and ventilate the room.
Damage, deterioration of tightness and blockage.
When a crack forms in a pipe, dirty water flows onto the floor and wall. This results in stains and mold, which lead to an unpleasant odor. The crack is sealed with sealant, and the pipe is wrapped with tape. The sealant is also used to restore the tightness of drain and pipe connections.
Cleaning the siphon from debris accumulated at the bottom is done by unscrewing the bottom of the siphon and washing it. For preventive purposes, chemicals designed to clean sewers are periodically used.
Pipe selection criteria
The main technical characteristic of plastic pipes is their diameter. It’s worth mentioning right away that in most cases, manufacturers mark pipes based on the size of the outer diameter.
For sewage drains, the main parameter is the internal diameter. The purchase of pipes of a certain diameter is carried out depending on the type of plumbing. In particular, the minimum pipe diameter is:
- for washing machine and dishwasher – 25 mm;
- for bidet and sink – 32 mm;
- for a shower stall or bath – 50 mm;
- for several devices connected to one outlet - 70 mm;
- for the toilet and the main riser in the apartment - 100 mm.
The second parameter that is taken into account when purchasing sewer pipes for the bathroom is the length of the products. Pipes with lengths from 1 to 6 m are available for sale. It is most convenient to work with material that is 2 or 3 m long.
When calculating the required footage of plastic pipes, you also need to take into account that they are equipped with sockets with sealing rubber bands, which are designed to tightly connect adjacent elements.
Required tools and materials
To connect the cabin to water supply and sewerage, depending on its type, you may need the following set of tools and materials:
- corrugated pipes;
- flexible water supply, adapter;
- fum tape, silicone sealant;
- shut-off siphon;
- keys, including adjustable keys;
- pliers;
- screwdriver or screwdriver;
- level;
- hammer drill and drills;
- when constructing a podium - bricks, cement, sand, gravel and crushed stone; water, an old bucket or basin.
Corrugated pipes.
Cabin selection
To understand how to connect a shower tray to the sewer system, you need to understand the types of cabins. Knowing their features will also help you when choosing the appropriate option.
A shower cabin is a hermetically sealed box that includes a shower tray and the shower itself. Hygiene procedures are followed there. The diameter of the tray may vary depending on the dimensions of the cabin. All shower cabins can be divided into two types:
- Open type structures. This is a regular shower tray. The space around it is limited only by the walls of the bathroom and the walls of the stall itself, which have a door. There are no structures on top, so the shower is attached to the wall of the room. This type of design is also commonly called a shower enclosure.
- Closed cabins are popularly called boxes. In addition to the shower tray and walls on all sides, they also have a so-called “ceiling” to which the shower sprayer is attached. Thus, the space is closed and limited on all sides by the structures of the cabin itself. The diameter of the pallet and the dimensions of the cabin may vary. Typically, sizes vary from 70x70 cm to 210x210 cm. Based on functionality, such designs are divided into simple and multifunctional.
Multifunctional shower cabins can be equipped with a rain shower system, hydromassage, radio, aromatherapy system and sauna mode.
Shower boxes or closed cabins
Closed-type shower cabins or boxes are characterized by a tight design, since they are closed on all sides by walls, a floor and an upper dome, a more complex design, size and number of functions. Boxes with one function are available - a shower, there are models reminiscent of a spaceship cabin, with a control panel and an abundance of buttons that activate a wide variety of options, such as horizontal or vertical hydromassage, contrast shower, Turkish bath, aroma and chromotherapy procedures, tropical shower, sauna.
Connecting a shower cabin with your own hands
Some models are equipped with comfortable seats and handrails, mirrors, voice control, telephone, overhead and side lighting, shampoo dispensers, liquid soap or shower gel. The significant energy consumption in this case makes it necessary to connect the shower cabin to the electrical network via a separate cable.
Preparatory work
Having decided on the location, you can safely begin installing the structure. If desired and with sufficient footage, the device can be installed anywhere in the bathroom, but do not forget that the ideal location is next to the ventilation hole, since in any other case the humidity in the room and condensation will exceed all permissible limits.
Information on how to connect a shower cabin is contained in the instructions attached to the design. Before making the actual connection, you need to study the assembled structure in detail, prepare the bathroom for installation, ground the metal parts of the structure connected to electricity, and prepare the tools that will be needed during the work, namely:
- pliers;
- adjustable wrench;
- Phillips and slotted screwdrivers.
It is important to check the equipment and, if necessary, buy additional materials:
- connection adapter;
- compression fittings;
- flexible hoses;
- fum tape;
- sealant.
During the preparation process, you should check how the water supply is organized and install cleaning filters necessary to increase the service life of the parts. Next, a detailed diagram of connecting the shower cabin to the water supply is described.
It is important to take into account all the nuances and subtleties so that the process of taking procedures brings only pleasure.
The water supply to the shower stall is not always carried out in the same way. It depends on the location of the water supply pipes and the type of cabin. The hydromassage box is supplied with water through a suspended pump, which is located under the cabin, so the water intake point is located at the level of the pan.
Installation and connection of a shower cabin
If the shower cabin is equipped with a steam generator and a hydromassage function, you should check the water pressure, since at a pressure of less than 15 bar, certain functions do not work. In such a situation, you will also have to install a water tank, the volume of which should not be less than 200 liters.
Examination
To make sure that the shower stall is installed correctly, you need to do the following:
- Climb into the tray and walk around in it. The product must stand firmly, without swaying or deforming. If swinging is detected, you need to adjust the legs of the pallet, and in case of deformations, strengthen the frame or place bricks under the pallet.
- Open the water at maximum pressure and see if there are any leaks and if the water has time to flow into the sewer. In the case of hidden installation of water pipes, checking for leaks must be carried out before filling the groove with solution.
- If there are leaks, the threaded connections are repacked, that is, they are disassembled and reassembled by wrapping more sealant around the threads.
- If the cabin is open, pour water where the walls and tray meet the bathroom wall. Water should not leak out. Otherwise, sealant must be added to the gap between the cabin and the wall.
- Check the functionality of the RCD using controlled current leakage. This operation should only be performed by a professional electrician.
Cheap pallets made of thin steel or acrylic can be deformed under the weight of the user, as a result of which sealing the gap between such a product and the wall with a sealant is not possible. In this case, the gap must be covered with a special part - a plastic or ceramic border, which is glued to the wall.
If the check is successful, the shower cabin can be used.
On a note
After connecting the shower to the water supply, sewerage and electricity, we try to start it up and make all the adjustments. The completed installation is checked in one simple way. A paper sheet is placed in the space between the booth and the floor, the tray is filled with water, and then drained. A completely dry sheet of paper will be proof of quality work done.
Do not forget the fact that all metal structures of the device connected to electricity must be grounded.
It is advisable to equip the room where the shower is installed with ventilation.
DIY installation technology
It is customary to start assembling the cabin structure from the pallet. You can install it with a frame or do without it.
Assembling the pallet
The material for making the pallet frame is metal. The main thing in the frame is high-quality fastening of the elements. A frame is a frame structure made of beams installed crosswise.
We act according to the following plan:
- We screw the studs into the holes of the pallet.
- Screw the nuts onto the studs. We attach one from below, and the second for support.
- We put the frame support on the studs.
- We place the central leg and fix it.
- We fix the fastening beams.
- We use brackets to support the screen.
- We put the pallet in place.
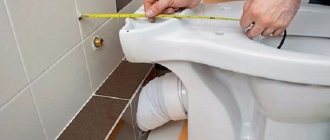
When installing a pan, it is important to drain correctly. Installing a siphon
An important detail is to check the joints for leaks. If there are leaks, they must be repaired with sealant.
Small pallets do not require a frame. The main thing here is to install the siphon correctly. Disconnect the hose from the clamp. We connect the siphon to the pan - before doing this we treat the joints with sealant. We wait for the sealant to harden. Then we put the hose and clamp back.
After fixing, check the tightness. After pouring water, see if any leaks are visible.
This is very important, it is better to fix everything at this stage rather than disassemble the entire structure if something goes wrong
Communications
An important point in installation is the connection to the sewerage system.
We proceed according to this scenario:
- There is a film around the contour of the drain hole; it should be removed.
- We will replace the installed rubber gasket with silicone.
- Installing a siphon.
- Lubricate the threaded connection and the lower part with sealant.
- We connect a siphon to the sewer system. We treat the joints with silicone.
Walls, doors and roof
Despite the fact that this is the easiest stage of installation, it would be better to enlist the help of a partner. This will greatly simplify the entire procedure. When installing the structure, follow the manufacturer’s advice, because the devices, although similar to each other, each cabin has its own differences. The walls are fixed with bolts.
Sequence of work:
- Remove the film from the top of the pallet, leaving it only on the bottom.
- Moving the pallet away from the wall, we install the wall.
- We connect it to the corner of the hole in the pallet and fix it. The main thing is not to overdo it. Screws must be screwed in without overtightening.
- We mark the corners with holes with a marker.
- Remove the partition and apply sealant.
- We put the partition back and remove the excess sealant.
- We place a tray with a partition against the wall and try on the central part.
- We apply sealant to the joints of the side panels.
- We connect the walls and the central part.
- We fasten the remaining walls, like the first.
- We treat the profile with sealant and install partitions.
- We place the profile at the top and bottom. We treat the bottom one with sealant.
Assembling the roof:
- We unscrew the ventilation grilles and remove the film.
- We treat the watering can with silicone. This will make the connection tighter.
- We're putting up a ceiling. We tighten it from the bottom with self-tapping screws.
- We secure the hoses to the slats with clips.
- Based on the color marking, we connect the wiring.
- We connect the device, check the supply of water and electricity.
- We seal the central part and along the lower perimeter.
Putting up the doors
After completing the assembly, we install the doors. Usually this doesn't raise any questions.
We proceed this way:
- We fix the limiters using self-tapping screws;
- We put handles on the doors;
- we attach moldings with magnets to the door, install rollers with the wheels facing out;
- We place the door on the upper rollers.
This completes the installation. Don’t forget to check how smoothly the doors move and how tightly they close.
General assembly rules
First, they always install the pallet, then the walls, hang the curtains or doors and finish with the installation of the roof. Let's move on to the instructions on how to properly assemble and install the shower cabin structure yourself.
Pallet
Acrylic
screwing the legs, siphon and fixing the drain
Acrylic models need a frame. Its beams are usually arranged crosswise, but can also be parallel. Studs are installed in the holes of these strips, secured with nuts on the top side and a thrust bearing on the bottom.
Using a level and an adjustable wrench, we adjust the height - the surface must be level to ensure normal drainage and to avoid the accumulation of water on the sides of the pan. A correctly installed structure does not bend or make cracking noises.
Ceramic
Ceramic options do not have space under the tray - they are supplied as a single block. The space for draining and laying pipes is cut out in the floor itself. Installation occurs according to the following algorithm:
The pallet is “tried on” to the area where the booth will be located. A marker outlines the perimeter and makes a mark at the location of the drain.
It is important that the drain hole is located as close to the drain pipe as possible to ensure rapid drainage of water. A hole is cut in the floor at the location of the siphon. A furrow is cut for pipes and communications.
The area under the booth is impregnated with a thin layer of PVA glue, slightly diluted with water. After complete drying, it is covered with another thin layer of adhesive. A siphon is connected to the drain, a tray is placed on the solution, maintaining the same horizontal level in all corners. At the end, a strip of silicone sealant must be applied at the joints with the floor and walls.
In parallel with the installation of the siphon, the water supply is connected - at this stage tees for cold and hot water will be useful. All joints are sealed with fum tape or sealants. Potential problems with leaks are eliminated by checking the seal (pour a bucket of water into the pan several times).
All electrical work is carried out before the walls and curtain doors are installed.
Walls
First, the rear part is installed - the one where electrical appliances, communications, etc. are located. It is located next to the side panel, attached to it and to the pallet with self-tapping screws. Next, a metal arch is mounted to the pallet with bolted connections
It is very important that the holes on the frame exactly coincide with the mounting holes on the pallet itself
The joints with walls and brackets must be treated with sealant so that during operation water does not leak outside the shower stall.
Curtains
only after the arrangement of all parts has been completely settled
A strip of rubber seal is cut and squeezed into the gap formed between the groove of the panel and the glass. Mounts with a roller mechanism are inserted. The rollers can be adjusted so that the sashes touch as closely as possible. Stoppers are placed at the ends.
When working with glass, caution is important - its hardening means not so much resistance to impacts, but a guarantee that, when broken, it will shatter into “peas” and will not form sharp fragments
Roof
The dome is installed last. It is equipped with a ventilation system, a watering can with a hose, and a speaker. Optional backlight.
To prevent the speaker from buzzing, it is also treated with sealant around the perimeter.
From this video you can learn more about the assembly and installation of the shower cabin: