When purchasing a washing machine, you should prepare a place for its installation in advance; usually the washing machine is placed in the kitchen under the countertop or in the bathroom. When deciding how to connect a washing machine to the water supply in the bathroom, you should take into account the fact that for its normal functioning it will need a connection to several networks - electrical, water supply and sewer.
It is not too difficult to connect the washing machine yourself - this will save some money, because the services of plumbers are among the most highly paid. In order to carry out installation work correctly, it is useful to know all the stages of its implementation, starting with the delivery of the machine to the house and ending with its first inclusion.
Fig.1 Washing machine in the hallway
Materials and tools for connecting to water supply and sewerage
The need for certain materials when installing and connecting washing machines to sewerage and water supply is determined, first of all, by the location of the unit and the accessibility of the designated objects.
In some cases, it is necessary to incur significantly higher costs in order to subsequently use household appliances conveniently for many years. If you plan to lay additional branches from the water supply in the groove, you will need a fairly powerful angle grinder with a saw blade for concrete. You can use a hammer and a chisel to break out the concrete.
A pipe without joints is laid in the groove to ensure its long-term operation without leakage. Otherwise, if a leak occurs, restoring the functionality of the pipe will involve a large amount of troubleshooting work.
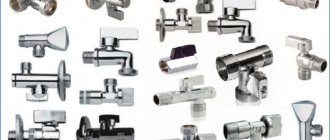
To connect to the water supply network, a tee with a shut-off valve is usually used, and to install it in place, a set of wrenches or a universal adjustable wrench is used. All threaded connections are sealed with tow or FUM tape.
Installing an external pipe involves attaching the pipe to the wall; for this you will need an electric drill and concrete drills. Plastic dowels are installed in the drilled holes, fastening is carried out with screws of the appropriate size.
When installing washing machines, the main requirement is that the top cover is horizontal in relation to the floor. For precise installation of the washing machine, a building level is used; adjustment is made using screw support legs.
To arrange a drain for washing machines into the sewer, you will need a drain adapter with an outlet at an angle of 45 degrees.
To connect washing machines to electricity, you will need a three-core cable with a cross-section of 2.5 square meters in double insulation and a 16-amp diffusion machine with a leakage current of no more than 30 milliamps.
In addition, it is possible to use control equipment - a voltmeter. Let’s take a closer look at how to properly connect the washing machine to the mains below.
Preparing washing household appliances for installation
First of all, when the unit is delivered to the installation site, it needs to be unpacked. Usually the machine is packed in a cardboard box and secured with plastic tape. It needs to be cut and removed.
After this, the cardboard box is carefully removed and the foam pads are removed from the top and sides. Next, you need to lift the car and pull out the lower foam platform.
In this case, it is worth paying attention to its design - if there is no special boss in the middle on which the device drum rests in the transport position, then in this design it is manufactured and installed separately. You need to tilt it and remove this insert.
Please note that the cardboard packaging and foam pads must be retained for the duration of the warranty. If a situation arises in which you need to replace the machine due to its defect, this operation will not take place without packaging. These are the terms of the guarantee.
Inside the cardboard package there is an envelope or folder with technical documentation. It contains:
- A passport for the purchased washing machine indicating the personal unit number and other credentials. All entries in it must be certified by the store’s seal.
- A warranty card, which is certified by the store’s seal indicating the date of sale, since the countdown of the warranty period begins with it.
- Operating instructions, starting from the moment of unpacking, and instructions on the installation procedure.
You should strictly follow all the manufacturer's requirements, since failure to comply with any of them will result in a waiver of warranty obligations.
Watch the video
The packaging also contains the components of the purchased washing machine. Typically they include:
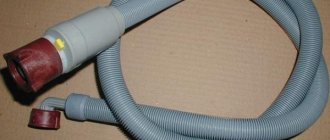
- Flexible filling hose equipped with plastic union nuts for connection to the machine and water supply;
- drain hose for removing used water after washing and spinning clothes;
- reduction – an intermediate part for connecting the drain hose to the sewer pipe;
- bracket for fixing the drain hose on the wall;
- wrench for removing transportation screws and adjusting the position of household appliances in space before turning them on;
- plugs installed on the holes for transportation screws after they are removed.
These are the main items of the sales kit, which may differ from model to model.
Removing shipping screws
This is a mandatory operation before connecting washing machines to water supply and sewerage. Their purpose is to secure the drum during transportation to prevent damage.
As noted above, a tool for removing bolts is included in the sales package.
Under no circumstances should the removed screws be thrown away; they will be useful if you need to transport the washing machine to a warranty workshop. The holes where the transport screws were must be closed with the covers included in the sales kit.
Placement options for washing household appliances
Household appliances of this kind are not purchased spontaneously; the purchase is preceded by careful analysis and preparation. First of all, this applies to the installation location.
The need to drain used water determines the location of washing machines as close as possible to the distribution of the sewer system.
Such points are located either in the bathroom or in the kitchen. There is also a water supply network there.
As for connecting to electricity, washing machines may require a separate power supply line from the input panel to the location where the outlet is installed.
Washing machine in the kitchen area
Installing a washing machine in the kitchen is common and relevant. This distribution is due to technical parameters that make it possible to simplify the connection without additional laying of water supply and drainage pipes.
Besides:
- more space than in the bathroom;
- less destructive moisture;
- in the kitchen it is easier to connect to the power supply;
- the ability to create a separate area for electrical appliances to make it easier to do everyday life and have everything “at your fingertips”;
- the surface of the washing machine can be used effectively, for example, it can be equipped with a place for an electric kettle and a microwave oven;
- The washing process will not interfere with water procedures.
Washing machine in the kitchen under the countertop
In addition to the advantages, there are also disadvantages. Washing involves the use of a number of chemicals that are harsh and can cause significant damage to the body. Therefore, all chemicals should be kept separately and away from food.
Installing a washing machine in the bathroom
Placing a washing machine in the bathroom is a classic option. Among the advantages of installation in this area are:
- in the bathroom, the floor often has enhanced waterproofing, which will avoid conflict with neighbors in the event of a water leak due to equipment breakdown;
- The close proximity to the bath allows, if necessary, to soak the laundry and easily transfer it to the washing machine or, conversely, remove it and wring it out manually.
- Chemicals and the accumulation of laundry waiting to be washed fit more harmoniously into the interior of the bathroom.
Washing machine in the bathroom
If there is no free space, you can plan installation under the sink or purchase a combined set, machine + sink.
In any case, the installation location is selected before the automatic assistant is purchased, and the washing machine model is selected to fit the dimensions of the installation location.
Various crane installation schemes
Let's look at popular connection options that you can do yourself using a minimum of tools and additional parts.
Installation of the flow element
To install a faucet of this type (regular or tee), you must first shut off the cold water supply, which can be done using a faucet on the riser. After this, the remaining liquid is drained from the pipes, which may interfere with further manipulations.
The easiest way is to install a flow valve on a separate branch of the pipe. As a rule, in this case a threaded bushing is already provided, to which you can easily screw a faucet with a two-outlet system connected to the filter. This element is attached to the inlet hose.
After completing all the manipulations, it is necessary to check the fasteners for leaks. If water is noticeable, all connecting nodes should be redone by installing additional gaskets.
End valve installation
If a special branch of the water supply is connected to the washing machine, you can connect the end valve using a tee (mortise clamp). This part is carefully screwed to the pipe so that the guide sleeve faces outward. After this, holes are drilled in the pipe through which a connection is made to the clamp or section of pipe where the tap is supposed to be installed.
At the end of the pipe, a thread is cut that matches the size and type of grooves applied to the tee. The external thread is wrapped with a sealant (FUM tape) or flax, after which the valve is screwed onto the outer pipe.
A hose (attached to the automatic machine or purchased specially) is connected to the second end of the tap. The other end of the hose is installed in a special hole, which is located on the back side of the washing unit (the transport valve must be removed from it).
The assembled structure is checked for leaks. Typically, the angled end of the hose is connected to the washing unit, while the straight end is connected to the water supply. This option is more convenient because the washing device is usually installed next to the wall.
Installation of tap with pipe insertion
A more complex process is to install the tap directly on the pipe, since in this case you will have to cut out the section.
For plastic structural elements, this can be done relatively easily using special scissors. Such an operation will require much more effort if we are talking about a metal pipeline: in this situation you will have to use a grinder.
To determine the size of the cut section, you need to add the length of the tap and the size of the filter. After this, you can make an incision and cut threads at the ends of the pipes that match the parameters with those on the tap. Following this, a filter is installed that will protect the machine mechanism from impurities contained in tap water.
Then a tap is installed to regulate the water supply. To do this, you need to remove the mounting nuts from the part that are used to connect to the pipe. If the installation is carried out on a polymer structure, this part should be expanded using a calibrator before starting manipulation.
The joints are fixed with tightening rings. The shut-off faucet compartment is connected to the inlet hose of the unit. After this, all nuts are tightened with an adjustable wrench.
It is important to pay attention to the fixation force: a poorly tightened or overtightened bolt can cause enormous damage to the structure, becoming a source of leaks
All joints are well sealed with O-rings, which are included with the faucet and/or filter, as well as with fum tape, flax fibers or other materials. The final stage is checking the assembled structure.
How to connect an automatic washing machine to the water supply
The most important stage of installing an automatic machine is installing the equipment to the water supply system. Connecting the washing machine to the water supply involves the following steps:
- determine the location of the machine in order to select the connection option based on which hoses and additional connecting elements are purchased;
- installation of flexible pipes (if such a step is necessary) is carried out along the stack and placed behind all pieces of furniture, that is, purchased taking into account all bends;
- There are often hoses included with the equipment, but they are not always long enough; then you can use an extension cord; such items are sold in plumbing supply stores.
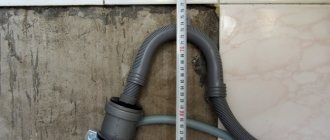
Connecting the washing machine to the water supply
The water supply pipe to which the washing machine is connected must have a ball valve or valve that shuts off the water supply. What to choose, a faucet or a valve, depends on the specifics of the wiring.
As a rule, the connection (insertion) is made on a straight section of the pipe. For this, either a tee or a piece of pipe is used, which is mounted into the main line.
Flexible hoses are used to connect to a toilet cistern or faucet.
Before you begin installing the system for connecting the machine to the water supply, it is important to prepare materials and tools: an adjustable or gas wrench, fum tape or tow, the latter being preferred by plumbers.
To connect to an internal water supply system made of polymer pipes, you will need a special calibrator and a soldering iron for fastening the pipes. In addition, you will need fittings for plastic or metal-plastic pipes.
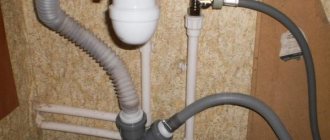
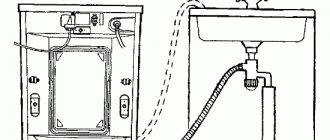
Connecting the hose to the washing machine
The first step is to attach the hose to the washing machine. A filter is first installed at the end of the hose. The convex edge of the filter faces the drain. A special hose mount is screwed onto the corresponding element of the machine; it is not advisable to use keys.
Connection to mixer
Connecting the washing machine to the mixer
No less popular is connecting the washing machine to the water supply through a mixer, which is located in the bathroom or kitchen. To do this, you will need a certain tee in which a ball valve is installed. The tee is installed on the cold water supply pipe in the mixer. This connection option is quite simple and reliable; the only drawback is its aesthetic appearance. The rubber water supply hose to the machine is within sight.
Separate branch
The simplest method of connecting to a water supply is using a separate outlet, designed at the stage of laying water.
Connection to the toilet cistern
The easiest way to connect a washing machine to the water supply system used in apartments is to connect it to the toilet cistern. The entire complexity of the operation associated with installation is limited to a few steps that are accessible even to a beginner.
Connecting the washing machine to the toilet cistern
When connecting the washing machine to the toilet barrel, it is necessary to remove the flexible line from the pipe. Then install the tee fitting. Install the water line from the tank to the tee, as well as the hose through which water enters the machine.
This hose must be equipped with a valve or shut-off valve. Such installation is available if it is possible to place the washing machine next to the toilet. It will not be possible to connect to the water supply from another room in this way.
Connection using a tee
The washing machine is connected to the water supply using a special tee. In this case, the pipe can be either metal-plastic or polypropylene. To do this, you need to cut the pipe, and install a metal tee along the cut, which acts as a communication tap to the washing machine.
Tee for connecting the washing machine to the water supply
Step-by-step manipulations look like this:
- cut the pipe;
- determine fitting parameters;
- prepare part of the pipe into the appropriate adapter;
- connect the ring to the nut;
- using a calibrator, flare where the tee is connected;
- connect the pipe and fitting;
- secure with O-rings and tighten the nuts.
Before attaching the adapter, it is better to install a shut-off valve on it in advance. This is done so as not to damage the elastic metal-plastic pipe in the process.
At the completion stage of connecting the tee, flexible hoses from the washing machine are installed. If the water supply in the apartment is made of plastic pipes, then in addition to fittings you will need a special soldering iron.
Fitting
An excellent connection method for those who have a metal-plastic water pipe is to connect using a fitting (this is a special connecting tee).
- To begin with, it is necessary to measure the installation length of the tee (this is the distance between the beginning of the fittings, excluding the thread).
- Next, you should find a flat section of the pipe where installation will be carried out and measure the installation length on it.
- Cut a piece using scissors.
- Then we put the nuts on the two halves of the pipe.
- We expand the ends of the pipe with a calibrator so that the fittings can be inserted into it.
- We put on the tightening ring and insert the fitting until it stops.
- Tighten both nuts one at a time. To prevent the tee from spinning, hold it.
Crimp coupling
As a last resort, when connecting to a water supply, a crimp coupling is installed. It is necessary to drill a hole in the water pipe with a diameter of about 10mm. And a crimp coupling is installed on top. A 15*20 mm angle ball valve is screwed into the coupling. and only after that the inlet hose is connected.
How is a plumbing tee used?
The tee with the tap is made from such parts as: a body made of brass, which is plated with nickel, a rod, which is also made of brass, a ball valve, handles, rings and a clamping nut. The tee is used to connect household appliances to the water supply; it can also be used to install another water supply. It is easy to install the tee using a union nut using the union connection method.
Try to purchase locking equipment from trusted manufacturers
You can install the tap tee in any position convenient for you. A tee valve can also be used to move liquids with temperatures not lower than -10 and not higher than +85 degrees. The pressure in the pipes should not exceed 6 bar. The handle of this faucet rotates 90 degrees, and the weight is about 100 grams. This tee faucet comes with two outlets: three-quarter and half-inch. It can also have both external and internal threads. The manufacture of handles for such faucets is sprayed in black or red. The service life will be approximately four thousand cycles and repair of the crane is not possible. To avoid early failure of the tee valve, you must very carefully choose a high-quality tee valve in order not to become the buyer of a defective product or a counterfeit tee valve made of low-quality and cheap material.
You need to remember the advice of the experts to prevent buying a fake or defective product:
- The logo on the faucet must be clear;
- Letters on the product should not be smeared;
- It is necessary to buy strictly brass products and that the ball for stopping the water in them is also brass, since an analogue made of metal can lead to a flood and subsequently to quarreling with the neighbors below and, accordingly, to the payment of funds for repairs;
- It is imperative to ask about the quality of the product, this is necessary to ensure that the product is not made from recycled brass;
- If the funds for the purchase allow, then you need to choose something more expensive and of better quality;
- The locking ball must be perfectly smooth and reflective;
- If the water supply pressure in your home is not constant, but fluctuates, then you need to purchase a faucet with a stem inserted from the inside.
Based on these recommendations, you can purchase a high-quality faucet that will become a reliable protector from unforeseen situations.
Non-standard options
Installation of built-in equipment
A built-in washing machine is a great space saver in an apartment or house. You can build a cabinet for the washing machine, place it in a closet, on a shelf, mount it in a wall and other places. Only such creative ideas should be carefully thought out to avoid trouble.
In a private house
The classic installation option is the bathroom. All the necessary communications are present here, and it will be convenient to use the machine here. The only risk is increased humidity in the room, which in the future may affect the performance of the equipment.
In a private house there are many unusual ideas for installing a washing machine: in a closet, under the stairs, in a closet, in any buildings located in the courtyard of the house, etc. Only here can a problem arise with communications, water and electricity.
In the kitchen or hallway
If there is not enough space in the most common places, then the equipment can be installed in the kitchen or in the hallway. But it’s unlikely that anyone in the corridor will have the required communications. You will have to bring everything to the installation site, and this will significantly complicate and increase the cost of the process. But it will fit quite comfortably in the kitchen. Most often it is mounted next to the sink or in a built-in kitchen unit. It is worth considering that the temperature and humidity of the kitchen will not always correspond to the operating rules of the device.
Drain installation
At first it may seem that organizing the drainage of such household appliances is as simple and understandable as possible. However, in reality, everything depends on certain connection nuances.
This can be done in two main ways.
- Temporary. With such a connection, the drain hose is lowered into the toilet or bathtub (in case of a combination).
- Stationary. At the same time, a tie-in is made into the sewer. However, here owners quite often face a number of problems.
The machine is connected to the sewerage system in accordance with the following important requirements:
- the length of the drain hose should not be too long, as this may cause a significant load on the drain pump, which may cause it to break;
- as the drain is connected to the siphon, it will be possible to prevent the penetration of characteristic odors into the equipment directly from the sewer, which is a significant advantage.
The drain hose must be connected to the siphon of the washbasin or sewer. The result is a very strong and tight connection.
Now let’s look in detail at how it is possible to ensure the drainage of such household equipment using different methods. You can drain the water from the device into a bathtub or washbasin. This option is quite simple, but not very practical.
Some manufacturers add to the equipment kit such an element as a special hose-hook. It is fixed on the wall of the bathtub or sink. The main advantage of this solution is that to ensure it, there will be no need to connect equipment to the sewerage system.
It should be taken into account that this solution has many more disadvantages. Firstly, the contaminated liquid will stain the bathtub or sink. This problem will be especially acute if the plumbing fixtures are made of acrylic. Secondly, even a very minor blockage in the sink during the draining process can become a provoking factor for flooding of neighbors.
In addition, in many cases, due to strong vibrations during the draining process, the hook falls to the floor, which can also cause leaks. The connection can be made using a siphon. In order for the drainage from the equipment to be stationary, the specified part will be needed.
The siphon is equipped with an outlet for machines. It should be located under the knee part of the siphon. Otherwise, contaminated liquid may be sucked into the equipment itself. Because of this, a bad smell can “settle” in it.
You can also make a connection to a sewer pipe, which should be 4-5 mm thick. Usually a special sealing element and an S-shaped hose are used here. The last part is inserted directly into the pipe so that it does not come into contact with the drains. The top of the hose should be placed at a height of 55 cm from the floor.
Methods for organizing drainage
The design of the washing machine provides for indirect removal of contaminated liquid from the tank into the sewage system: the delivery set includes a plastic bracket for securing the hose to the edge of the plumbing fixture. There are no other devices for direct connection to drainage pipes.
Are you unplugging your washing machine?
Oh yes! No
In total, there are 3 methods of pumping and draining liquid from a washing machine:
- through the side of the plumbing;
- connection to a siphon;
- adjacent directly to the sewerage pipeline.
From an improperly organized discharge, the waste liquid can go backwards and enter the machine, odors from the system will penetrate into the room, and the normal operation of the SMA will be disrupted. Before connecting, be sure to check the permeability of the drainage channels, and clear any detected blockages.
Direct drain to the bathroom
Without electricity the car will not work
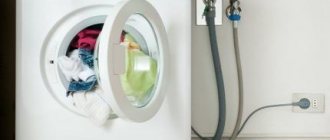
Well, we have supplied the water, organized the drainage, now all that remains is to supply the power supply. This will avoid many unpleasant (and possibly tragic) consequences. After all, high voltage coupled with water is a terrible force. Therefore, caution and caution again are the main tips when connecting current in wet rooms.
To keep your family safe, be sure to ground your distribution board. The grounding bus should be no thinner than three millimeters. We use only a three-wire outlet. By the way, if the washing machine is in the kitchen, it is quite possible to plug it into an outlet made for an electric stove. If you need an extension cord for connection, use only one that has grounding contacts.
The optimal solution would be to connect the machine with a separate wire leading from the meter. A circuit breaker is installed on it. It is better to invite an experienced electrician for this work. If a separate wire is not installed, use a portable RCD - residual current device.
And one more thing: never connect the ground to radiators, gas and water pipes. This is deadly!
Expert advice
Some experts recommend adhering to the following features when installing a washing machine:
Use an adapter on the water supply. It will reduce the negative effect of periodically occurring water hammer in the system.
By following all the above recommendations, you will receive a reliable and safe connection to your washing machine.
Do not connect the products to gas or solid fuel dispensers. Since this may disrupt the setting mode in the washing machine. And this will cause breakdown of the entire product.
By following these simple, but at the same time numerous rules, you can achieve correct connection of the product. And this will be the key to reliable and long-term operation of the washing machine.
We carry out tests
Once again, carefully inspecting all the connections and connections, and just in case, checking the instructions, you can carry out a test run. At the same time, we consistently perform all the necessary operations and check that everything is happening as expected.
First, you need to fill the tank of the machine with water, noting the time it takes to fill it to the mark and checking it with the data specified in the passport. If it is discovered that any of the connections are leaking, the water must be drained and the leak repaired. If everything is fine, you can turn on the machine.
After five to seven minutes, the water is heated to the desired temperature. While the washing machine is operating, no extraneous sounds should be heard - after all, modern devices operate almost silently. If something grinds or knocks, this indicates a malfunction. Having determined that everything is in order, Next we will check how the squeezing device works, and then we will try the drain. At this point, the performance check of the washing assistant can be considered complete.
Replacing the inlet hose
To replace a damaged inlet hose, you need to carefully perform a few simple steps, observing safety precautions. In order not to make a mistake when purchasing, it is better to take the damaged part with you to the store - then you can check on the spot whether the lengths and diameters of the connecting nuts match the old and new ones. To do this, you must first remove it without damaging the other parts.
Before unscrewing the connecting nuts, you need to turn off the water in the supply tap and wait a few minutes for the pressure to drop. You need to unscrew it carefully, placing a container to drain the remaining water - first near the tap, then from the side of the machine. After installing the new hose, you need to check the tightness of all connections and the water supply tube itself.
Leveling the washing machine
The device is installed in a certain sequence. Correctly aligned legs play a role in the alignment process. There are models on sale in which only two of them are regulated, and there are models in which all four are regulated.
Before installing the machine, you need to check the floor surface for a horizontal line; only after making sure that the surface is absolutely flat can you begin installing the equipment.
For a safe washing process, the machine must be level. Not everyone knows how to install a washing machine correctly, especially if the surface on which the machine is installed is uneven.
To ensure a level surface, a building level is used when installing the machine. If there are significant differences, hills or, on the contrary, holes at the installation site, it will not be possible to install the machine levelly. The floor surface must first be leveled.
After leveling the floor, the machine must be connected to the water supply and sewerage system, so that after the final installation, the equipment will no longer be moved from its place. Using a wrench, unscrew the locknut on the legs.
Next, the machine is installed in a permanent place and the surface of the machine is leveled using a building level. Focusing on the level, adjusting the legs achieves a flat surface.
Installing and leveling the washing machine
The corner of the washing equipment rises when the corresponding leg is unscrewed, therefore, by twisting it in the opposite direction, the corner lowers. It is necessary to control the level in several zones.
The level is placed on the top cover of the machine, first along, and then across and diagonally. All indicators should point to zero, or the control bubble in the level should be located strictly in the middle.
Despite the fact that the level shows zero on the horizontal surface of the machine, it is necessary to check that the vertical sides also correspond to the level.
After all the legs are set to the desired length, their surfaces remain equal relative to the level, the nuts are fixed to maintain the selected position.
Important! The machine periodically vibrates when washing, which causes imperceptible movement. As a result, re-alignment will be necessary after some time.
Leveling a washing machine is not only an aesthetically external necessity, but also a characteristic, if not observed, it is pointless to expect high-quality work from the machine.
An uneven position will lead to displacement of the drum, especially when there is heavy laundry inside, which in turn will lead to an uneven position relative to the axis. As a result of an unstable position, the machine may move during the washing process and vibrate strongly.
Rubber pads to reduce vibration
Vibration and movement during washing will contribute to rapid wear of the fixing and other elements inside the device.
Special rubber pads can not only reduce vibration, but also create additional shock absorption and also fix the machine in place.
Helpful advice! After installation is complete, you need to check the machine by loading a small amount of laundry and set a short-term program, preferably “spin”. It is during intensive spinning of the drum that the machine shows how level the device is installed.
- If during the spinning process the machine remains in place and there is no visible vibration, then it is installed in compliance with all the rules.
- When spinning, the machine vibrates, rattles or moves; additional position adjustment is necessary.
- If anti-vibration pads are not used, it is worth purchasing them and installing them under the legs.
It is better to choose a level length of approximately 40 cm, with a bubble, and not electronic or laser. This type of level is more suitable for leveling small surfaces.
If you don’t have it at hand, you can replace it with a plastic container into which water with dye is poured, and on the outside, at the level of the edge of the water, a strictly horizontal line is applied, which will serve as a control point. If, after adjusting at a homemade level, the strip and the liquid level clearly coincide, and the device is stable and does not wobble, then the machine is installed correctly.
Reference! This technique is installed taking into account small gaps from the wall or furniture.
Table of the main causes of inlet hose leaks
All inlet hose leaks can be divided into two main categories - on the flexible tube itself and at the joints. Their causes are different in nature, and the ways to eliminate them are also different.
| Cause of leakage | Remedy |
| The integrity of the hose is compromised due to natural wear or kinks or kinks. | Even if the crack is not visible to the eye, it will grow over time. Strong pressure inside the tube makes any repair impractical and impossible. The entire hose needs to be replaced. |
| The nut connection has become loose due to vibrations | Tighten the nut, check the tightness of the connection |
| The rubber gasket inside the connecting nut is worn out | Replace the gasket, tighten the nut |