How to cut at a 45 degree angle
From time to time it is necessary to cut this or that part or product at a certain angle. Typically, it is necessary to cut baguettes, fillets, platbands, baseboards and other similar interior elements at an angle of 45 degrees. Anyone can cope with this task. The main thing is to take your time, don’t worry, and everything will work out.
Purchase ready-made corner elements
For example, as for baguettes or fillets, special corner elements are sold for them that fit perfectly into the corner and do not need to be cut. They are quite easy to stick into place and press down perfectly.
Where not to use tiles with a groove
The burr area is less strong and durable. The operation of some surfaces is associated with high impact loads: stairs and thresholds. If the right angle is inconveniently located, where it is often touched, the structure will chip and collapse over time.
In these cases, it is not recommended to embed the finishing parts. It is advisable to use other methods:
- The tiles are laid entirely, the joints (90 degrees) are formed with metal corners.
- The upper part is overlapped - it protrudes forward by the thickness of the facing element. The vertical one is located below.
- Corner ceramic parts are used, which are a single fragment.
Method of joining platbands without trimming
Nowadays, platbands are often not cut at an angle in order to be joined together later, but the joints are made at right angles. This method of connecting platbands does not require any special trimming, which is very convenient. In addition, this method looks more modern and presentable.
Cutting at an angle using a miter box
If you still need to cut this or that part at an angle, then you should stock up on a miter box - a simple device that looks like a small box. The miter box has slots that are designed for a saw or a long, sharp knife. Obviously, these slots are made in such a way that they form a smooth and clear angle of 45 degrees.
In general, a miter box can have a huge number of slots at once, at different angles. This is convenient, because with the help of 1 device, you can cut any parts at different angles.
There are adjustable miter boxes on sale. The slots in such a miter box can be adjusted, which allows the master to set exactly the angle that is required at that moment. Namely, it is quite easy to move the slits of such a miter box to a position of 45 degrees.
Now cutting the workpiece can be trivial. A baguette, platband or plinth is placed in the miter box, after which a saw is inserted into the slots and the excess is easily cut off. The angle ends up being perfect, exactly 45 degrees.
What to do if there is no miter box? It's painfully simple. It is necessary to make a template according to which it will be easy to transfer the required markings to the workpieces. As a template, you can choose thick cardboard or anything else that will be appropriate in this case.
Application of thermal methods
In addition to mechanical methods, thermal methods are often used, where welding or cutting machines are used as tools. For example, an autogenous gas cutter or a conventional welding machine (DC/AC).
With the help of such machines, thick-walled metal pipes can be cut. However, it is extremely difficult to obtain a perfectly even, high-quality cut using electric welding or gas autogen.
Cutting technology using electric welding and autogen is widespread everywhere. The technique does not provide high cutting accuracy, but when installing pipes this factor is often not decisive
Typically, after thermal cutting, products undergo additional processing. The cutting line is aligned and the required angle values are adjusted. This approach is economically unprofitable, as it is accompanied by additional costs for mechanical processing.
As a rule, thermal cutting techniques are used in industrial production conditions. True, housing and communal services also often resort to this technique.
Thermal cutting is also used to work with plastic materials. There are devices - thermal guillotines. The sharp thin blade of such devices is heated to a high temperature, after which the cut is performed.
Thermal guillotines support cutting at an angle, and this is their advantage. However, these devices cannot be used to work with materials that are more rigid than polyvinyl chloride, wood, or chipboards.
To cut metal-plastic pipes, you need pipe cutters that can evenly divide products with a multilayer structure into parts. Our recommended article is devoted to their varieties and methods of application.
How to cut 45 and 90 degree angles correctly
How to make an angle on a plinth more or less than 90°
Not all angles are exactly 90 degrees. If the deviation is small, the cracks can be removed using sandpaper. In other cases, you will have to mark and cut taking into account the real degree. The main task in this case is to find the point on the floor where the two baseboards will join.
Let's start by explaining how to correctly cut an external corner if it is not 90 degrees. We take the bar, place it against the corner on one of the sides, press it tightly against the wall - because it must stand. Using a pencil, draw a line on the floor along the bottom edge of the plinth. We apply the bar to the other side of the corner and do the same. The place where the two lines cross will be the joining point of the two skirting boards.
How to join a plinth if the angle is less or more than 90 degrees
Now we are placing the baseboard strip again, setting it up because it will be attached. We make two marks: at the top at the very turn, at the bottom at the place where the straight lines we drew intersect. Now the main task is to make a cut according to these marks. If you have a miter saw or a miter box with an adjustable saw angle, set it up and cut it. If not, carefully cut it with a hacksaw. To avoid confusion, you can use a pencil to mark the line along which you need to cut. Similarly, mark and cut off the second part. We finalize the connection of the baseboards with sandpaper.
Not many experts process joints with sandpaper - this takes time and additional labor. But if you join skirting boards in the corners of your house with your own hands, you definitely want everything to be perfect. This is why this manual finishing is required.
With an internal corner of an unusual size, everything is exactly the same. Place the plinth in the corner and draw a straight line on the floor. Let's do it on the other side. We transfer the crossing point to the planks.
How to achieve a perfectly right angle at the joint?
If you want to create an even joint, you will have to work as carefully as possible:
- To begin with, the first tile is attached using a building level. Its edge should extend slightly beyond the plane of the corner of the base.
- After this, the second side of the corner is leveled. Each tile adhesive has its own hardening time, which is how long you are given to trim the resulting angle.
- Subsequent fragments of tiles are glued using the same principle. The main thing is that the vertical of the walls is maintained initially, otherwise it will be almost impossible to hide the defect from unsuccessful joints.
Keep in mind that at the joints after cutting, the tiles become more fragile. For this reason, this installation is usually not used on surfaces subject to high impact loads. It is especially rarely used when facing steps. So, when designing street stairs, builders most often use metal corners, and sometimes they overlap the tiles so that the top module protrudes slightly above the side one.
Another way to create a bias edge:
If you want to trim a piece of ceramic with your own hands in an easier way, then there is another option. To do this, draw a line on the decorative side of the tile with a glass cutter. After this, turn it over with the wrong side facing you, and then use a grinder to make a V-shaped cut across the entire width of the tile. Now you can break off the excess and also fine-tune it using sandpaper.
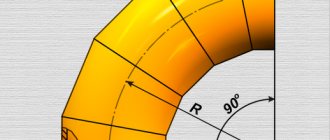
45 degree cutting
Usually, in order to rotate a pipe by 45 degrees, fittings and bends with a rotation angle of 45 degrees are used, made of the same material as the pipes themselves; if the pipes are iron, then the turns are welded from steel. For HDPE pipes there are electric-welded or cast bends at 45 degrees (note that it is virtually impossible to find compression fittings with such a rotation angle in Russia).
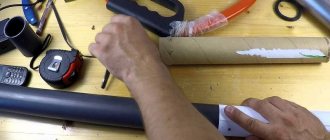
But, if you still need to cut a round pipe made of steel or various types of plastics, then a pattern for cutting pipes at an angle, the shape of which is calculated manually or by machine, is useful for this. The task is greatly simplified if you need to cut a square iron profile at an angle of 40 5 degrees.
To quickly trim, you can use an ordinary sheet of paper, folded at an angle, with which you mark the surface for the future cut. Using folded paper, proceed as follows:
- carried out on a straight surface of the profile in the place where the cut is made, strictly perpendicular to the fishing line;
- apply a sheet of paper folded at an angle to the side surface with the sharp end to the mowing line in such a way that the upper edge of the cardboard triangle is flush with the upper side of the iron profile.
- draw a line with a pencil along the side of the sheet at an angle of 45 degrees, then apply the cardboard corner to the other side and trace it with a pencil (it is better to use a narrow marker).
READ How to Cut 45 Degree Angles
For sawing, you can use a grinder with a metal disc, first running a narrow line along the markings, then evenly deepening it until the edges are completely separated.
When working with an angle grinder, you need to take into account the following factor - if the edges are completely cut, the disk may be damaged by an acute angle , which will lead to its failure, and in the absence of protection on the angle grinder, even to injury to the worker.
Therefore, it is better not to cut off the corner edges to the end, but to leave a narrow groove and then break them off, then sanding the protrusion.
How to cut a profile pipe at an angle
The marking of a profile pipe differs from a round one. Doing it manually can lead to a significant error. The best method for solving the problem is to create a cutting template from the same profile, but larger in diameter.
You will need a small piece of profile pipe. Using a protractor, mark an angle of 45 degrees on it. Now, using a grinder, you need to cut off part of the workpiece along the marked mowing line. The edges of the cut must be sanded and imperfections removed. All that remains is to simply stick the original product into the template for cutting pipes at an angle. Then you need to mark the cut of the larger profile along the mowing line. And the pipe itself is cut along it.
The text describes methods on how to cut a pipe at an angle of 45 degrees. When the marking is already completed, it is recommended to use a grinder. With its help you can make an even cut. You can change it using a hacksaw. You can also cut the product by welding, but you need experience in handling the tool, otherwise there will be unevenness. to cut evenly - tools and cutting methods.”
When carrying out work on the installation of gas or water mains, it is often necessary to change the direction of the mowing line, while the pipeline is cut and then welded at the desired angle. Most often, the direction changes by 90 degrees, and the question arises - how to cut the pipe at 45 degrees in order to accurately connect the joints when welding.
You can cope with the problem of cutting edge angles of 45 or 90 degrees if you have the appropriate knowledge and techniques that will help save not only time, but also materials during the work. At other rotation angles, it is impossible to solve the problem using a ruler and a sheet of paper - you will have to call computer technology for help.
Waterjet cutting of tiles
Taking advantage of the variety of colors and textures, craftsmen use the most advantageous combinations that make the interior unique and truly exclusive. But sometimes choosing just a combination is not enough
When the need arises to emphasize the importance of a place or the status of its owner, the conversation turns to various panels, zones, borders, and decoration of facades
Waterjet cutting of ceramic tiles is a reliable assistant for the modern designer, allowing him to implement the most ambitious, exclusive design projects. Hydrocutting of tiles allows you to process materials of various thicknesses and dimensions, and to combine seemingly incompatible materials (inserts made of metal, stone, glass) into a single product.
Porcelain tiles are highly durable, and special technologies have been developed for cutting them. The most advanced of them was waterjet cutting of porcelain stoneware, being universal (curvilinear cutting, straight cutting while maintaining high precision), it has firmly established itself in the Russian market and is successfully used in various industries. Hydrocutting of porcelain stoneware and ceramic tiles allows you to cut materials of various thicknesses and densities, and produce parts of various shapes with any radius of curvature. Thanks to the minimum cutting width (about 1 mm) and the minimum load on the material, the most rational use of the amount of material is achieved (no breakages, chips, or overheating). In addition, cutting porcelain tiles with waterjet has a high accuracy of 0.1 millimeters, and products made using this method do not require additional processing - the edges of porcelain tiles are polished with abrasive particles, the cut is smooth and even, allowing to significantly reduce production time and optimize the cost of the finished product.
How to cut at a 45 degree angle
Often during repairs you may encounter a situation where it is necessary to saw off a piece from a part at an angle of strictly 45 degrees. Typically, this is needed to connect two parts at a right angle, 90 degrees, such as: door trim, baseboards, pieces of furniture and much more. An experienced craftsman, professionally engaged in repair work, can often do without special devices, and is able to cut the required part evenly and clearly by eye. But if you are a novice repairman, and you want to do the job as efficiently as possible, without damaging expensive parts, then you simply need to purchase a miter box - a special device that allows you to saw off material at a given angle without any special tricks.
To work, you need to have: a miter box, a hacksaw, a protractor with a pencil, a piece of wood, a screwdriver with screws or a clamp.
How to cut a 45 degree angle without a square and a protractor
How to use a miter box
cut the baseboard at an angle of 45 degrees. By the way, do you know how to use a miter box? Our portal specialists have prepared a step-by-step guide for you.
How to cut corners of ceiling plinths
This is a tutorial that teaches you how to cut the corners of a ceiling plinth. Options for solutions are considered.
Making a longitudinal cut
To make a high-quality, even longitudinal cut, you can use a simple device in the form of a metal corner. It is securely fixed to a flat wooden surface with screws and the pipe is pressed against it with a heavy weight. Using an angle grinder, make a longitudinal cut in the pipe top, lightly resting the disc on the surface of the angle.
The corner can be attached to the pipe with clamps and a slot can be made along the upper wall of the corner in a similar way.
Paper pattern for pipe
One of the common ways to make a pattern for pipes with a round surface is a method for which you will need a lined sheet of paper, a ruler and a pencil. To obtain a paper pattern proceed as follows:
- Draw a circle on a piece of paper with the diameter of the pipe being cut, divide the circle into 16 equal segments, each time dividing large segments into two equal ones.
- Measure the length of the circle by multiplying its diameter by the number Pi equal to 3.14. Lay this dimension on both sides of the axis of the circle in equal segments, each of which is divided into 8 equal parts.
- Draw the vertical mowing line up from the segments on a straight line and horizontally from the points placed on the circle.
- The places where they intersect are connected by a smooth line and, as a result, a template is printed on paper, which is cut out and glued to the surface to be trimmed. For trimming, it is better to use a grinder with a disk of small diameter - the surface will be curved and when using a large disk, the error will increase.
Making your own miter box
- 1. First you need to assemble the box of the future tool. To do this, it is necessary to drill holes in its side walls for future fastening with screws and, having smeared the ends of the parts with glue, connect them in such a way that both walls are strictly perpendicular to the bottom and parallel to each other, after which we fix them with screws.
- 2. Using a protractor, mark a 45-degree angle with a pencil; if necessary, add additional mowing line for the grooves. The most important part is the cuts; they are best done with the same hacksaw blade that you will use to cut the products. It is necessary to saw while holding the blade, avoiding strong pressure on the tool; first saw through one side, then the other.
- 3. We begin processing the material. Use a clamp or screws to secure the miter box to the work surface. At the site of the future cut, we make a mark on the plinth or board. How to cut at an angle of 45 degrees becomes clear if you press it firmly against the side wall and align the mark with the slot on the template. We insert the hacksaw into the groove and cut the workpiece, while the work of the blade is limited to cuts, which allows you to make the cut as evenly and accurately as possible.
- 4. Before sawing the baseboard, you need to make sure that the corner of the room is really straight and, if this is not the case, you need to adjust the cutting angle of the workpiece. To do this, measure the internal angle of the joint between the walls, and divide the result by two. If you do not have a professional rotary miter box capable of changing the cutting angle to the required value, then to achieve the result you need to cut additional grooves at the desired angle in a homemade miter box. This way you can cut the baseboard for the most accurate alignment.
Now you know how to cut a workpiece at an angle of 45 degrees. Perhaps it's time to move from theory to practical action. The mebeldok.com portal team is confident that you will definitely succeed. Stay with us!
How to use a miter box
A miter box will help you cut the baseboard at an angle of 45 degrees. By the way, do you know how to use a miter box? Our portal specialists have prepared a step-by-step guide for you.
How to cut a cast iron pipe
The main difference between cast iron and ordinary steel is its high fragility and large wall thickness; its precise cutting must be performed in the following sequence:
- angle is drawn according to the template using a scriber, for
supports under the part are placed on a wooden board or board.
- Use a grinder to make a shallow cut of the surface around the entire perimeter.
- Next, the groove is deepened in several passes until the two parts are completely separated.
45 degree cutting
Typically, in order to rotate a pipe by 45 degrees, fittings and bends with a rotation angle of 45 degrees are used, made of the same material as the pipes themselves; if the pipes are steel, then the turns are welded from steel. For HDPE pipes, there are electric-welded or cast bends at 45 degrees (note that it is almost impossible to find compression fittings with this angle of rotation in Russia).
READ How to cut tiles correctly
But, if you still need to cut a round pipe made of steel or various types of plastics, then for this you will need a pattern for cutting pipes at an angle, the shape of which is calculated manually or by machine. The task is greatly simplified if it is necessary to cut a square metal profile at an angle of forty-five degrees.
For quick cutting, you can use a regular sheet of paper folded diagonally to mark the surface for future cutting. When using folded paper, proceed as follows:
- carried out on a straight surface of the profile in the place where the cut is made, strictly perpendicular to the fishing line;
- apply a sheet of paper folded diagonally to the side surface with the sharp end to the mowing line so that the upper edge of the paper triangle is flush with the upper side of the metal profile.
- draw a line with a pencil along the side of the sheet at an angle of 45 degrees, after which the paper corner is applied to the other side and traced with a pencil (it is better to use a thin marker).
For sawing, you can use a grinder with a metal disc, first running a thin line along the markings, and then gradually deepening it until the edges are completely separated.
When working with an angle grinder, the following factor must be taken into account: if the edges are completely cut, the disk may be damaged by a sharp corner, which will lead to its failure, and in the absence of protection on the angle grinder, even to injury to the worker. Therefore, it is advisable not to cut the corner edges to the end, but to leave a narrow groove and then break them off, subsequently grinding the protrusion.
Electric tile cutter for cutting
As the name suggests, a tile cutter is a more highly specialized tool, which means that cutting tiles can be done with better quality. Of course, not everyone will buy it for one-time use. If we are talking about a high-quality model with additional functions, then this tool will be quite expensive. In addition, you can achieve really good results with experience, so you will have to spend some time acquiring the necessary skills.
If we are talking about professional finishers, then they should have an electric tile cutter in their arsenal. Cutting tiles with it takes less time, and such a machine leaves less dust.
The tile cutter operates in two modes:
- for straight cutting;
- for cutting at the desired angle.
Using a tile cutter
To learn how to use this tool correctly, you need to follow a certain procedure:
Painting tape is applied to the tile in place of the cut. Mark the desired cutting width on the tile using a pencil and ruler. Place it on the tool platform. Press the tile and carefully push it towards the disc. First you need to cut off the excess, and then grind the corner. You must not allow the glaze to touch, otherwise the edges will look uneven. If, however, the surface decorative layer of the tile has been damaged, then with sufficient skills it can be sanded with emery.
If, however, the surface decorative layer of the tile has been damaged, then with sufficient skills it can be sanded with emery.
Some tips for cutting pipes
Sometimes households need to cut to connect a pipeline at different angles or along an axis. The main tool for performing these works is a universal grinder and metal discs.
For industrial use
In industry, large-diameter pipelines are used to transport liquids and gases, so pipe cutting units are heavy and have large dimensions. There are also manual pipe cutters of the rotary and clamp operating principle. In the first case, the cutting rollers rotate along a round surface using an adjustable handle; in the second version, cutting is carried out by arcuate plates, which gradually move during rotation.
DIY miter box for cutting pipes
Using a template is not very convenient - you have to make the cut along the mowing line, holding the grinder suspended, which leads to large errors. If you have a welding machine, you can make a simple miter box - guides for the grinder disk, preventing it from moving to the side.
To do this, use a previously made template, drill a hole in the side of which and weld a nut. When working, a homemade miter box is placed on the profile, a bolt is screwed into its nut and the device is pressed against the profile surface. A grinder with a metal disc is used to make a cut, lightly pressing the disc against the side surface of the device. It is clear that with prolonged use, the edges in the miter box are gradually ground down, and although the process occurs simultaneously on all edges, some errors will appear over time. Therefore, it is better to make the device from hard, wear-resistant metal in order to increase its service life and obtain a more accurate instrument.
Tools used
There are several ways to cut a pipe; for this, construction and industrial tools for metal processing are used. Of all the types, only the grinder allows you to obtain curved surfaces without further processing with the closest arrangement of edges.
For individual use
The following tool is used for cutting steel pipes at home:
Manual pipe cutters. Allows you to cut round parts with an even, right angle of cut due to the cutting edges of the rollers. There are several varieties of products of this type, consisting of single rollers or a series of rollers attached to a chain. In everyday life, such devices are quite rare and are more suitable for professional work.
Cutting parts at an angle using a protractor
You can cut the part at an angle using a protractor. This is a measuring tool that is easy to use, and which is designed specifically for measuring angles or making the necessary markings on certain parts. The protractor is applied to the part, the angle is marked and the markings are made with a pencil. Using these markings, cutting the workpiece at the desired angle will not be difficult.
How to file a corner of a plinth at the required distance
The second and all other corners of the baseboards must be done at a certain distance. If the next corner is again an internal one and the distance to it is less than the length of the plank, we use the same fragment that already has a notch on it. We measure the distance using a tape measure - strictly from corner to corner. Then this distance is laid out on the bar using the same tape measure. We align the beginning of the measuring tape with the protrusion, measure the required distance, and make a mark with a pencil. This will be the starting point for the cutting.
You need to know at what distance to cut
The plinth with the mark is placed in a miter box, and the desired cutting direction is selected. The dash can be combined with a hacksaw blade or with a slot in a miter box. Whichever is convenient for you. Cut off. This segment must be “tried on” in place. If both corners rest against opposite walls or the gap is only 1 mm, everything is fine. You can cut a second strip from a new piece to form a joint. And again we remove the flaws with sandpaper.
If the length of the wall is greater than the length of the baseboard strip, take a new strip. We will cut the second corner on it. It is important not to make a mistake in which direction to cut. Having installed both planks along the wall, mark the junction on one of them and make a straight cut. There are also slots in the miter box for straight cutting. So there won't be any problems.
How to connect two skirting boards in a straight line
But a straight joint does not always look perfect, and during operation it often diverges, forming a visible gap. If you wish, you can cut two strips at an angle (any angle).
To do this, first cut off the edge of one plank at an angle and mark the joint on the second one. The mark is placed on the side of the plinth that is pressed against the wall. Using this mark, we saw off another section, without changing the position of the saw relative to the miter box, but inserting the bar on the other side. The joint is made obliquely. He's more careful. The difference is especially visible on wooden skirting boards and MDF. Once again, polish the cut using sandpaper.
First joint in the room
The first strip of the baseboard should be cut as close to the edge as possible. Carpenters have their own jargon and they say "cut" a corner . It doesn’t matter what you call it, it’s important that we set the bar in the miter box so that we can make the cut at the very beginning. Using the cutting line, we extend the bar a short distance, for starters maybe 1-2 cm. Cutting off a smaller piece is more difficult, so save the savings “for later,” when you have at least some skill.
In the miter box, we place the floor plinth against the far wall “facing” ourselves. This makes it easier to check whether you are cutting/sawing correctly
Next, you need to make a corner on the baseboard like this:
- We place the plinth in the miter box and press it against the wall opposite to us. We set it in its mounting position - as it will stand against the wall.
- We insert the hacksaw into the required slots (see the picture below).
- We move the bar so that it extends slightly beyond the cutting line.
- Let's cut it off.
- We take the second piece of plinth, repeat the same operations, but change the position of the saw on the miter box to the opposite. We insert the bar on the other side. Be careful here, otherwise you will have to redo it several times, as the connection will not work.
READ How to Make a Stationary Using a Manual Circular Tool Video
How to properly cut a floor plinth in a miter box: for external and internal joints
We received two sections sawn down for joining in the inner corner. To make the joint perfect, we try on the parts in place. Most likely, there are some flaws. Take medium-grit sandpaper and remove everything that interferes with joining. Then using fine grain we achieve a tight joint without cracks or gaps.
When connecting skirting boards in a corner, use transparent silicone sealant. Before installing the fasteners, a layer of silicone is applied to the cut. Immediately after the plinth is fixed, we remove the excess that appears on the outside. Clean until the surface is completely clean. This method of connecting skirting boards in the corners looks more neat and does not get clogged with dirt and dust.
External corners
It happens that a room has not only internal, but also external corners, which also need to be covered with plinth (see photo). How to do it? There are several ways here too. The easiest way, as in the case of internal corners, is to trim them using a miter box. The external joints must be cut so that the side that will be glued to the ceiling is on the surface of the miter box, and the side pressed against the wall is facing the wall of the device.
As in the case of internal corners, you can also use markings “in place”, that is, draw a mowing line on the ceiling. Here the technology exactly repeats that used for internal corners.
You can use markings on the wall by attaching a blank and drawing a line along its lower edge (see photo).
If the outer corner turns out to be too rounded, you can refine the joint using a knife.
READ How to Correctly Cut a Corner of a Skirting Board for a Ceiling
Cutting ceiling plinth. External and internal corners
To the point where they meet, a fishing line is drawn directly along the future part of the connection. From the point on the ceiling to the second one. The resulting marking will be the line along which you need to saw off or cut off the connecting parts. Using these techniques, you no longer have to wonder how to cut the corners of the ceiling plinth.
How to cut skirting boards at inner corners: step-by-step action plan
Begin installing the skirting boards in one of the corners. If this is your first experience, choose the part of the room in which something will stand. Not always, of course, the first pancake is lumpy, but still it’s better to play it safe. To make a neat corner on the baseboard, work slowly. One was sawed off, checked, adjusted. Let's move on to the next one. It is better to fasten after two adjacent corners have been assembled. But you shouldn’t delay the assembly too much either.
Trimming skirting boards in corners requires certain skills. But by making a few joints yourself, you can beautifully design complex angles
How to use a miter box to cut baseboards? Place the device in front of you, preferably on a table, but it can also be on the floor. It doesn’t matter which way you turn it, it’s symmetrical. Insert the bar into the profile and turn it so that it will stand against the wall. When cutting down a floor plinth in a miter box, the “wall” is the wall that is farthest from you. Once again: firmly press the baseboard strip against the back wall in the position in which it will be installed. Insert a hacksaw into the required slots. You can start sawing.
Silicone seam
Making this connection is the most technically correct, and many grout manufacturers recommend making the connection this way.
Many customers like it because regular cement grout has a matte effect, while silicone grout has a glossy effect. This corner formation is carried out after all the grouting has been completed.
Using the basic grout mixture
The simplest, but no less labor-intensive way to form an internal junction is to use the main grout mixture.
Let’s say from experience: if you do not have permanent walls, but, say, made of APA plasterboard panels, then this method of formation will not suit you, since you may subsequently get a crack in this seam. In this case, the previous method is better for you. Let's also add that we prefer the rounded shape of the junction. To do this, we perform this grouting in several stages. First, we fill the space between the tiles, and only then we directly form a rounded shape. And, unlike the two previous methods, here we first grout the corners, and only then do the rest of the grouting on the walls.
Method of joining platbands without trimming
Today, platbands are often not cut at an angle and then joined together, but the joints are made at right angles. This method of connecting platbands does not require any special trimming, which is very convenient. In addition, this method looks more modern and attractive.
Cutting at an angle using a miter box
If you still need to cut this or that part at an angle, then you should stock up on a miter box - a simple device that looks like a small box. The miter box has slots that are designed for a saw or a long sharp knife. Of course, these slots are made to form a smooth and precise 45 degree angle
However, a miter box can have many slots at once, at different angles. This is convenient because with the help of one device you can trim any parts at different angles.
There are adjustable miter boxes on sale. The slots in such a miter box can be adjusted, which allows the master to set exactly the angle that is required at the moment. In particular, it is quite simple to move the slits of such a miter box to a position of 45 degrees.
Cutting and adjusting 45 degree angles
Now you can trim the workpiece simply. A baguette, platband or plinth is placed in the miter box, after which a saw is inserted into the slots and the excess is simply cut off. The angle ends up being perfect, exactly 45 degrees.
What to do if there is no miter box? Very simple. You need to make a template according to which it will not be difficult to transfer the necessary markings to the workpieces. As a template, you can choose thick cardboard or anything else that will be appropriate in this case.
Tags
materials mosaic diagonal laying of tiles kitchen foam plastic podium for shower stall cutting tiles at 45 degrees trimming tiles reinforcement floor screed concrete waterproofing waterproofing shower cabin bathtub bathroom primer leveling tile replacement grouting tiles soundproofing the floor our services holes in tiles marking tile laying mortar for screed we recommend! laying mosaics laying tiles laying floor tiles bathroom floor screed heated floor thin-layer screed tamping the base cracks in the screed forming a corner from tiles cement prices for services finishing floor screed extruded foam plastic
How to cut a 45 degree angle correctly
Sometimes you need to cut a particular part or product at a certain angle. As a rule, you need to cut baguettes, fillets, platbands, baseboards and other similar interior elements at an angle of 45 degrees. Anyone can cope with this task. The main thing is not to rush, don’t be nervous and everything will work out.
Buy ready-made corner elements
For example, as for baguettes or fillets, special corner elements are sold for them that fit perfectly into the corner and do not need to be trimmed.
They just need to be glued into place and pressed well.
How to connect to a door frame
You know how to carefully make a corner on a plinth, but that’s not all. Most often, the room has doors. By the way, they must be installed before attaching the baseboards. So, you still need to correctly connect the skirting boards with the trim on the door. cut straight , it turns out rough. There are plugs for plastic - not the most elegant way, but quite acceptable. Wooden ones can also be trimmed by cutting off the “face” diagonally. Also “not ice”, but already something. What to do with MDF skirting boards, since their timber is unpresentable? There is a way to create a beautiful connection to the jambs. You will need to make two cuts at an angle of 45 degrees (see photo below).
How to properly design the joint between the baseboard and the door jamb
If the edge is not even, first cut it strictly perpendicular. We make a cut at 45 degrees relative to the aligned edge. A small cut piece will be useful to us for decorating the junction. We make the second cut at 90 degrees relative to the first, but if we lower the perpendicular from the corner, we also get 45°.
How to make a neat connection to a door jamb
Now we take the first cut piece and apply it to the cut we just made with the long side. This creates a beautiful rounded cut. If there are chamfers or recesses on the baseboard, they match perfectly. In the case of a wood pattern, you cannot be sure that the lines match. All the same, such a junction of the plinth and door trim is much more aesthetically pleasing.
Platband is an overhead frame inherent in the opening of a door or window. This is a decorative detail made in the form of figured strips. There are also carved frames; their difference is that they are made of wood and are often decorated with abundant carvings. The role of the frame is not only decorative, it allows you to slightly eliminate such unwanted blowing in the area of the gap between the wall and the window or door frame by covering it.
Sources:
https://mebeldok.com/masteru/kak-otrezat-pod-uglom-45-gradusov.html https://montagtrub.ru/kak-otrezat-trubu-pod-45-gradusov-s-tochnostyu/ https:/ /ingener-pto.ru/2019/12/12/kak-pravilno-otrezat-ugol-45-gradusov/
Plastic, wood or MDF - which one to choose?
Having made sure that installing corners is not just a whim, but a necessity, we will study the construction market in order to make the right choice. These products are divided into types depending on the material from which they are made. So, the corner can be plastic, wooden, bamboo, made of cork or MDF. Absolutely each type has its own pros and cons; let’s look at them in more detail.
Plastic corners are made by hot bending a sheet of polyvinyl chloride. Basically, they have the same shelf width - from 10 to 40 mm in increments of 5 mm. However, there are asymmetrical specimens, for example, 10x25 mm, but regardless of this parameter, the angle between the sides is 90 degrees. If it is necessary to transform an arched opening, this is done using a special flexible profile. Their advantages include their relatively low cost; they do not require painting, unlike wood.
The next type is cork corners. Such decorative elements are quite often used for arched openings, but this does not mean at all that their use is limited only to this area. They can also be used to finish slopes of various shapes. Cork has a number of advantages, including strength, fire resistance, practicality and environmental friendliness. In principle, this material has practically no disadvantages, except that if your pet wants to sharpen its claws on it, this will damage the surface.
READ How to Distinguish Original Bosch Or Chinese Rotary Hammer
It is also worth noting wooden and bamboo products, which will always be signs of excellent taste and will fit into almost any interior. In addition, we must not forget about their environmental friendliness. True, such elements are somewhat more expensive than their counterparts made from other materials, and besides, they often require painting. A material such as MDF can also be compared to natural wood, but it costs significantly less, because wood dust is used to create it.
Programs for calculating cutting angles
Pattern cutting technology allows you to obtain different cutting angles. But to form a pattern at angles other than 45º, you will need to perform mathematical calculations and cut out a template from paper or similar materials based on the calculated data.
True, there are computer programs designed to save the master from making calculations. Patterns for cutting pipes are printed by such programs on a printer.
A simple calculation program created on the basis of the MS Excel application allows you to calculate and draw up a pattern for almost any pipe diameter and required cutting angle.
All the user needs to do is enter the appropriate values in the “Outer diameter” and “Cut angle” cells. Using these parameters, a pattern will be generated that can be sent for printing.