Is it possible to tighten a dripping American water pipe without turning off the water (the tap does not hold)?
The American is digging in, the tap on the riser does not completely shut off the water.
Is it possible to pull up the American one and not shut off the water, or is that not done?
First you need to decide which faucet is not holding.
If the inlet valve (main at the outlet of the riser) then the valve definitely needs to be changed.
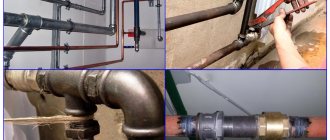
Next, decide where exactly the “American” flows; if we are talking about a metal pipe, then the “American” is screwed onto the external thread of the pipe, the assembly is “packed” using fum tape or tow.
In this case, pulling up the “American” is not effective; you need to turn off the water, dismantle the “American” and repack this unit.
If the pipe is polypropylene and the “American” was soldered to it, then in this case it is useless to tighten it.
Most likely, the “American” will have to be changed completely, that is, this unit will have to be soldered.
If we are talking about insufficiently (not qualitatively) squeezed out like this
In general, it is better to re-tighten “American” ones some time after installation.
From personal experience I can add that you need to squeeze out the gasket without excessive effort, so as not to overcook it.
In some cases (for example, scale got under the gasket), simply tightening the “American” is not enough; you still need to turn off the water, unscrew the “American”, wash the gasket, and if necessary, replace it with a new one.
Sometimes simply flipping the gasket helps.
If you have already changed the gasket before and installed a paronite gasket instead of the standard rubber one, then tightening the American gasket is useless; you won’t be able to press (additionally) squeeze the paronite gasket.
It is better to replace the gasket with a “native” (standard) one.
Source
How to install a heated towel rail
Today I offer you step-by-step instructions for installing a heated towel rail in the bathroom. I would like to say that the procedure is not complicated, but it is responsible, because if you do something wrong there is always a chance of flooding your neighbors! So if you have never picked up the keys and don’t know what pipes are, it’s better not to take on this matter. For everyone else who has at least some idea of the installation process, read on...
So, I bought a “ladder” heated towel rail (with right-hand pipe connection), although if you have a “spiral” or “bracket”, the installation will be practically no different.
We also bought two “American” mounts; without them, it would be problematic to connect the heated floor dryer.
I already had pipes for connection from the riser. If you don’t have one, then it’s very difficult to crash into the riser yourself. It’s better to entrust this matter to your housing and communal services employees, because the riser is a serious matter, if you damage it, not only will you leave everyone without water, you can get fined (many housing and communal services offices closely monitor this, especially if the risers are already old). In general, we will assume that you have outlets, it is advisable to have them with taps in order to turn on and off the heating of the heated floor dryer.
Next, we need to firmly secure the “American” ones; for this we use fum thread (I wrote about it here). And we tighten the American ones using a 12 mm hexagon.
Next, we need to try on the heated towel rail itself, remove the rubber gaskets from the “American” and tighten the nuts almost to the end, do not pull the nuts. The nuts must be wrapped with mounting tape to prevent damage with the wrench. This is needed to measure the fastenings to the wall. Let's look at the photo.
We screw the rear fastenings and mark them on the wall.
After this, remove the dryer and drill holes in the tile according to the marked dimensions. Carefully, so as not to damage the tile itself, you need to do it with a special drill.
Now we install the mounts on the wall, here is a photo.
We install the heated towel rail back, only with rubber gaskets from the “American” ones. And we twist everything, already tightly. And pipe fastenings and wall mounting.
Next, turn on the water and check to make sure there are no leaks anywhere. If not, then you did everything correctly, you can remove the protective film, both from the reflectors on the wall and from the heated towel rail itself.
This completes the installation. The next article talked about why the heated towel rail is cold and how to deal with it.
Because You are not logged in. To come in.
Because The topic is archived.
Good evening. I don't like situations like this))
In general, I unscrewed the lower one, but the upper one endures superhuman efforts, even as the key turns over the nut. What should I do? 
I consider it necessary to write for people who tried to help me with something.
American coupling for polypropylene pipes - types, sizes, installation
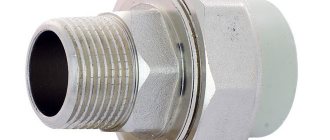
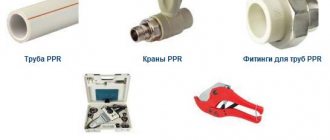
Polypropylene (PP) pipes are widely used in household communications for supplying cold and hot water, supplying coolant to radiators and heated towel rails. When installing water supply lines, American polypropylene pipes are widely used, which is the main way to connect plumbing, fittings, and heat exchange devices.
The use of American type fittings has replaced obsolete threaded methods of connecting pipelines, fittings and plumbing fixtures using various couplings, adapters such as squeegees, which require various types of sealants for sealing - flax fiber, FUM tape, plumbing thread, anaerobic sealants. An American connection is made in a matter of seconds and provides a reliable and tight joint for many decades without the use of any additional sealing materials.
Rice. 1 American with PP coupling
Markings for fastening
The standard location for the radiator is the partition under the window opening. According to SNiP 3.05.01–85 (clause 3.23), the battery on the side of the riser should not extend beyond the window opening, and their axes are not required to coincide. But for the battery to look harmonious in the interior, it must be located symmetrically relative to the vertical axis of the opening. Therefore, first, this axis is leveled.
The second step is to tap the horizontal level of the battery position and ensure alignment when connecting the connections to the fittings.
But there is one feature here - the horizontal channels of the radiator must be oriented strictly according to level, and the forward and return supply pipes must have a slight slope relative to the flow of the coolant. These angles are needed to reduce the force of resistance to flow and to reduce the risk of airing the battery. The slope value is very small - 5–10 mm for a line length of more than 50 cm (SNiP 3.05.01–85 clause 3.18), and steel line pipes less than 1.5 m long are not attached to the wall. And if the battery is replaced in connection with an existing wiring, then, for example, for a single-pipe system with a riser, a shift in position up (or down) can level out the slope of the forward (or reverse) supply.
The very position of the radiators must ensure that the following conditions are met:
- distance from the floor - more than 6 cm;
- distance from the window sill - more than 5 cm;
- distance from the wall - more than 2.5 cm.
American - what is it?
As the name suggests, this type of connection was invented in America and from there came to the Eurasian continent. The American is a fitting consisting of a cylindrical coupling with a flared or protruding edge, onto which a union nut with internal thread is fitted. Inside the fitting, on the expanded part of the coupling, there is always an annular sealing gasket, which ensures sealing of the joint with the connected threaded pipe when the union nut is screwed onto it.
The American can be equipped with a mating part in the form of a coupling with external or internal threads of different diameters, which is connected to water sockets, plumbing fixtures, and various types of fittings.
Since a polypropylene pipeline is installed using soldering, a standard American fitting for polypropylene pipes consists of two parts - a polypropylene part with a union nut or a brass joining unit soldered into it.
When assembling a line with a soldering iron, the heated pipe is inserted inside the polypropylene part of the fitting; the option of connecting the pipe externally is possible, but this reduces the flow area of the channel. After holding the parts for one to two minutes, a soldered joint is obtained.
Distinctive features
The American type connection has the following advantages and features of use:
- Used for joining cylindrical parts made of various metal and polymer materials.
- The coupling has one significant advantage - the parts being joined can be in a stationary position and do not need to be rotated around their axis.
- Connecting pipes or fittings using an American connection is not critical to their linear arrangement and allows for some deviations from alignment.
- The product is used repeatedly; if absolutely necessary, the fitting can be cut out from the pipeline, the internal fragment of the sealed pipe can be drilled out and soldered back in place when installing other communications.
- The coupling is strong, reliable and durable, and is sealed for many decades.
- To fix the outer nut, an adjustable or open-end wrench of a suitable size is sufficient.
- American polypropylene usually provides a transition from polymer to metal threaded pipes.
- The connection has a simple design and is easy to install and disassemble.
- The physical and chemical characteristics of the couplings correspond to the parameters of polypropylene, their service life is at least 50 years.
- The overwhelming majority of American women are made from corrosion-resistant materials: brass, less often stainless steel, so their service life is practically unlimited. There are similar budget fittings for use in various industries; they can be made of cast iron, different grades of steel, galvanized or nickel coated.
- The cost of couplings depends on the diameter; for 20 mm products the minimum price is 80 rubles.
Rice. 3 Composite American pipes for PP pipes - design
Replacing a valve on a gas pipeline
Replacement scheme
Replacing valves in an apartment on a gas supply pipe occurs in the following way:
- preparation of materials. To carry out the work you will need:
- new valve, selected according to all parameters;
- two adjustable wrenches;
- means for sealing joints (linen thread and graphite lubricant);
- plug (required if work is performed by one person);
- Before replacement, it is necessary to shut off the gas supply to the room. To do this, the old tap must be moved to the “closed” position, that is, perpendicular to the pipe. Then you need to remove the remaining gas from the pipeline (for example, burn it using a stove burner);
- The old valve is dismantled:
- if the valve is installed on a thread, then the fixing elements are unscrewed;
- if the valve is installed by welding, then the device is cut out of the gas pipeline;
It is recommended to install a threaded valve in place of a welded valve. To do this, threads are cut at the ends of the pipeline using a die.
How to cut threads on a pipe yourself
- A plug is installed at the end of the pipeline. If the work is done by two people, then the pipe can be plugged with a finger;
- the threads are treated with sealing materials. For the strength of the connection and smooth operation of the valve, graphite lubricant is applied over the flax thread;
Thread treatment with graphite lubricant
- A new faucet is being installed.
Installing a new valve on a gas pipe
For safety reasons, replacing a gas tap must be done in a well-ventilated area and with electrical appliances turned off.
Leak test
After installing the valve on the gas pipe, you need to check the tightness of the connections and the device itself. You can determine the presence of a gas leak as follows:
- a saturated soap solution is applied. To do this, the maximum amount of any soap needs to be diluted in water;
- The resulting solution is coated with a sponge on the joints and the valve.
Using Soapy Solution to Detect Gas Leaks
If the connection between the valve and the pipes is not airtight, soap bubbles will form.
The formation of a bubble indicates a violation of the tightness
If a leak is detected, it is recommended to perform all the work again and increase the sealing.
You can replace all the valves in your living space yourself. To carry out the work, minimal knowledge and a small set of tools are required.
American for polypropylene pipes - types
American designs for polypropylene pipes can be divided into two large groups:
Combined. Since any American pipe consists of two parts - a coupling with a protrusion and a threaded nut, then for PP pipes connected by soldering, a budget option made of polymer and metal is relevant. The internal coupling in such parts is made of polypropylene, and the external threaded nut is made of brass.
Metal. In this design, the fitting coupling together with the union nut are made of brass and sealed into a polypropylene pipe section. Unlike the combined type, this variety has higher strength parameters and, accordingly, costs more.
The following types of American women come in shape:
- Straight type couplings.
- Angled at 45 and 90 degrees.
- Tee and cross-shaped, allowing you to connect side branches to the main line.
- Transitional from larger diameters to smaller ones and vice versa.
In American women, cylindrical threads are used for domestic purposes; to ensure a stronger and more reliable connection in critical components, conical threads are used.
Depending on the operating conditions, the coupling connection is equipped with rubber, silicone, polyurethane or heat-resistant paronite, fluoroplastic gaskets.
Rice. 4 Polypropylene ball valves with American style, straight and angle
Rice. 5 Types and technical characteristics of popular American women
Thermal head
The next type of radiator tap is a thermal head for a heating radiator.
If there is a need to provide automatic temperature control, then using thermal heads together with a thermostatic valve will come in handy. This type allows you to adjust the optimal temperature without any human intervention.
Features of the functioning of the thermal head?
The thermal head functions inversely depending on the air temperature in the room. If the temperature increases (much higher than the comfortable and optimal temperature - this phenomenon can be observed when there are a large number of people in the room, or the operation of many electrical appliances), then the bellows of the thermal head expands. The expansion of the bellows of the thermal head leads to the fact that a certain part of the valve (stem) begins to move and there is a decrease in the flow of the heat generator through the radiator. If the air temperature, on the contrary, decreases, then this mechanism works in the opposite direction in order to increase the temperature for a comfortable and optimal temperature for the room.
Typical dimensions of thermal head valves
Basically, the typical and most common head size is M30*1.5. But the sizes are individual for each model. Today, manufacturers in most cases mark cranes, indicating their exact dimensions and production characteristics. The markings indicate special symbols with which the indicators are deciphered.
Installation of thermal heads
- Using certain rods, the plate is attached to the wall.
- The thermal head is fixed on the plate itself.
- Next, fixation is performed on the wall of the capillary tube.
- The thermal head is installed according to certain marks.
- Tighten and fix the bolt.
Features and differences between corner taps and straight taps, their advantages
What are the positive characteristics of corner taps?
- There is a guaranteed ability to turn off the battery.
- Resume operation of the heating system at any convenient time, if necessary.
- Guaranteed ability to independently adjust the temperature, which will be comfortable and optimal for being in the room (if there are temperature changes outside, and so on).
- The angle tap is very convenient to use, especially when draining a heat generator. This greatly reduces the time for this procedure.
- Easy maintenance.
When choosing between corner and straight taps, it is recommended to mainly use corner taps due to the above-mentioned positive features.
Installation
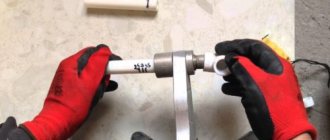
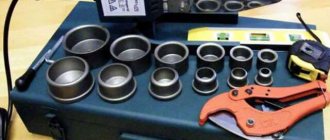
When installing a water supply or heating system made of polypropylene, the pipes are connected by soldering through adapter couplings using a special iron with replaceable cylindrical nozzles. To correctly install an American pipe with a polypropylene sleeve on a pipe, carry out the following operations:
- Screw on the soldering iron nozzles of the required size for the American pipe and the pipe on which the coupling will be soldered.
- Turn on the iron and set its heating temperature to 260 °C.
- After reaching the set temperature, put the parts being joined on the nozzles on both sides, holding them for a certain time according to the table for soldering polypropylene pipes, it is usually included with the soldering iron.
- Next, the parts are quickly removed and connected to each other, trying to keep them strictly along the center line without any movement. The minimum holding time is also determined from the table in the soldering iron operating manual; in its absence, find the necessary information from Internet sources.
Rice. 7 Examples of PP pipe connections using American pipes
The American combined split coupling for polypropylene pipes makes the transition from polymer to metal and allows you to easily, quickly and reliably connect various types of plumbing fixtures and fittings to a PP pipeline. Since the American sleeve is made of polypropylene with a standard internal diameter, it is mounted on the top of the PP pipe by soldering, using for this purpose a special soldering iron for welding polymer materials.
Source
Fuel supply valve
| Purpose and design of the valve-regulator. The valve is used to smoothly regulate the amount of liquid fuel (fuel oil, oil) supplied to the stoves. The fuel can be heated to 200° C and supplied under pressure up to 20 kgf/cm2.
Drawings of parts 4, 6, 8, 11, 15, 18 and 19 are not given. Det. 4 – M3x5 screw, GOST 1491-72; det. 6 – rivet 2x5, GOST 10299-68; det. 8 – bolt, GOST 7805-70; det. 11 – M3x5 screw, GOST 1476-64; det. 15 – gland packing grade AP, GOST 5152-66 (cord, the cross-sectional diameter of which is 4 mm); det. 18 – bolt, GOST 7805-70; det. 19 – cylindrical pin 3x14, GOST 3128-70. The listed parts should be found by GOST number in technical reference books. Select the missing dimensions of standard parts in the GOST tables, taking into account the purpose of these parts in the assembly unit. The designations of standard parts in the specification of the assembly drawing must correspond to the symbols adopted in GOST standards. You can download a three-dimensional model of the valve-regulator on which this article was compiled in the download section. |
Contents | Read comments (1)
1
| Commented by: Alexey | 12.05.13 |
| The link to the fuel supply valve model is broken, please refill it! |
American for polypropylene pipes: overview of couplings and types of connections, installation procedure
Beginning plumbers, and people who just happened to come across this word, often wonder what “American” is.
If someone hears this word for the first time, then what comes to mind is a slightly different American woman, or rather, a woman from America, or a film with the same name, but in reality this is not the case. In order to understand the meaning of this word, you need to know one more, and it sounds like “fitting”. This word usually refers to angles, tees and couplings necessary for connecting pipes in plumbing.
Installing heating batteries (radiators) with your own hands - the main technological stages
Independent installation of heating devices is a task for which you need to carefully prepare. The slightest violations of a process that seems simplest to an amateur often lead to negative emergency consequences. Therefore, it is advisable to entrust the replacement of batteries in city apartments to plumbers, on whose powerful shoulders the entire burden of responsibility will fall, and in a private house, installing heating batteries with your own hands can be successfully done by the owner. However, in order to avoid having to repair floors and re-glue wallpaper after a hot “flood”, you should familiarize yourself with information about the basic rules and nuances of installation.
Main differences
If you ask any professional plumber what is the difference between a regular faucet and a special American faucet, or the most common coupling and a simple American one, he will easily highlight several advantages:
- You can disassemble the plumbing without any rotation of the pipes; this is very convenient, especially in conditions where access to the pipes is very difficult.
- Much more convenient and practical than the so-called sweep. Has a smaller size. The drive is not a detachable connection.
- The American has a special lining - a seal, which simplifies the installation of this fitting, since the use of fum tape or other sealing agents is not required.
- The insertion is not required.
FIFTH MISTAKE – DO NOT close radiators
This is no longer my mistake, it’s the furniture installers. Mom ordered a wardrobe and a bedside table next to it. So the installers covered half the radiator with this bedside table.
Now we need to carry out an audit to see if it is leaking or not. But I can’t, I need to dismantle half the cabinet.
An error, as the classic saying goes.
Now let's watch the video version of the article.
I’ll finish this, I think my experience will help you in installing aluminum heating radiators. Read our blog, watch our channel.
Assembly Types
The connection, called American, is threaded and can be disassembled without any problems.
It has an O-ring in its design. There is a possibility of repeated use of the American one.
Thanks to all these factors, the American one can be installed even in the most inaccessible places and does not require much effort even when installing particularly large parts. If it suddenly becomes necessary to replace this coupling, it will not be a particular problem, since the American coupling is dismantled as easily as it is installed.
If it is necessary to join any two sections of pipe, then an American with a regular union nut will cope with this task. A positive feature of this method is the repeated dismantling and assembly of plumbing fixtures.
There are a huge number of variations of connecting pipes using an American coupling; they are very diverse and can be, for example, like this:
- connection with external thread;
- connection with internal thread;
- welded joint using a special union nut.
Also, the above connections can be made in any complete set.
Read the article on how to choose a ball valve here.
Connection diagrams
The radiator has holes at the ends for connecting pipes supplying coolant to the radiator and discharging it (return). exist :
Lateral
The coolant supply pipe is connected to the upper hole at the end of the radiator . The coolant passes through all sections from top to bottom and is discharged through a return line connected to the lower hole at the same end.
is installed in the upper hole at the other end to bleed off excess air . A plug is placed in the remaining lower hole.
- It is used in apartments with a single-pipe coolant supply system.
- The length of the radiator is no more than 1 m (heat loss increases with the number of sections).
Diagonal
The coolant supply is through the upper hole on one side, the return outlet is through the lower hole on the other side of the radiator. The coolant flows diagonally from top to bottom.
- Effective heat transfer with any number of sections.
- Allows you to connect several radiators in series.
Lower and saddle
The supply pipe enters the lower hole on one side, the return pipe exits through the lower hole on the other side of the heating device.
Photo 1. Bottom heating radiator connection diagram: pipes pass between the floor and the radiator.
- Used for hidden pipes in the floor.
- Thermal efficiency is 30% lower than diagonal (coolant stagnation in the upper part of the radiator).
Reference! Most often in private homes, heating pipes are laid along the wall between the radiator and the floor. Near the radiator, upward bends are made with a diagonal connection.
What are they made from?
The most popular and common materials used in American fittings are stainless steel, ordinary steel, brass, cast iron, with the addition of polypropylene, if this fitting is made for use in polypropylene pipe systems.
The price and all the characteristics, temperature, hydraulic and others, will primarily depend on the material used in the American, and, accordingly, on the price.
The range of such American women is really wide, for any budget and for any system. Often, the manufacturer coats the fitting with nickel or other protective layers to protect it from external environmental conditions and to make the connections look beautiful.
Wiring methods
There are three types of connecting heating devices, each of which will affect the installation process itself.
- Lateral.
- Diagonal.
- Lower.
In the first case, the battery is connected from the end on one side. To do this, you will have to install plugs with mounting holes on the side where the heating system riser is located. In the second case, the same plugs are installed on opposite sides of the device: one on top, the other on bottom. Please note that a supply pipe is usually connected to the top plug, from where the coolant flows into the battery. The return pipe is connected to the lower one accordingly. With the bottom connection everything is simple. Both plugs are installed on opposite sides only from the bottom.
There is nothing complicated in this heating radiator installation scheme. It is important to understand and apply it in practice. Usually in city apartments a side connection is used, so it is almost impossible to make a mistake here. True, sometimes the diagonal scheme is used in apartments, but only if the number of sections in one radiator is more than 12 pieces. This ensures uniform distribution of the coolant throughout the entire volume of the device. With a side connection, the outer sections may heat up slightly, and they will be of no use.