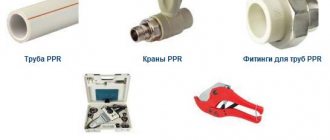
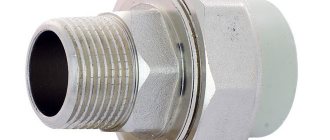
The most popular material for the manufacture of water and sewer pipes is polypropylene. This material is highly resistant to chemicals and corrosion. The PP pipe is not destroyed when the coolant freezes. Plus a long service life: up to 50 years with cold water supply and up to 25 with hot water.
Polypropylene pipes are the most wear-resistant, and they are not afraid of large temperature changes.
The reliability of such water supply systems largely depends on the tightness of the connections and correct installation. The reliability of attaching pipes to the ceiling, floor, and walls affects the service life of the pipeline.
Duct types
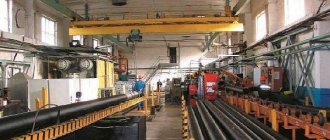
Special channels - air ducts - are used as routes for the movement of air masses. As a rule, these are pipes, which are usually distinguished by shape, rigidity and material of manufacture.
Section shape
The most commonly used are round or square air ducts. Sometimes, due to the characteristics of the room, only flat ducts can be installed. In this case, oval ones are used, obtained using special equipment by compressing round pipes. Often, in conditions of limited space, rectangular products of small height are installed, but wide enough so that the cross-sectional area meets the required characteristics.
Round ventilation ducts differ from square ones in that they are less expensive, lighter in weight, and have better aerodynamics - they have fewer obstacles to air exchange. The advantages are also high tightness, quiet operation and easy installation. The advantage of rectangular pipes is that they save space - they are simply irreplaceable for small spaces.
Rigidity
On this basis, flexible, semi-rigid and rigid air ducts are distinguished. The former are divided into frame and frameless and are made in the form of a round corrugated sleeve. They are used to assemble small air distribution systems, instead of corner outlets or as a connector of individual sections of ventilation ducts. Flexible pipes can be bent in any direction, and can also be stretched and compressed many times without losing their properties. The frame is usually a steel spiral, for the covering of which polymer, synthetic materials or aluminum tape are used. The design of such pipes can use heat-protective or noise-absorbing insulation.
Semi-rigid air ducts are characterized by a double-sided aluminum coating with an internal layer of mineral wool. They have the same wire frame. Another option is a pipe rolled from an aluminum strip. It can be stretched and given the required configuration only once. This design is good because it can withstand heating up to 700 degrees and can be used in smoke removal systems.
Rigid air ducts have a smooth inner surface and are characterized by high aerodynamic characteristics. In addition, they are durable and provide good tightness of joints, which is especially important for ventilation in industrial premises with hazardous production. There are straight-seam and spiral-wound ones.
Material
As already mentioned, for the manufacture of air channels, metal sheets with different characteristics are used:
- For relatively cold (up to 80 degrees) and dry (no more than 60% humidity) air, thin iron pipes - 0.5-1.0 mm - are suitable. It can be cold-rolled galvanized or hot-rolled steel.
- For higher temperatures and humidity levels, stainless or carbon steel structures would be appropriate. The wall thickness of such air ducts is from 1.5 to 2.0 mm.
- If the system is to be assembled in industrial premises with heavy dust, as well as in the presence of chemically aggressive gases and vapors, products made of aluminum alloys, plastic, and carbon steel are used. Exhaust ventilation structures in such cases must have a protective coating.
There are also plastic products (made of PVC or polypropylene) and air ducts made of fiberglass.
Insulation
As protection against condensation or to reduce heat transfer, ventilation ducts are sheathed with insulating material: mineral stone wool, polyethylene foam, rubber and others.
In residential premises, especially in children's rooms or bedrooms, it is often necessary to reduce the noise inherent in operating ventilation systems. To ensure sound insulation, similar materials are usually used. It is better to entrust the calculation of the required layer thickness to specialists.
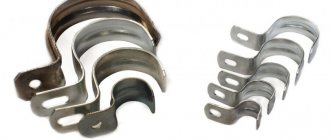
Fixation with clips
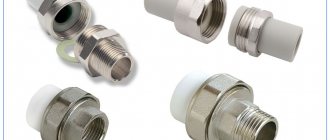
These plastic clips are used to install polypropylene pipes. Fasteners are divided into two types:
The first is used for cold or warm water. Only light weight communications can be secured with clips. The diameter of such pipes is usually 5 cm.
The fastening technology is as follows:
- Marks are placed on the wall along which holes will be drilled;
- A dowel plastic insert is inserted into the hole made with a puncher. The clip is pressed into it with force. For more reliable fixation, self-tapping screws are inserted into the holes;
- The pipeline is laid using extended clips. They begin to shrink, tightly enveloping the part.
When fastening a pipeline to a surface, it is necessary to take into account the properties of the material and its temperature range.
To operate the hot drain, additional clamps must be installed. The number of folds is kept to a minimum. This will make it possible to eliminate the appearance of a large number of blockages.
Requirements for installation of ventilation systems
Let's consider a number of important technical aspects on which the performance, durability and ease of maintenance of the system depend.
General requirements
- In the process of designing and assembling ventilation structures, it is necessary to take into account the spiral movement of air masses through the pipe.
- To install channels in basements, basements, concrete structures when passing through ceilings, as well as in case of contact with the ground, exclusively rigid pipes are used.
- To lay the route through the walls, adapters and steel sleeves are used.
- Flexible channels are not used when installing vertical sections above two floors.
- Sagging of the air ducts is unacceptable - the pressure drops in this area.
- When turning, you cannot bend a pipe with a radius of less than two channel diameters, since this will sharply reduce the aerodynamic characteristics of the system.
- In all cases, metal ventilation structures are grounded to prevent the accumulation of static charge.
- Flexible and semi-rigid air ducts are installed as stretched as possible.
- If damage to the pipe or external insulation is discovered during installation, this section must be immediately replaced.
Requirements for fastening ventilation elements
The installation of ventilation ducts is carried out in strict accordance with the design; the equipment is connected to the system after installation.
If you plan to transport moist air masses, the longitudinal seams should not be at the bottom of the channel. A slope of 0.01-0.015° and drainage devices at the lowest points of the pipeline are also provided.
The tightness of flange connections is ensured by gaskets:
- for channels intended for the extraction of dust masses and industrial waste with temperatures up to 70 ° C - made of porous silicone, tape rubber (monolithic or porous) 4-5 mm thick, foam rubber, or polymer mastic rope;
- over 70 °C - from asbestos cardboard (cord);
- in the presence of acid vapors - from acid-resistant gasket materials.
Tightness of wafer joints:
- for round air ducts at temperatures of moving masses up to 40 ° C - with silicone sealant or Guerlen tape;
- up to 70 °C - heat-resistant sealants.
All flange bolts are installed on one side of the joint (at the top in vertical sections) and must be properly tightened.
The distance between the fastenings of metal horizontal non-insulated pipes depends on the type of joining of the air ducts:
- for a wafer connection - with a diameter of round or larger side rectangular channels up to 400 mm - no more than 4 m, from 400 mm - maximum 3 m;
- for flanged pipes - with a diameter of round or larger side rectangular pipes up to 2000 mm - no more than 6 m, over 2000 mm - according to the documentation.
Vertical metal channels are fastened in increments of no more than 4 m, and inside multi-storey buildings with ceiling heights of up to 4 m - in interfloor ceilings. If the floors are more than 4 m, the distance is determined by the project. The same applies to the installation of air ducts on the roof.
For any channel size, attaching guy wires directly to the flanges is not permitted. The clamps should not have any gaps at the channel surface.
Permissible deviation from the vertical is up to 2 mm per meter. Installation is carried out so that the weight of the air ducts is not transferred to the equipment.
Vertical asbestos-cement channels should be fastened every 3–4 m (in this case, the upper section is inserted into the socket of the lower one). Horizontal - two fastenings per section for couplings and one for socket joints near the joint. They are sealed with hemp strands in the form of a rope, pre-moistened in an asbestos-cement solution mixed with casein glue. The remaining space of the coupling or socket is filled with sealant in accordance with the operating temperature conditions. After hardening, the joints are tightly covered around the perimeter of the box with protective adhesive tape or cloth, which is painted with oil paint.
All equipment: air conditioners, fans, pumps, electric motors and others are installed strictly in accordance with the technical documentation for the product and according to the design of the ventilation system.
Standard distances
There are also a number of regulatory requirements that determine the minimum distance between building and engineering structures:
- between round air ducts and the ceiling - 100 mm, walls and other building structures - 50 mm;
- between a channel made of a rectangular pipe and building elements or other highways - 100 mm (with a duct width of 100-400 mm), 200 mm (with a width of 400-800 mm), 400 mm (with a width of 800-1500 mm);
- between round channels and other utilities (water, sewer, gas pipes) - 250 mm.
- the distance from the air duct to the electrical wiring is at least 300 mm;
- joints between ventilation elements when passing through building structures must be located at a distance of at least 1 m from them.
Suspended pipeline supports
Pipeline hangers are steel products designed for fixing vertically and horizontally located pipelines to the enclosing structures of buildings.
Their functions are to compensate for vertical and horizontal movements of the pipeline and transfer its mass to the supporting structure. The main area of application of such hangers is the construction of pipeline systems of nuclear and thermal power plants. Suspended supports are produced in a wide range of designs from different materials.
Our catalog contains a wide range of pipeline hangers
Air duct assembly
Let's look at the installation procedure for the most common types of channels.
Rectangular metal
To connect ventilation pipes to each other, as well as to fittings, various types of connections are used, but the flange method has gained the most popularity. A metal angle or tire rail can be used as flanges for rectangular channels.
In the first case, a product of the required cross-section is made and secured to the air duct by welding. In the second - through rivets with anti-corrosion coating. At the corners, stiffeners with holes for the connecting bolt are inserted into the grooves of the tire rail. The joints are sealed with rubber (6-8 mm) or foamed silicone sealant. If you plan to remove hot air masses, use asbestos cord (cardboard).
Bolted connections are not always sufficient to ensure a tight joint. If the pressure inside the channel does not exceed 1000 Pa, but the dimensions of one of the sides of the cross-section are quite large, use special clamps in the form of a bracket:
- with 20 mm flanges - more than 900 mm;
- at 30 mm – from 1100 mm.
When the pressure in the system is over 1000 Pa, such a need arises even with smaller duct sizes:
- for joints made of 20 mm – from 700 mm;
- for 30 mm – for widths over 900 mm.
However, at joints with tapered or curved sections, more clamps are required compared to straight sections.
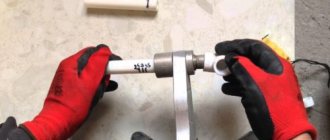
Round metal
When installing round metal air ducts, the following sequence is observed:
- According to the design of the ventilation system, a set of straight sections and shaped parts is prepared.
- To connect the air duct to a fitting or nipple, silicone sealant is used, which is applied along the edge of the product in a thin strip of no more than 2 mm.
- Next, the fitting is inserted inside the channel. The sealant is then evenly distributed over the entire joint area.
- The connection is fixed with self-tapping screws or rivets (see table).
Products with rubber sealing rings are even easier to join:
- A set of necessary parts is being prepared.
- The fittings are connected to straight sections in a counter motion up to the limiter, with a slight rotation around the axis of the joint. This technique makes the connection more reliable.
- The sections are fixed using rivets or self-tapping screws, which are evenly distributed around the perimeter of the joint. In this case, it is necessary to take into account the distance from the edge to the sealing ring so as not to damage it. As a rule, this is about 10 mm.
A coupling is used to connect shaped parts. Unlike a nipple, it is not inserted, but is put on top of the mounted fittings.
Flexible without thermal insulation
Flexible channels without thermal insulation are attached at the rate of 1-1.5 m per pipe. If there is a need to install a section of greater length, fastening is provided to prevent sagging.
Installation is carried out taking into account the direction of air movement “in a spiral”, which is indicated on the packaging and on the air duct itself. Cutting such a channel to the required length is done with a sharp knife along the turn; the cut line is first drawn with a marker. The steel spiral is cut with side cutters.
The finished fragment is placed on a pipe of at least 50 mm. The joint is sealed with sealant or DIAFLEX aluminum tape. The air duct is secured with a nylon hose or steel clamp.
The attachment points (suspension points) are calculated depending on the flexibility of the air duct so that its sagging does not exceed 50 mm. Typically this distance is 1.5-3 m. For vertical sections - from 1 to 1.8 m. To avoid deformation of the section, the size of the clamp is carefully selected. It is not allowed to touch the plastic air duct with high-temperature lines (heating, hot water supply). This can cause it to become deformed, and in this case its service life will be sharply reduced. Installing an outdoor channel that is not protected from sunlight will also lead to a similar result.
Flexible with thermal insulation
Thermally insulated flexible air ducts are very popular due to their low cost. When working with such channels, some features should be taken into account:
- to connect a pipe to equipment or when joining two sections, it is important to accurately fit and cut them to size;
- after putting it on the pipe (the rules are the same as in the case of non-insulated air ducts), the insulating layer is pressed out so that it is convenient to work with the inside of the pipe;
- the connection is sealed with adhesive aluminum tape, at least two layers;
- the insulation is returned to its place, the joint is also insulated with an aluminum strip until completely sealed and secured with a metal or nylon clamp.
IMPORTANT: securing the connection only with a clamp does not provide an adequate degree of sealing without the use of adhesive tape and can lead to the joint getting wet due to condensation if the duct is intended for an air conditioning system.
The installation of sound-insulated pipes is almost no different from heat-insulated pipes. However, airtightness in this case is more important than in the first. It is better to put the prepared channel on the pipe completely, for its entire length. A polyester separator is additionally attached to the micro-perforated internal air duct using the same tape. This must be done as reliably as possible, since when the pressure in the system increases, it can move.
To prevent vibration from the fan from being transmitted through the duct, an anti-vibration gasket is installed between its outlet pipe and the air duct, providing a flexible connection.
IMPORTANT: any leakage leads to uneven distribution of moving air masses and the generation of noise.
To reduce turbulence, a straight section is provided between the fan and the nearest turn or change in the channel cross-section. Its length should be at least 1.5-2 diameters of the outlet pipe.
There are three options for incorporating diffusers, grilles and other air intake and distribution devices into the system:
- The final element is mounted directly in the channel. For this purpose, appropriate transitions are used - from square to round cross-section or vice versa.
- Flexible pipes are used for connection. One end is attached with a nylon clamp to the air duct flange, the other to the device, and the angle of rotation of the flexible hose should be no more than 90 degrees.
- To distribute the flow through several channels, a hole of the appropriate cross-section is cut in the main air duct, onto which an adapter is placed, connected using a flange that ends with a connection to the distribution grille.
Plastic
Plastic air ducts are used both in everyday life and in industry due to a number of advantages:
- good noise and heat insulation properties;
- low resistance to air flows;
- resistance to adverse conditions (temperature, humidity, chemicals);
- harmlessness (see quality certificate!);
- high strength with low weight;
- convenience and ease of installation;
- safety at a low price.
A variety of standard sizes of sections, fittings and fasteners allows you to design plastic ventilation of almost any configuration quickly and without special installation costs.
IMPORTANT: do not neglect the design stage, even of a simple system, despite the obvious ease of assembly. To avoid additional costs and time spent on “finishing”, before purchasing materials, be sure to work out the diagram and calculate the necessary parts.
The installation process itself consists of sequential installation and connection of finished products into a system of supply and exhaust ventilation ducts. It is better to do this “from the bottom up” and from the equipment (after its installation) to the final elements: diffusers, grilles, deflectors, etc.
The sections are adjusted to length using a regular hacksaw or grinder. Studs, pendants, clamps and metal punched tape are used as fasteners. The joints of plastic air ducts and fittings are sealed with silicone sealant or insulated with aluminum tape.
Safety precautions during work
Most installation work is carried out at height. Lifting mechanisms are required. It is mandatory for installers to undergo safety training.
For the successful outcome of the work at height phase, it is required that:
- Work was carried out only by trained, qualified installers.
- The work site was fenced, and the passage of people near the site was limited.
- To reduce the degree of danger of installation at height, all preparatory processes were carried out at the zero level.
When performing work in private homes, reliable, strong scaffolding and inventory scaffolding are used. Work on laying ventilation pipes with thermal insulation is carried out wearing protective gloves and goggles.
The following article will introduce you to the specifics of arranging the passage of ventilation pipes through a roofing pie, which we recommend reading.
Ceiling mounting options
Let's look at the basic fastening materials for air ducts and how to install ventilation ducts to the ceiling with your own hands.
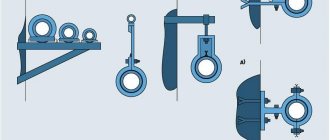
Traverse and hairpin
This type of fastener is used, as a rule, for hanging main channels of rectangular cross-section with a width of over 600 mm. The crossbar reliably supports the massive air duct from below, and the studs adjacent to the side walls of the section prevent it from moving to the sides. This type of fastening of the air duct to the ceiling is most suitable for heat and sound insulated systems, since the integrity of the pipes is not compromised by self-tapping screws. In addition, it is enough to put a rubber gasket between the traverse and the box to significantly reduce the noise level.
Installation is very simple:
- Holes are made using a hammer drill for steel or brass collets. The distance between the drilling points is calculated by the formula: B=S+D, where S is the width of the air duct, and D is the diameter of the stud.
- The collets are driven flush with the ceiling, the studs are screwed in until they stop.
- The channel section is inserted into the gap to the required height, a traverse is put on from below and secured with nuts. If necessary, such a system can be disassembled very easily.
Clamp and pin
A round channel is also attached to the ceiling. You can find a variety of sizes of fasteners on sale. They are usually equipped with an internal rubber gasket, which helps reduce noise and vibration. This method is also used for fastening insulated air ducts.
Installation procedure:
- The center line of the future channel is marked on the ceiling, along which holes are drilled for the collets. For pipes of small diameter, fastening to a plastic dowel is allowed.
- A fastening element is driven into the holes and a pin with a clamp is screwed in.
- The lower part is unscrewed, the air duct is installed in place, and the clamp is tightened tightly around it.
TIP: you can secure a short flexible channel with a clamp without a pin. Such products are also on sale.
Punched tape
This method is inexpensive and easy to install. Using punched paper tape, you can fasten air ducts of both round and rectangular cross-sections. To do this, pieces of the required length are cut, the pipe is covered with a loop, the ends of which are secured to the ceiling with an anchor. Another option: a piece of punched paper tape is screwed to the bolted connection of the sections, and the other end to the ceiling.
However, this type of installation does not provide the ventilation system with sufficient rigidity. The air ducts are too mobile, which in conditions of strong vibration can lead to depressurization. One more nuance: it is not possible to accurately adjust the height of hanging pipes on punched tape. Changes create zones of turbulence, which increase vibration and noise. Therefore, experienced installers advise limiting the use of this fastener to round air ducts up to 200 mm.
A slightly more rigid fastening is obtained when punched tape is used in conjunction with a clamp. But even in this case, it is not recommended to attach large ducts to the ceiling.
Sometimes mounting to the ceiling is not possible; in this case, the air ducts are mounted on the wall, having previously installed brackets from an equal-flange angle. Then the air ducts are laid on top of the brackets and secured with punched tape. When the channel cross-section is over 315 mm, hanging is carried out in the same way as fastening to the ceiling. This will prevent the ventilation system from deforming under its own weight.
Profile and stud
Among installation specialists, a popular method of fastening air ducts is using a stud and a special profile. It comes in two types: L-shaped and Z-shaped.
Both are screwed to the sides of the channel with self-tapping screws. One of the planes has a hole equipped with a rubber seal for connection with a pin. Thus, vibration is dampened and the noise level is significantly reduced.
The difference is that the Z-shaped profile with one of its planes supports the air duct from below, this allows it to be used for the installation of massive systems with a large cross-section. This connection increases the rigidity of the structure and reduces the load on the screws.
Plastic holder
Among the variety of fittings for plastic air ducts, there are special fastening elements - holders. They are made of the same material and in accordance with the standard sizes of the channels.
There are two types of products: for round and square air ducts. They are mounted on the ceiling or wall as standard - a dowel plus a self-tapping screw. To securely fix the pipes, there should not be a distance of more than 1 meter between the holders. Sometimes, in order to eliminate vibrational displacement of the channels laid above the furniture, the holders are screwed to the cabinets. To do this, instead of dowels, small wood screws are used.
Fastening pipes on Y-Pipe cable hangers
- Allows you to quickly and easily hang two parallel pipes
- One mounting point for two pipes
- Replaces - supporting profile, crossbars and threaded rods
- Standard distance between pipes: 200 mm; 100 mm and 150 mm distances available on request
- The kit is ready to use without any preparatory work
- No on-site adjustment required
- The system is ideal for use with the universal clamp
- Supplied in kits, with cables of the required length
How to combine a plasterboard ceiling with air ducts
Air ducts “get along” perfectly with plasterboard ceilings. The hollow space between the ceiling and the gypsum board is excellent for laying ventilation lines. An alternative option is to cover the air duct with a plasterboard box.
ATTENTION! It is necessary to ensure reliable thermal insulation of the channels to prevent the possible occurrence of condensation and damage to plasterboard sheets.
Hiding in the ceiling space
If the ceilings in the room are high enough, there will be no problems with masking the ventilation ducts. For installation in such cases, flat channels of rectangular cross-section with a heat-insulating coating are most suitable. Attaching the air ducts is carried out as usual. In this case, contact with the metal profile frame must be excluded so that vibration and noise are not transmitted to it.
What is installed first is a matter of personal preference for installers. You can, for example, mark out the ceiling hangers, then assemble the ventilation, and after that - the frame for the plasterboard. It is important to combine the fastening fittings of both structures on the ceiling area without violating the standards. The sheets are hemmed after testing the ventilation system.
We close it with a box
When the apartment already has low ceilings, you can hide the air ducts in another way. To do this, the main gypsum board ceiling is “pressed” against the ceiling as much as possible, and ventilation switches are mounted along the walls under the second-level ceiling duct. Of course, in this case, the costs for air ducts and fittings will increase somewhat, and a two-level design will cost more.
If the space is really bad, the ceiling is plastered for painting, and a mini-box made of gypsum plasterboard is assembled for the ventilation duct. In this case, a small amount of starting profile and one sheet of drywall will be enough for the room. When calculating, it is necessary to take into account that there should be a small space between the air duct and the walls of the box for air circulation.
As in any business, a creative and innovative approach is encouraged when installing ventilation systems. However, we should not forget about the main thing: any violation of the standards and rules for attaching air ducts to the ceiling leads to unnecessary problems.
Types of fasteners
The external system can be secured in several ways. The choice of the appropriate technology depends on what the pipeline itself is made of. Today builders use the following fasteners:
Galvanized steel is used to make clamps. Parts are assembled from two identical half-rings, fastened with screws. One half ring has a special pin.
To obtain a single structure, the half rings are tightened with screws. To combat the resulting vibration, the pipes are equipped with rubber gaskets.
The size of the clamp can vary from 1.4 to 22.2 centimeters. To secure sewer pipes to the wall, you must follow a certain technological sequence:
- The axis of the pipe is taken as the base. A line is drawn indicating the points where the fasteners will be installed;
- If plastic dowels are used, holes are made in the wall in advance, in increments of 50 centimeters. This size will prevent deformation of the pipeline;
- To make the fastening more reliable, additional clamps are installed where the pipe is laid with a bend. For their installation, 15 cm is set aside from the angle of rotation;
- The dowel is inserted into the hole made. The clamp, located perpendicular to the pipe, is twisted tightly; The lower bolt is unscrewed, the half-ring is moved down;
- The pipeline is mounted in open clamps, after which it is tightly fixed. Only half rings are tightened with screws.
- At the final stage, the final, tight tightening of the half rings is performed.