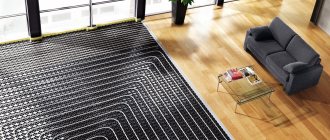
Modern homes are increasingly equipped with heated floors. After all, the availability of this heating method increases while maintaining high efficiency. Despite the simplicity of the design of heated floors, they can be called the most optimal option for heating a house or for additional heating.
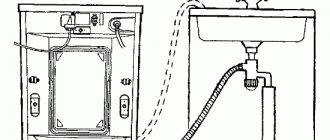
Connecting a heated floor to electricity
Heated floors can be of two main types by design: water and electric. Let's look at how an electric heated floor works and is connected.
The principle of operation of warm electric floors is simple: they convert electrical energy into thermal energy due to the resistance of the conductors. At the same time, the screed or tile warms up. It is these materials that are able to evenly distribute heat over the entire area and release it into the environment.
Serial connection of a rod heated floor
Heated floors powered by electricity have a fairly simple design and consist of the following main parts:
- heating element (depending on the type, it may be a cable or a mat);
- temperature sensor;
- thermostat.
The structure of a floor heated with electric cables
Many people think that laying a heated floor and connecting it to electricity is difficult. In fact, in its essence, this type of heated floor resembles ordinary wiring, which is laid in layers of screed or under tiles. For full operation, a regular outlet with 220 V alternating current is sufficient.
The connection diagram itself does not cause any difficulties - it does not even require special knowledge. But be sure to remember when working that this is an electric current, which, if handled incorrectly, can greatly harm a person, even leading to death. To prevent this from happening, you must strictly follow a number of rules when choosing and connecting.
Selection of heated floor power
Calculation of heated floors
The most important indicator that you need to focus on when choosing heated floors is their power. This criterion depends on the following points:
- floor area that needs to be heated;
- type of heating required (additional or main);
- type of room where heating will be carried out (balcony, living room, office, warehouse).
The type of connection to the network and the presence of additional elements depend on the power.
Calculation of underfloor heating power
When calculating a heated floor, you need to take only the usable area where a person is most often located. So, if this is a kitchen, then you don’t have to calculate the area under the furniture and refrigerator. When making calculations, it is imperative to determine in advance the location of all heating elements, since it will be impossible to change their positions in the future.
If you decide to use underfloor heating as the main heating, then the area allocated for it should be at least 70% of the entire room.
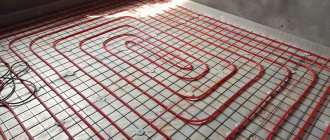
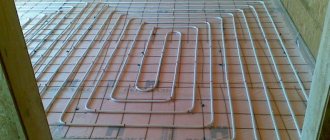
Water heating
The first switching on of the water-heated floor is carried out only after pressure testing of the system. This is testing for the tightness of pipes and connections.
Pressure testing is carried out as follows:
- if the floor line is made of steel or copper pipes, then cold water is run into it; the pressure gauge should read 6 bar; leave the system for a day; check the indicator on the pressure gauge; if it remains unchanged or drops by no more than 1.5 bar, then the system is ready for operation;
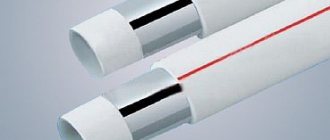
- when crimping a pipeline made of cross-linked or heat-resistant polyethylene, water is pumped under a certain voltage; operating pressure is 4 bar; it is increased by 2 times; the line is left for 24 hours;
- crimping can be carried out using air; a compressor is used for this; a plug is installed at one end of the pipe; air is pumped through the other end using a compressor; the line is left for 12 hours; the pressure reading on the pressure gauge should not change.
We recommend: What should be the height of the heated floor?
Some craftsmen use high-temperature coolant, up to 85 0C, into the water circuit as a pressure test. If no leaks are detected at the base within half an hour, then the system is sealed and ready for connection.
The main line is closed with a screed when the water in the pipes has cooled. There is no need to drain it. On forums they often discuss when to turn on the “warm floor”. The first switching is carried out immediately after crimping.
- It is necessary to bleed air from the system. To do this, open all the valves in the circuit, the air tube, and the cover in the three-way valve.
- Turn on the circulation pump; it works for 3-4 minutes; the system is filled with water;
- Alternately close the valves on the collectors for a few minutes and open them again; achieve a certain pressure in the pipes.
- If the system does not have a circulation pump, the system is closed, then the air is removed using liquid. It is pumped into the main line from below. The pipeline and heat exchanger are filled until the pressure gauge reads 4 bar. Next, the valves on the manifold are closed. The pressure should drop. This means that air is leaving the system. Add more coolant, bringing its pressure to normal. The steps are repeated until the pressure is established. Liquid is visible at the outlets of the falling and return manifold.
After the air has left the system, close the air pipe, install a thermal head on the three-way valve, close the end valves, and keep the valves on the manifold open. Perform a screed. After 28 days, when the concrete coating has dried, the floor covering is finished. Next they turn on the “warm floor”.
- The temperature on the thermal head is set to 20 0C.
- The same mode is set on the thermostat, which is located on the boiler.
- The floor temperature is increased gradually. Otherwise, the concrete coating may deform or crack due to sudden temperature changes.
- Within 2 days the temperature is brought to normal, to 45 0C.
- On the supply manifold, it is necessary to set the filling level of the water main. The flow meter is set to 1.5.
- Subsequently, the microclimate in individual rooms is monitored. Perhaps the highway's capacity should be increased.
We recommend: How are PEX pipes connected for heated floors?
Pressure testing of the pipeline is carried out every time before the start of the heating season. Otherwise, there will be areas with air in the line. When heating water, the air will not allow all the thermal energy to be transferred to the floor. The water circuit will undergo heavy loads.
Specific power of heated floors and its calculation
Advantages of Uriel thermostats
Warm floors can be used both as the main source of heat in the house and as heating. For the first type, the calculation is approximately 150-170 W per 1 sq.m. Heating is calculated based on values of 110-130 W per 1 sq.m.
This indicator may vary slightly depending on the type of heated room. For example, rooms where people are constantly present must have very warm floors, and for this reason the calculated power consumption increases. If this is a kitchen or bathroom, then you can not overestimate the values here, since residents spend little time in them.
Electricity consumption of underfloor heating can be controlled
Additionally, when calculating, it is recommended to take into account the number of storeys. If the floor of an apartment on the first floor is insulated, then the power needs to be increased by 10-15%. In all higher rooms the values can not be increased.
electric heated floor
Types of electric heated floors and thermostats
Now there are two types of electric heated floors:
- cable or sectional;
- mats, infrared film systems.
Cable heated floor
Each of these types has its own characteristics and is used in specific cases. So, if a warm floor is installed in a concrete screed, then it is better to use a cable type. Mats or film heating elements are best suited under the tiles.
Naturally, the main part of a warm floor is the heating element itself. But it works fully thanks to the thermostat, which is the heart of the system.
A thermostat for a heated floor is a device that, without human intervention, automatically regulates and maintains the optimal air temperature
It allows you to maintain the desired surface temperature. Buying a thermostat is not a problem: it can be either mechanical, with manual setting and temperature control, or fully automatic, with measurement of surface temperature, room air and selection of the most optimal parameters.
Thermostat for heated floors Electrolux ETT-16 Thermotronic Touch
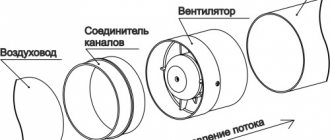
Infrared carbon floors
Infrared floors consist of heating elements filled with a carbon mixture and fixed to a polypropylene base. When exposed to current, carbon emits heat waves with a length of 8–14 microns; the waves pass through the floor covering and warm up the objects in the room (the air only slightly). A room heated by an infrared carbon floor is always very comfortable - there is no dry air, which is why we suffer so much in winter.
It heats up objects: tables, stairs, walls, that’s the whole point. You open the windows wide, ventilate, and when you close everything, it’s warm again. Because not only the air is warm, but everything around it.
Infrared floors are not afraid of frost: you can come to a cold country house in winter for the weekend after a week of hellish minuses, turn on the system and it will work normally, and a comfortable temperature will be established very quickly (the system enters operating mode in 5-7 minutes, but it also cools down such a floor immediately).
Film and rod floors have their own characteristics.
Installed without wet processes, on a dry, flat surface under the finishing coat. Installation is quick, with the ability to dismantle the system and use it again.
Laying is carried out in a screed or a layer of tile adhesive (2 cm) with mandatory thermal insulation of the rough base. Foil materials are not allowed for the coating substrate.
It is not recommended under carpet, carpet tiles, linoleum on felt - these coatings reduce the heating efficiency several times. Parquet and solid boards are possible if the operating temperature of the system is not higher than 28 degrees.
Connecting the thermostat to the system
Installation diagrams for film heated floors
Before connecting a heated floor, regardless of its type, you need to decide on the location of the thermostat. This device is used to maintain a stable set temperature indoors. In addition, the thermostat directly connects the heated floor to the network.
It is better to install the thermostat close to existing electrical wiring.
The thermostat is installed at a height of at least 1.5 meters from the floor and in places where it will be completely protected from high temperatures. This will allow you to take measurements as accurately as possible and set the desired floor heating.
Before connecting the thermostat, you first need to decide which method will be used to do this: power from the panel or use of an outlet. It’s worth noting right away that these two methods involve the additional inclusion of a circuit breaker in the circuit, which will trip in the event of a breakdown, overheating or short circuit. Its maximum shutdown power is selected depending on the type of heated floor.
In most cases, the connection diagram is indicated on the thermostat, which greatly simplifies installation without the help of electricians. If there is no diagram, then the following wires need to be connected to the following terminals:
- 1 terminal – network phase;
- Terminal 2 – network zero;
- 3, 4 terminals – heating element cores;
- Terminal 5 – timer;
- 6, 7 terminals – floor temperature sensor.
This distribution is standard, but it is worth understanding that different manufacturers may create circuits that require different connections. It all depends on the design and additional capabilities of the system.
We prepare a place for installing a thermostat: we supply power to it (hidden or open, as desired)
Before connecting, you need to cut a small ditch in the wall. It will house two plastic tubes. In the future, the wires of the heating element will be passed into one, and the temperature sensor will be located in the second. Upon completion of these activities, you can begin installing and connecting the entire underfloor heating system.
About the role of the sensor
It should be remembered that in setting up a heated floor there is one irreplaceable part - this is the sensor. The control unit adjusts the floor heating and saves electricity. Programmable devices provide the greatest savings, but they are expensive.
The ability to customize the heated floor as needed saves energy and, accordingly, money.
The effect lies in the correspondence between the electrical power of the floor and the meter. Heating the floor to the required temperature is only possible with sufficient power. Therefore, when purchasing, you need to be interested in the characteristics of the product.
In some cases, in large rooms it is necessary to connect more than one regulator.
An important point is the type of setting. You should find a way for yourself not to make holes in the wall, but to limit yourself to a box for a thermostat. Do not deviate from the recommendations in the instructions.
Both functionality and appearance are all significant factors. You can consult with specialists. You need to be especially careful when installing insulated floors in rooms exposed to moisture (bathrooms).
Under no circumstances should the control unit be installed inside; you need to run the cable to the heaters through a hole in the wall and place the sensor in the corridor.
We recommend: What is included in the Valtek heated floor kit?
Electronic tuning equipment is capable of servicing different operating modes of floor heating with a high degree of energy saving. But this is an expensive technique.
- Related Posts
- How to fill a heated floor?
- Which plasticizer to choose for heated floors?
- Rating of manufacturers of heated floors for tiles
- What is included in a heated floor cake?
- How to make a dry heated floor?
- How is Lavita underfloor heating installed?
Connecting a cable-type floor heating system
Connection diagram for cable heated floor
To connect a cable heated floor, you need to level the surface. Next, attach a damper tape along the wall and then lay thermal insulation. The cable can also be installed on an old surface, without a lining. The only condition for this is the presence of a heated room below. Before laying the cable, you need to stretch all the wires to connect to the thermostat.
Next, you can lay the heating element, having previously placed a regular mounting tape on the floor. This is done to keep the cable in the desired position and not move. The cable can be laid in any shape, the main thing is that it does not intersect with itself. The most effective and convenient installation method is the so-called “snake” - the cables are sold in rolls, already laid in the form of a coil on a mesh.
Connection diagrams for single-core and double-core cables for heated floors
Having distributed the cable evenly, you can secure it. It is important that the edges do not reach about 10 cm from the location of the furniture or walls. Next, you need to install a temperature sensor, which is hidden in the tube mentioned earlier. Its location should be at a distance of 40-50 cm from the edge of the heating element coil.
This completes the installation of the cable and sensor. Using a tester, you need to check the resistance of the heating element. It must correspond to the passport data. Next, you need to fill everything with screed and wait until it hardens. You cannot immediately turn on the heated floor to dry it, as cracks will appear and the strength indicator will significantly decrease. All that remains is to simply connect all the wires to the thermostat and check the functionality of the system.
thermostat for heated floors
How to install heated floors
Every owner wants his home to be comfortable and cozy. Modern heated floors help achieve comfort and warmth. But it is not at all necessary to involve craftsmen in installing floors. You can do this yourself if you know some subtleties and nuances.
There are several designs of underfloor heating. Let's look at the main ones.
Electric floors can include a heating electric cable, special heating elements and film. The peculiarity of this type of floor is that in addition to the entire room, it also heats the floor covering
When choosing a coating, you need to pay attention to some nuances. Certain materials can release very harmful substances. Some systems are not suitable for certain types of coating
For example, such a floor is not laid under linoleum, which has double insulation
Some systems are not suitable for certain types of coating. For example, such a floor is not laid under linoleum, which has double insulation.
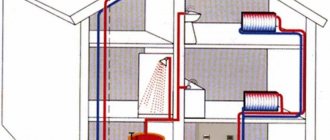
A water-based heated floor can be covered with any floor covering you like. With the exception of high-rise buildings. This type of flooring can disrupt the public heating system. But if you really want to install it, then you need to get permission from the utility service. Heated floors in a private home - reliability, durability and savings.
There are several options for laying heated floors under the laminate. The main rule: uneven temperature distribution can contribute to distortion and cracking of the coating. The heating temperature for laminate should be no higher than 30 degrees and have a power of about 110 W/m2.
Parquet is much more sensitive to high temperatures. It cannot withstand more than 24 degrees. But experts generally do not recommend laying this covering on a warm floor. Installation under coatings with low thermal conductivity - wood and cork - is also not recommended.
The most suitable materials are ceramic tiles, stone and porcelain stoneware. Any type of heated floor is suitable for them, since they conduct heat well.
It is dangerous to cover a heated floor with cheap linoleum. It is capable of releasing very harmful phenolic compounds.
Any heated floor has its drawbacks. Sometimes you simply cannot do without floor insulation, for example, in your home and on the lower floors of high-rise buildings. It is not advisable to install flooring in bedrooms - it may cause headaches.
Warm floors installed in the bathroom have their own specifics. On the one hand, the feeling of discomfort when stepping on an icy floor disappears
On the other hand, there is a room with high humidity and great care is needed during installation:
- Good copper wiring must be used;
- Then grounding is installed;
- An automatic shut-off device is connected.
There are also some requirements for the concrete screed itself. Air cavities should not form near the floor, as this can lead to insulation breakdown and breakdown of the entire system.
Advice from an expert: you cannot place household appliances on a heated floor, and furniture that does not have legs may overheat.
If it is not possible to use the services of professionals, you can do it yourself. Thermal film is best suited for DIY installation.
First you need to position the film, retreating about 70 cm around the entire perimeter. You cannot install baseboards and furniture on thermal film. All strips of thermal film must be mounted in parallel, secured with special clamps. The cable connection points must be insulated with electrical tape.
Any covering can be laid on it without a cement screed. Household linoleum cannot be laid without a screed, as it is very easily damaged. If you plan to lay carpet on a warm floor, then you need to place sheets of MDF or plywood under it to make the base rigid.
If hydronic underfloor heating is required, some additional skills will be required. First you need to remove old flooring, dust and debris.
1. In order for the screed to be of high quality, it is necessary to install beacons using a level. Then concrete is poured and leveled.
2. A heat-insulating layer is laid.
3. The pipeline is laid.
4. The entire system is carefully poured with concrete.
5. Then the selected floor covering is laid.
The time it takes for concrete to dry is about 4 weeks. If you need to speed up the drying of the floor, you can temporarily turn on the water heating with a maximum temperature of 30 degrees.
By following these instructions, you can install any heated floor efficiently. The main thing for this is desire.
Connecting heated floors in mats
To figure out how to connect heated floors in mats, you don’t need to have a lot of knowledge and experience. The basic principle is approximately the same as that of the cable type. It is only worth noting some differences.
A thermal mat is a heat-resistant film onto which a heating element is attached. Since the pitch and shape of the installation are set during production, you will only need to calculate the heated area and power consumption.
Electric floor in mats
When installing such heating, you need to lay out the mats on the surface according to the calculated area. Next, everything is filled with a thin concrete screed or glue is applied for laying tiles. A very important point is the lack of thermal insulation. This can lead to system overheating and failure.
If the cold leads are not long enough for connection, just use a piece of mat. The coupling must be located inside the screed itself.
Common Mistakes
How to install electric floors correctly with your own hands - this question often arises for beginners who want to do this heating at home.
The main mistake is installing floors under large furniture. Underneath, the surface is not cooled, which leads to overheating and then failure of the system.
You cannot bend the cable either, as this will disrupt the functioning of the device. When laying cable mats, cutting the wire is unacceptable, so you should correctly calculate the size of the heated area.
A common mistake when constructing electric floors is inappropriate control of the insulation resistance during installation. The indicator should not exceed that specified by the manufacturer by more than 10%.
When using a film heated floor, it may stop heating if the film is damaged. Its current-carrying parts must be properly insulated, otherwise electric current will leak and the system will eventually shut down.
If we talk about the temperature sensor, then you should not pour it into the screed. In case of breakdown, replacement will be difficult. It is placed in a corrugated pipe.
Connecting a film-type heated floor to the electrical circuit
Film-type warm floors are a relatively new invention. It is made of special heating film. Even the most experienced builders may have problems connecting this system. In order to do this without problems, you must definitely understand the film heated floor system itself.
Sequence of work when laying electric heated floors
The film heated floor system consists of special carbon and bimetallic heating elements, which are sealed in a special heat-resistant material. Copper contacts are located along the edges of the film. With their help, the device connects to the network.
The actual connection is made by soldering wires to the terminals and leading them to the thermostat. A special feature of the installation is the use of a substrate that has a foil surface. This solution allows heat to be reflected from the lower surface and completely directed to heating the floor.
The temperature sensor is installed, as a rule, in a special recess under the film itself, but options for its location on the surface are not excluded. This type can also be cut according to special marks applied by the manufacturer. They are located at a distance of up to 30 cm from each other. When the installation is completed, the sheets can be connected in parallel.
The main difference between a film heated floor is that it fits under any surface. The only exception is its installation under the carpet, since there is a high probability of damage to the integrity of the film.
The decision to install heated floors in the house has always been justified. It is convenient, practical and quite economical. And if there are children in the house, a warm floor will allow parents not to worry about them freezing and getting sick.
Video - Connecting a heated floor to electricity
Which is better, manual or automatic?
Today the market offers a large selection of such devices from various manufacturers. Note that the first underfloor heating systems were equipped with mechanical thermostats. However, this method of setting the desired temperature of the heated floor was inconvenient, as it required constant human control. There are still such models on sale, and it is worth saying that during this time their sales have not decreased much.
We recommend: 7 signs of a good layout: myths and reality
After some time, mechanical thermostats were replaced by electronic thermostats, which allow you to control heated floors automatically. With their advent, people no longer needed to constantly monitor the floor heating temperature. It’s just that their price is slightly higher than the first ones, but not so much as to deprive yourself of the pleasure of being free from constant temperature control.
If your budget does not allow you to purchase an expensive automatic controller, then you can install a mechanical device, even if it does not have a large number of functions, but the ease of installation and control can also be considered a big plus, and if you add the low cost, then such a thermostat will be suitable solution for a heated floor system on a limited budget.
To understand which floor heating control is better, let's compare automatic and mechanical thermostats. To make it clearer, we present a comparison in the table according to several parameters:
| Comparison options | Mechanical thermostat | Automatic thermostat |
| Device price | From 3-4 thousand rubles | From 9 to 20 rubles |
| Work management | In manual mode | In automatic mode |
| Screen | Absent | Available |
| Thermal measuring device | Absent. Measuring the heating temperature of a heated floor occurs using tactile sensation | Available. The temperature sensor monitors the maintenance of the required parameters |