Heating a house with warm water floors is not uncommon today, and increasingly this system is preferred when choosing a heating method.
The design of water floors consists of pipes laid in the floor with a coolant moving inside (usually water). The system is connected to central heating, hot water supply or a specially equipped boiler.
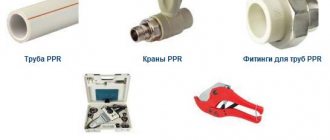
There are many types of pipes that can be installed in the construction of heating floors; today we will talk about polypropylene.
Types and characteristics of polypropylene pipes
Polypropylene pipes are widely used in the construction industry, as they are inexpensive and quite durable.
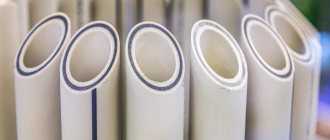
They are available in two types: single-layer and multi-layer. Each type has its own positive and negative sides. Let's look at them.
Single layer
Single-layer polypropylene contours come in several varieties:
- RPH - made of homopropylene. They are not intended for heated floors, but are widely used in water supply, sewerage and ventilation systems.
- PPB - made from polypropylene block copolymer. Products of this type are durable and resistant.
- PPR - random copolymer polypropylene is used in production. The contour of it evenly distributes the load along its walls.
- PPS - this product is flame retardant. Pipes are able to work efficiently even when heated to +95 degrees.
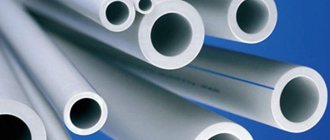
Multilayer
Multilayer polypropylene pipes are also available in several types and have the following technical characteristics:
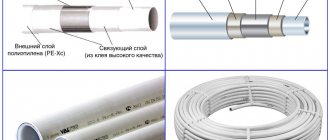
- Aluminum - the pipeline has a thin reinforcing layer on the outside. In the process of connecting such elements, the aluminum layer is cut off by 1 mm. There are products where the reinforcement is between the walls. Polypropylene pipes with a reinforcing layer function effectively even at + 95 degrees.
- Fiberglass - reinforcement is located between sheets of polypropylene. This type works great in the construction of warm floors.
- Composite - between two layers of polypropylene there is a layer that combines fiberglass and aluminum fibers.
Choice
Polypropylene pipes are presented on the market in several versions. They are divided into single-layer and multi-layer. For multilayer ones, reinforcement is carried out using aluminum or fiberglass. In a heated floor system, multilayer pipes must be used. They exist in three types:
- With an aluminum layer, which is located on the outside or between layers of polypropylene.
- Composite ones are reinforced between layers with a mixture of aluminum and fiberglass.
- With a layer of fiberglass they are optimal for installing heated floors. They do not deform due to temperature changes, are characterized by increased durability and strength, and lie well in the screed.
The polypropylene pipe for installing heated floors must be up to 17 mm in diameter.
Advantages and disadvantages of polypropylene
The main reason for the popularity of PPR pipes in the construction of heated floors is cost-effectiveness. Their cost is affordable, and this is especially important when installing a pipeline over a large area.
In addition, polypropylene contours:
- have increased mechanical strength and elasticity;
- have an excellent level of tightness - this is ensured by a special soldering method, the product is monolithic, almost seamless, which allows you to place pipes under a screed;
- durable - if installation rules are followed, they will last for several decades without an accident;
- are light in weight - this makes the installation process simple;
- inert - not susceptible to aggressive substances;
- are not subject to corrosion - thus, deposits do not accumulate inside the pipe;
- have good sound insulation;
- environmentally friendly - no harmful substances are released when heated.
Polypropylene is highly resistant to low temperatures, which protects the coolant from freezing.
But even if it freezes, the walls of the pipes are not destroyed, since the polymer is able to expand, and when heated, returns to its original shape. Therefore, polypropylene pipes are ideal for installation in country cottages where the owners do not live permanently and the floor is used occasionally.
However, this type of pipe rolling materials also has disadvantages. Polypropylene is highly flammable and should not be installed in rooms with a high level of fire hazard (wooden). In addition, the optimal operating temperature limit is + 75 degrees. It is worth saying that the PP has poor flexibility, and it will not be possible to make turns within a small radius.
In addition, ordinary PVC pipes are intended for use in water supply and sewerage systems, but they cannot be placed in heated floors, as they will not withstand thermal and hydraulic loads. Therefore, it is necessary to lay a reinforced contour in heated floors.
Pipes for heated floors. Recommendations from experts // FORUMHOUSE
Warm tiled floors
Tile floors are durable and resistant to moisture and aggressive liquids. Therefore, many homeowners opt for an electric heated floor followed by laying tiles.
Tiled floor heating
In addition, they are economical because they allow you to adjust the temperature according to the season. The installation of heated floors under tiles is made of cable, film and in the form of heating mats. Let's look at their pros and cons.
Cable underfloor heating system
Today, cable underfloor heating under tiles is rarely used. Due to the high pie of this system, which includes a concrete screed up to 4 cm thick, the height of the room increases and the load on the base increases. Therefore, it is better to use it in rooms without finishing.
Cable underfloor heating system
Cheaper products include single-core cables. Their use is problematic in rooms with complex layouts, since there is a need for a thermostat. Easier to install are taller two-core options, the ends of which do not meet at one point. This floor is started after the screed or tile adhesive has completely hardened.
Warm floor made of electric mats
This option is suitable for rooms with a concrete base. The mats have a base of thin cables embedded in a reinforced mesh. They are produced with a thickness of no more than 3 mm and do not reduce the height of the room. The absence of screed and the minimum thickness of heating mats allow the use of such floors in rooms with low ceilings.
Appearance of mats with electric cable for heated floors
They are laid directly on concrete, covered with tile adhesive, onto which the tiles are fixed. Despite the ease of installation of this heating system, it is much more expensive than its cable counterpart.
Film floor option
Film heated floors under tiles are among the most modern and efficient electrical systems.
Film heated floor
It is easy to install and can be used on all topcoats. The coolant in the form of infrared radiation not only has high efficiency, but is also harmless to health.
Now you know how to make a heated floor with your own hands, and choosing the appropriate option will allow you to create not only a reliable heating system yourself, but also save on installation and commissioning work.
Marking of polypropylene pipes
Currently, there is a wide variety of products in this segment on the market, which are labeled as follows:
- PN 10 - installed on ordinary polypropylene pipes with a homogeneous structure. They are recommended for use in water supply systems with water temperatures up to 20 degrees and pressure up to 10 atm. Pipes with this marking usually have a diameter from 20 to 110 mm.
- PN 16 - designates a single-layer product that is suitable for installation in warm water floors. Let's allow the coolant to heat up to 80 degrees and pressure up to 10 atm. The diameter of the contours is the same as PN 10, but the thickness of the walls is much greater.
- PN 20 - marking of homogeneous pipes; they have a permitted heating level of the circulating coolant up to + 95 degrees. The working pressure in this case is no more than 6 atm, and the diameter is from 20 to 110 mm.
- PN20 AL (PN20 GF) - installed on polymers with an aluminum reinforcing layer or fiberglass. The remaining indicators coincide with PN 20. This type differs from other consumables in the coefficient of thermal expansion - it is smaller.
It is very important to take this marking into account when choosing a product for certain operating conditions; the efficiency of the heated floor depends on it.
The Hidden Dangers of Pipe Reinforcement
The set of building codes and regulations governing the creation of heating systems prescribes the use of pipes with limited oxygen permeability. Oxygen dissolved in hot water actively interacts with all elements of the system, oxidizing metal and loosening plastic. Reinforcing polypropylene pipes with aluminum foil or fiberglass reduces the possibility of atmospheric oxygen penetrating into the coolant.
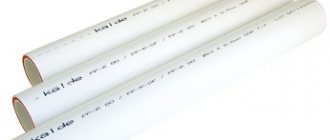
Glass fiber reinforced pipes
However, pipes with an oxygen barrier made of foil are expensive, and fiberglass-reinforced polypropylene pipes are more common on sale. The advantage of fiber reinforcement is that it increases the resistance of the polymer to thermal deformation during system operation. The downside is that polypropylene products are demanding in terms of storage conditions, transportation and loading and unloading technologies.
The manufacturer recommends storing polypropylene pipes with fiberglass reinforcement at above-zero temperatures and protecting them from impacts and bending, especially in the cold season. Domestic realities are harsh! Unheated warehouses, leaky sheds, careless loading and unloading operations, and transportation on rough roads lead to the destruction of brittle strands of fiberglass, which reduces the service life of the pipes.
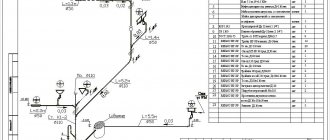
Creating a diagram and calculating the number of pipes
Before starting work on installing a heated water floor made of polypropylene, you need to prepare a project and calculate everything.
Warm floor made of polypropylene.
The drawing is made on graph paper, it reflects the layout and installation step.
Project preparation
The water heated floor pipeline can be laid according to the following schemes:
- “Snake” is a simple option, but has a drawback - the coolant cools down as it passes through the pipe, and in the end it will be colder.
- “Spiral” - with this method, heating is uniform, which is why it is more popular.
- “Double snake” - in this case the heat is distributed evenly over the floor surface.
When choosing a scheme, the degree of heat transfer of the structure is taken into account, since the efficiency of the floor will depend on this. To do this, you will need to know: the area of the room, the material from which the walls, ceilings and thermal insulation are made, the type of flooring, the diameter of the circuit and its material, the temperature of the coolant.
After choosing a laying pattern, it needs to be applied to paper. It is recommended to make the step between the pipes from 10 to 30 cm, and the length of the loop is no more than 80 meters. The contour is laid at a distance of 20 cm from the walls. The installation location of the manifold cabinet should be noted on the drawing.
If warm water floors are used as the main heating, then the pipeline should be laid in increments of 12-15 cm.
Pipe sizing calculation
To determine the footage of polypropylene pipes for heated floors, two methods are used. One is to measure the size of the pipeline on the drawing with a ruler, and then multiply this indicator by the appropriate scale. A margin of 10% for pruning is added to the result obtained.
The second way is using thread. A thread is placed on the floor according to the contour laying pattern. Then, you just need to measure it - this will be the size of the pipeline. Just as in the first case, you need to add 10% of the reserve.
For each room, the length of the pipes must be calculated separately.
Preparatory work before installing the system
For the correct installation of a warm water floor “pie” made of polypropylene pipes, preparatory work should be carried out. Step by step, the actions look like this:
- The old floor covering is removed and the screed is dismantled.
- The foundation is assessed and if cracks are found, they must be repaired. But first, you should clean the surface from concrete chips and apply a primer. If the subfloor cannot be reconstructed, a thin layer of leveling screed must be poured.
- The manifold cabinet is installed on the wall or in a specially equipped niche, at a distance of 1 meter from the floor. This must be done before laying the floor “pie”, since the installation process is quite messy.
- A waterproofing layer is laid, thick polyethylene is suitable, it is able to retain moisture. The film needs to be laid with an overlap of 10 cm on the walls. If the area of the room is large and several strips of film are laid, then they overlap, and they can be connected to each other with tape.
- A damper tape is glued around the perimeter so that the concrete screed does not crack when heated.
- Thermal insulation is installed. It is possible to lay different materials - roll or sheet. When choosing extruded polystyrene foam boards, there should be no gaps between them, so the material should be laid in two layers. For greater tightness, the joints can be sewn with polyurethane foam.
- A foil backing is laid down; it is necessary to reflect heat rays. The heat is directed upward, thereby heating the floor and the air in the room. The material is connected using adhesive tape. If the thermal insulation material has a foil layer, then this substrate is not needed.
- A reinforcing mesh is placed to add strength to the structure, and a pipeline can also be attached to it.
Strict adherence to all rules for carrying out this work contributes to the efficient operation of the system.
Installation
Installation of the heating system occurs in several stages.
Lining
To ensure effective heating, the floor must be prepared before installation.
If there is no base as such, first make a rough screed from sand-cement mortar. If concrete slabs serve as the base, they are leveled, covering all the cracks and ensuring that there is no level difference above 1 cm.
The rough screed is cleaned of dirt and dust, after which a layer of waterproofing is laid. The material for this is usually a thick film. Experts recommend placing the film on the walls at a distance of 10–20 centimeters. In rooms with high humidity, in country houses, this is mandatory. The film is overlapped by 10–20 centimeters and taped at the joints with mounting tape.
Damper tape is glued around the perimeter of the room. Its edges should be approximately 20 mm higher than the future screed. After the screed has dried, the edges of the tape are usually cut off.
Then thermal insulation is laid so that the warm floors heat the room most efficiently. There are different heat-insulating materials, both rolled and in the form of plates; the choice of coating depends on personal preferences, price, thickness. All cracks between them should be sealed with polyurethane foam to eliminate the possibility of heat leakage. The thickness of the thermal insulation when installed on a cold floor or ground should be from 5 centimeters, otherwise 3 centimeters is sufficient.
If the thermal insulation material is not foil-coated, a foil film is placed on top of it. At the joints it should be taped with aluminum tape.
We recommend that you read: How to properly bend a copper pipe with your own hands?
Once completed, the floor is ready for installation of the heating circuit.
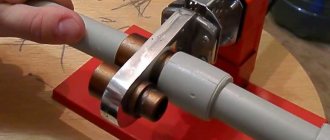
Pipe laying
When working with polypropylene indoors, it is necessary to maintain the operating temperature above 5°C.
There are two ways to fasten the pipe: using dowels through thermal insulation and fastening to a reinforced mesh. The preferred option is to attach it to a grid as it is more reliable. Plus, the mesh allows you to strengthen the layer of screed that will cover the heating system.
The mesh for fastening is placed on a heat-insulating substrate. Then pipes for a warm water floor are laid along it according to the previously chosen scheme and secured with plastic clamps or wire. The fastening should not be over-tightened - this can lead to deformation of the pipes during operation and reduce their service life. At the junctions they are fastened together using a special welding machine. It comes in several variants and is easy to work with.
Testing
After laying and securing the pipes, they are connected to the collector and tested. To test heating equipment, water is supplied while simultaneously removing air. In this case, the water pressure should be higher than the working one, but not more than 6 bar.
After a day, the pressure is checked, and if it has dropped by no more than 2 Bar, then you can start coating. If the pressure is less, then there is an error in the gasket.
Final stage
After successful testing, they begin laying the concrete screed. If the room is small, you can additionally use another reinforcing mesh, which is placed on top.
For concrete screed, a special mixture with a plasticizer is prepared; in the absence of additional reinforcing mesh, it is also recommended to add fiber from polypropylene fibers. The screed is laid at a temperature of 5C. It is worth remembering that the screed needs 28 days to dry completely.
After the screed has dried, you can begin laying the flooring. The choice of floor covering is made among materials with special markings. Tile is considered the ideal material for heated floors.
Laying polypropylene pipes
Installation is a critical stage in the construction of a water heating floor. The pipeline must be laid in accordance with the developed diagram - “snake” or “snail”. You need to start from the collector, the second end of the pipe after laying should also return to it.
When working with polypropylene pipes, the room temperature must be maintained at +5 degrees.
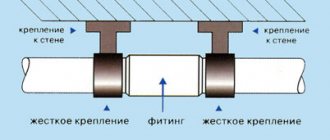
Pipe fastening is carried out in several ways:
- To the reinforcing mesh using plastic clamps or wire is a reliable option. Do not fix the contour tightly, this may damage it.
- To the thermal insulation product with dowels.
- Using thermal insulation mats with bosses. The pipeline is laid between them in grooves, thereby being firmly fixed.
Fasteners should be installed every 80 cm.
Installing a sewer pipeline in the bathroom
Laying sewer pipes in the bathroom floor is carried out in several stages. First you need to draw up a project for the future sewer system and prepare materials. It is recommended to use plastic pipes with a compacted structure. Don't skimp on quality, as repairing piping hidden in the floor can be very expensive.
Cast iron products today are quite rarely used for installing internal pipelines. This is explained by their high cost and heaviness. You should also prepare your tools. If you still use cast iron pipes, you will need a grinder. When working with plastic products, you need a hacksaw. During the installation process, you cannot do without a hammer and screwdriver.
If a sewer pipeline is being replaced, you first need to dismantle the old pipes, then you should clear the room of foreign objects, clean the pipes, connect them, seal them, and connect plumbing fixtures.
Floor connection
The first step is to assemble the device, which consists of a pressure gauge, an air valve, an adjustment and drain valve, and a mixer.
You can install a ready-made collector, with the required number of outlets, into an installed cabinet. Pipes for supplying heated coolant are connected to it using a nut and bushing, as well as a return hose.
After this, the floor circuits are connected to the collector group. One end of the pipe goes to the supply valve, and the other to the return valve.
System testing
Before filling the pipeline with a concrete screed, it is necessary to test the device, since in case of malfunctions or leaks, it will be difficult to eliminate them under the concrete.
To check the system, each circuit is individually filled with water and all distribution valves are opened, which helps remove air from the pipes. In this case, the pressure is set to 1.5 times the working pressure, but not less than 6 bar.
After 3 - 4 hours, the pressure drops and needs to be raised again. This must be done three times. After this, the floor is left for a day, and if during this time the pressure drops by no more than 2 bar, then the system is installed correctly.
If leaks or problems are found, they must be eliminated, the leakage areas must be soldered, and then the floor testing must be repeated again.
Filling the screed
To fill the screed, a cement-concrete mortar with plasticizers is used, which you can make yourself or buy ready-made.
To give greater strength to the structure, you can lay another reinforcing mesh on top of the pipeline. If additional reinforcement does not fit, then fiber from polypropylene fibers should be added to the solution.
The room temperature when laying the screed should be + 5 degrees. First you need to install a beacon profile, which will make the surface smooth.
You need to start pouring from the far corner of the room, in stripes, and end at the exit. Leveling the solution is carried out using the rule.
Depending on the diameter of the pipes, the thickness of the screed ranges from 30 to 70 mm.
It will take 28 days for the solution to dry completely. Only after the screed has hardened can the finishing coating be laid. The best type is ceramic tiles, especially for the bathroom or toilet, although installation of flooring products from a different material is acceptable.
Until the concrete mixture dries well, it is forbidden to turn on the warm water floor. Before the first start, all air must be released.
As you can see, installing a heated water floor made from polypropylene pipes is not difficult. The material is easy to work with, so anyone can make a warm polypropylene floor with their own hands in a private house or apartment.
Installation of pipes in a concrete floor
When installing in concrete floors, polypropylene pipes are often used. You can install a warm floor made of polypropylene pipes into a concrete screed with your own hands, thereby saving money.
When planning the installation of a heating system, keep in mind that it will take you at least a month from the start of work until the screed is completely dry. The operating temperature in the installation room should be above 5°C.
When installing in an apartment, it is worth conducting an examination and obtaining permission from utility services. Concrete floors should not be installed in completely wooden houses.