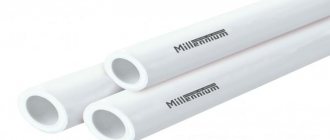
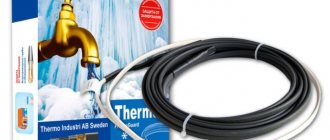
In some situations, it becomes necessary to lay a heating cable for the water supply inside the pipe.
In those regions where the temperature reaches very low levels in winter, people justifiably ask the question: “At what depth should the water supply be laid, because conventional insulation in cold regions does not protect it from freezing.” To avoid this, the line is equipped with heating from the inside. These actions make it possible to maintain the desired temperature regime of the pipeline with a significant decrease in temperature.
In the article we will look in detail at what a cable for heating a water pipe is, the principle of its operation, characteristics, what types there are, which cable to choose depending on the situation and how to install it inside or outside the pipe.
What is a heating cable, how does it work?
Heating of external pipelines is very common in many regions of Russia. A heating cable for water supply can be installed both inside and outside the pipe, and is essentially a simple wire. And due to the presence of resistance, one of the capabilities of a metal conductor is used - by passing an electric current through itself, the metal has the ability to heat up.
As the current increases or decreases, the temperature of the cable increases or decreases accordingly. Thus, the presence of these physical properties makes it possible to regulate the temperature norm.
Accordingly, the lower the resistance level, the more the device heats up. It is clear that the self-regulating electrical wire must be protected by good waterproofing, because it is located in water.
Turn on the heating cable at a temperature of + 5 degrees inside the water supply. As the ambient temperature decreases, the resistance on the wire increases, thus maintaining the desired water temperature in the water supply.
This cable can be purchased in various lengths. These can be species from two to twenty meters. They allow you to heat part of the water supply with a wire, or the entire main if it is located in a freezing zone.
Heating cable inside the pipe connection
At first glance, such a cable seems to be a very simple device that you can install with your own hands and effectively heat the water supply. But, in order to correctly select and install the heating cable inside the pipe, you must carefully study all the information that will be presented below.
Modular connection method
The method is very expensive and problematic in terms of finding the required components. The most widely used heating cable for installation is the Raychem brand.
This manufacturer has a special system called FlexiClic.
There is no need to press, solder or twist anything here. The cable is sold in ready-made kits. The connection of one piece of cable to another, or to the supply wire, occurs through factory connectors.
You just snap them together, plug in the heating and everything works.
You can not only consistently build up straight sections along the water pipeline, but also make branches to the sides.
Just keep in mind that when extending two pieces of heating cable, you must use brands of the same power. Among other things, the joints will not have the same heating effect as the rest of the pipe.
Let us repeat once again that this method is not very common in our realities and is not cheap. Therefore, let's look at more “down-to-earth” connection options:
with installation of the coupling through pressed sleeves
without installation of a coupling with direct connection of the heating cable to a 220V network
Let's consider the design of heating electrical wires
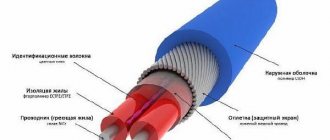
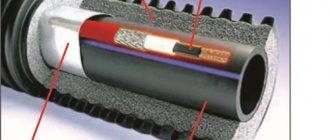
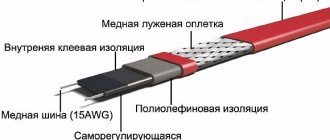
The heating cable for pulling inside the network is produced in the form of a strip electric heater. In the context of the heating device, it has the following components:
- Metal conductor for heating.
- Heating electric cable cores covered with heat-resistant PVC (polyvinyl chloride) insulation.
- The inner layer of insulation is covered with fluoroplastic protection.
- All conductors are enclosed in a screen in the form of a copper mesh.
- The last outer layer of insulation on the heating device is also made of heat-resistant PVC coating.
The outer insulation layer on the heating cable has the following characteristics. It is resistant not only to the influence of moisture and high temperature, but is absolutely not afraid of exposure to aggressive chemical environments.
Also, the warm cable for pulling inside the water supply system is made from materials whose composition is approved for use in the food industry. Therefore, it can be installed in the drinking water pipeline.
In addition, the heating cable is equipped with a temperature regulator, as a result of which it becomes self-regulating and gains the ability to independently set the temperature regime. This allows you to control the temperature inside the water supply without human intervention. If the temperature exceeds the specified parameters, the system is turned off automatically. These features of the device help prevent overheating and save energy.
A heating cable for installation inside a pipe has the following advantages:
- Reliable performance.
- High security.
- Possibility of using a heating cable both internally and externally.
- Easy installation and operation.
- The ability to save energy through automation is a self-regulating ability.
Perhaps the only drawback of these heating units is their dependence on electricity. For these reasons, it is recommended to install additional power supplies along the main pipeline routes.
Types of heating cables – resistive and self-regulating
Internal or external heating of the pipeline depends on the method of heat generation and is performed by the following types of devices. 1. Resistive - consist of one or more metal wires. Due to the complexity of installation, single-core ones are used much less frequently. The difficulty lies in the fact that it is necessary to loop the circuit around the power source, and this is not always possible.
Two-wire - at one end we connect to the power source, at the other, to ensure the circuit is closed, we install a contact coupling.
Either one core can heat up (the second only provides conductivity) or two. In the latter case, the power becomes much higher.
2. Self-regulating – heating cable designed for installation both inside and outside the water supply system. The operating principle is similar to the previous type of device. A distinctive feature is the ability to independently regulate the level of heat supply when the temperature changes, resulting in significant savings in electrical energy consumption.
For these reasons, it is excellent for installation on small sections of the highway. It is not necessary to install a thermostat. Self-heating cable-type devices come not only with a thermostat, but also with various elements for installation and special seals - adapters for pulling inside the water supply.
Self-regulating heating cable has become more widespread. The disadvantages include its high cost.
Selecting a cable by power and manufacturer
Internal self-heating cable for heating water supply according to type of use is divided according to power indicators.
The power indicator depends on the following parameters - the average annual temperature of the region, the method of laying the pipeline (external, internal) and its insulation, how the heating will be carried out - inside the pipe or outside. The diameter of the pipe will also be an important factor.
When purchasing a heating cable for a water supply system, you must ask the seller to provide information on cable consumption per 1 meter of pipeline (provided by the manufacturer for each power).
For use in a short household line, it is better to install a low-power heating kit. For example, for a country house and cottage, a power of 5 to 25 W/m is used for heating. But again, everything is individual here.
The amount of heat loss depends on the volume of the pipe and the quality of the insulating layer. So, for example, a 50 mm metal pipe with 20 mm insulation is effectively heated by a device with a power of 20 W/m.
A high-power cable system is installed on an important main line for heating. Before installing such a system, you should know that the power in the heating wire is selected in accordance with the diameter and length of the main line. But, the energy consumption for heating in this case will be noticeable.
Why do you need a heating cable in plumbing?
The most popular among specialists are the products of “Raychem” (Germany). This trade line is represented by a variety of models that are used not only in industrial enterprises, but also in household pipelines.
Any cable set that this manufacturer offers has a higher price than similar options from other manufacturers. But this is fully compensated by the quality of the products.
Professional craftsmen also include Russian ones in their line of high-quality products, which quickly gained popularity among consumers.
The “Underlux” pipe heating kit made in Germany deserves special attention. This kit, which is intended for installation within the network, is most often used in everyday life.
This system has received an expert opinion on hygienic safety, which is evidence that it is allowed to be installed in the network supplying drinking water. The heating temperature of the “Underlux” kit along its entire length is under constant control.
Installing Underlux products is not difficult. This is done using fittings made by casting. The main advantage of this self-regulating device is the ability to independently change operating parameters, depending on the ambient temperature.
This advantage ensures long and reliable operation. The kits provided by this manufacturer are characterized by high operating efficiency and the ability to save energy. They can be installed in the water supply and drainage systems, in gutters, etc.
The review of various manufacturers can be continued for a long time. The main thing to do when choosing is to carefully study the pros and cons of the proposed options. Also, each model comes with instructions from the manufacturers. It also needs to be carefully studied before work.
Watch the video - insulating the water supply from the trench to the house
Insulation of water supply pipes from the trench to the house + heating cable
You can buy a good and high-quality product from many manufacturers, but it is better to contact a trusted company. If difficulties arise in determining the amount of wire to be purchased, then consultants will help you make this calculation.
They will also help you choose the right product at a reasonable price. By the way, it must be added that the best place to buy electrical wire for pipes is the Leroy Merlin construction hypermarket. There is always a large selection of products of high quality and reasonable prices.
Heated pipeline installation
The main requirement for such connections to the source is to place the outlet below the freezing depth of the soil. This factor depends on the climatic conditions of the area.
Video
For the Moscow region it is about 1.8 meters, in the Chelyabinsk region - 1.9. Let's imagine a situation where the supply section should be 10 - 15 meters long with a trench depth of more than 2 meters (up to 30 cm will be the installation of a drainage layer). At the same time, its width should ensure comfortable work for the excavator. It's time to order an excavator here!
When using heating cable routes, it is enough to dig a ditch up to 50 cm deep and about 30 cm wide. A drainage device is also necessary. Laying the plastic pipe with the heating cable must be done freely, not tightly.
With this placement of the pipe, its deformation due to soil movements is inevitable, but in the case of using plastic products, they are not dangerous due to the plasticity of the material.
The cable for heating plastic pipes can be placed on it in various ways:
pipe winding
This fastening provides the largest contact surface between the object and the heating element. Fastening is done with metallized tape in the transverse and longitudinal direction;
laying the heater along the pipeline wall parallel to its axis
With this arrangement of the heat generator, one or two threads are laid on different sides of the pipe. Fastening is done in the same way;
placement of the heater inside the pipeline. It is better to entrust this operation to experienced specialists, since it can damage the wire, which leads to its rapid failure.
To prevent heat loss to the environment, heated pipes in all cases are equipped with an additional heat-insulating layer of detachable insulators, winding of porous sheet insulators or conventional roll insulation. To protect it, various materials are used, from roofing felt to metal foil.
Installation of cables in internal plastic pipes is not used for heating drainage systems. Such wastewater often contains chemically active substances that can cause significant damage to the pipeline in a short time.
Heating cables are often used to defrost drain pipes to prevent them from collapsing. In this case, more powerful heat generators are used at the rate of 30 - 50 W per meter.
The cable for defrosting plastic pipes of drainage systems should have the same power.
Errors when installing heating cables
Let's consider typical errors when installing heating systems:
- installing heaters at a wiring depth below the soil freezing level, this can be considered as an unproductive expense. In this case, it is enough to install local heating in high-risk areas where the depth of the system is insufficient. This place is usually the entry point into the house;
- Some consumers believe that the heating system can replace pipeline insulation, which is not true. In the absence of external insulation, they receive an ineffective heating system that does not protect against freezing;
- It is a mistaken belief that the heating circuit must operate continuously; often this is not necessary, and the energy consumption at a consumption rate of 18 W per meter can amount to a significant amount. In this case, additional costs for automatically turning on/off heating using temperature sensors will pay off in the shortest possible time.
Video
A cable for defrosting plastic products is installed, as a rule, for preventive purposes in order to avoid the formation of ice plugs in high-risk areas, in particular at the outlet of the drainage system from the house.
It is not a fact that it will be used constantly, but extreme operating conditions may arise in any climate. In this case, the additional possibility of heating/defrosting the pipes will not be superfluous.
Conclusion
The costs incurred for a heating cable for plastic pipelines and its installation will significantly reduce the cost of construction work and reliably protect the consumer from climatic vicissitudes.
Cable prices
The price of a heating cable kit is influenced by a number of factors:
- length of the heating product;
- equipment;
- the cost of the gland, which is necessary to insert the thermal cord into the water supply;
- model of power cord with plug;
- sockets;
- price list for assembly services of all components.
The average price per meter of thermal cord is 440 rubles. The cost of an adhesive kit for connecting a structure starts from 350 rubles. The minimum price for oil seals is 420 rubles. A two-meter power cord with a molded plug can be purchased for 200 rubles. For the service of assembling the entire kit you will have to pay at least 500 rubles.
Heating cables are sold in specialized stores, where you can choose the right size. In addition, it is possible to place an order for courier delivery of the finished product from companies that sell these products by phone or online.
For your information! To reduce the amount of energy consumed when using a cable for heating a water supply, the size of which is more than 3 meters, it is recommended to use it with a thermostat sensor.
Installation work
Installation of the heating wire into the pipe must be carried out by specialists.
They will not only determine exactly how many meters you need to buy, but will also install the heating device in compliance with all safety rules. We must not forget that the heating cable for plastic pipelines, as well as for pipelines made of other materials, constantly operates in water and can become a source of health hazard.
Therefore, if a warm water supply is created by a professional master, then he takes into account all the details of the installation. And in small areas of the water supply this installation can be done independently.
Rules that must be followed when installing electrical wires.
- When performing installation, it is necessary to install a tee. In this case, all sealing standards must be observed.
- A special insert must be screwed into the transition device.
- During installation, a heating electric wire of the required length is inserted into the insert.
- When performing installation, it is necessary to accurately measure the length of the pipe prepared for heating.
- The thermal cord cannot be installed through the shut-off valve on the pipe.
- The place where the cable set is inserted into the pipe is marked with a warning sign.
- Installation should be done very carefully so as not to damage the electrical wire. If the heating wire is damaged during operation, it will have to be replaced immediately.
- Sharp edges and threads on some parts must be covered with tape during installation. This will prevent damage to the wire.
A properly installed heating cable for water supply inside the pipe will create a non-freezing source of water for a long time, which will function uninterruptedly on cold winter days.
How to install a self-regulating heating cable inside a water pipe
If you decide to install the pipeline heating yourself, then you need to read the instructions and only then start working.
Let's consider the installation of a heating cord, using the example of installing a heating cable inside a water supply system. It is necessary to install a self-regulating, warming electrical cable, which is equipped with a food-grade casing, into the water pipe.
Purchasing material
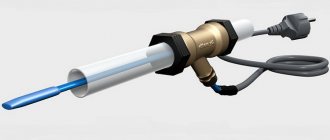
Before you go to the store to buy a self-heating cord, you need to decide on the size - its footage should match the length of the heated water pipe. You should immediately buy the accompanying material that will be needed for installation: an oil seal, a section of electrical wires with a plug, and a set of couplings. In addition, you will need a tee for proper insertion of the thermal cord.
Perfect for heating wells and water pipes inside Devi products in winter. They are able to independently regulate the heating process, depending on temperature changes.
Preparing the thermal cable
Preparation consists of insulating the thermal cord, which is done using couplings. The process is the completion of termination:
- the top protective layer is removed by 4.5 cm, the braid strands are cut off from the insulation shell;
- one side of the matrix is shortened;
- The heat shrink tube is crimped using a crimper.
At this point, the work on insulating the heating cable is completed; if all actions are performed correctly, the unit will be completely sealed.
Attention! The self-regulating design fails faster if it is turned on and off frequently. Also, its incorrect connection to the power source and poor termination have a negative impact on the operation.
Connecting the power cable to the main one
This action is required to supply the heating wire with power, which is necessary for the operation of the entire device:
- preparing the power cord - separating the cores and stripping the insulation;
- a pass-through kit (oil seal) is put on it - each part is put on strictly according to the instructions.
The process of connecting the heating element to the power element is as follows:
- the protective insulation layer is removed;
- the cores are freed from the matrix;
- A heat-shrinkable tube is placed on the thermal cord;
- the supply and main wires are connected using a crimp sleeve;
- the wires are insulated with HDPE pipe;
- the braid is spliced with the core of the supply wire;
- The final isolation of the node is done.
Note! These steps will only be needed when making a homemade unit. When purchasing a ready-made kit for heating a water supply system, there is no need to carry out this work.
Placing the cable inside the pipe
Insertion can only begin after the couplings have cooled, by pushing the insulated end of the cable into the water pipe. It starts through the installed tee. Actions should be carried out without jerking, sharp corners should be avoided, as this can damage the product.
After the entire wire is inside the water supply, the entry point should be sealed; for this, a penetration will be needed. All fasteners are tightened well by hand and then tightened with a wrench. At the same time, the rubber insulation inside is flattened, thereby sealing it.
Note! When placing a heat cable inside a water pipe, make sure that the electrical wire does not pass between the shut-off valves, this will lead to damage.
Power connection
Upon completion of installation work, you can proceed to connecting the heating system to the power supply. It is better if a separate source is used. You should consider the safety of the line and equip it with a 10 mA RCD. This will protect against current leakage if the cable is damaged. The device will de-energize the line, thereby protecting the owner from electric shock if it malfunctions.
The procedure for connecting the heating system is simple. You need to insert the Euro plug located at the end of the power cable, which is connected to the heating wire, into the socket.
Due to the fact that the design has a matrix, there is no need to monitor the temperature and turn off the system; the self-regulating cable is “smart”, it will monitor this process itself. This completes the connection work.
The heating electric cable is activated if the temperature of the liquid inside the water supply reaches +5 °C, and the system turns off at a temperature of +15 °C.
However, it is important not only to connect the heating device correctly, but also to operate it correctly so that it lasts for a long time:
- do not unplug from the socket unless absolutely necessary - this will reduce the “life” of the cable and the self-regulating matrix will fail;
- if the water supply is laid on the surface, then you should consider additional heating of the pipes from the outside, in the form of a heat-insulating casing, this will reduce heat loss in winter.
Methods for attaching the conductor
First, we’ll look at how to install a heating cable for a water supply system internally and externally, after which we’ll talk about the nuances of connection and additional thermal insulation of the system.
Through the pipe
At the stage of laying the water supply circuit, it is considered more preferable to fasten the heating cable through a pipe. This can be done in two ways - along the pipeline or around it. Let's look at the mounting instructions for each method.
Along the pipeline
The easiest way is to install the heating cable in one line along the contour. In this case, a prerequisite must be the fastening of the conductor under the pipe, which helps protect the heating element from mechanical damage from above. In addition, water begins to freeze from below, so the lower location of the flexible heater will allow you to quickly eliminate freezing of the water supply.
If you decide to lay several cable lines along the pipe, you need to do this as shown in the diagrams below:
As for attaching the heating cable to water pipes, it is best to use aluminum tape, which securely fastens the conductor and increases its heat transfer. Instead of tape, you can also use adhesive tape for fastening, which is used to wrap the pipeline according to the following scheme:
Pay special attention to installing the heating cable for the water supply through the corners. To ensure that the bend is not too large, it is recommended to place the conductor along the outer radius of the pipe, as shown in the picture below:
Spiral
In regions with very low temperatures, it is recommended to completely wrap the heating element around the pipe. In this case, the heating efficiency will be an order of magnitude higher, because The coil pitch is about 5 cm (can be increased if desired). The length of the conductor when wound in a spiral should be approximately 1.7 times the length of the water pipe. Laying the cable in a spiral in hard-to-reach places can be done as follows:
In this case, the heating cable is first wrapped with an allowance, after which the loops are wrapped in the opposite direction. The result is less action than with step-by-step winding of the water supply.
Individual nodes
On assemblies such as metal supports, taps, valves and flanges, more flexible heater needs to be fixed, because there is greater heat dissipation here. You can clearly see the installation diagrams below:
We also recommend watching the video on how to lay a heating cable through pipes:
How to install a flexible heater with your own hands
Special attention should be paid to installing the temperature sensor. To ensure that the heating of the water supply works properly and the cable does not overheat, it is recommended to place the sensor at the coldest point, as far as possible from the cable line
It is recommended to pre-glue the installation location of the temperature sensor with a strip of aluminum tape. Examples of correct sensor placement are provided below:
From the inside
It is recommended to install a heating cable in a pipe if it is not possible to carry out heating from the outside. Most often, this method is chosen if the water supply system is already installed underground, in concrete structures and other inaccessible places. The disadvantage of internal installation of a flexible heater is as follows:
- The pipe clearance (inner diameter for water supply) decreases.
- Over time, the conductor begins to become overgrown with plaque, resulting in blockages.
- A new point is added in the water supply - a tee, which reduces the reliability of the circuit.
- Installation of the heating cable is allowed only on straight and slightly curved sections of the water supply system. It is prohibited to route a flexible heater through tees and shut-off valves.
At the same time, the positive aspects are considered to be the low energy consumption of the heating system (direct contact of the heater with water), as well as less labor-intensive repairs (just pull the cable out of the tee, no need to break up the ground, etc.).
So, installation of the conductor inside the pipe is carried out according to the following step-by-step instructions:
- First of all, you need to put a gland assembly on the cable to place it in the pipe. This node looks like the one shown in the photo above.
- A tee is installed in the required place in the water supply system, through which a flexible electric heater will be introduced.
- The cable is carefully laid to the problematic area that will need to be heated.
- The stuffing box assembly is twisted, sealed and crimped.
As you can see, the internal installation of a heating cable in a water supply system is not difficult. Now let's talk about the final stages of installation: connecting to the network and thermal insulation of pipes.
