Here you will learn:
- Features of cross-linked polyethylene
- Construction of polyethylene pipe
- Types of fittings for joining cross-linked polyethylene
- How to connect pipes
- Step-by-step installation of heated floors made of cross-linked polyethylene
- Filling the screed
The strength of cross-linked polyethylene is explained by the special technology of its production, which creates a three-dimensional molecular network.
The following methods are used for this:
- Heating polyethylene together with peroxide (PEX-a).
- Exposure to moisture and implanted silam, together with a catalyst (PEX-c).
- Electron bombardment (PEX-c).
- Application of nitrogen (this option is used very rarely).
As a result, it is possible to impart to polyethylene such characteristics that make it one of the most suitable materials for the manufacture of water-heated floor pipes.
Features of the material
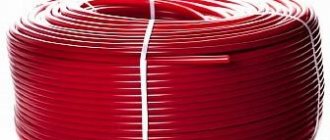
Pipelines for heated floors are made from various raw materials: copper, metal-plastic, but the most modern type is considered to be a cross-linked polyethylene pipe.
Cross-linked polyethylene is a type of ethylene obtained by chemical and physical exposure to it. During production, a three-dimensional cellular network is formed from ethylene molecules. This model is called PEX.
Strength
The strength of this product is given by the transverse connections formed during the production process, in addition to the longitudinal ones. The expansion rate of PEX tubing ranges from 250 to 800%.
In addition, unlike polypropylene, the material has increased durability and does not collapse even with significant temperature changes.
Temperature resistance
When using cross-linked polyethylene hoses, a maximum temperature of 140 degrees is recommended. But melting processes begin when heated from +190 degrees.
The subzero temperatures that this pipeline can withstand, and at which the strength and elasticity of the product are maintained, are -50 degrees Celsius.
For your information! Cross-linked polyethylene has increased resistance to short-term temperature extremes.
Therefore, it is recommended to use it in a low-temperature heating system, where heating is not significant and frequent temperature changes occur. But polyethylene should be used where the pipeline is constantly hot.
Physical properties
Despite the high density of PEX tubes, the material is soft and elastic, and has the following properties:
- liquid and gases do not pass through it;
- It bends easily, allowing you to make the tightest turns.
Chemical properties
An improved production process - cross-linking - has made polyethylene more resistant to organic and inorganic influences, and it is also not subject to the destructive effects of solvents.
In addition, the material is resistant to the negative effects of the environment: sunlight and oxygen. This quality is due to the presence of a protective anti-diffusion coating on most models.
Other characteristics
Polyethylene contours have a diameter from 10 to 200 mm. For water heated floors, the recommended size is 16 mm.
Main technical characteristics:
- wall thickness - 2 mm;
- meter weight - 110 g;
- meter volume - 0.113 l;
- density - 940 sq. m3;
- degree of thermal conductivity - 0.39 W/mK.
Advantages and disadvantages of cross-linked polyethylene
Pipeline made of cross-linked polyethylene, like any other type, has its pros and cons.
Advantages:
- Elasticity - this allows it to be used when laying circuits with a large bend, without fear of the product creasing.
- Environmentally friendly - it does not contain harmful components, so when heated, substances hazardous to human health are not released.
- The combustion temperature is high - the complete melting process begins at +400 degrees. But even when decomposed, all components are non-toxic.
- Performance indicators - the device does not rot, is not susceptible to corrosion and is not exposed to chemicals. All this guarantees a long service life of water heated floors made from this material.
- Frost resistance - no deformation occurs at high sub-zero temperatures.
- It has sound-absorbing properties - the floor with a heating element made of cross-linked polyethylene operates silently.
- It has the property of “shape memory” - it is able to restore its original appearance.
- Has a reasonable price.
One cannot help but mention the minor disadvantages that cross-linked polyethylene pipes have. First of all, this concerns some difficulties during installation.
Pipe bends require reliable fixation. In addition, when laying them in a heated floor structure, you need to be extremely careful so as not to damage the protective coating.
Another disadvantage is the negative impact of direct ultraviolet rays, under which the material becomes fragile.
Negative characteristics
Among the disadvantages are the destructive effects of ultraviolet radiation on the material. If we talk about REX pipes, which are sometimes compared to metal-plastic pipes, the former do not have an aluminum layer, so working with them can be somewhat more difficult, since more manipulations will be required to strengthen the pipe and maintain its shape. You must study the information (technology) about warm water floors before starting work, since if you do not know some of the nuances, you may subsequently encounter troubles. For example, there is an anti-diffusion protection on the outside of the product that should be handled with great care. If installation rules are not followed, the protection may be damaged, which can lead to various problems in the future. Therefore, sometimes there is a need to involve certified specialists in manipulations, which can be quite expensive.
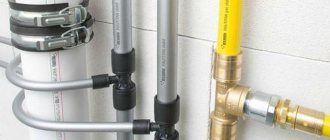
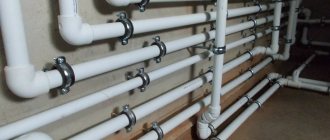
Construction of polyethylene pipe
Polyethylene contour is a structure of several layers with a reinforcing layer. Reinforcement increases the strength of the product, reduces the degree of expansion and softens pressure surges inside.
The reinforcing gasket can be polypropylene, fiberglass, aluminum foil or sheets. When connecting several pipes, it is necessary to strip this layer by 1 cm.
It is important to know! It is worth noting that for underfloor heating structures, a contour without reinforcement is more often used.
In addition, cross-linked polyethylene has an “oxygen barrier” - anti-diffusion protection. This layer is present in all PEX products. If it is not there, then oxygen penetrates deeper, which leads, albeit slowly, to destruction of the product.
There are several types of cross-linked polyethylene that are used in the manufacture of pipes for heated floors:
- PEX - hydrogen peroxide is used in its production. Peroxide cross-linking adds strength and elasticity. Such pipes have the best molecular memory.
- PEX-b - silane is used to stitch polyethylene, it holds up to 80% of the molecules together. Contours are equal in strength to the PEX type, but are less elastic and hold their shape less well.
- PEX-c - cross-linking is carried out under the influence of radioactive radiation. Pipes are less flexible, as a result of which kinks may form during installation. Eliminated using a coupling.
- PEX-d - nitrogen is used for cross-linking, but the technology is complex and rarely used.
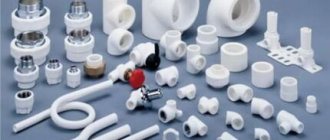
Types of fittings for joining cross-linked polyethylene
Today, to sew polyethylene pipes together, the following types of fittings are used.
Pipes and fittings for heating and water supply systems // FORUMHOUSE
Compression
Compression, also called crimp, is a detachable connection method. Fitting - a nut, a split ring and a fitting, most often the elements are made of brass.
Press fittings
With this type of fitting, a non-detachable connection is formed; it is strong and durable. Recommended for use in a structure with a screed, in a system with a high level of pressure and high temperature.
The press fitting includes a body, a ferrule and a sleeve.
Axial
An axial fitting is a device that has a fitting and a sleeve. It is installed using expansion and tension tools.
Installation of heated floors with cross-linked polyethylene pipelines
Technologically, the installation process for the construction of heated floors from cross-linked polyethylene contours is a step-by-step work of laying layers of the structure. The total thickness of the structure is about 15 cm.
Warm floor made of cross-linked polyethylene
Preparatory work
Before you begin installing the system, you should carry out preparatory steps. First you need to decide on the model of pipes and components.
To install a heated structure you will need:
- polyethylene pipeline;
- expansion tank;
- boiler for heating water;
- circulation pump;
- sanitary fittings;
- fastening elements;
- manifold, ideally with a hydraulic arrow;
- damper tape;
- insulation material and fittings;
- screed solution.
When choosing a collector unit, it is recommended to give preference to a device with balancing valves and flow meters, this will simplify the process of adjusting the system.
All necessary components should be prepared before installation, so as not to be distracted during the work.
Layout diagram of the heating element
There are several basic schemes that are used when laying underfloor heating pipelines: “snake”, “snail” and “double helix”:
- “Snail” is the most common design; it is easy to install and ensures uniform heating of the entire room, since all angles are 90 degrees.
- “Snake” - the installation process is more complicated, since the turns reach 180 degrees. According to this scheme, it is good to lay pipes made of cross-linked polyethylene, because they bend easily.
The choice of installation scheme for water floor heating should take into account the characteristics of the room. If the area is large, then a “double snail” or “spiral” is recommended. Also, this model should be used if you want to project the zoning of areas according to the degree of heating.
With a standard “snake” or “snail”, the maximum length of the highway is 60 - 80 meters. In rooms with a significant excess of length over the width of the room, it is allowed to increase the size of the circuit to 120 meters, but the diameter of the pipes must be larger.
An important point when laying pipes is the step of their placement. Usually it is 10 - 35 cm, the smaller it is, the more heat the floor will give off. In some areas where the degree of heat loss is high (near the door and window), the step should be minimized, but in the center of the room it can be increased. Installation of pipes from the walls is carried out at a distance of at least 30 cm.
For your information! It is also recommended to place the collector in the center of the apartment or house, this will allow all rooms to be heated evenly.
Calculation of the number of pipes
Before purchasing cross-linked polyethylene pipes for heated floors, you need to calculate the required size and diameter of the product. According to current practice, contours with a diameter of 16 mm and a wall thickness of 2 mm are considered a suitable option. For a large area, a size of 20 - 25 mm is recommended.
To calculate the amount of product for heating a room, you can use the formula:
D=S / M x k, where:
- D—design pipe size;
- S is the size of the room area;
- M - laying step;
- k is the safety factor, if the area is 30 m2 - 1.1, larger - 1.4.
The maximum length of the pipeline is affected by the diameter of the circuit. With a diameter of 16 mm - 90 m, 20 - 120, 25 - 150 meters.
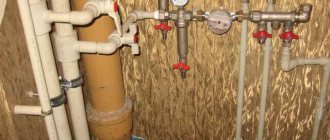
Preparing the base for pipes
The actual work on installing the heated floor “pie” should begin with the preparation of the rough base. The process consists of:
- dismantling the old finishing coating and screed, cleaning and leveling the base;
- laying waterproofing material - polyethylene film;
For your information! If you have the means, it is better to use a polymer membrane; it will allow the floor to “breathe”.
- thermal insulation of the base - extruded polystyrene foam tiles or cork are used;
- placing a reinforcing grid - there is no need for it if polystyrene foam is used as thermal insulation;
- installation of a damper tape - it is necessary to compensate for the thermal expansion of the screed.
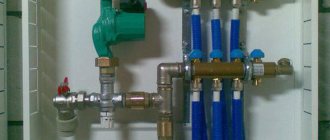
Then, the boiler and manifold are installed at the planned location. The device must be connected to water supply and power supply.
Installation of polyethylene pipes
Polyethylene pipes are laid according to the diagram on polystyrene foam sheets or a reinforcing grid. If the room is large, then the area is divided into several circuits.
To simplify the installation process, it is recommended to make markings on the slabs. You should start from the collector, the second end should also return to it.
Important! Before starting installation, you should consider the method of connecting and fixing the pipes.
It is recommended that the contour be solid (seamless). But if necessary, the tubes are connected to each other, or to the manifold, by welding, or by crimping and pressing fittings.
Sewing the outline using press fittings is a reliable and uncomplicated method. A coupling is put on the hose, then the diameter of the pipe inside is increased to the desired size using an expander. The fitting is screwed in well and the sleeve is put on it.
Fixing pipes to fittings or polystyrene foam boards is done in several ways:
- polyethylene clamps;
- steel wire;
- fixing tracks.
Using clamps is the simplest and most cost-effective option. Only 2 pieces per 1 meter are required. In a straight line, they are mounted every 50 cm, at a turn - 20 cm.
Basic rules for installing a cross-linked polyethylene pipeline:
- when turning, do not make sharp bends;
- installation work should be carried out at a temperature of at least +18;
- if the pipes were in the cold, they should lie in a warm room before laying;
- the turning radius of a pipeline with a diameter of 16 mm should not exceed 12 cm;
- cut off the excess length of the circuit only before connecting;
- It is prohibited to place heavy objects or step on pipes during installation;
- The contour should be positioned evenly, without twisting.
Water connection and pressure testing
Before pouring the screed, you should check the system for operation and for defects in the line.
Connecting the floor consists of connecting the supply and return hoses to the manifold. After which, it is necessary to open the control and air valves. Then turn on the circulation pump and compressor with a pressure of 5 - 6 bar.
With their help, water is supplied to the main line for 12 hours. In this case, the pressure should exceed the working pressure by 1.5 times. If the clamps were shot off during the process, they are placed again, but 5 cm lower.
After this time, all valves are closed except one, the pressure is set to the operating level, and each branch is adjusted in turn.
Laying scheme
To carry out installation work correctly, during the development of the project, a clear diagram of exactly how the pipes will be located is drawn up. The most popular laying patterns are single or double snake, as well as spiral.
It is important to follow the parameters recommended by experts:
- The average length of the heating water circuit is recommended within 40-60 m. In any case, making a pipeline longer than 120 m is not effective.
- The minimum pipe laying pitch is 10 cm, the maximum is 35 cm. If the room has a complex shape, or when it is necessary to increase the heating level, it is possible to use different distances between individual turns of the circuit. Reducing the laying step is allowed near external walls or the entrance door.
- To lay the damper tape, a distance of 20-30 cm is made from the walls around the perimeter.
Before purchasing polyethylene pipes for heated floors, the first thing you need to do is determine the total length of the circuit.
Filling the screed
Only after checking the device can you proceed to laying the next layer of the structure. There are two options - concrete screed and dry floor.
Concrete screed
For screeding, a mortar, either purchased or made independently from M300 cement, is suitable. The minimum layer of concrete that can protect polyethylene pipes is 3 cm, and the maximum is 7 cm.
Most often, the screed is installed without thermal joints; they are necessary:
- if the room area is more than 33 m2;
- if the length of the room exceeds 10 m;
- with a complex layout.
It is possible to pour reinforcing screed, that is, using reinforcing mesh, this gives strength to the structure.
The screed is poured at a time, the process should begin from the front corner of the room and end at the door. After leveling the concrete surface, the floor is left for 4 weeks to dry completely.
Dry floors
Installing a dry floor over pipes is an easier and faster method, since there are no wet processes, which are labor-intensive and require hardening.
An inexpensive type of dry flooring is expanded clay sand. In addition, if there is a leak, the sand is simply removed and, after the damage is repaired, it is filled up again.
Installation of heating circuits - step-by-step instructions
First of all, the base is covered with a waterproofing film with an overlap of 15...25 cm on the walls (thickness of thermal insulation + screed). The overlap of adjacent panels is at least 10 cm, the joints are taped. Then the insulation is tightly laid, the seams are filled with polyurethane foam.
Next, let's look at the points on how to make a heated floor yourself:
- Cover the walls with a damper strip to the height of the monolith. Place the waterproofing overlap over the expansion tape.
- Mount a distribution cabinet with a pump and manifold inside.
- Lay out the circuit pipes according to the diagram, using a measuring tool and observing the laying interval. Immediately bring the ends of the loops and connect them to the comb.
- Attach the pipe to the thermal insulation by inserting plastic “harpoons” in increments of 50 cm. If the structure of the insulation does not hold the clamps well, before rolling out the pipelines, place a metal mesh and tie it to it with clamps.
- Install expansion tape on the expansion joints, as shown in the photo. The latter are installed along the boundaries of concrete monoliths, between individual heating circuits and in doorways.
- Lay the lines to the radiators by wrapping the pipes with heat-insulating sleeves. The connections to the comb should also be insulated - in this place the loops are located too close, there is absolutely no need to heat the floors in the corridor.
- Connect the collector to the heating network of a private house, supply electricity to the cabinet for the circulation pump and other automation (if available).
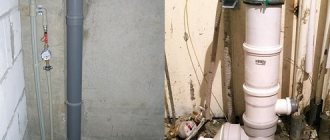
The passage through the deformation joint - it is better to cover the pipes with covers or wrap them with insulation
After assembling the system, you need to fill the contours of the heated floors with water and check the tightness of the joints by pumping up a pressure of 2-4 bar (focus on the response threshold of the boiler safety valve). The technology for filling and releasing air from each TP loop is described in detail in the next material.
It also doesn’t hurt to start the boiler, warm up the heated floors without screed, and visually verify the correct operation of the system. How to install underfloor water heating is shown in the video:
Operating rules
The service life of heated floors made of polyethylene pipes is affected by operating conditions - temperature level of the coolant and pressure. PEX pipes withstand temperature changes well, but over time, this leads to their aging.
Basic operating rules that will extend the life of the floor:
- after installation, it is forbidden to turn on the device to maximum;
- the water heating level entering the circuit should not exceed +45;
- When commissioning the system, especially in winter, switching on should be gradual, starting from 2 hours, with a subsequent increase in operating time every day.
Metal-plastic
Metal-plastic consists of two layers of PEX and a layer of aluminum sandwiched between them. This connection allows the use of metal-plastic in water supply and air conditioning systems. Metal-plastic products have a number of positive features:
- Resistance to aggressive environments;
- Excellent sound insulation;
- Corrosion resistance;
- Good throughput;
- Easy installation;
- Long service life.
Heated floor system assembly
Comparison of polyethylene pipes with other materials
A comparison of the polyethylene circuit with pipes made of other materials is shown in the table:
| Pipes from | pros | Minuses |
| Cross-linked polyethylene | Products made from this material can restore their shape. They are heat-resistant, durable, do not corrode, are lightweight, provide noise protection, are environmentally friendly and inexpensive. | Cross-linked polyethylene reacts negatively to ultraviolet radiation, so it can only be installed in closed communications. |
| Copper | Copper pipes are durable, they will not melt or crack, they do not allow bacteria to grow and corrosion to develop. Copper products tolerate high and sub-zero temperatures well and are not subject to mechanical stress. | Pipes made from this material are expensive and heavy, and do not tolerate hard water saturated with acidity. You cannot combine copper and steel products in one system. |
| Polypropylene | This material is non-toxic, resistant to chemicals, pressure and temperature changes. Pipes made from it are lightweight, which simplifies installation. | Polypropylene pipes have low flexibility and a high expansion coefficient, which leads to an increase in their dimensions. |
| Metal-plastic | Despite the reasonable cost of metal-plastic pipes, they are durable, not subject to corrosion and are equipped with anti-acid protection. They are light in weight, keep their shape and are environmentally friendly. They bend easily, making installation easier. | The two layers that make up the pipes - polyethylene and aluminum - have different amounts of linear expansion, which can cause delamination of the product. There is a risk of pipe rupture when the fitting is pinched, and if threaded fittings are used, then there is a possibility of scale forming inside. |
To summarize, we can say that copper pipes for heated floors are an excellent option, but not everyone can afford it. Polypropylene products are cheaper, but not flexible enough, and metal-plastic does not tolerate temperature changes well.
Therefore, the use of cross-linked polyethylene pipelines in heating floors is practical and convenient, and is gaining great popularity every year. In addition, it can withstand freezing, and minor deformations disappear at a comfortable temperature.
However, when choosing pipes for underfloor heating, experts advise taking into account the characteristics of the room and operating conditions; the comfort in the home and the service life of the device depend on this.