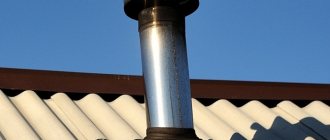
Form and function
The main tasks of the chimney cap:
- Increased air draft;
- Protection against birds accidentally flying into the pipe;
- Preservation of the chimney masonry;
- Protection from snow and rain.
Please note: the use of a hood increases the efficiency of the chimney by almost 20 percent.
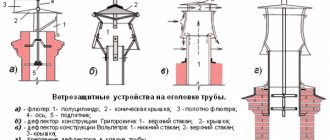
The pommels differ in geometry, shapes and sizes. Their varieties are determined by the style of the facade of the house and the peculiarities of the weather vagaries of the area.
- Umbrella (cover) – protects the pipe from rain and snow. Can be made in the form of a weather vane, flat cover or gable cover.
- Drip cap - removes moisture from the pipe walls and stops the formation of ice.
Caps are made from materials that are resistant to the destructive effects of weather conditions. This product is fixed in a very hard-to-reach place, so it is better not to save money and purchase stainless steel or sheet copper.
Some features of the use of caps:
- The semi-circle shaped deflector is more suitable for European design;
- An umbrella with a flat top will look natural on a cottage in the Art Nouveau style;
- A wind vane with a weather vane installed can be equipped with a damper, which will make the pipe work effectively even in the absence of wind;
- A weather vane with a gabled top promotes intensive ventilation;
- Hoods with a movable roof make it easy to clean the chimney.
How to make your own chimney
At first glance, it seems that the design of such a cap is so simple that its creation does not cause any difficulties. However, it should be noted that making such a device with your own hands is quite difficult.
If you have little experience in this kind of work, you first need to make an accurate drawing of the future structure, then transfer it to a cardboard sheet. After this, the template is cut out.
The next step is to decide how the cap will be attached: using welding or self-tapping screws.
Next, you need to cut out all parts of the tire from a metal sheet and begin preliminary assembly.
During the work process, it is important that all pipe measurements are made correctly. This is necessary for high-quality production of the future cap.
The figure below shows the simplest drawing of a head with a 4-pitched roof. To correctly determine the angle of inclination, it is necessary to perform calculations using the formula shown in the image.
Procedure
First stage. The metal sheet blank is placed on the table, with the front part facing upward. The drawing shows the specific place where you need to drill a hole with a diameter of 3.5 mm.
Second phase. The workpiece must be bent strictly along the dotted lines indicated in the diagram. The bend angle should be 90 degrees. To carry out the work, a special tool is required - a sheet bender. When using it, the formation of dents is completely eliminated. Of course, not everyone has such a device. In this case, you can use another method, which involves fastening the edge of the corner with a clamp to a workbench and using a regular hammer.
Third stage. The workpiece is bent along the lines with the o. As a rule, the angle is determined experimentally. In this case, the main thing is to get the intended appearance of the cap.
The structure must be absolutely level and without distortions. You can check the straightness of the head by placing it on the table. If curvature is detected, the stiffening ribs located below are marked with a marker. Next, notches are made with a core and drilling is carried out.
Fourth stage. The resulting chimney is fastened with rivets measuring 3.2 mm.
Fifth stage. The workpiece is bent according to the values “b - a”, which is necessary to fix the leg.
Sixth stage. In accordance with the diameter of the chimney, a base is made to which the cap will be attached. For this purpose, metal parts with a cross-section in the shape of the letter L are additionally used. The corner should be positioned so that one side is on the side, and the other touches the brickwork.
Next, the parts of the future structure, together with the legs, are connected by electric arc welding.
Seventh stage. The base is cleaned, onto which a special anti-corrosion compound is subsequently applied. After it has completely dried, the supporting part is coated with paint in several layers. Any composition intended for external use is suitable.
Eighth stage. The cap is attached to the base.
If it is impossible to make a square head, it is recommended to use an easier method. To do this, just take a curved sheet of metal and adjust it to the required dimensions. The manufacturing technology of the cap in this case will differ from that given above:
- It is necessary to carefully measure the dimensions of the chimney. Based on the data obtained, a base is made for the future chimney.
- The steel angle must be installed so that the entire structure is securely fastened. One rib will hold the chimney outside, and the other will rest against the end of the pipe.
- Legs are made that connect the base to the entire structure and support the cap. The supports must have high strength and rigidity, since they will have to withstand strong winds and large amounts of snow.
- The structural parts are coated with an anti-corrosion compound and several layers of paint. All actions are performed similarly to those described above.
- The structure is assembled taking into account the type of material used.
Drawing of a simple cap
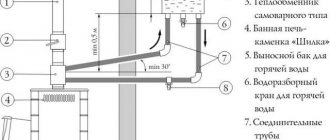
How does a chimney cap work?
The air, entering the wall of the lid, turns upward and with its movement draws up the smoke. The chimney begins to work more efficiently and draft increases significantly. When the wind is angular or vertical, an umbrella also helps increase traction. To avoid problems when lowering, you need to install a reverse cone on the lid. In addition, by protecting the pipe from moisture, the deflector prevents the development of fungus and saves fuel.
Please note: a properly made and securely fastened cap should not make noise or vibrate even in a stormy wind.
Making your own chimney cap
Making a cover for a fireplace or chimney yourself is not difficult.
To work you need to prepare:
- Sheet of galvanized metal, copper or stainless steel;
- Cardboard and markers;
- Metal scissors;
- Devices for bending sheets;
- Welding machine.
Before starting fabrication, it is important to carefully measure the chimney pipe. Then you need to make a model of an umbrella from cardboard. Pattern drawings:
The umbrella should fit onto the pipe without much effort, so when drawing up the drawing you need to leave an overlap of half a centimeter.
After trying on the layout, the drawing is applied to a metal sheet. The workpiece is cut out with scissors. Using bends, the material is given the desired shape. The joints are fastened with 3-4 rivets. Making droppers is similar.
The brackets are cut from metal plates and attached to the apron and top by welding. Welding points must be treated with a primer. The entire cap is additionally coated with anti-rust compound and paint.
Afterwards all that remains is to put it on the fireplace chimney. All joints must be treated with fire-resistant sealant.
The umbrella must cover the entire plane of the chimney. Some structures have a half-brick protrusion, which also needs to be covered from rain.
Please note: in winter, ice or snow may form on the cap. It is important to choose the thickness of the metal so that it does not get pressed under such a weight.
An excessively high or too low lid will not fully remove smoke, so it is worth making drawings taking into account all the necessary parameters. It is not difficult to use a cap to correct defects in the chimney, for example, if it is not of sufficient height.
You can decorate the deflector using a forged weather vane. This will be a durable and practical solution.
Even novice craftsmen can make a chimney cap on their own. It is important to take measurements carefully and choose high-quality metal. A well-made deflector will correct shortcomings in the operation of the chimney and provide constant draft in any weather. And if you apply a little creativity in your work, the product will become a decoration for the facade of the house.
Basic materials
Different metals are used to create protection for the pipe. They must be reliable, strong, not react to external environmental influences and not reduce the traction force. These materials include galvanized steel, stainless steel and copper.
Protection made of galvanized steel withstands aggressive environmental influences well and is distinguished by its practicality. Galvanized steel does not lose color when exposed to direct sunlight. It can additionally be coated with a colored polymer – polyester. If a cap made of galvanized steel with a small thickness is installed, it can burn out after 3-5 years of constant use. High temperature gases destroy it, so it is recommended to install a stainless steel reflector. The cost of the device will be higher, but the service life will increase by several decades.
Higher grade materials include stainless steel. It is durable and highly durable. Its cost is higher than galvanized steel. Can be used as an additional protective element of the cap.
Copper caps are considered the most profitable. They have a long service life that reaches 100 years. Copper goes well with gutters and other elements, and also does not lose its attractive appearance over time. Making a cap for a chimney from copper sheets is easier and more convenient. For work, a copper sheet with a thickness of 0.5 mm is selected. They are harder to work with than thin ones, but the stability of the assembled structure will be higher.
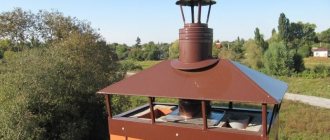
Purpose and functions of the chimney cap
The cap on the outer part of the chimney pipe is a rather important element that performs several functions at once. A correctly selected pipe part complements the appearance of the building well, emphasizing the design style. At the same time, the cap has compact dimensions, is easy to install and increases the efficiency of the chimney.
A chimney cap can become an original decoration for the roof of a residential building
The chimney cap is made of metal, as this material ensures the strength and durability of the product. The simple design performs the following functions:
- protection of the inside of the chimney from moisture, debris and dust;
- increased draft in the pipe for efficient combustion of fuel in the furnace;
- aesthetic addition to the building design;
- extending the life of the chimney as a result of its protection from precipitation.
A rectangular or square shaped cap is the most common option. Such an element provides effective draft and complements the chimney design well from an aesthetic point of view.
Materials for the chimney
The cap is located outside the chimney and is exposed to climatic factors and ultraviolet rays. Therefore, for the manufacture of the chimney, only high-quality, durable materials that are resistant to various factors are used.
Metal is a practical basis for a chimney
To make a cap, various types of metals are used, each of which has different properties and characteristics. The main options are:
- sheet steel;
- sheet aluminum;
- rolled copper metal;
- stainless steel in sheets;
- zinc - titanium alloy.
Depending on the material that served as the basis for the cap, the characteristics of the product differ. For example, the service life of steel chimneys is about 5 years, and models made of sheet aluminum can be used for 8 years. The most durable caps are made of stainless steel, zinc-titanium alloy and copper, the service life of which reaches 50–100 years.
Design options
There are many options for chimney caps that differ in appearance. Moreover, the design of all types of products includes a base, an upper roof and vertical posts. This cap is simple and protects the chimney well from precipitation. More complex options are deflectors, one of the main functions of which is to enhance traction.
Deflectors are varied and can be either simple or more complex.
Among the most popular smoke vent options, the following are especially noteworthy:
- cap with opening lid;
- flat chimney for pipe;
- cap with weather vane;
- cap of multi-slope design;
- deflector with ventilation holes.
The choice of a specific option is made depending on the type of roof, the design of the house, the shape and design of the chimney. For example, for a round metal pipe, metal deflectors are optimal, providing enhanced traction.
Photo gallery: types of chimney caps
Choosing a hood depending on the chimney
The correct choice of a chimney cap is the key to effective heating of rooms in the house and the absence of chimney breakdowns. The choice of chimney type is made depending on the type of pipe and heating system. For example, for the chimney of a gas boiler, only elements in the form of a nozzle with an open top are used. This model eliminates the possibility of ice covering the entire surface of the hood during the winter season.
Products in the form of a pipe are optimal for a gas heating system
For brick outlets, multi-slope, rectangular or square elements are often used. Precipitation does not accumulate on the surface of such caps and therefore the chimneys are not subject to significant load. The shape of the deflector is selected depending on personal preferences and the design of the building. Many cap options can be easily complemented with a forged weather vane or twisted elements.
The principle of operation of a fungus on a pipe
The air flow hits the walls of the upper cylinder and goes around it. The air stream slides over the surface of the fungus, rushing upward - the smoke in the pipe is sucked in and removed. The air in the chimney moves more intensely - the draft increases.
Wind flows may not move in a horizontal direction, but vertically or at an angle, but the wind vane will work in this case too: air flows will penetrate into the upper cylinder through the gap, carrying away smoke. The exception is the downwind: mini-vortices will appear under the hood, slowing down the exit of smoke.
Design form
The purpose of the installation determines the choice of design - the fungus on the ventilation pipe can take the form of a lid or umbrella. Two more types are drips and water outlets. Umbrella shapes and covers protect the chimney opening from precipitation and dust. Drip pipes and water outlets localize flowing moisture, preventing it from entering the building, and prevent freezing of the upper fragments of the chimney in winter.
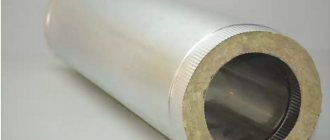
Material selection
Mushrooms are made of metal (non-ferrous, black) and vary in thickness and the presence of forged decorative elements. The most common option is a product made of galvanized sheet. The unitary design allows you to make such a fungus on a chimney pipe with your own hands in an hour and a half, if you have experience - in 10 minutes. The product can be refined by painting it in a shade that harmonizes with the color of the roof.
Black steel is an expensive material, but it looks modest due to its color, which is why steel vane models are decorated with forged elements. The disadvantage of steel products is their large mass, so this option is not suitable for every roof.
On the market there are fungi made of alloy steel, copper, strength is a plus, high cost is a minus. Therefore, such models are in limited demand.
The choice of material for the fungus is rather a matter of material capabilities, since functionality depends on the structure of the structure. Buying a finished product is a quick solution, but if you want to make your own mushroom, it won’t be difficult. Let's look at the algorithm of actions.
Making a cap with your own hands
The most common and universal option is a rectangular cap with four slopes. Such a product is easy to purchase, but you can make a simpler, but no less effective semicircular version with your own hands.
The semicircular smoke vent is simple and easy to use
To do this, you will need a sheet of galvanized metal with a thickness of 1 mm, rivets, and metal scissors. A set of devices complements the marker for marking. The dimensions of the structure are preliminarily determined and a life-size drawing is made on cardboard. You can make a drawing yourself or take a ready-made diagram as a basis and adjust its parameters.
For a semicircular chimney, you can use a drawing of a pitched structure by changing the shape of the lid
The complex of works for the manufacture of a chimney involves the following stages:
- A rectangle is cut out of a sheet of metal, which will become a semicircular roof of the chimney. To do this, transfer the drawing to the metal and cut out the element with scissors.
Galvanized steel is easy to process
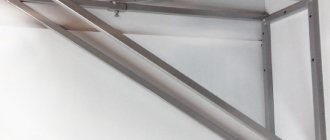
Metal strips or profiles allow you to make a frame for attaching the cap
The frame can have a stepped shape
Making a cap for a chimney pipe with your own hands is not difficult, but precise determination of the parameters of the product is important. High-quality materials are also the key to creating a durable structure.
Recommendations for selection
The main function of the cap is to protect the chimney, so the appearance and shape can be any. It is important that the product matches the size of the pipe. The fungus should not interfere with ventilation and smoke removal from the room.
Typically, caps with four slopes are installed on brick pipes. It is better to install chimneys with a cone on round chimneys.
The umbrella overhangs should protrude a few centimeters on each side of the pipe. This will additionally protect the chimney from rain and leaves. To protect against birds, a net is placed under the umbrella. Its functions can be performed by openwork forging, which will decorate the appearance.
If your home uses a wood stove, it is best not to choose a painted chimney. The paint on it quickly fades under the influence of smoke. It is better to take heads with a sealed double lid. For ease of cleaning, they are equipped with heads with a hinged lid. When installing a gas boiler in your home, you can install painted caps.
Cap function
Before starting work, you need to know exactly the full range of functions that the cap can perform in order to take into account all the subtleties during manufacturing.
It is installed in order to:
- the following did not enter the pipe space: debris, snow, rain, birds;
- for a long time the pipe itself did not collapse under the influence of temperature changes, moisture, or icing, because in most cases the pipe is laid out of brick;
- strengthen the top layer of the chimney masonry;
- increase traction up to 20%;
- create a windproof exhaust gas outlet;
- decorate the highest point in the house structure.
Atmospheric phenomena put pressure on waste gases, even if the ventilation pipe is made according to technological requirements.
However, according to the physical law of aerodynamics, when a flow of cold air comes into contact with the hood and goes around the installation, a discharged area is obtained, then the air begins to move at a higher speed, which increases the draft in the chimney and allows heating devices to operate more efficiently.
How does a fungus work?
Initially, the roof fungus was made of galvanized steel. Especially popular are designs made of impact-resistant polypropylene, which is slightly exposed to the sun, frost, and corrosion. In some types of hoods, the inner tube is made of a steel alloy. The ventilation fungus includes a number of elements:
- 2 pipes (for gas removal, fastening with a horizontal section of the air duct);
- fastening units (flanges);
- container for condensate accumulation;
- an air valve responsible for the necessary air circulation;
- rings for support, fastening;
- aerator (a device that saturates the room with oxygen);
- deflector (a device that increases the draft of air flows);
- valves
Ventilation fungus on the roof
Step 1 . Draw a sketch of the planned cap. We recommend choosing a basic model online and making adjustments to the linear dimensions. If desired, add original decorative elements.
Materials and tools used
Among people, the cap is called a visor, a chimney, a fungus. Its scientific name is deflector.
Forged deflectors are very original, but their price is not always justified. After all, you can make a cheaper structure from the following metal material:
- galvanizing;
- stainless steel;
- steel with paint and varnish coatings;
- aluminum;
- copper
The most convenient, practical and cheapest is galvanized sheet.
You need to have the right tool. List of what you may need during work:
- rubber or wooden hammer;
- small iron hammer;
- screwdriver;
- electric drill;
- drills of the required fastener diameter;
- rivets;
- fastenings;
- roulette;
- marker;
- construction corner;
- bends;
- special clamps;
- metal scissors;
- metal ruler;
- iron corner up to 1 meter in size.
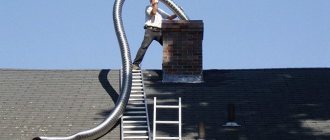
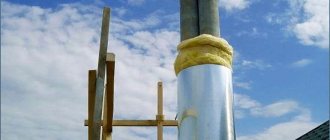
Installing a protective apron around the pipe
To ensure that the connection of the roof deck to the chimney system is airtight, an apron is installed on the roof slope.
Or rather, two are installed: internal and external. The inner one is under the finishing roof deck, and the outer one is above it. A waterproofing flashing is necessary to prevent melt water from getting into the attic and into the house. You need rolled metal sheets with a height of 40-45 cm. A flexible lead or aluminum tape, which can be easily cut with metal scissors, is suitable. On the pipe at a height of 20 - 25 cm from the rafters, a line is marked on all four sides, which will be parallel to the rafter flooring. A 1.5 cm deep groove is laid along this line along the entire perimeter. You can cut it with a grinder, then wash the cut or blow off the sawdust.
The installation of a metal apron begins with the bottom wall of the pipe. Take a piece of sheet 15 cm longer than the width of the pipe wall. To enter the groove, bend the tin along the edge by 1 cm at an angle of 90º in one direction and after 20 - 25 cm bend the remaining part at an angle of 90º in the other direction, use the remaining 20 cm to overlap under the roof covering. This will prevent leakage. Do this on all four sides. Fill the edges of the additional elements inserted into the groove with heat-resistant sealant.
After the finishing roof covering has been installed, you can install an external apron. It is more necessary as an aesthetic element. Therefore, a material is selected for it that will be harmonious with the roof. It is easy to select rolled products with a polymer coating both in color and quality. An apron for a round chimney can be purchased in a store; it comes in metal with adjustable sizes and silicone (rubber), which is easily adjusted due to the elasticity of the material. Making a roof passage by hand is even easier than making a chimney cap.
Such a structure can only be attached to the roof system. since shrinkage of the house can play a cruel joke and prematurely damage either the pipe or the apron. A clamp with an elastic heat-resistant gasket must be put on the pipe.
Wind vanes on the chimney pipe
How and from what to make umbrellas for chimney pipes. Headband for a chimney pipe. Installation of a chimney on the roof.
Deflector shapes
The shapes of the deflector or head can be striking in their diversity.
Therefore, you need to decide which shape of the deflector will be ideal for the ventilation pipe, while still looking neat.
- round,
- square;
- hip;
- conical;
- tent;
- standard hipped;
- with a flat umbrella;
- with a semicircular umbrella;
- gabled with four slopes and a high roof;
- with weather vanes.
Types of protective elements
Products for protecting the chimney from precipitation and debris vary in appearance.
According to the cross-section of the pipe there are:
The most common designs include:
- Models in the form of houses. They have a hipped roof.
- Houses with gable roofs.
- Chimneys with semicircular and cone-shaped roofs.
- Flat umbrellas.
Additional elements can be attached to the chimney cap. This could be a spark arrester, a weather vane, ornaments, figurines (skates, birds) and other decorative details.
Types of exhaust hood
The types of exhaust hood also have a variety, but the most popular are:
- tsags are a simple model that can be made in a workshop;
- Grigorovich;
- It is difficult for a beginner to make a spherical “Volper” with his own hands, since machines are required;
- H-shaped;
- star shape "Shenar";
- ASTATO open.
You can find plastic hoods on sale; they are best used for basements and garages; for high-rise structures they are fragile and do not last long.
Manufacturing technology of the Tsaga deflector with drawing
Manufacturing drawing of the Tsaga deflector. (Click to enlarge)
First you need to decide on the dimensions of the external and internal pipes. Measurements must be accurate.
The outer diameter of the stove hood fits tightly onto the chimney pipe.
The main parts are made in proportion to the internal diameter:
- the inlet pipe is placed on the pipe;
- the outer cylinder is a diffuser, its size should be approximately 30% larger than the internal diameter of the pipe;
- cover, its size should be about 90% of the pipe diameter.
In order to correctly calculate the dimensions of the deflector, a table is provided.
- A drawing is made on paper to match the shape and dimensions of the cap.
- The patterns are applied to a metal surface and cut out with metal scissors.
- The resulting parts must be bent according to the design and connected with rivets.
- The finished parts of the deflector are assembled in the workshop, and at a height they are only fixed above the pipeline.
How to make a weather vane
Material selection
Popular materials are stainless and galvanized steel. The manufacture of chimneys for pipes with a round cross-section and light weight involves the use of galvanization (the low weight of the structure will help to avoid unnecessary load on the chimney). When designing large brick chimneys, stainless steel with a polymer coating or exposed with paint is used.
To give the building a light antique flair, the caps are made of copper. The high cost does not frighten aesthetes who are eager to improve their home - the service life, estimated in decades, and the aesthetic appeal that increases over the years are worth the money spent.
Before making a chimney smoker, draw up a drawing and cut out a model from cardboard or a sheet of paper in the original size. Model the model of the cap, attach it to the chimney, make adjustments to the initial calculations if necessary, and when you are satisfied with the result, proceed to create the weather vane.
Let's consider the two simplest options - gable and vaulted models.
Choose the model and design of the chimney depending on the purpose of installation
Creating a gable weather vane
Before work, take measurements from the pipe, prepare tools: a vice, rivets, a welding kit. Required:
- Metal sheet;
- 4 pieces of pipe with a square cross-section (2x2 cm) half a meter long;
- 2 metal strips;
- metal corners 20 mm wide (2 pcs.).
Install 4 square pipes in the chimney, deepening them to the height of 3-4 bricks. Weld the corners around the perimeter to the resulting structure - the structure will be held on the pipe due to them.
Before work, draw up a drawing of the chimney
Mark the sheet of metal in the middle, attach metal corners on both sides, clamp it in a vice and give it the desired shape (a bend angle of 90° is enough). Weld 2 plates to the tops of the posts at a 45° angle. For reliability, cover the structure with a primer or paint for metal products. Make 4 holes in the strips, try the chimney roof on the pipe, check the drawing and drill holes in the roof. Connect the roof to the base, secure with rivets.
Make sure that the fastening is strong - the weight of the gable structure is large; in case of strong wind, if it falls off the chimney, it will seriously damage the roof.
Installing a weather vane on a brick chimney
Vaulted (semicircular) weather vane
The development of a chimney onto a pipe with a semicircular cap is even simpler - it consists of a cap and a semicircular “arch”. You will need a sheet of metal bent into an arc, 4 stands to support the structure, and scissors for working with metal.
The operating procedure is as follows.
- Mount the cap on the pipe.
- Cut a piece of the plate with a margin (so that when installing 3-4 cm remains on each side).
- Make cuts on the sheet of 2-2.5 cm every 3-4 cm around the perimeter, bend the resulting petals upward.
- Bend the posts at the bottom, prime and paint. Weld or rivet the posts to the cap (to the horizontal and vertical parts).
- Attach the arch to the legs.
An optional step is decoration: installing a weather vane, decorating the structure with forging. If you want the structure to serve a decorative function, install decorations on the weather vane before installing it on the roof.
Manufacturing technology of a rectangular exhaust unit with a weather vane
Drawing of a rectangular chimney cap. (Click to enlarge)
- Cut a rectangle out of a sheet of iron, taking into account when bending it so that there is 10 cm for the chimney to fit.
- Oblique cuts are made on the sides at equal distances; when joined, these cuts will produce trapezoidal segments.
- Next, four posts are made, attached to the corners of the rectangle, secured with rivets.
- Bend the ends, you get a hole, as in the drawing.
- Separately, cut out a rectangle: bend it into an arch, fasten it - this is a ready-made hood; for originality, you can make a weather vane.
- The finished structure is installed in the chimney pipe.
The pipe is attached to the installation according to what the chimney is made of.
Installation recommendations
It is important to correctly calculate the height and diameter of the cap, the height of which must be at least 10 cm from the pipe cut.
Installing a finished roof cap is quite simple if you follow safety precautions.
The structure should fit onto the chimney pipe, and not fit into it. If you leave a small gap of up to 3-4 mm, the cap will easily fit on the head. If the nozzle fits tightly and does not fluctuate with gusts of wind, there is no need to strengthen it. Otherwise, a clay or adhesive solution is used to further secure the nozzle to the pipe.
You cannot do without additional roofing elements when installing roofs with any roofing covering - corrugated sheets, metal tiles, ceramic tiles, slate.
The latter are mounted on chimneys and, like all other additional elements, perform protective and decorative functions .