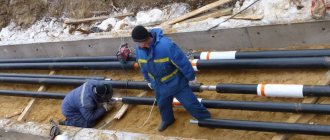
Before installing a heat source that requires gas, solid or liquid fuel in a private house, bathhouse or outbuilding, it is necessary to prepare a design for a combustion product removal system. Today, classic designs made of brick or asbestos-cement pipes are replacing convenient and practical chimneys made of stainless steel, for the installation of which ready-made elements are used.
Types of stainless steel chimneys
You can connect any type of heating boiler, metal or compact brick stove, or fireplace to the universal modular chimney. You can assemble the smoke channel yourself by choosing the right system. They differ in design, purpose, and metal characteristics.
Varieties
begins with choosing the type of pipe that is optimally suited for specific conditions. The following varieties are available for sale:
Single-circuit
The so-called mono pipes consist of a single layer of alloy steel alloy, the layer thickness of which is about 0.5 mm, and the operating temperature is 500 degrees.
The scope of application of such pipes is limited; their installation is possible only indoors, since due to the lack of an insulating layer, a single-circuit chimney freezes in winter, allowing condensation and soot to settle on the internal walls.
Single-circuit chimney pipes made of alloy steel
Sandwich pipes
In construction terminology, they are also known as thermal systems, two- or three-layer pipes with insulation laid between layers of steel. The operating temperature of a double-circuit steel alloy chimney pipe is up to 850 degrees.
For thermal insulation of such a chimney, insulation based on mineral wool, in particular, basalt fiber, is used. They protect sandwich pipes from condensation and also retain heat inside, reducing fuel consumption.
Sandwich pipe for chimney
For most regions of Russia, professional builders recommend the use of double-circuit sandwich pipes. They are indispensable if the project plans for external installation with an exit through the wall.
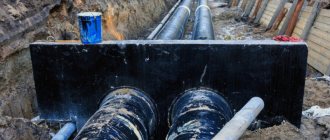
However, remember that stainless steel is installed after the chimney exits to the street, and not immediately to the inlet pipe of the heating device.
Performance
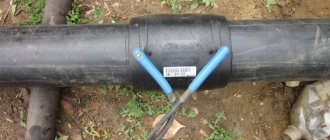
Steel chimneys are built from additional elements, connecting them together to make a pipe through which the products of fuel combustion are discharged from the heat-generating device to the street.
In the production of chimney pipes, high-quality alloy metal is used, which has high anti-corrosion characteristics and can withstand high temperatures.
Stainless steel components for chimney assembly
Please note that steel grades 321 and 316Ti have the best performance characteristics, the operating temperature of which is 850 degrees. They have excellent acid resistance and anti-corrosion properties. However, a chimney made of a steel pipe for extreme conditions of use, for example, in a sauna or bathhouse, is made from elite 310S metal, which can withstand temperatures up to 1000 degrees.
The selection of pipes for a chimney is based on three parameters: thickness, diameter and shape. The most common form is considered to be cylindrical, since the installation of pipes of a different geometry provokes settlement and accumulation of soot deposits on their inner walls.
The diameter is selected based on the size of the inlet pipe of the heating boiler and the design draft force inside the chimney system. The required pipe thickness depends on the type of fuel used: for solid fuel devices - 1 mm or more, for gas devices - more than 0.5 mm, for liquid fuel - at least 0.8 mm.
Installation of a stainless steel chimney
The parts for assembling a stainless chimney are very diverse, so the channel configuration can be any without harming the draft force and the working process in the stove. Quite often, a corrugated pipe and several elbows become an element of the chimney, helping to avoid a global reconstruction of the walls.
Instructions for assembling the smoke channel
A stainless steel chimney is installed as follows:
- A design sketch is created on paper, which reflects the expected configuration of the smoke channel. Then the walls are marked, indicating exactly where the pipe will be attached. Based on the results of this work, the length of the structure is determined and all parts are found, including rotating elements for connecting pipe sections. At the same time, do not forget about the fragment of the chimney that goes onto the roof of the house. It should rise slightly above the level of the roof ridge.
- Before assembling the chimney, the pipe joints are lubricated with a sealing compound. A special tool will make the articulation of parts more reliable.
- Moving from bottom to top, one chimney section is connected to another. The elements are joined to each other so that the upper section is inserted into the lower section using a special latch. In the absence of this device, one element is inserted into the other by approximately one-half the size of the outer diameter.
- Clamps are attached at all joints of elements. The manufactured structure is fixed on the external or interior wall of the house every 1.5 or 2 meters. Elements passing through the wall and inspection sections of the pipe must be secured. The smoke duct is fixed to additional brackets in the areas where the tees and elbows are located.
Video: connecting chimney elements
Rules for installing stainless pipes
Installation of the structure should be carried out according to the following rules:
- horizontal elements and elbows cannot be installed in places where they will be in close contact with electrical wires and gas pipes;
- chimney elements must not be connected where the structure passes through the wall;
- pipe fragments located horizontally cannot be made long (the permissible limit is 1 m);
- The direction of the chimney can be changed no more than three times;
- the diameter of the selected stainless steel pipe cannot be less than the size of the pipe coming from the furnace of the stove or fireplace;
- when running a smoke duct through the wall, ceiling and roof around an uninsulated stainless steel pipe, it is customary to leave at least a meter of free space;
- the height of the smoke channel must be more than 5 meters, otherwise the products of fuel combustion will be poorly drawn out;
- It is customary to pass a stainless steel pipe through non-flammable roofing material, creating a clearance of 13–15 cm;
- a stainless steel chimney installed outdoors or in a cold building must be covered with thermal insulation materials;
- at the point where the smoke duct exits through a roof made of flammable materials, it is necessary to install a device that extinguishes sparks.
Important principles for installing a chimney
If you want to make your chimney work efficiently, you should listen to some recommendations. In many respects they relate to the use of corrugated pipes. It can be installed both inside and outside the house, but the best place to place such a product is considered to be the transition from the stove pipe to the main channel.
The advice of the experts does not ignore the shape of the hole for the pipe. It is better to make it rectangular or elliptical. The hole in the roof should be located where the smoke duct can pass centrally between the ceiling beams and the roof support structure.
Most often, a rectangular hole is created for the chimney pipe, since it is easier to cut and seal.
Installation of a stainless steel chimney requires mandatory waterproofing of the structure.
This is important, because the upper section of the pipe, not protected from dampness, can cause moisture to leak onto the attic floor
Video: installation of a chimney from a sandwich pipe
The smoke exhaust channel, made of stainless steel pipes, copes well with the functions assigned to it. The installation of this structure will seem simple, like an easy mathematical problem, if you know the intricacies of the process and take into account the advice of the experts.
Main advantages
A stainless steel chimney has the following advantages over brick and ceramic chimneys:
- a smooth inner surface that prevents the deposition of soot on its walls;
- Possibility of installation in already used premises;
- there is no need to construct foundations for it;
- the presence of sloping areas is allowed;
- the ability to carry out repair work regardless of the time of year;
- due to the insulated design of the chimney, minimal condensation occurs;
- high resistance to aggressive influences of exhaust gases;
- high strength and durability;
- full compliance with all modern fire safety requirements.
Types of chimneys
Based on the components used, these devices can be divided into the following:
- single;
- multilayer.
The materials used for their manufacture are particularly durable and highly resistant to acid condensate. A clean surface helps to completely remove moisture and soot from the smoke duct.
Single pipe structures are very often used. Such technical solutions are used to adapt old chimneys to new heating equipment. Pipes for them are made square, oval or round. Austenitic stainless steel is used for their production. Enameled pipes are also produced, but they are not widely used because they are sensitive to mechanical stress.
Single chimney needs additional protection
When installing a single chimney, you should be guided by the fire safety rule, which requires a distance to the nearest wall made of flammable materials of at least 1 m.
Double-layer structures have their advantages. The thermal insulation layer between the walls of such a chimney reduces the cooling of the inner pipe, resulting in less condensation. The inner pipe is made of high-quality steel, since condensate has an acidic reaction and other materials, including galvanized steel, will not be able to work for a long time in such conditions.
The double-layer chimney is already insulated
Such chimneys are placed at a distance of at least 20 cm from walls made of flammable materials. If this cannot be avoided, then the wall is sheathed with metal with a backing. It is made from fire-resistant material, for example, asbestos sheet.
According to the installation method, chimneys are:
- Internal. This design can rise vertically from the furnace through the internal ceilings and roofing pie. Its main disadvantage is that condensate flows directly into the firebox, increasing its concentration in the flue gases. The result may be an unpleasant pungent odor in the room and accelerated wear and tear of the chimney.
- External. With this design, the chimney is diverted from the stove horizontally through the wall. For this, two elbows are used, which can have a rotation angle of 30, 45, 60 or 90 degrees. In this case, the outer one looks like a tee, and at the bottom there is a container for collecting condensate. The vertical part of the chimney is installed parallel to the wall, the pipe is attached to it using brackets and clamps.
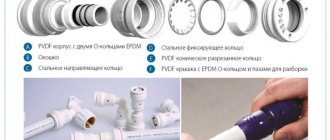
Components
It is impossible to assemble a chimney without using fittings. They are intended for:
- performing contours of engineering systems;
- changes in pipeline direction;
- switching to another diameter;
- traction adjustments;
- condensate collection;
- protecting the upper end from precipitation, leaves, debris and nesting birds.
Additional elements for assembling a chimney from pipes must be used
Using these structural elements, you can assemble a chimney of any configuration with your own hands. The permissible length of horizontal sections is no more than 1 m, otherwise the traction will be greatly weakened.
How to vent a chimney through a wall?
The best option would be to exit the chimney from the gable side. If the heating equipment does not allow such an installation and the chimney pipe will exit from the side of the roof slope, then it is necessary to assemble a support post to which the chimney will be attached with sliding fasteners. If the roof overhang is more than 40 cm, then it is quite possible to do without such a rack.
In this case, the chimney can pass through the roof overhang, where additional fixation of the pipe can be arranged
It is also important to install snow guards above the chimney exit point. They will protect the chimney from damage due to snow.
How to remove a chimney through the roof, video instructions:
If a wooden house will be covered with siding, then it is worth keeping in mind that most manufacturers of this material indicate an operating temperature range from -50 to +50 degrees
Therefore, it is necessary to install the chimney so that the distance to the facing material is at least 15 cm. The place where the pipe exits through a wall covered with siding must be additionally protected with heat-insulating material.
Installation of a chimney is a fairly important stage in the construction of a private house (read: “How to properly build a chimney in a private house”). Therefore, before starting work, you should prepare and understand the most important aspects of installation. Not only the functionality of this element, but also the efficiency of the entire heating system depends on the correct installation of the chimney. Only full compliance with fire safety requirements and chimney installation rules can ensure its proper operation.
Types of metal structures
Components for chimney installation are available in two types:
- single-walled,
- three-layer sandwiches.
Single-wall metal pipes are made from galvanized steel or stainless steel. A chimney made of single-layer steel has one significant disadvantage - heat exchange with the external environment. As a result of this thermal interaction, a single-layer chimney is susceptible to condensation and is a fire hazard.
Most often, single-circuit pipes are used:
- for smoke exhaust equipment in outbuildings where heat loss is not of fundamental importance;
- to construct the internal part of the chimney, if it is planned to be used as an additional heat source;
- as a smoke channel during the construction of a combined chimney.
Sandwich chimneys are ready-made sections for assembly, consisting of two circuits: an inner pipe and an outer casing, the space between them is filled with mineral wool.
Possible combinations of materials:
| External casing | Smoke channel |
| Cink Steel | Cink Steel |
| Cink Steel | stainless steel |
| stainless steel | stainless steel |
| stainless steel | ceramics |
Double-circuit pipes are more expensive than single-circuit pipes, but the chimney assembled from them is self-sufficient and does not require either insulation or additional protection.
Video
Watch the video for a description of the characteristics of a stainless steel chimney:
Stainless steel chimney. How to do it?
Everyone should remember that the life of household members depends on the quality of installation work. If the structure is installed and assembled incorrectly, a fire may occur, which will subsequently lead to a fire. You need to be as careful and careful as possible.
Catalog: “Pipes and chimney elements”
Heat-producing equipment using natural gas, liquid and solid fuels - boilers, stoves, fireplaces - requires removal of flue gases.
Chimneys are designed for this, which can have different designs - made of brick or concrete; steel, ceramic, stainless steel chimney pipes. Brick chimneys are installed for the same brick stoves and fireplaces. For a number of reasons, for modern stoves and fireplaces made of metal, solid fuel and gas boilers, it is more advisable to install chimneys from metal pipes. Next, we will look at the types, advantages and range of chimney pipes.
Advice from professionals
When installing a chimney, you should take the advice of experts to make the ideal unit for the smoke to escape. The tube that comes from the outside collects condensate. If you perform the smoke procedure, condensation can leak into the cartridges. The insulation cannot be wetted; in this situation, the tubes will be poorly insulated, and the outer sleeve can cause a fire when the wall structures heat up. In addition, freezing of liquids can cause holes to form in the tubes, and the acid inside the condensate substance causes the liner to burn out from the inside. The leakage of smoke in open spaces is not dangerous; it can be eliminated if you additionally lubricate the joint parts with sealant.
It is not recommended to reduce the diameter of the chimney opening; this may cause a stop or decrease in draft. The chimney duct must be cleaned of soot twice a year, and the head part of ice, snow or condensate frozen on it. Sandwich pipes do not require additional insulation, except for the section of passage through the partition or wall. For this purpose, it is better to use fire-resistant insulation and eliminate the use of glass wool. The area where the pipe runs through the wall must be insulated using ceramic or basalt wool, asbestos or foamed vermiculite. The use of asbestos does not cause problems; at the final stage, the product will not begin to generate dust or release hazardous substances.
When working with wooden walls, you must remember the danger of fire, so installing chimneys in such buildings is much more difficult when compared with brick ones. When the chimney is routed through a wooden wall, the distance from the pipe to the wall must be strictly observed; it should not be thicker than 260 mm. Additionally, you need to take care of the thermal insulation part and treat the walls with fire retardants. When installing a chimney in such a structure, you will need to insulate the surfaces of the walls near the monopipe and the outlet pipe from the heat generator. Such insulation is created using combustible materials, such as tiles, plaster, stone or metal sheets.
https://youtube.com/watch?v=SrXoY-IEbs0
Installation of stainless steel pipes
A single-wall chimney pipe can be installed either indoors with further lining with heat-resistant and fire-resistant material, or in an existing brick chimney (chimney liner).
Provided that double-walled stainless steel chimney pipes with sandwich thermal insulation are used, installation can be carried out both inside and outside the room. . This type of chimney pipes is reliable and durable (fire safety, corrosion resistance, etc.). Due to its increased fire resistance, stainless chimney pipes are usually installed in bathhouses and wooden houses.
Installation of single-wall stainless steel pipes
One of the easiest ways to install chimney pipes is to “chimney liner” (see Chimney repair). The stainless steel pipe for the chimney is lowered into the existing brick chimney, after which it must be connected to the pipe of the heating unit - this is done to avoid condensation on the brickwork, which is formed from the chimney gases.
A chimney without a pipe absorbs condensate, resulting in the destruction of the chimney.
https://youtube.com/watch?v=6JGzRnrPgyE
Installation of double-walled pipe with thermal insulation
Installing a chimney pipe with thermal insulation is considered more difficult. A chimney pipe made of stainless steel “sandwich” is a double pipe of a larger and smaller diameter, which is inserted into one another. The layer between the pipes is made of fire-resistant material - basalt.
Double wall pipe with thermal insulation
When installing pipes with thermal insulation, some nuances should be taken into account:
When joining “sandwich” pipes, it is important that inside the “sandwich” the upper pipe fits into the lower one, and outside the “sandwich” the lower pipe fits into the upper one (fitted). Not all manufacturers take this into account, so before installation you need to take this point into account and, if necessary, pull out the inner pipe, turn it over and insert it back.
When joining, it is advisable to use a heat-resistant sealant.
The joints of the outer sandwich pipe must be secured with self-tapping screws. Incorrect installation of a double-walled pipe with thermal insulation can lead to the appearance of stains and streaks on the outer sandwich pipe.
Improper installation of a double-wall pipe with thermal insulation can lead to stains and streaks on the outer sandwich pipe.
Options for the location of chimney pipes
Installation of pipes starts from the bottom (from the heating system upwards). Before installing the chimney pipe, it is necessary to prepare a passage between the ceiling. A special adapter pipe can be purchased at the store. It is needed to insulate the ceiling from overheating.
c1b612d5957746a572fbe3973b32da2b.jpe
Prepared adapter pipe
The inside of the adapter pipe must also be protected from heat. This is done using foil mats made of basalt fiber.
Then you can begin installing the pipes. The stainless steel pipe for the chimney is installed in such a way as to avoid joints in the transition pipe.
For ventilation and cooling, it is necessary to provide clearance between the via and the pipe. Next, you need to check the level and secure the protective elements of the adapter.
The pipe also needs to be additionally secured to the wall. This can be done using brackets, which should be installed every 2 m.
To clean the smoke duct, it is necessary to provide a removable part or door, which is located at the bottom of the chimney.
The chimney is cleaned twice per heating season.
Advantages and disadvantages
Stainless steel chimney ducts are characterized by a number of advantages:
- adaptability to any heating concept;
- strength of steel body;
- light weight and, as a result, no need to build a separate foundation;
- long service period (up to 30 years);
- high heat resistance coefficient. They are able to withstand temperatures up to 900⁰C;
- resistance to destruction and vibration;
- resistance to temperature changes, moisture and acid condensate formed inside the circuit;
- immunity to corrosion;
- operational safety;
- ease of installation and minimal time spent on installation work;
- the ability to give the smoke circuit the desired configuration;
- ease of maintenance and repair work;
- acceptable price.
Among the disadvantages it should be noted:
- the need for thermal insulation measures (relevant only for single-wall chimneys);
- visually unsightly design and, as an option, additional finishing in the form of erecting a decorative box. Although the natural specularity of stainless steel can easily be used in the design of any room.
- non-solidity of the structure when using poor-quality or unsuitable sealant leads to depressurization of the circuit under the influence of high temperatures.
Materials and tools for making a chimney
Before you start purchasing parts, fasteners and tools to perform this work, you need to decide on the design of the device and complete a preliminary design, an integral part of which is a material list, which lists all the necessary parts. By adding the cost of materials to this list, you will receive a cost estimate.
Before construction, it is recommended to sketch the chimney
Installation of the device is carried out from the bottom up, that is, from the stove to the top, for which you will need:
- a transition device made of fittings from the furnace to the pipe; depending on the design, a branch may be required;
- multilayer pipe;
- gate;
- fireproof material for the passage through the ceiling;
- plates made of galvanized sheet, approximately 500x500 mm in size - to close the passage;
- materials for insulating the intersection of the roofing pie, for example, a probe for protection from the outside;
- chimney head;
- clamps for fixing connections at the rate of 1 pc. for each;
- brackets for attaching chimneys to walls (depending on its design);
- collection for draining condensate;
- high-temperature sealant for sealing joints;
- steel pipes at the rate of 1 pc. per meter of chimney;
- stainless steel wire for guy wires;
- screws, nails.
The list of tools is small and may look like this:
- drill with drill bits for concrete and wood;
- jigsaw;
- screwdriver or wrench for installing fasteners;
- plastic inserts (dowels) for attaching brackets;
- hammer.
Depending on the design of the chimney, other tools may be needed; this will become clear when drawing up a preliminary design.
Installation of a coaxial chimney: requirements
The total length of the coaxial chimney should be no more than 3 meters (for condensing boilers up to 5 meters).
Photo 1. Assembly diagram of a coaxial chimney for gas heating. All main parts of the structure are indicated.
No more than 2 turns (2 rotary bends) are allowed along the entire length of the smoke channel.
Important! The smoke exhaust channel is routed to the street through the wall. It is forbidden to display it out of a window or vent! It is prohibited to lead the smoke exhaust duct into the entrance, onto a closed balcony or loggia, as well as onto a street containing buildings of architectural or historical value, children's and medical institutions
It is prohibited to lead the smoke exhaust duct into the entrance, onto a closed balcony or loggia, as well as onto a street containing buildings of architectural or historical value, children's and medical institutions.
In addition, the general requirements applicable to all types of chimneys must be met:
- The diameter must be equal to or greater than the cross-section of the boiler outlet pipe.
- It should not have any curvature along its entire length, and its cross-section should not decrease.
- The smoke exhaust duct must be gas-tight, watertight, and the joints must be carefully insulated.
Installation
Installation of a coaxial chimney is not particularly difficult. In the standard case, the outlet is carried out through the wall on which the boiler is mounted.
Photo 2. Installation diagram of a coaxial smoke outlet for a wall-mounted boiler. The required indentations and diameter of the pipes are indicated.
In this case, a small piece of vertical section is attached to the device pipe, then a 90-degree rotary elbow is placed. Next comes the horizontal part, which is led out through a hole in the wall to the street. The length of the street part is at least 30 cm. The structure ends with a special head.
When the smoke exhaust channel is removed offset from the boiler or through an adjacent wall, the circuit becomes somewhat more complicated and requires the purchase of additional parts.
Attention! To avoid condensate getting into the boiler furnace, the horizontal section must be located with a slope of 3 degrees towards the street. The fitting of the coaxial chimney parts by the manufacturer is carried out carefully; additional sealing of the connections is usually not required
The fitting of the coaxial chimney parts by the manufacturer is carried out carefully; additional sealing of the connections is usually not required.
The diameter of the hole in the wall for venting smoke to the street is made several centimeters larger than the diameter of the outer pipe. Upon completion of installation, the space is sealed with polyurethane foam.
Some manufacturers provide boilers with separate pipes for smoke removal and air supply.
This design expands installation options to three options:
- both pipes are discharged through one wall;
- pipes are led out into different walls;
- the air supply system is discharged into the wall, and the smoke exhaust system into the existing chimney.
The third option is especially relevant for multi-apartment residential buildings.
Advice. In non-standard cases of chimney location, contact specialists to draw up a diagram.
Location rules
Location on the roof
When designing the installation of such combustion product removal systems, take into account the standards provided for by technical standards:
- The roof duct outlet, located on a flat roof or 1.5 m from the ridge, must have a height of at least 0.5 m.
- The chimney, located at a distance of 1.5–3 m from the ridge, reaches its level.
- The edge of the pipe, located at a distance of more than 3 m from the ridge, is flush with a line 10° from the horizon of the ridge line.
- The minimum height of the chimney is 5 m, the maximum length of the horizontal section is 1 m.
- The thickness of the channel walls for solid fuel boilers is 1 mm, devices on
- liquid fuel - 0.8 mm, for gas appliances 0.5–0.6 mm is sufficient.
- The joints of the structure do not fall on the floor.
- The passage through the roof of the sandwich pipe has a gap of 13 cm, through the ceiling - 20 cm.
- The permissible number of turns of smoke exhaust channels is 3. The diameter of the pipe is not less than that of the outlet pipe.
Chimney assembly instructions
So, a suitable laying scheme has been selected and materials have been purchased. Before installing the smoke duct, perform the following preparatory work:
- Lay out the route of the future gas duct. Make sure that when crossing a wall or ceiling, the pipeline does not fall on supporting structures - frame house posts, roof beams, rafters.
- Install a boiler or stove. Here it is important to choose a place well so that the chimney does not turn more than 2 times (the third turn is the entrance to the tee).
- Protect the flammable cladding of the ceiling and walls adjacent to the heat generator from fire. Use galvanized sheet + basalt cardboard, mineralite slabs or other fire-resistant materials.
- Make a passage hole in the outer wall or ceiling (depending on which scheme you have chosen).
First, try to collect chimney fragments on the ground, according to the developed diagram. Make sure all parts and fasteners are present.
An example of a wiring diagram for installing a chimney inside a house
An important nuance. High-temperature furnace sealant is often used to join chimney sections. When the composition hardens, it will not be possible to separate the modules, only cut them with a grinder. Again, Schiedel recommends assembling your pieces without sealant, using clamps only.
How to properly install a sandwich chimney with your own hands:
- The chimney must not load the boiler with its own weight. Secure the supporting parts - floor stand, wall brackets. Remember about the offsets for combustible structures, move the pipe to a safe distance. For plastered brick or concrete walls, the minimum interval is 50 mm.
- Assemble the ceiling assembly (CPU). To prevent the metal box from touching the wood, lay strips of basalt cardboard at the joints. Place basalt insulation into the inner cavity of the box when you install the pipe.
- Start installation of the flue from the heat generator. Install the coupling, a section of a regular stainless pipe, then move on to the sandwich.
- The correct connection of pipes is “condensate”. The bell of the upper section (female) is put on the lower one (male). The metal outlets on the sandwich will block the junction on both sides, then condensation inside the channel and precipitation outside will safely flow down the walls.
- After connecting adjacent modules, the joint is additionally crimped with a special bandage. Do not confuse it with mounting clamps.
- A tee with an inspection and a condensate drain can be assembled on the ground, then attached to a horizontal chimney and supported on a bracket.
On the left in the photo the tightening of the crimp clamp is shown, on the right - the installation of the assembled fragment with a tee, a condensate glass and a bracket - Further installation of the sandwich pipe is carried out from the bottom up. Every 1.5...2 m the trunk is attached to building elements capable of supporting the weight of the chimney. We cover the upper cut with an appropriate nozzle that protects the insulation from precipitation.
- The channel laid through the roof is sealed with a “roof”, the upper edge of which is inserted under the roofing, while the lower edge remains on top. Additionally, a skirt is placed above the “roof” to cover the gap around the pipe.
Reminder. The connection of 2 elements should not end up inside the wall, in the polyurethane foam. The ban applies to structures of any flammability, even zero.
If the end of the flue rises 1.5 m above the last attachment point, it should be secured with guy wires to prevent wind swings. Another option is to make a square or triangular mast from steel corners. The chimney is installed inside the lattice tower using standard mountings.
Installation features
When installing a chimney, it is recommended to follow a number of rules.
The basic rule is that all objects surrounding the pipe should heat up by no more than 50 °C. Steel ones tend to heat up, so when installing them it is recommended to lay an additional layer of thermal insulation. This problem can be solved using ready-made sandwich systems.
The chimney must be located at a safe distance from electrical wiring, gas pipes and trees.
Where the pipe passes through walls or roofing, there should be a thick layer of heat-resistant sealant between it and the appropriate material. The same sealant is laid between the pipes at their joints.
When connecting, they are guided by one more rule: one pipe must enter another at a distance that is equal to the radius of the outer section of the pipes.
When assembling the structure, it is worth considering that the chimney should not have any narrowing areas, otherwise the aerodynamics of the pipe will suffer.
Horizontal sections should not be longer than 100cm.
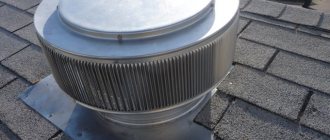
An inspection window is installed at the bottom of the chimney - a removable nozzle. The upper part ends with a head with a spark arrester and a cone.
Frequent errors and problems during installation
- Incorrect configuration. Unjustified deviation from verticality, sharp bends and excessive horizontal lines reduce the traction force in the circuit.
- Insufficient or excessive shaft height also reduces the efficiency of the chimney.
- If the pipe head enters the wind pressure zone, it provokes a backdraft effect.
- The use of stainless steel of insufficient strength leads to its rapid wear and threatens to burn out the steel.
Disadvantages of a steel chimney
In addition to the advantages, steel pipes have a number of disadvantages. Their main disadvantage is the rapid absorption of heat. Steel heats up quickly, so they need to be insulated. If this is not done, the pipe may heat the materials it comes into contact with and cause a fire. In addition, when it gets hot, it loses its ability to extinguish sparks that occur in the chimney.
Another disadvantage of steel pipes is the large formation of condensate. This feature of the material can vary in severity depending on the coating and type of structure. The least condensate falls on straight pipes without horizontal outlets.
Principle of operation
The principle of operation of the chimney is based on the natural draft force that occurs in the circuit due to temperature differences. The heated air becomes light and naturally rushes upward.
Fresh cool air coming from outside not only replaces exhaust gases, but also supports the operation of the system as a whole, because oxygenated air masses support the physics of combustion.
Features of operation
Metal chimneys, having a lot of undoubted advantages, require increased attention both during assembly and during operation:
- They should not be located near other utilities, such as electrical wiring or plumbing.
- Before starting installation work, the internal longitudinal seams of the pipes must be coated with a special sealant, since they are subject to temperature changes, which gradually weakens the joining edges.
- When cleaning stainless steel pipes, it is better not to use traditional metal balls with a wire “hedgehog”. Their influence deteriorates the mirror inner surface, making it difficult to drain condensate into the storage tanks. It is better to choose a brush made of synthetic materials.
Material selection
To make stainless steel pipes for chimneys, various grades of steel are used. The service life of the product and its resistance to burnout when soot ignites in the pipe depend on the choice. The higher the quality of the steel, the more expensive it is. Be sure to take into account the frequency of operation of the chimney - the requirements for the chimneys of boiler units that operate around the clock during the heating season are higher than for the pipes of sauna stoves that are fired from time to time.
| steel grade | Characteristics |
| 439 | Titanium and aluminum are used as additives. The material is resistant to acid corrosion and can withstand heating up to 850 °C. |
| 430 | Mainly used for the manufacture of casings and other elements that are not directly exposed to high temperatures and aggressive environments. |
| 409 | High heat resistance and acid resistance, can be used for chimney pipes of solid fuel stoves and fireplaces. |
| 304 | High strength, good weldability. It serves as a cheaper analogue of steel 316, somewhat inferior to its parameters due to the low amount of alloying additives. |
| 310S | A universal material due to its ability to withstand heat up to 1000 °C. |
| 316 | Thermal stability and chemical resistance are ensured by the addition of molybdenum and nickel. The material is suitable for boiler pipes of any type. |
| 316i, 321 | Pipes are universal, flexible, and corrosion resistant. Can be used for wood stoves. |
Selection of stainless steel material
In private housing construction, stainless steel pipes of grades 409, 430, 439 are predominantly used. With periodic operation (weekly heating of a sauna stove with wood), such a system will last about ten years. On boilers in load mode 24 hours a day, the average service life will be 2–3 years. To extend the service life of the chimney system, it is recommended to install it from 3XX stainless steel.
Features of transition of sandwich pipes in floors
In size, such a structure must exceed the thickness of the ceiling by at least 70 mm. It is these parameters that make it possible to ensure high-quality protection of the ceiling from fire.
In this case, you need to pay special attention to the quality of the box fastening
It is important that the pipe mounted in the box does not have joints. Before directly installing the dividing box with your own hands, you need to correctly mark it
It is possible to make a hole in the ceiling only if the dimensions of the box are known and the pipe in it is correctly located.
After the box with the pipe is installed, it is properly insulated. For this purpose, it is better to use basalt mats with a foil base. The hole made in the ceiling is also subject to insulation. For this purpose, mineral wool or other heat-insulating material that is not subject to fire is used.
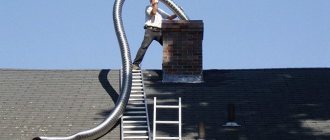
Features of installing a sandwich pipe on the roof
To bring the sandwich chimney above the roof level, a special link is used, called “roof cutting” by stove makers. Such a structural element should be selected based on the slope of the roof structure. Only taking into account this parameter, all work on the removal of the chimney above the roof will take place without any problems. Doing such work yourself consists of the following steps:
- Using a marker, mark the inside of the roof.
- A hole is installed in the roof structure that matches the diameter and thickness of the sandwich pipe.
- For insulation, a sheet of galvanized metal is fixed to the roof structure, in which
- a hole is cut in advance for the chimney pipe, through which it will come out.
- A groove is mounted on top, on top of which a sandwich pipe is assembled, the length of which must correspond to the calculated parameters.
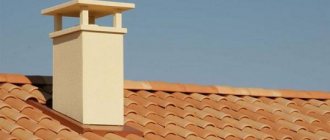
- At the finishing stage, the edge of the sandwich chimney is protected from precipitation by an umbrella-shaped tip.
As you can see, self-installation of a sandwich chimney is not as simple as it might seem at first glance. But if you familiarize yourself with all the materials and videos, all the work on installing sandwich pipes can be done independently.
However, before deciding on experiments of this kind, you need to sensibly assess all your capabilities, and if you are not confident in them, then it is better to entrust all the work to professionals.
Main elements and characteristics
Chimneys consist of parts presented:
- tees;
- knees;
- audit;
- condensate collector.
Characteristics:
- the main element is a long and straight pipe of different lengths, it consists of fragments connected by analogy with a socket, without special fastening;
- at an angle of 45 degrees, an inclined elbow connects 2 channels, changing the smoke exhaust indicator, the component is used when joining a horizontal and vertical fragment;
- at an angle of 90 degrees, the universal elbow acts as a rotating element for making changes to the structure; several similar things are present along the entire length of the chimney;
- tees - designed to remove gases and cut off condensate, they are joined 1 in 1 or in the form of a socket;
- outlet under the tee - allows you to remove excess accumulated liquid;
- revision - refers to open components for cleaning soot, built under a tee located near the base of the vertical shaft.
These parts allow you to avoid basic mistakes when trying to connect and join elements for geysers or classic stoves.
Chimney elements must be made from high-quality raw materials