A chimney duct is a structure that is installed from certain materials and serves as insulation and additional protection for the chimney. Among other things, such a case has another function - artistic, adding a beautiful appearance to the chimney pipe. If you wish, you can completely or partially dismantle it, which is very comfortable and practical.
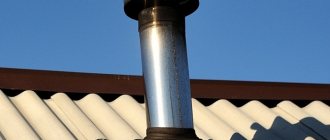
The iron casing, placed on the chimney, performs a protective and insulating function
Functional purpose of the chimney cap
Sometimes the design of chimney caps is so intricate that they become a real masterpiece of architectural art. However, miscalculations made when installing the hood can lead to a decrease in draft, even leading to smoke in the home.
In the most general sense, the cap on a chimney pipe is designed to serve as a barrier to prevent rainwater, snow or debris from entering the pipe channel, as well as bird nesting. Even the simplest chimney umbrella will protect against these negative aspects, plus it will make the roof look neater.
Regardless of the design of the structure and its cost, the canopy for the chimney pipe performs the following functions:
- ensures the cleanliness of the chimney, preventing it from clogging and moisture ingress;
- protects the brickwork of the protruding part of the pipe from premature destruction, leveling temperature differences and the adverse effects of atmospheric phenomena;
- prevents the influence of gusty, hurricane winds on the movement of air in the system, preventing it from blowing into the pipe.
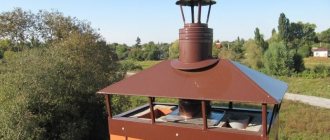
A pipe cap with a deflector - to increase draft Source pechi-dimohody.ru
However, not everyone considers a chimney umbrella to be a necessary element of the heating system, considering its shortcomings too significant.
For example, if, due to the installation of a cap, the chimney channel becomes narrower, this affects the performance of the entire heating system, and in the most extreme cases, it can lead to the filling of the home with combustion products, the most dangerous of which is carbon dioxide.
Installation of the steel case
A steel casing is considered the most popular option for organizing a casing with the protective function of a chimney. Let's discuss the process of installing a steel casing on a chimney:
- You can choose a case or make it yourself, using a sheet of steel, profiles and ordinary self-drilling screws.
- A steel casing is placed on the main pipe.
- In the third step, the space between the key pipe and the case is filled with thermal insulation material, which must be selected based on the heating temperature of the chimney.
- Finally, the case (made from zinc-coated steel or stainless steel) needs to be painted with an oil-based paint.
The casing can be secured with screws, and to protect against corrosive destruction it is recommended to paint the assembled structure
Painting a steel case is necessary to give it a beautiful appearance. As we said above, a much more expensive, but also the most attractive option is used for this - a polymer decorative coating.
Arguments against installing a chimney cap
As a rule, a cap on a brick pipe rises on the roofs of houses in a holiday village, almost never being found in villages. This is due to the fact that such an architectural element has disadvantages, knowing about which, pragmatic village people refuse additional costs. So, the cap, in any case, is a kind of barrier that makes the draft less than in its absence. This leads to the fact that the wood burns worse, and the smoke moves through the channels of the heating system more slowly. At the same time, the visor is an obstacle to the release of combustion products, which can create a dangerous situation at the slightest disturbance in traction.
If the draft disappears, then all the smoke from the stove goes into the house Source ptzgovorit.ru
In addition, the visor requires maintenance and periodic replacement, which is not always convenient and safe. In particular, ice forms on it in winter, blocking the exit of carbon dioxide. To remove it, you need to go up to the roof and mechanically clear off the ice. However, the main arguments against installing a fungus do not even concern its disadvantages, but its inexpediency in general. In particular:
- modern chimneys are narrow and round in shape, which makes bird nesting impossible;
- a well-designed flue has a special compartment for collecting condensate and moisture;
- caps made of galvanized steel are short-lived, burn out within 5 years and require replacement.
The most important counterargument against installing an umbrella on a chimney among most skeptics remains the need to incur additional costs that can be avoided without compromising safety and comfort.
Types of chimney caps
Today, developers have access to a huge variety of options for chimney caps, from budget models made of tin to ornate multi-level products with forged copper elements.
Copper pipe head - relatively durable, but expensive Source avito.st
See also: Catalog of companies that specialize in the installation of fireplaces and stoves, as well as related work
The choice of one option or another depends on three factors:
- Financial opportunities . You can make a simple galvanized steel cap with your own hands for no more than 1,000 rubles, while an exquisite copper cap with decorations and a weather vane can cost several tens of thousands of rubles;
- Heating system design . When planning the head for a pipe, take into account its diameter and features. A cap that is raised too high will not prevent birds from entering the chimney with all the ensuing consequences, but a cap that is set too low will inevitably have a negative effect on the traction force.
- General concept of the architectural project and personal preferences . The main principle of architecture is harmony, therefore, on a modest one-story building, an elaborate cap on a brick chimney pipe will look bulky and inappropriate, just as an artisanal cap on the chimney of an elite mansion will spoil the appearance of the facade.
The classic chimney cap resembles a house with a sloping roof and looks very elegant. Very popular today are finials with a rounded roof, which can be found in old Europe.
The simplest cap for a round chimney Source tildacdn.com
Domestic developers of the budget segment prefer cone-shaped canopies with an adjustable base diameter, which makes it possible to make their size universal.
As for the newfangled forged umbrellas for the chimney pipe, for all their attractiveness, it is important to understand that they will burn out at exactly the same speed as less expensive ones, although they will please the eye many times more.
Box made of wooden panels
A case made of wooden shields can be made in two ways. Let's consider the first method:
- First you need to make a wooden frame, depending on the size of the chimney pipe.
- Next, the frame that is ready is lined with asbestos-cement corrugated roofing sheet.
- The third step involves installing wooden panels around the pipe.
- Finally, you need to fill the space between the iron pipe and the wood panels with thermal insulation material. The materials used for thermal insulation are:
- fiberglass wool;
- slag;
- dry land.
Let's consider the installation technology of the second method:
- wooden panels are installed around the pipe, forming a box. The distance between the iron pipe and the wooden panels should be at least 5 cm (preferably 10).
- The second step is finishing the internal seams. For this purpose, asbestos sheets are used.
- Next, an asbestos-cement corrugated roofing sheet is installed on the asbestos sheets.
- In the fourth step, it is necessary to seal the outer seams of the box made of wooden panels. For this, a cement solution is used.
- Next, slag concrete slabs are installed (at a short distance from the metal pipe).
- The plates need to be strengthened using ordinary wire.
- At the end, the space between the plates and the pipe is filled with mortar. For the solution you need to use gypsum and clay.
Protecting the chimney from destructive processes under the influence of natural factors is the main measure that will make it possible to increase the operating time of the chimney. For the protection box, you can use various materials that are available to any craftsman nowadays.
The main mistakes when installing a cap on a chimney
The most common mistake when installing an umbrella on a chimney lies in the use of bird netting around the perimeter. The problem is that even without it, condensation appears along the contour of the visor during the cold period, which freezes in winter, turning into thick ice. As soon as the ice blocks the access of air to the pipe, the release of combustion products will stop, smoke will begin to enter the room, and the draft will disappear. If the roof is additionally framed with bird netting, the formation of ice will occur faster than it can melt and the owner will have to regularly climb onto the roof to clear the ice deposits.
Most likely, the head will have to be cleaned regularly Source myguru.ru
How to make a chimney cap with your own hands
Despite the fact that it is not difficult to make a chimney pipe cap yourself, most developers prefer to buy ready-made ones, saving time and effort. This approach is not without common sense, since professional production of chimney caps allows you to obtain products of a more aesthetic appearance, equipped with additional functions and decorations. Particularly attractive is the opportunity to order a visor according to an individual sketch, taking into account all your wishes.
However, if you try, you can make a chimney cap of quite decent quality and appearance yourself. This requires five steps:
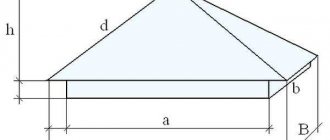
1) Draw a sketch of the cap , carefully measuring the internal diameter of the chimney pipe. The dimensions are calculated as follows:
- diffuser diameter = inner pipe diameter × coefficient 1.3;
- diameter of the base of the cap = diameter of the inner pipe × coefficient 1.7;
- cap width = inner pipe diameter × factor 1.9.
It is important! It is necessary to ensure that the dimensions of the canopy are 10 cm larger than the size of the pipe, protruding at the edges on all sides by 50 mm.
The edges of the head should protrude beyond the pipe Source stroy-pz.ru
2) Purchase sheet metal and scissors for cutting it, as well as a rubber mallet, metal corners and hardware.
3) Give the sheet of metal a square shape and bend its corners in pairs towards the opposite ones.
4) Attach the resulting pyramid to the base post.
5) Install the cap on the pipe, securing it, having previously adjusted it to size.
Before installation, be sure to check the technical regulations of the region and ensure that the work meets the requirements. This will not only save you from troubles with putting the building into operation, but will also provide the opportunity to obtain insurance in case of damage or loss of the structure.
Step-by-step instructions for making a cap
We will make the cap from copper sheet: this metal is quickly covered with a thin film of oxides and in the future is not afraid of the harmful effects of aggressive chemical compounds, and they are always present in smoke. The thickness of the sheet is 0.6 mm, do not use anything thinner, it is easier to work with, but it does not have sufficient mechanical strength, it can be deformed, bent, etc. The process will be much faster and its quality will improve if you have access to a cutting machine and bending machine car.
To make the cap you will need copper sheet 0.6 mm thick
Copper sheet prices
Copper sheet
To perform the work, you need to prepare a metal ruler, square, and awl.
Step 1 . Draw a sketch of the planned cap. We recommend choosing a basic model online and making adjustments to the linear dimensions. If desired, add original decorative elements.
The drawing can be done on a computer or drawn by hand
Step 2 . Transfer the details of the cap onto a sheet of copper. Mark the outline of the structure. You can increase its scale, so all the nuances are easier to see. When transferring dimensions, you should always leave 0.5 cm for rolling.
All measurements are transferred from the drawing to the copper sheet
Practical advice. It is much easier to work not on a whole sheet, but on separate blanks for each element. To do this, you need to first cut them according to the available sizes, and then make markings on each one separately.
Rules for drawing up a drawing
Experienced craftsmen strongly recommend detailing each element; they once again check all the nuances and only after that transfer the image to the metal surface. You can draw on copper with special felt-tip pens or an ordinary awl. The second option is much better, it has thinner lines. In addition, you will not have to clean the product from felt-tip pen marks later.
The most convenient way to mark the contours of workpieces on a copper sheet is with the tip of an awl
Step 3 . Use metal scissors to cut out the part. If you have a plasma cutting machine, then cutting can be done with this unit. Short cuts should be made with right and left scissors. Pay attention to which direction you then need to bend the metal and, depending on this feature, choose one or another scissors. Then it will be easier to make various folds and connections.
Cutting of blanks is carried out using metal scissors
Prices for metal scissors
Metal scissors
Using the same algorithm, cut out all the remaining blanks.
Bending and assembling the cap
If you have a minimum of knowledge and skills, then these operations do not pose much difficulty. If the work is being done for the first time, then it is recommended to practice some operations on unnecessary pieces of metal in order to practically master some operations. It doesn't have to be copper, use cheap sheet metal.
Cut blanks for the cap
Step 1 . Bending of base blanks begins with rolling the edges. The workpiece is precisely positioned on the machine and the metal is bent by lifting the table. Such operations can be done manually using a mallet, but the quality will be much worse. In addition, it only takes a few seconds to bend all the elements on the machine; the manual method will require much more time and effort.
The process of rolling edges using a machine
Prices for sheet metal bending machines
Plate bending machine
Step 2 . Make the first part of the base, the additional bottom bend provides increased strength, it is always recommended to provide it. The angles are indicated on the drawing and controlled with a protractor during bending. Some machines have fixed templates; the specific mechanical bending technology has almost no effect on the algorithm of actions. It is recommended to roll the bases; the convex line controls the location of the element’s fixation on the chimney wall and increases its stability.
To increase the strength of the base of the cap, a bend is added at the bottom
Step 3 . Begin assembling the base of the hood. The work requires special pliers; with this tool, move the fastening parts of individual elements into a single structure in different directions.
The edges on the sides of the workpieces must be bent using special pliers.
Step 4 . Lay out all the workpieces on a flat surface, check the dimensions and correct bends of the connecting ends. Using pliers, bend the ends and assemble the elements together. Don’t close the locks yet, just prepare them. The work requires skill, do not rush, do not damage the front surfaces. You need to know that fixing dents will always be noticeable, and such marks indicate low qualifications of the technician.
All blanks are assembled into one structure
Step 5 . Close the locks with blows of a mallet, the lower table should only be made of shaped metal, the dimensions are selected depending on the parameters of the product. An experienced craftsman has many different profiled sections for such purposes, which he uses while performing the work.
Using a mallet, connect all the joints on the sides of the base
At this point, the assembly of the base for the cap on the brick chimney is completed; you can begin making a cover, or umbrella, that protects the chimney pipe from above.
Ready chimney cap base
Making a hood roof
First, the drawing is carefully studied and, if necessary, each element is detailed on an enlarged scale. In our case, the roof resembles a complex hip-hipped structure, consisting of two trapezoids and two triangles. This option is most suitable for rectangular chimneys.
Drawing of an umbrella for a chimney
Step 1 . Transfer the dimensions of the slopes to the metal, as always, use a metal ruler and an awl. Don’t forget to draw a hem tail at each corner of the element. The length can be arbitrary, each master gets used to his own. The parameters are given in the range of 5–15 mm; there are no strict restrictions. Remember that the length of the top hem should be twice as long as the fixed bottom one. The decision should be made in such a way as to minimize the amount of unproductive waste. It is enough to draw one element, check that all dimensions are correct, cut it out, and then use it as a template for the second. On triangular slopes, the outlets are 30 mm, on trapezoidal slopes, 15 mm.
Marking the workpiece on a copper sheet
Step 2 . Use metal scissors to cut out the blanks. Do not forget that for small elements, depending on the side of the bend, a left or right tool is selected.
Cutting blanks for an umbrella
Step 3 . Start bending parts. After everything is prepared for connection, lay them out again on a flat table and check the position. There is still time to correct minor errors. Roll the stiffening ribs in the middle of the plane and make a bend at the bottom; it further increases the bending resistance. We have already mentioned above that the structure will be affected by large snow and wind forces; measures must be taken to increase the strength of the elements.
Bends are made along the intended lines
Step 4 . Assemble the umbrella; this is done in several stages.
- Insert the ridge connectors, align them exactly along the line.
- Place triangular slopes on the trapezoidal slopes and connect them into a fold. All connections should fit without much effort, there is no need to rivet anything, just use the hooks. Connect the bend with maximum force; the elements should not move after the assembly is completed.
Assembling a smoke umbrella
Once the roof is completely ready, you can begin making the legs.
Step 5 . Draw the details on a piece of copper of suitable size. It is not necessary to cut a new sheet; you can use waste; there is enough of it to prepare small elements. The total width of the blanks is approximately 110 mm, the width for rolling is approximately 25 mm. Dimensions may vary depending on the parameters of the segments.
Scraps of material are suitable for making legs.
Step 6 . Cut the blanks for the legs, bend the folds. The rivet will be made through two layers of metal, increasing strength by rolling. Drill holes for rivets.
Leg blanks are passed through a bending machine and drilled for fasteners
Now all that remains is to assemble the roof, legs and body. If you plan to protect the chimney from birds, then you need to attach a copper mesh around the perimeter. Remember that it can create many problems in winter. The mesh is additionally fixed with specially prepared corners. Secure the roof with rivets.
The legs are attached to the base with rivets
A mesh is put on the frame
The roof is attached last
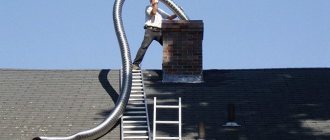
The structure is completely ready, climb onto the roof and install it on a brick chimney.
How to install a cap on a chimney pipe
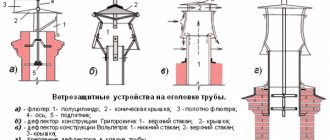
When installing the headrest, it is important to remember that the safety of the system and its proper functioning are more important than the aesthetics of appearance. That is why it is necessary to strictly follow the rules for installing the visor, namely:
- If the efficiency of the heating boiler exceeds 85%, it is unacceptable to use the classic pyramid. Only a conical visor with an open nozzle is suitable here, which will not become covered with ice in any frost;
- If the chimney is made of brick without inserts and is directly connected to the heat generator, it should be covered with a lid with a through pipe;
- A stainless steel plate should be placed inside the chimneys, which will significantly extend the life of the visor;
- If the umbrella for the pipe has vents, it is optimal to use gable or hip umbrellas.
Since this issue is of importance that determines the reliability of operation of the entire heating system, it is better not to try to solve it yourself, but to seek advice from specialists.
Decor of a steel box for a chimney pipe
Pipe casings are considered not only as working structures, but also, as we said above, they influence the exterior of the structure. Today you can easily choose a product that will make your home decor more beautiful and will please your eyes for a very long time. If we compare a box made of metal for a chimney pipe with casings made of other materials, then it is considered the least presentable.
However, this problem is very easy to solve with the help of specialized decorative coatings, which can be purchased in absolutely any specialized store or can be purchased with home delivery using the Internet. Decorative coating for metal casings will give your box a beautiful appearance. Today you can find a wide variety of colors and textures of such coatings, thanks to which anyone can choose the right option for themselves.
A decorative coating, which consists of a polymer, must be applied to the metal. The polymer copies the structure of another material (wood, stone, etc.). The use of such decorative coatings makes it possible to make a pattern of brickwork on a metal casing, while the real brick pipe will be well protected by this casing from the influences of the external environment.
Why do you have to change the caps on the chimney pipe?
Not a single cap on a chimney, even the most expensive one, will last forever and will sooner or later require replacement. The reason for this is the effect of high temperatures on the vulnerable metal. At the outlet, the temperature of the smoke stream exceeds 150 °C - 180 °C and its constant impact on the walls of the canopy leads to its burnout. A galvanized steel sheet will last no more than 3-5 years, or 7-10 if it is equipped with a reflector. In comparison, a luxury copper chimney cap will last up to 50 years.
Luxurious forged chimney cap Source metkolor.ru
Installation of a duct for an asbestos-cement chimney
Let's look at how to install a casing on an asbestos-cement chimney pipe:
- It is imperative to prepare the pipe for installation of thermal insulation material and the duct. To do this, you need to clean it from dirt and dust.
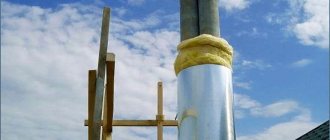
- In the second step, it is necessary to place the thermal insulation material in a case made of galvanized steel or roofing iron. Mineral wool can be used as insulation. Thermal insulation material is placed along the entire length between the casing and the pipe.
Helpful information! When selecting the cross-section of the casing, one key factor should be taken into account, namely, the distance between the casing and the chimney pipe should be at least 6 cm. This space is needed for the free placement of thermal insulation material.
- The upper part of the pipe is installed with a smaller slope.
- The niche between the asbestos-cement chimney and the pipe must be filled with cement mortar. Concrete grade M-150 is perfect for these purposes.
Mineral wool can be used to fill the space between the pipe and the casing
It is recommended to assemble such a case from several parts. This is a necessary measure; it makes it easier to install the insulation.