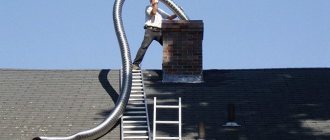
When you see a chimney on the roof or a photo of it, people usually think about ventilation or stove heating. Ventilation is vital for home residents, since unventilated housing can be harmful to health - the walls begin to mold, the air in the room is damp and stale.
Most often, ventilation pipes lead through the roof to the roof of the house. The chimneys also lead to the roof. The article is about what communications are brought to the roof, as well as the rules for installing them yourself.
Design Features
Despite the huge selection of materials for the construction of chimneys, the most widely used today are double-circuit steel pipes, popularly called “sandwich”.
The sandwich type chimney is a two-layer structure. Between two metal pipes of different diameters there is a layer of heat-insulating material, which simultaneously serves as insulation and insulation.
Video: Chimney made from sandwich pipes
Compared to single-circuit pipes, which are made from steel 0.5 mm thick, the double-circuit design is characterized by increased fire safety and better technical characteristics. To install a chimney outside the building, single-circuit pipes are not recommended. After all, due to only one layer, they are simply not able to retain heat in the cold season. Due to a sharp temperature difference, condensation forms in such a chimney, reducing draft and creating blockages in the pipe.
Construction of a double-circuit sandwich pipe
Therefore, to install a chimney through a wall, the best option would be to purchase sandwich pipes. The popularity of such a double-circuit chimney is due to its low price compared to a brick chimney, attractive appearance, excellent technical characteristics, fire safety and long-term operation.
In addition, you can do the installation of a chimney made of this material yourself. And although there are some nuances and subtleties here, even a beginner can cope with the task if you strictly follow our detailed instructions.
Selection of materials for the chimney
When constructing a stove, you need to purchase building materials correctly; this is the only way to ensure the smoke exhaust duct has optimal temperature conditions and a long service life. Materials must warm up quickly.
To build chimneys use:
- ceramics;
- metal;
- asbestos cement mortars.
Each of the listed materials has its own disadvantages - this does not allow us to call their choice ideal. Therefore, when purchasing this or that product, you should consider how suitable the product is for installing a chimney on the roof.
For example, metal structures look good, but only if an on-mount chimney is built. But making a basic model of a metal pipe will be very expensive.
When constructing the internal parts of chimneys, bricks or modules are used - materials that are fire-resistant and durable. For external sections of the structure, it is better to use asbestos-cement products.
Advantages and disadvantages of sandwich pipes
- The thermal insulation layer prevents the outer pipe from heating to a critical temperature.
- Compact and versatile in use.
- The smooth surface of the inner casing increases the chimney draft.
- Low price compared to ceramic material.
- Operating temperature up to 850 degrees (for single-circuit pipes, for comparison, 5000).
- Easy to assemble.
- The fire safety of the home increases.
- Easy maintenance compared to a solid pipe chimney (less soot accumulation).
- Does not create additional noise when drafting smoke.
The only drawback of the multilayer structure is the decrease in sealing after a long time. Due to sudden temperature changes, air can enter at the junction of sections.
Pros and cons of external smoke exhaust through the wall
The use of the smoke exhaust method through the wall is most often determined by the convenience of work and the feasibility of the design:
- almost the entire chimney pipe goes out to the street, and does not pass through the entire house;
- installation can be carried out both at the construction stage and after the construction of the house, for example, during the installation of a heating system;
- there is no need to make holes in the ceilings if the boiler is located on the first floor of a two or three-story building;
- the roof remains intact;
- The chimney through the wall is easy to assemble and install.
However, this design is not without its drawbacks:
- the need to insulate the part of the chimney located on the street;
- since the structure cannot be completely vertical, its efficiency is reduced compared to one installed vertically through the roof. Based on this, it is necessary to think through the design so that the chimney, on the one hand, fits harmoniously into the environment, and on the other, has a minimum number of elbows and turns.
We recommend that you read: How to hide the ventilation pipe from the hood in the kitchen?
Technical characteristics of sandwich pipes
- Material. Basalt fiber (mineral wool) is mainly used as a thermal insulation material. This type of insulation is resistant to high temperatures and chemicals. Mineral wool has excellent thermal insulation/sound insulation properties and is laid with a thickness of 30-60 mm. Due to their fireproof properties, multilayer pipes can be used in houses built from any material. More expensive alloys with a high degree of heat resistance are used for the inner casing.
The inner layer of the sandwich pipe is mainly made of galvanized steel, and the outer layer can be made of copper, brass, stainless steel, etc. The scope of the pipe and the price depend on the content of alloying materials, various alloys and the thickness of the heat-insulating layer.
Sandwich pipes galvanized and stainless steel
- Connection type. Sandwich pipe elements are connected in two ways: corrugated edges and sockets. The advantage of a corrugated connection is ease of installation, but to ensure tightness, a large amount of sealant is required, and this increases the cost of the chimney. With a socket connection, a high degree of tightness is achieved due to the presence of a wider chamfer on one side of the pipe. The advantage is a high degree of tightness, due to which the design can be used for gas boilers. But the downside is the complexity of installation and the need for very precise adjustment of all parts.
Types of sandwich pipe connections
Profiled surface
Today, corrugated sheets are very popular. But this material is no exception, and leakage is also possible on its surface if the chimney is not installed correctly.
It is recommended to install the chimney pipe in a vertical position. A passage in the roofing surface is created using a grinder. It is very important that nicks do not appear on the edge of the corrugated sheet.
When laying a round pipe through a profiled sheet, roll bitumen moisture insulation or bitumen foil tape is used.
Next, a roof penetration is installed on the chimney (it is attached to the sheathing), and then a heat-resistant sealant is applied. To prevent the passage from melting due to high temperature, a clamp with heat-resistant material is installed under it.
The most important installation rules
- If you are planning to install a chimney through a wooden wall with your own hands, take the trouble to accurately calculate the diameter of the pipe from the beginning. This value is determined by the boiler power and other characteristics. Incorrect calculation leads to poor traction or large excess fuel consumption;
- Remember that the sleeve has a hole only for the chimney pipe! There should be no communications nearby;
- Any chimney outlet into the wall must strictly observe an angle of 90 degrees, that is, it is advisable to make the chimney outlet through the wall strictly horizontal, and it should not be longer than 1 m. Optimally, a 60-centimeter horizontal transition;
- All vertical structures must be strictly perpendicular, and this is the most important answer to the question “how to bring a chimney through a wall”;
- No matter what the wall is made of, and even more so, installing a chimney through a wall in a wooden house with your own hands requires strict adherence to fire safety rules! The wall must be reliably protected with fireproof and heat-insulating material.
Choosing a chimney for a gas boiler
When choosing a chimney for a gas boiler, it is necessary to take into account some features of the device and the parameters of the boiler's exhaust gases, and also take into account the severity of the winter climate. Otherwise, the owner of the house will get into trouble. Here are some “surprises” that may await the homeowner.
The temperature of the flue gases of a gas boiler usually does not exceed 200 °C. In addition, most of the time the boiler operates at reduced power, which further reduces the temperature of the flue gases.
A steel chimney placed outside, on the facade of the house, often does not warm up well. As a result, the condensate on the walls of the chimney flows down into the condensate collector and freezes there. Condensate drainage is blocked by ice. Condensate accumulates, its level rises, and water from the chimney begins to flow into the combustion chamber of the boiler.
For a chimney located outside, it is necessary to arrange heating for the condensate collection area .
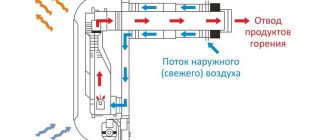
Another popular smoke removal scheme for a gas boiler with a fan looks like this: exhaust gases are removed through a vertical chimney channel, and for air flow, a horizontal pipe is laid and discharged along the shortest route through the wall of the house, to the facade. When the boiler burner is not working, due to the presence of natural draft in the chimney, cold air from the street is sucked through a short air intake pipe into the combustion chamber of the boiler. The internal parts of the boiler freeze up and damage the smoke control system. The water in the heat exchanger freezes and destroys it.
Read about the problems of working in a harsh climate with coaxial chimneys of gas boilers in this article above.
Schematic diagram of a two-channel smoke removal system for a gas boiler with forced circulation of exhaust gases
In harsh climates, for a gas boiler with forced gas removal, a two-channel smoke removal circuit works most reliably. One vertical duct serves as a chimney, and the other vertical duct serves as an air intake. To stabilize the air flow and eliminate natural draft through the boiler, the chimney channel in the lowest part is connected to the air intake channel by a jumper - a bypass.
Types of external chimneys
The most difficult to construct are single-wall brick chimneys. But if you have to connect a wall-mounted 2- or 1-circuit gas boiler, then they are completely unsuitable. Most modern builders choose more pragmatic sandwich pipes. Also, a sleeve of two pipes with a layer of thermal insulation is brought out through the wall. Most often this is basalt fiber. Pipes can be selected of any diameter to suit any needs, and the chimney wall passage unit is also selected individually. The advantage of sandwich pipes is their cost-effectiveness and ease of installation of a chimney with your own hands, as well as sufficient durability. Stainless steel pipes guarantee that such a chimney through the wall of a wooden house will serve you for many years without unpleasant surprises. And a metal structure weighs much less than brick structures. At the same time, a sandwich chimney in a bathhouse through the wall, just like in a house, is quite decorative.
Passing through a wall is done in two main ways:
- A single-circuit, or single-wall chimney, is when it is used when installing one pipe;
- Double-circuit, when a sandwich chimney is discharged through an external wall, consisting of 2 pipes with thermal insulation between them. This is the most acceptable option with higher protective properties.
How to arrange a pipe outlet
Let's consider how the pipe should be routed through the metal tile so that the risk of leaks at the junction areas is minimized.
Rectangular outlet
The organization of rectangular, in particular, and square output is carried out in two stages:
- installation of the internal apron before installation of the coating begins;
- installation of an external decorative and protective element after completion of the roof covering.
Schematically, installation of the output can be reduced to the sequential implementation of the following steps.
- Find out the location of the upper edge of the inner junction strip by attaching it to the chimney wall.
- Along the marked marking line, for example, using a grinder, make a groove with a depth of at least 150 mm. The groove should have a slight upward slope. At the end, it is cleaned well, it is advisable to even rinse it with water.
Attention It is imperative to inspect the rafter system, since due to leakage the wood may begin to rot or fungus may form on it, but, say, the new roofing material will weigh quite a lot
- The connection strip is first installed on the side of the chimney, on the eaves side, then the other three are mounted: on the sides and at the top.
- The planks are laid with an overlap of 150 mm and the edges are filled with silicone sealant. They are fixed using roofing screws.
- To form a “tie” through which water will flow, a metal sheet is placed under the bottom of the apron. It is directed either directly into the gutter or into the valley.
- Remove the waterproofing and, lifting it approximately 50 mm onto the chimney wall, secure it with special heat-resistant tape. This ensures additional reliability of the junction unit.
- After installing the coating, an external apron is installed, which is more necessary for decoration than protection.
- It is installed in the same way as the internal one, only the pipe walls are not tapped to secure the outer planks. In fact, the lower apron, bypassing the pipe with metal tiles, is sandwiched between its layers, preventing moisture from getting under the roof.
Round (oval) outlet
Providing reliable junction protection for a round exit is a more difficult task. Therefore, a special element was developed - the chimney passage. This is a combined element, which includes a flat steel base and an elastic cap on the chimney pipe. Transitional diameters are marked on it. The passage components are hermetically connected to each other.
6f74a441dd125887a5462a278eb0a23f.jpe
Additionally, we recommend studying: The passage of a chimney through a wall.
Advice Pass-through elements are also suitable for arranging any part of a circular cross-section that is exposed to the roof, say, ventilation.
The process of installing the passage is performed in the following order:
- It is necessary to cut a hole of the appropriate diameter on the roofing.
- After wetting the element with liquid soap, it is pulled onto the pipe.
- The sealing element is given the shape of a metal tile by pressing against the base.
- To fix the element, use self-tapping screws, after applying sealant under its edges. The screws are placed at a distance of 35 cm from each other.
Advice
If desired, you can make a passage element for metal tiles yourself. However, it must be taken into account that the roof cutting performed in this way must comply with all building codes and regulations
https://youtube.com/watch?v=O4asQV68dpM%3F
General requirements for good chimneys
Boilers, stoves or fireplaces of a certain power have chimneys with different channel cross-sections. These sections must be calculated correctly and accurately. If the channel is too narrow, the smoke will not have time to escape, the draft will be poor, and the heating device will smoke. The type of material is often decisive, for example, chimney pipes in a wall made of aerated concrete require more reliable thermal insulation than street pipes, but less than pipes passing through wood.
A round chimney shape is preferable; in this type there are no turbulences that cause poor or reverse draft. At the same time, installing any chimney through a wall assumes an optimal height of 5-10 meters. With individual construction, pipes 10 meters long are something out of science fiction. But chimneys shorter than 5 meters are a fairly common phenomenon; people are not too interested in how to remove the pipe from the stove correctly. Moreover, what height is guaranteed to provide poor traction.
If the roof covering is susceptible to fire, then a spark arrestor in the form of a metal mesh with cells of 0.5x0.5 centimeters must be installed on the exhausted boiler or stove chimney. There should be excellent ventilation near the heating device. Horizontal sunbeds should not exceed 1 meter (optimally 0.6 meters). Longer horizontal sections impair traction and can quickly become clogged with soot. In any pipeline, especially if it is a single-walled chimney made of metal, there must be a condensate collector and a hole (or door) for cleaning soot. It is advisable to avoid angles of 90 degrees; it is better to replace one such angle with two 45 degrees.
Rules for installing pipes on the roof
To install a chimney through the roof surface, you must follow a few simple rules that will allow you to do this work correctly:
For the chimney, it is necessary to provide a foundation or a so-called concrete cushion, since the chimney is a very massive structure.
since the chimney is a rather massive and heavy structure, like the stove itself, when building a house it is necessary to provide for a separate foundation, the so-called concrete pad; It is believed that a long pipe provides better traction, but there is one “but” - the efficiency of the furnace drops significantly. Therefore, it is necessary to find a middle ground. Therefore, when installing a pipe, there is no need to look for long paths; it is best to lay it directly; It is recommended to make the pipe exit close to the ridge if the roof is pitched. Calculating the location is quite simple: you need to draw an angle of 10 degrees from the line horizontal to the ridge, going down. The top of the pipe should be 30-50 cm above this line
Many believe that the location of the chimney is optimal at the very ridge of the roof; It is important to install a special spark arrester at the top of the pipe, which will prevent the ignition of roofing materials and other elements. The design of such an extinguisher can be very different; it is often made from ordinary steel mesh, which prevents burning sparks from leaving the pipe
What parts does an outdoor chimney consist of?
As already mentioned, the most popular and most reliable of the street ones are sandwich chimneys. A standard pipe sleeve must be routed through wood with particularly careful fire protection, which only sandwich technology can provide. At the same time, there should be no pipe joints at the point of transition through the wall! So, what parts does an outdoor chimney usually consist of, which is led out through the wall? This:
- Pipes;
- Tees;
- Elbow for bending the pipeline in the desired direction;
- Chimney support;
- Clamps. Distance between clamps when attaching to the wall: 60-100 cm;
- Tee with revision, i.e. door for cleaning the chimney;
- A condensate collector with a spout for removing it.
Fire protection comes first!
Stove or boiler - it’s all the same. It also doesn’t matter how your chimney goes or what it’s made of, in general – it doesn’t matter! The most important thing is the thermal protection of your premises, because a stove or boiler costs 1000 or 2000 dollars, and the entire building costs tens or even 20 times more. Therefore, the main thing is to understand how to secure a building and what thermal protection is. The most difficult question is how to ensure that the pipe passage made through the external wall does not pose a fire hazard.
Expanded clay is an excellent material for insulating the space at the pipe passage
Where we plan to place the chimney, it is necessary to cut a fairly wide (at least 25 cm from the pipe) wooden hole in the wall, which is closed on both sides with a special metal flange. It looks neat both outside and inside, and weighs very little, because the metal sheet is not thick at all. Having closed the transition with the chimney opening from the side of the boiler (from the inside), we secure a metal flange from the side of the room, and then we fill the part that remains between the inner and outer flange with non-flammable material. The best ones are considered to be stuffing made from basalt wool or expanded clay. Then we close the structure with a flange from the outside and install the chimney along the street. The protective sleeve must be attached very securely, using screws or anchors, around the entire perimeter.
In the markets you can see two passage nodes - round and square. And many are interested in what the difference is between them. Apart from their shape - absolutely nothing. For any passage unit you will need to cut out the same square, either in the wall or in the ceiling. And inside the box you will have a chimney. The space is filled with mineral wool, expanded clay, basalt fiber or other fire-resistant materials, but not brick, and especially not sand. You may have seen how Turkish coffee is prepared on the sand. So it can get so hot that water is boiled on it, and this is not the limit.
Where is the best place to place the chimney outlet?
It is best if the street chimney passes through the wall from the gable side. If this is not possible, and the sleeve will come out from the side of the roof slope, you will also have to build a support post if the roof overhang is more than 40 centimeters. If the overhang is small, then the pipe can be passed directly through it. With proper fire protection, especially if a chimney is built through a wall in a wooden house, it will serve as an additional retainer.
Proper fastening of chimney pipes to the wall on the street side is very important. There are two options for this mounting:
- In the first option, clamps wrap around the pipe and are rigidly attached to the wall on both sides.
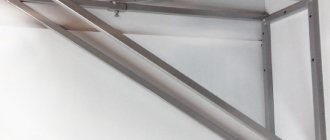
- The second option is a standard clamp, which is tightened and then attached to the wall with an anchor pin. The third fastening element is the lower console, which picks up the pipe and prevents it from falling down. This console has the form of 3-angled metal supports, one side of which is screwed to the wall, and the chimney rests on the other side, so that the supports do not interfere with opening the door for cleaning. You need two such supports. The option with stilettos is traditionally considered more budget-friendly.
Traditional galvanized steel: durable "tie"
To ensure a tight connection of the roof to the chimneys, make an internal apron from the strips:
- Step 1. Place the bar itself against the walls of the pipe and mark the level of the top edge on the wall.
- Step 2. Then carefully remove the dust after the groove and rinse the groove with water.
- Step 3: To install the inner flashing, start at the bottom of the pipe. Here the abutment strip needs to be trimmed.
- Step 4. Install the apron in other places in exactly the same way and do not forget about the 150 mm overlap to protect against leaks.
- Step 5. Next, the edge of the strip, which is inserted into the groove, needs to be sealed using a special roofing tape.
- Step 6. Now place a tie (a flat sheet with flanges) under the bottom element of the inner apron.
- Step 7. Point the tie into the valley or down, right up to the cornice.
- Step 8. Now you can proceed to the installation of the roofing.
The main requirement here is to maintain sufficient distance for ventilation of the space under the roof. At the same time, so that during rain the wet brick does not crack due to overheating, it is wrapped in a steel sheet with a polymer coating. The gap for ventilation is left 20 mm.
Here is the most popular option for bypassing the pipe:
- Step 1. We extend the waterproofing 50 mm directly onto the pipe, if the membrane or film itself is heat-resistant. Glue the cut of waterproofing to the pipe with adhesive tape.
- Step 2. Create a protective line around the pipe using protective strips.
- Step 3. Make a groove in the pipe itself (but under no circumstances into the masonry seams). The depth of the groove should have a slight slope and be at least 15 mm.
- Step 4. If there is a valley on the roof, it is better to divert the water there using a “tie”; if not, then to the eaves.
Bypassing the chimney on a metal tile roof should only begin after laying the metal tiles.
To do this, external junction strips are placed on the pipe, part of which goes into the groove and is sealed with a special heat-resistant roofing sealant. And the lower part of the strip must be secured with roofing screws directly to the sheathing.
If we are talking about a roof with composite tiles, the technology for it is slightly different:
- Step 1. We will need a flat sheet of sprinkles, which will consist of 4 parts: front, back and two sides. Such a sheet is always made individually, according to the dimensions of the chimney.
- Step 2. The sheet needs to be folded upward by 5 cm.
- Step 3. Now take a block 5 cm high to support the back and front of the sheet in front of the chimney.
- Step 4: Install the front flashing piece to the closest row of shingles ahead of the chimney.
- Step 5. Attach the side abutments to the front and back single pieces and secure them into the metal lock by folding them.
Building regulations
Chimneys are designed and installed in accordance with SP 60.13330.2012 “SNiP 41-01-2003. Heating, ventilation and air conditioning.”
Chimneys must meet the following requirements:
- The height from the mouth to the grate must be at least 5 meters.
- The internal channel should not have narrowed areas.
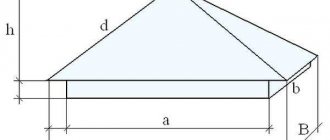
- The height above the flat roof is at least 0.5 m (preferably 1 m).
- Head height for pitched roof:
- At a distance of less than 1.5 m from the ridge (parapet) - no lower than 0.5 m from the ridge.
- If the distance to the ridge is from 1.5-3 m - not lower than the level of the ridge.
- If the distance to the ridge is more than 3 m, the height should not be below a line drawn from the ridge at an angle of 10° to the horizontal (down from the horizontal).
- When calculating, you should take into account not only the height of the ridge closest to the chimney, but also the height of the highest ridge of the building (or the highest part of the building).
- Pipes may have inclined sections at an angle of at least 30° to the vertical, with a horizontal pipe displacement of no more than 1 m. The cross-sectional area of inclined sections should not be less than the cross-sectional area of horizontal sections.
Fire safety requirements for chimneys
The distance between the outer surface of brick or any other chimneys (with insulation) and the structures of walls and roof slabs must be at least 130 mm. The distance from the structures to the wooden wall must be at least 260 mm.
If the chimney in the area of the roof overhang passes close to rafters, sheathing and other combustible materials, the passage must be insulated with non-combustible materials.
The chimney of solid fuel, wood and peat heating devices must necessarily have a mesh spark arrestor with a mesh size of no more than 5x5 mm if the roof is covered with flammable materials (bitumen tiles, roofing felt, ondulin) or leaves fall on it. When installing a chimney in a wooden house, be sure to install a spark arrester.
Traction and height
The height of the hog is the main parameter that determines the traction force.
Other factors affecting traction force:
- Sufficient insulation of the pipeline.
- Smoothness of the walls of the chimney channel.
- The thickness of the soot layer on the walls.
- The presence of a head or deflector (which does not interfere with the free exit of smoke).
- Air supply to the firebox.
- Closing the canal with valves, condensate or ice frozen at the mouth.
- Correctly selected internal cross-section.
How to choose a diameter
The diameter of the internal chimney channel must necessarily coincide with the diameter of the boiler outlet pipe (information from the heat generator’s passport).
In SP 7.13130.2013 “Heating, ventilation and air conditioning. Fire Safety Requirements" shows the cross-sectional dimensions of the internal channel depending on the power of the heat generator:
- Up to 3.6 kW – 140×140 mm (diameter not less than 158 mm).
- 3.5-5.2 kW – 140×200 mm (diameter not less than 189 mm).
- 5.2-7.0 kW – 140×270 mm (diameter not less than 219 mm).
Design of junctions between the roofing covering and the pipe
When a reliable foundation for arranging the connection of the roofing material to the chimney is ready, you can proceed to the installation of coating sealing elements.
The design of the system for connecting the coating to the pipe can be different, depending on the selected roofing material. The functions that are assigned to the elements included in the junction structure are sealing and waterproofing the joints of the roof covering and ventilation or chimney pipes, as well as draining and redirecting water flows flowing from the roof ridge to the pipe above.
Ideally, the layout of such a junction should be determined when drawing up the design of the rafter system and roofing “pie”. The fact is that some options involve the installation of individual structural parts before laying the roofing.
In addition to the type of roof chosen for covering the roof, when drawing up the project, you should also take into account the location of the chimney pipe, its shape, as well as the material from which it is made.
Professional builders usually recommend using only ready-made structures that are produced by roofing manufacturers for arranging junctions. However, many craftsmen prefer to make these parts themselves.
One of the options for a home-made design of a junction of a roof to a brick pipe of rectangular cross-section. It’s easy to make such a “kit” yourself from galvanized sheets
It should be noted that a chimney pipe passing through the roof directly at the ridge line of the roof is the easiest to seal. With this arrangement, water during rain, as well as snow drifts in winter, do not have the opportunity to accumulate above the rear wall of the pipe, which minimizes the risk of roof leakage in this, perhaps, the most vulnerable junction.
It will not be difficult to arrange a reliable connection of the roofing material to the chimney, which is also located in close proximity to the ridge line, that is, almost immediately behind the ridge element. There is also a very small space above the pipe, which prevents the accumulation of snow and water.
An additional fracture of the roof above the pipe - a groove - will prevent rain or melt water from accumulating in this space - it will redirect its flows to the sides
But performing high-quality sealing of a chimney located in the middle or lower part of the roof slope is much more difficult. In this case, waterproofing must be especially reliable. Therefore, quite often, and especially, for example, when the roof is covered with a soft bitumen roof, it is necessary to equip an additional pitched structure - as shown in the illustration above. Such a special break in the roof will divert water flows, directing them along the side walls of the pipe. Such protective extensions to the pipe are usually called grooves.
Perhaps the most unfortunate location of the pipe is on the valley line. It is advisable, even at the stage of designing chimney and ventilation ducts and roof structure, not to allow a detailed passage of the pipe through the roof
And, of course, the most difficult thing is to properly arrange the junction around the chimney, which is located in the middle or lower part of the valley. In this case, the pipe will be in the path of clearly directed flows of water, which during rain or melting snow will flow into the gutter at the junction of the slopes
In this case, it is extremely important to reliably seal not only the back side of the pipe, but also its side lines. Therefore, even at the design stage, it is necessary to try very hard to avoid such a pipe location
Now, in order to answer the most popular questions that arise in the process of arranging this roof assembly, it is necessary to consider several options for sealing pipe passages through the roof.
Chimney installation rules
- In no case should the chimney be laid in the place where communications pass (electrical wiring, sewerage, etc.).
- To minimize heat loss, it is recommended to locate most of the structure indoors.
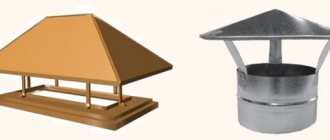
- The outer part of the chimney must end with a deflector to prevent precipitation from getting inside. Don't forget about the snow guard. They will protect the gas outlet channel from damage.
- Keep the step of fastening the structure to the wall no more than one meter to avoid further curvature of the chimney.
- The place where the pipe passes through the wall must be additionally protected with thermal insulation material. To do this, the diameter of the hole needs to be made slightly larger than the diameter of the pipe.
- The sandwich pipe cannot be installed as the first pipe above the combustion tank. It is preceded by the so-called “sandwich start”.
- The length of horizontal straight sections of the chimney should not exceed 1 m.
- When designing a chimney, make sure that when passing through the wall there is a single pipe without joints. All connections must be visible and directly accessible.
Selecting the type of chimney outlet
A chimney through a wall can be done in two ways. The first option involves raising the pipe closer to the ceiling and then exiting. The second option represents a design that goes directly from the boiler in a straight line.
With the second option, almost the entire chimney ends up outside the house. The advantage of this type of design is that only one elbow will need to be used, which will affect the efficiency of traction. And the likelihood of soot plugs forming is much less.
Chimney outlet options
Before performing installation work, it is necessary to draw an assembly plan, calculating the diameter of the chimney and its height. There are some factors to consider.
Warm air rises, which means the higher the chimney, the greater the draft. It also depends on the diameter, so it is very important to correctly determine what size chimney you need. Its size is also affected by the power of the heating device.
Calculate the diameter of the structure
The diameter of the double-circuit pipe directly depends on the size of the boiler installation pipe. Therefore, it is difficult to draw an installation diagram without knowing what type of heating device will be used. A simple rule applies here: the inner casing of the sandwich should in no case be smaller than the pipe itself. You can take more.
For example, if the diameter of the outlet pipe is 120 mm, then the internal diameter of the sandwich pipe should be the same size or larger. In no case should you allow “narrowing” at the junction of the pipes and throughout the entire chimney, otherwise this may affect the draft.
Determining the chimney diameter
The diameter of the chimney is also affected by the type of heating device. Therefore, if you are building a smoke exhaust structure before purchasing a stove or boiler, then immediately take into account its power.
If the power of the heating device does not exceed 3.5 kW, then you can limit the diameter of the internal casing to 80 mm. For more powerful boilers (up to 5.2 kW), the pipe size should be increased to 95 mm. The larger the diameter of the inner pipe, the faster it will cool.
Determining the height of the chimney
Calculating the height of the chimney pipe depends on the overall height of the house. If the height of the house is small (up to 5 meters), the height of the chimney in any case should be at least 5 meters. A short chimney can cause “smoke” in the house, and the power of the device is significantly reduced due to poor draft. And an excessively long pipe will increase fuel consumption, as if “forcing” the operation of the heating device, which affects the low efficiency of the heating system.
Calculation of chimney height based on boiler power
The optimal pipe length is considered to be in the range of 5-10 meters.
If the house is higher than 10 meters, then we focus on the ridge of the roof. The chimney should be 0.5 meters higher than the ridge to avoid creating turbulence. Consider also the material from which the roof is made. If the roof is covered with flammable material, then the top of the chimney should be 1 meter from the ridge.
How will we assemble the sandwich: by smoke or condensation?
Before starting construction work, you should decide on the type of assembly of the pipes themselves: “smoke” or “condensate”.
Sandwich pipe assembly options
The “smoke” design is characterized by building sections inward (visible clearly in the figure):
Inner tube: The bottom element is inserted inside the top element of the sandwich.
The outer pipe is built in the same way as the inner one. The lower section is inserted inside the upper contour.
Each subsequent section is built upon the previous element, as if being put on top. This type of chimney connection is best used in stoves with high combustion temperatures.
The “condensate” design is built using the opposite method:
Inner tube: take the upper section of the sandwich and insert it into the lower part.
Outer pipe: Here you have to do the opposite method. Take the lower element of the outer pipe and insert it inside the outer pipe of the upper element.
With this construction, condensate flows freely along the outer casing of the chimney into a special sump.
When is it better to use this assembly scheme?
- at low temperatures of combustion products;
- for external installation of a chimney;
- in stoves with a long burning function;
- in fireboxes with smoldering combustion.
Differences between smoke and condensate connections
Considering our task - to assemble a chimney outside the house, the choice of the type of sandwich connection is obvious. Pipes outside the house, when exposed to low temperatures, will cool faster, which means that the likelihood of condensation forming is high. Under the influence of moisture, soot begins to dissolve, forming acids. These substances pose a serious threat to pipe surfaces.
What tools are needed for installation through a brick or concrete wall?
- screwdriver;
- construction gloves to protect hands;
- ladder;
- knife;
- electric drill (for attaching the bracket);
- building level (to check the verticality of the chimney installation);
- perforator (for a hole in the wall).
What materials are needed for installation?
- metal box (pipe);
- dowels;
- sandwich pipe set;
- silicone sealant (necessarily heat-resistant!);
- tee (necessary to change the direction of the smoke and connect the pipe directly to the firebox of the heating apparatus).
- knee (450 or 900);
- support console, bracket (the entire structure is supported on it);
- clamps for connecting sections;
- foiled mineral wool (for insulating the pipe opening);
- plug (protective umbrella from precipitation and debris).
Vaka strips: reliable connection
So, to protect the abutment seams:
- Step 1. Install the strips and fill the top flange with sealant. In traditional units, a brick overlap is usually used, but here the plank performs exactly this function.
- Step 2. Cut the bottom strip to the required length - so that the length of the strip is the width of the pipe and 5 cm on the sides.
- Step 3. Cut the top of the strip and bend it along the line of the pipe itself.
- Step 4. Now cut the bottom part of the pipe and bend it along the line that will be 1 cm further from the corner of the pipe.
- Step 5. Cut the strips to 1 cm and bend the top flange with a hammer to the pipe.
- Step 6. On the bottom, cut a corner parallel to the slope line.
- Step 7. On the top part, drill holes in increments of up to 20 cm, for dowels 6 mm. The holes for them need to be drilled 6x40 mm.
- Step 8. Attach the strip directly to the chimney with heat-resistant dowels.
The finished chimney bypass should look like this from all sides:
Next, attach the side bar so that it is parallel to the line of the slope, and follow these instructions:
- Step 1. Mark the outline of the bottom strip on the inside surface of the plank.
- Step 2. Cut the top of the strip along the line of the pipe, and the bottom of the strip along a line that is 1 cm away from the corner of the chimney.
- Step 3. Cut the side strip along the contour of the bottom strip that is already attached.
- Step 4. Secure the plank with screws in increments of up to 20 cm, and do the same with the second plank.
- Step 5. Now cut the top strip to the width of the pipe with a 2cm overhang on both sides.
- Step 6. On the inside of the top plank, mark the contours of the already installed side strips.
- Step 7. Cut the top strip and bend it along the line of the pipe. Make the necessary cuts, drill holes in the pipe for dowels, 6x40 mm. Secure the bar.
Finally, apply sealant to the flange around the entire pipe. For convenience, take a construction syringe, and to make the seam neat, stretch it with cardboard.
Internal chimney through the roof: advantages
A chimney installed indoors from a heating device upward through the floors and roof is called internal and is most widespread. The main thing in this matter is to plan such a smoke removal route in advance, at the very initial stages of building construction.
Advantages of an internal chimney:
- the most stable and good traction
- absence of external factors that can damage the structure
- insulation of the chimney and, accordingly, eliminating the possibility of overcooling of smoke and gases with subsequent formation of condensate
- independence from climatic and weather conditions
- no wind load
- no heat loss
- no violations of the integrity and insulation of the external walls of the building
- longer service life
- the possibility of saving on fasteners, since they can be used to fasten the structure of the house itself, and also use inexpensive fasteners due to the absence of load on them by external factors
- easier installation and maintenance
Disadvantages of an internal chimney:
- violation of the tightness of the roof and the need to dismantle some load-bearing structures in cases where the chimney route was not included in the original house construction plan
- higher level of fire hazard due to the location of the pipe inside the house
- the need to insulate all areas where the pipe adjoins the walls and where the pipe passes through the ceiling, ceiling and roof
- use of useful living space
- risk of smoke in the room if the pipe is damaged
Attention! When organizing a smoke exhaust system inside a house, it is important to pay special attention to insulating all surfaces and pipe passages.
When pipes are heated, the surrounding areas, especially those made of flammable materials, may begin to smolder or catch fire. It is strongly recommended not to skimp on the quality of insulating materials and to install them in accordance with all established rules. You should also maintain safe distances between the chimney and surrounding areas of walls, ceilings or roofs.
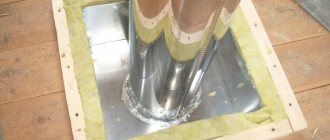
Sealing with a metal pipe - how to secure it correctly
In addition to elastic penetrations, you can use metal passage pipes, which also help solve the problem of how to attach a chimney to the roof. They can be purchased at construction stores. This element is used to arrange the passage of a chimney through a flat roof. Most often, the pipes are made of alloy steel; they are selected in accordance with the angle of the roof.
Installation of a metal passage pipe is carried out as follows:
- Mark a mark on the roof surface with a marker and cut out a hole of the required size for the chimney to exit onto the roof. For cutting, you can use a grinder or special scissors, retreating 1-2 cm inside the circle.
- Clear the passage for the chimney by removing waterproofing material and insulation. If necessary, cut down elements of the rafter system.
- A fire-resistant material with a hole for the pipe and a size that exceeds the diameter of the chimney by 15-20 cm is fixed on the roof from the attic side.
- Insert the pipe into the hole and connect it to the laid chimney; the joint is tightened with a clamp.
- The pipe is placed on the chimney and fixed to the roof surface using sealant or self-tapping screws.
- The pipe is extended with new segments until the required height is reached.
External and internal chimney: do it yourself or with the help of professionals?
On the Internet you can find numerous diagrams for connecting external and internal pipes, their designs and fastening methods. But installing a chimney with your own hands is always a big risk. Since it concerns fire safety, property safety, life and health of the residents of the house, it is recommended to use the services of trusted specialists.
Carrying out installation work by professionals has the following advantages:
- preparation of a work plan taking into account all technical features of the structure
- guarantee for work performed
- guarantee of high quality assembly and installation
- guarantee of compliance with all required standards, including those established by law
- taking into account all the nuances and features of the smoke exhaust system
- high efficiency of work
- fire safety guarantee
Insulation of external chimney
A more practical option for a chimney is to use a sandwich pipe, which is not only easier to install, but also does not require additional insulation.
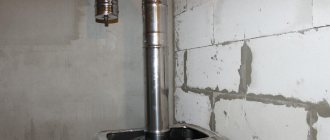
If a single-circuit pipe is used for smoke removal, it is necessary to install it in a box, where the distance between the walls of the box and the pipe is filled with a basalt heat insulator.
You can also use foil or other non-flammable material for insulation, but there must be a thick layer of heat-insulating non-flammable material on top of the pipe.
A shaft for a chimney made of brick, where the pipe is placed, is of course beautiful, aesthetically pleasing, but very labor-intensive and impractical - a brick shaft is not dismountable, it is difficult to clean, and besides, brick is not cheap.
What decorative materials are used to finish “weak” areas?
Starikovsky expanded clay is rarely used in modern walk-through devices; now, to a greater extent, various basalt fillers or various fiber cement boards are used. They look like drywall and cut well. This is generally the best material at the moment. Fiber cement boards have many commercial names.
Brick is often used, the rule here is simple - the brick is laid from the pipe along its entire length, and this, in principle, is enough for fire protection. The heat is mainly removed by brick, but a little fiber cement board around the perimeter still won’t hurt.
Porcelain tiles are great because they can withstand temperatures up to 1500 degrees and can be used for decorative purposes along with fire protection. You can use its analogue - this is a very resistant special heat-resistant tile called terracotta. Excellent tiles that are used for thermal protection and at the same time for room decoration, both on the floor near the stove and on the wall at the chimney outlet.
The service life of such a chimney
The service life of chimneys depends on the designs and materials from which they are made.
A ceramic chimney will last up to 40 years. Manufacturers declare 50 years or more, but no one has checked it yet. A brick one can last longer, but stainless steel liners will have to be replaced after 15-20 years. The service life of the liner primarily depends on the thickness and grade of steel. The thickness of the liner steel should not be less than 0.8-1.0 mm. Galvanization will not last long.
A good quality sandwich will last for 15-20 years or even more. The service life depends on the material and thickness of the inner liner - a good stainless steel inner liner with a thickness of 1 mm will last 20 years. Enameled liner made of carbon (“black”) steel – 15 years.
The service life of the liner depends on the type of heating unit (more precisely, on the type of fuel and the heating temperature of the exhaust gases). The shortest service life is for chimneys for fireplaces and coal boilers, which release very hot gases during intense combustion. The service life of chimneys from boilers and fireplaces using peat, briquettes and wood is slightly longer. Chimneys for pellet and gas boilers will last the longest.
How to choose the right chimney for a boiler in a private house?
To correctly select a chimney for a boiler in a private house, it is necessary to determine the operating conditions and parameters of the exhaust flue gases.
These parameters depend on the type of heating boiler and the type of fuel used. The chimney is selected according to the following parameters:
- Based on the temperature of the exhaust flue gases. The nominal operating temperature of the chimney should not be less than the temperature of the boiler exhaust gases in normal operation.
- Based on gas pressure in the chimney.
Some chimneys can be designed to operate with natural draft (vacuum in the pipe), others are designed to work with boilers with supercharging - forced removal of combustion products (excess pressure in the pipe). Chimneys that are universal for this parameter are also produced. - Based on the presence of condensate in the chimney.
Some chimneys are designed to operate in a dry state, in conditions where condensation does not form in the pipe. Other chimneys are equipped with condensate collectors and steam traps - they can operate in conditions of moisture condensation on the pipe walls. - According to corrosion resistance,
which is determined by the sulfur content in the burned fuel. Chimneys are divided into three classes of corrosion resistance to sulfur compounds: 1 - class, chimneys for removing combustion products of gas fuel; 2 - class, chimneys for boilers using wood and liquid fuel with a sulfur content of up to 0.2%; 3 - class, chimneys for boilers burning coal, peat and liquid fuel with a sulfur content of more than 0.2%. - According to the resistance to fire of soot accumulation in the chimney.
Chimneys may or may not be resistant to the combustion of soot in the chimney. When soot accumulations burn, the temperature in the chimney can briefly rise to 1000 °C. - According to the permissible distance to combustible structures.
Combustible structures in the house must be located from the outer shell of the chimney at a distance no closer than specified in the technical documentation for the flue, or additionally protected from exposure to high temperatures.
Manufacturers are required to label each element of the chimney system. According to European Union standards, symbols (letters and numbers) indicate all the main parameters: exhaust gas temperature, gas pressure class, condensate resistance, corrosion resistance class, soot ignition resistance, permissible distance to combustible materials.
The chimney must ensure the removal of a certain amount of gases from the boiler per unit time. The movement of gas in a pipe can be forced, with mechanical stimulation, or natural - under the influence of traction forces.
Before choosing a chimney, choose a boiler
Boiler manufacturers usually indicate in their technical documentation the minimum chimney dimensions for their equipment and other requirements for the chimney system. Before choosing a chimney, choose a boiler.
In addition to the parameters of the exhaust gases, the choice of chimney is also determined by the design features of the building . For example, when installing a boiler in the attic, it is advisable to choose a steel chimney that is lightweight and does not require reinforcement of the ceiling.
It is necessary to select a boiler and chimney before starting construction of the house , in order to make the necessary changes in the structure of the house in advance for their installation.
It is better to entrust the choice of a boiler, a chimney and the exact calculation of the dimensions of the chimney duct for the boiler to a specialist.
Do it yourself or order it?
You can only make a brick chimney yourself or a structure from an insulated single-layer steel pipe. But laying smooth and beautiful walls of a brick pipe is more difficult than laying just a brick wall, and you must have the skills of an experienced mason. Single-layer pipes will have to be insulated; the quality of self-insulation is much worse than that of ready-made factory-made pipes.
You can independently install a chimney made of ceramics and sandwich pipes. It is impossible to manufacture elements of such chimneys on your own, but the industry produces many modules that allow you to assemble a pipeline of any design.
The question of whether to install a pipe yourself or hire a team of professionals is quite complicated. Installing a chimney is quite a complex job, and it is worth thinking about and carefully assessing your capabilities: is it possible to take prefabricated scaffolding or scaffolding of the appropriate height, will you have assistants, do you have the skills to install building structures, how do you react to height.
What do the professionals advise?
As you can see, making an attached chimney yourself is not so difficult. The main thing is to choose all the materials correctly and take into account fire safety standards, which will allow you to avoid many unpleasant situations. It’s up to you to decide whether to vent the chimney through the roof or make it external. After all, what is better or worse is always easier to determine in each specific situation.
And finally, I would like to share some advice that professional stove makers give:
- Before you start purchasing chimney elements and installing it, be sure to determine the power of your firebox. The more powerful it is, the larger pipe diameter you will need.
- Be careful when choosing the height of the structure, which has a significant impact on obtaining good traction. A chimney that is too short will poorly remove combustion products, while a chimney that is too long will lead to excessive heat loss. Practice shows: the optimal pipe height is 5 meters. But here, too, everything is individual.
- If your boiler is equipped with forced draft, then the output of the external chimney can be completed at the stage of arrangement of only the horizontal section (without further extension of the vertical pipe).
- It is better to remove the chimney from the side of the gables (if possible). This greatly simplifies the task, since its arrangement will not be hampered by awnings and roof eaves.
- The maximum length of the horizontal section should not exceed 1.5 meters. It is here that the smoke flow is inhibited, which significantly reduces draft.
- Here, provide a special hole for technical needs: inspection and cleaning of the chimney. After all, the horizontal section is the most problematic in this regard. Sales consultants will help you choose the right item.
- If there is a wooden wall on the side of the boiler, fireplace, or stove, be sure to install a protective screen. These can be sheets of mineralite, asbestos, galvanized, fire-resistant plasterboard, glass magnesium or other fire-resistant material.
There's no need to do that
Sewerage
Why lead the sewer riser through the roof? The fact is that the air heats up when it comes into contact with wastewater, becomes saturated with moisture and rises.
If the risers are hermetically sealed, an unpleasant odor can penetrate into the kitchens, bathrooms on the upper floors, and in cases of leaky joints between plumbing and sewerage. The installation of ventilation systems is in many ways similar to the installation of ventilation.