The efficiency and safety of a stove, fireplace or heating boiler directly depends on how competently the chimney was installed in a private home. If earlier this depended on the professionalism of the stove maker, today it is a matter of wise choice of the owner of the house. Sandwich chimneys, which can be installed independently to any type of heating equipment, are in great demand, and deservedly so. It is important to choose the right pipes and install them, observing all the necessary conditions.
Nuances of the device and installation
The design of the pipe, as such, is not particularly important. The number of bends, turns and other obstacles in the path of flue gases only worsens the draft, so you should try to make the pipe as straight as possible.
However, the main qualities of draft are determined by the height of the pipe, which is measured from the outlet of the boiler to the head of the pipe. The pipe head is the end of the pipe that is hidden under the umbrella. By the way, the existence of an umbrella is mandatory; this is protection intended, first of all, for the boiler itself. Moisture entering the combustion chamber can lead to damage to all boiler equipment.
Another point worth noting is the welds and penetrations through the building envelope, i.e. walls, ceiling or roof surface. Welding seams must be made with the utmost care. A minimal rupture can lead to smoke entering the room.
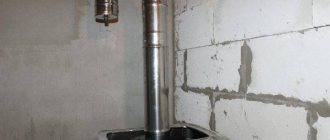
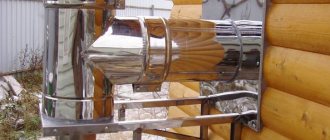
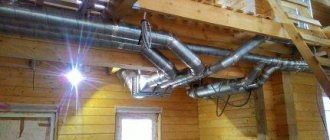
Chimney made of steel pipe
All passages through enclosing structures must be made in the form of a sleeve. A sleeve is a pipe with a cross-section larger than the cross-section of the chimney itself. The space between the sleeve and the chimney is clogged with sealant. This is done in order to protect the space surrounding the pipe from rising temperatures.
Let's summarize the features of chimney installation:
- The height of the pipe must be selected in accordance with the boiler power. Special tables will help you select the height, but it’s easier to just look at the boiler’s passport; as a rule, you can find the required pipe height there.
- All welds must be made neatly and without breaks.
- The passages through the fences are lined and sealed.
- The chimney should not be laid near the passage of wiring and other communications. The outer part of the pipe should be located at a distance from trees.
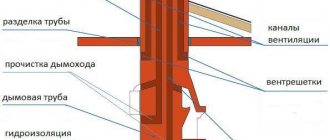
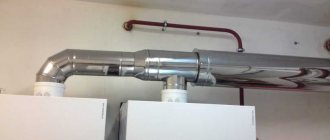
Wiring a chimney through the ceiling
Sealing with elastic penetration
In private housing construction, the question of how to install a chimney through the roof is most often solved using round metal pipes. The tightness of the outlet in this case is achieved through the use of elastic penetration. This special device is made of rubber or silicone in the shape of a funnel with a wide round or square flange called an apron. A feature of elastic penetration is the ability to take any shape and adapt to the slope of the slope. In addition, the element is characterized by resistance to extremely low or high temperature values, and to the effects of aggressive chemicals. May have different colors.
Before purchasing an elastic penetration, it is important to accurately determine the diameter of the pipe and the color of the roofing material. The universal type model is made in the shape of a stepped pyramid, so it can be used on chimney pipes of any size. To fit the sealing element, you need to trim the penetration to the required height. To install an elastic apron, it is adjusted to the outlet of the chimney, pressed with a metal circle in which there are holes for fasteners. The joint is treated with heat-resistant sealant and fixed with self-tapping screws. If the chimney pipe is installed on a roof with steep slopes, then plastic penetrations are used, the flange of which has a given angle.
Pros and cons of homemade chimneys
A homemade chimney has a number of pros and cons. The advantages are provided mainly by independent production of components:
- Savings up to 60% of the total cost
- The ability to independently install pipes in a way that is convenient for the owner
- Possibility of independent selection of materials
The disadvantages mainly arise due to installation errors:
- Possibility of loose installation, which will cause flue gases to penetrate into the room.
- If the pipe height is chosen incorrectly, the draft may overturn, which will lead to the penetration of flue gases into the room and damage to the boiler equipment.
- An incorrectly chosen material can quickly deteriorate, which at best will lead to the replacement of a homemade chimney, at worst to damage to all boiler equipment.
But, if you follow the instructions exactly, carefully select materials and correctly calculate the height of the chimney, then no problems will arise, and independent installation will result in significant savings.
Homemade pipes
Material selection
The choice of material is determined by the operating mode of the boiler equipment, the financial budget of construction and the personal preferences of the master. There are designs from:
- Brick. Brick is the most traditional material for chimneys. The only positive quality of brick is its thermal insulation properties and thermal inertia. The rest is all downsides: some experience is required in order to create the right solution, which is dense enough not to allow gas to pass through. This pipe is large in size and difficult to connect to the boiler. Therefore, the use of brick when creating a chimney yourself is rare.
- Steel. Steel is a wonderful material. Properly selected stainless steel will be an excellent material, easy to install and affordable for self-assembly. In addition, the pipe can be made independently by welding from a sheet of metal, which will significantly save on material. The only negative is the high thermal conductivity coefficient. This means that, unlike brick or ceramics, steel requires a significant layer of insulation. In order to avoid such an unpleasant procedure, which requires some skill, you can use sandwich pipes.
- Glass. Indeed, glass pipes exist. But it’s worth saying only a few words about them, since there is practically no such product on the Russian market. Glass pipes have almost absolute gas tightness, which is why they are popular in Europe. In addition, plexiglass goes well with a minimalist interior, which allows this design to fit organically into the interior. Among the disadvantages: price, complexity of installation and heavy weight of the structure.
- Polymer. Polymer pipes bend too easily, so they are used only as sleeves laid inside brick pipes. By lining polymer pipes, you can extend the service life of an old brick chimney.
- Asbestos-cement. Asbestos-cement pipes are a cheap and easy-to-install material. But at the same time, asbestos cement has a low heat capacity, and it is much more difficult to insulate it than the same steel. In addition, despite the ease of installation, pipes are almost impossible to lay at an angle.
Asbestos-cement pipes are a cheap and easy-to-install material
Manufacturing and installation technology of a steel chimney
The manufacturing and installation technology is not particularly complex: the main thing is to avoid gaps in the manufacture of components. Or just buy ready-made ones so you don’t have to worry about a possible weld gap.
Tools and materials
Tools required to create fasteners and fit metal parts and bends:
- Rubber mallet
- Screwdriver for fastening brackets
- Screwdriver for tightening clamps on brackets
- Tape measure for measurements.
The components you will need are:
- Straight pipes
- Bends at required angles
- Insulation
- Larger diameter pipes for sleeves
- Umbrella parts
- You may need an adapter from the boiler to the chimney
- Brackets and clamps for pipe fastening
Pay attention to the grade of steel. The steel needs to be corrosion-resistant and fire-resistant. Ideally, the chimney material should be as smooth inside as possible - this will prevent the appearance of soot.
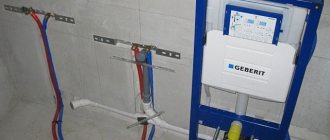
Adapters and other auxiliary elements for chimneys made of steel pipes
Calculations
You need to calculate the required volume of components using a tape measure. The length is taken along the axis of the future pipe. All bends are measured as if they were planned at 90 degrees. The missing part is then taken into account using a multiplying factor. After this, the resulting pipe length is increased by 10-20%. If you plan to use purchased bends, then the required number of turns is calculated. At this point the calculation is completed, all that remains is to correctly assemble the purchased parts.
Assembly and installation rules
Steel parts need brackets. The minimum quantity is 2. One is installed indoors and one outdoors. The brackets are installed first. Next, the pipe is installed from the boiler to the roof. The last compartment is mounted with the bolt already attached.
A little advice: it is better to finally tighten the clamps on the brackets after the entire pipe has already been installed. This will make the installation process much easier. It is also worth noting that the pipe insulation must be done immediately during the lining process. That is, you need to follow the following procedure:
- A hole is made in the fence
- A sleeve is inserted, that is, a pipe of larger diameter
- The chimney is passed through the sleeve
- The chimney compartment is connected to the previous one
- The space between the sleeve and the pipe is filled with insulation. In this case, the pipe must be located strictly in the center of the sleeve.
- Chimney installation continues.
Bracket for attaching the chimney to the wall
How to install an outlet passage through the roof
The roofing pie consists of various materials, each of them has its own degree of fire resistance. However, the rafter system in most cases is made of wood, which does not have this property.
Safe exit of the pipe through the roof is ensured by a passage box, the installation of which is carried out according to the following scheme:
- To begin with, buy or make your own metal or asbestos box, the size of which is slightly larger than the chimney. The optimal distance between the walls of the pipe and the box is at least 15 cm.
- The box is inserted into the prepared hole so that the top edge is flush with the roof slope.
- The chimney is brought out inside the box and the insulation and vapor barrier are sealed with sealant.
- The space between the pipe and the box is filled with expanded clay or stone wool.
- From the outside, an elastic penetration, a decorative apron or a metal pipe is put on the pipe.
A high-quality chimney fully complies with fire safety standards, retains moisture well and does not spoil the appearance of the roof. Compliance with all the rules when deciding how to remove the pipe from the stove through the roof helps protect the residents of the house and all property.
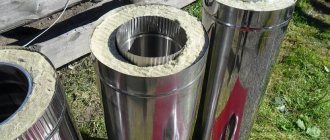
Do-it-yourself chimney from a sandwich pipe
The good thing about sandwich pipes is that you don’t need to bother with insulating the pipes and correctly installing the sleeves. Simply pass the pipe through the fence and the chimney is ready. But at the same time, it is much more difficult to make a high-quality sandwich pipe yourself, but this is also possible with some effort.
Materials for construction
The materials used are the sandwich pipes themselves and components. When purchasing, you should pay special attention to the connecting parts. If you decide to make all the consumables yourself, then the main thing is to understand the principle of manufacturing the main pipe. The step-by-step process looks like this:
- Manufacturing by welding external and internal pipes. Please note that external pipes are made of stainless steel, and internal pipes are made of galvanized steel. This is necessary in order to protect the outer surface from exposure to weather conditions, and the inner surface from the aggressive environment created by flue gases.
- The next stage is cutting out centering rings from stainless steel sheets. The rings must have an internal diameter equal to the inner pipe and an outer diameter equal to the outer pipe.
- Insulation is being laid. To do this, two centering rings are put on the inner pipe, between which a sheet of insulation is clamped.
- The outer pipe is put on the insulated inner pipe.
Homemade sandwich pipe
Manufacturing of additional parts
Bends are made using the same principle, only the length of the sections will be determined not by the width of the insulation sheets, but by the length of the straight parts of the bend.
Special attention should be paid to the connecting parts. When installing sandwich panels, it is important that the insulation layer is not interrupted. It is difficult to make a high-quality connection at home, so it is better to purchase connectors separately.
Chimney assembly and installation
The chimney is assembled according to the same principle as the installation of a steel chimney. Only when passing the fence there is no need to arrange a sleeve. That's all the differences.
Tips for installing an inner pipe
An inner pipe is a pipe that runs indoors. The problem is that sandwich pipes themselves are quite bulky and therefore do not look very appropriate in the room. If this is a technical room with a boiler, then aesthetics does not play a special role, but if these are residential premises, then it is better to make the inner pipe from steel.
Fortunately, this issue has long been considered by the manufacturer of consumables and there are special adapters from steel pipe to sandwich pipe.
Mandatory rules
Everything must be done in such a way as not to get further problems with regulatory organizations, and also to feel completely safe, and for this it is worth studying the mandatory norms and regulations for the design and operation of chimneys of heating devices. This is especially true for brick stoves and fireplaces.
A visual diagram of the basic rules for installing a chimney
- The oven must have its own foundation. This condition is important because this structure should not depend on other foundations of the house. In the event of shrinkage or other unforeseen movements of the soil, the distortion of the general foundation may lead to a violation of the masonry of not only the stove, but also the chimney. The appearance of seemingly minor and unnoticeable cracks can pose a serious threat to the health of residents.
- The blower hole must be at a height of at least ten centimeters from the floor, as it must provide a sufficient flow of oxygen, thereby ensuring normal combustion of fuel and draft in the chimney.
- For fire safety purposes, the stove must be located at least 25 centimeters from the building walls made of flammable materials. And the best option would be to insulate the walls with heat-resistant materials.
- When constructing the internal structure of the stove, where the chimney with smoke exhaust channels actually begins, it is necessary to strictly follow the layout of the rows. Blocking at least one of the channel openings can threaten the house with smoke with all the ensuing consequences.
- The stove body itself should be 35-40 centimeters below the ceiling. Next comes the chimney pipe.
- It is very important to arrange the correct cutting of the chimney passage through the attic floor. Brick protrusions should have steps seven centimeters high before entering the ceiling and after exiting the groove in the attic.
- If the attic floor is insulated with flammable insulation materials, a sand layer of at least five to seven centimeters must be laid on top of them.
- When fireproofing in the attic, the distance from the inner wall of the chimney to combustible materials must be at least 50 cm. For this purpose, the chimney skirt is laid out, which is located directly in the attic floor.
- The wall thickness of a brick chimney pipe should be 12-15 centimeters.
- If the pipe reaches the roof at a distance of more than three meters from the ridge horizontally, its height should be no more than 10 degrees in slope from the horizon. If the pipe is located at a shorter distance, it should rise above the ridge by at least half a meter.
- These rules are provided by fire safety services and must be strictly observed.
Frequent mistakes and problems when installing chimneys
Let's look at the most common problems that arise after installation. By the way, some of them arise not only when installing a chimney yourself, but also from experienced craftsmen.
- Traction overturning. This is a phenomenon in which flue gases flow back into the firebox, and through it into the room. There can be two reasons for the problem: incorrectly chosen pipe height or strong wind. In both the first and second cases, installing a deflector can help. This simplest device is installed at the upper end of the chimney and creates additional vacuum. If installing the deflector does not help, you will have to lengthen the pipe.
- Loosening of chimney pipes. This problem is especially common when installing it yourself. As mentioned earlier, any chimney needs at least 2 brackets. But some craftsmen believe that one in the room is enough, because the pipe is small. This leads to loosening of the outer part of the chimney, which can lead to damage to the entire chimney. The solution to the problem is obvious: install an additional bracket.
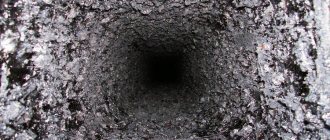
- Condensation on the chimney and nearby surfaces. This problem is especially relevant for the chimney section in the attic space, where the appearance of additional moisture threatens damage to the roof. In order to solve this issue, it is enough to arrange additional thermal insulation.
There is nothing mystical about installing a chimney. If you wish, you can save significant money by making all the consumables yourself. The main thing is to do everything efficiently and follow a clear sequence of actions.