Here you will learn:
- Single pipe systems
- Single-pipe horizontal
- Single-pipe vertical
- Scheme "Leningradka"
- Two-pipe system with bottom wiring
- Two-pipe system with top wiring
- Beam system with collectors
- With forced and natural circulation
One of the stages of building a private house is the design and creation of a heating system. This is a difficult stage, since you need to not only design the heating, but also save on materials. An important factor is that the heating created must be efficient and economical. We create heating for a private house with our own hands - you can find wiring diagrams (the most basic) in our review.
There are many schemes for laying heating pipes in private households. Some of them are combined, which allows you to increase the efficiency of the system and achieve more uniform heating throughout the house. In our review we will consider only the most basic schemes:
- single-pipe horizontal circuit;
- single-pipe vertical design;
- "Leningradka" scheme;
- two-pipe system with bottom wiring;
- two-pipe system with top wiring;
- beam system with collectors;
- schemes with forced and natural circulation.
Let's look at the features of the presented schemes, and also discuss their advantages, disadvantages and installation features.
Single pipe systems
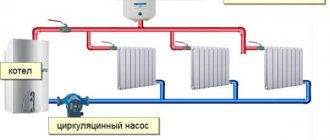
In single-pipe heating systems, the coolant passes sequentially through all radiators.
When creating heating for a private house with your own hands, the easiest way is to equip a single-pipe heating system. It has many advantages, such as cost-effective use of materials. Here we can save a lot on pipes and achieve heat delivery to every room. A single-pipe heating system provides for sequential delivery of coolant to each battery. That is, the coolant leaves the boiler, enters one battery, then another, then a third, and so on .
What happens in the last battery? Having reached the end of the heating system, the coolant turns around and is sent back to the boiler through a single pipe. What are the main advantages of such a scheme?
- Easy to install - you need to sequentially pass the coolant through the batteries and return it back.
- Minimum consumption of materials is the simplest and cheapest scheme.
- Low location of heating pipes - they can be mounted at floor level or completely lowered under the floors (this can increase the hydraulic resistance and require the use of a circulation pump).
There are also some disadvantages that you have to put up with:
- limited length of the horizontal section - no more than 30 meters;
- The farther from the boiler, the colder the radiators.
However, there are some technical tricks that can mitigate these shortcomings. For example, the length of horizontal sections can be dealt with by installing a circulation pump. It will also help make the last radiators warmer. Bypass jumpers on each radiator will also help compensate for the temperature drop. Let's now discuss certain types of single-pipe systems.
Stop warming the street!
Whether the heat exchangers will be changed during the heating restoration procedure or not, but since they will have to be removed for some time anyway, it will be much better to cut off the heat output to the outside. To do this, it is necessary to cover the wall behind the batteries with heat-insulating mats aluminized on both sides. You can read how this kind of bedding works to keep warm in the article about floor insulation; It is enough to highlight here that in a block Khrushchev building with radiators in niches, double heat shields behind the radiators are equivalent to covering the surface of the walls with 20 mm plywood.
In another option for insulating the wall behind the radiator, thermal insulation material (1) is used and
aluminum foil (2) separately.
Installing the shielding mat is simple: we cut holes in it for the hooks of the battery suspension, apply thin “sausages” of repair silicone or mounting glue using an “envelope” to the side adjacent to the wall, put it on the hooks and press it to the wall.
Mandatory requirement: the mat must be organic, made from synthetic or real fibers. The use of open mineral wool mats in residential premises is prohibited - it is detrimental to health.
Single-pipe horizontal
The simplest version of a single-pipe horizontal heating system with a bottom connection.
When creating a heating system for a private house with your own hands, a single-pipe wiring diagram may turn out to be the most profitable and cheapest. It is equally suitable for both one-story and two-story houses. In the case of a one-story house, it looks very simple - the radiators are connected in series - in order to ensure consistent flow of coolant . After the last radiator, the coolant is sent through a solid return pipe to the boiler.
Advantages and disadvantages of the scheme
First, we will look at the main advantages of the scheme:
- ease of implementation;
- excellent option for small houses;
- saving of materials.
A single-pipe horizontal heating circuit is an excellent option for small spaces with a minimum number of rooms.
The scheme is really very simple and understandable, so even a beginner can handle its implementation. It provides for a serial connection of all installed radiators. This is an ideal heating layout for a small private house . For example, if this is a one-room or two-room house, then “fencing” a more complex two-pipe system does not make much sense.
Looking at the photo of such a circuit, we can note that the return pipe here is solid, it does not pass through the radiators. Therefore, this scheme is more economical in terms of material consumption. If you don’t have extra money, this type of wiring will be the most optimal for you - it will save money and allow you to provide heat to your home.
As for the shortcomings, there are few of them. The main disadvantage is that the last radiator in the house will be colder than the very first one. This is due to the sequential passage of the coolant through the batteries, where it releases the accumulated heat into the atmosphere. Another disadvantage of a single-pipe horizontal circuit is that if one battery fails, the entire system will have to be turned off at once.
Despite certain disadvantages, this heating scheme continues to be used in many small private houses.
Features of installation of a single-pipe horizontal system
When creating water heating for a private house with your own hands, the scheme with single-pipe horizontal wiring will be the easiest to implement. During the installation process, it is necessary to mount the heating radiators, and then connect them with pipe sections. After connecting the very last radiator, it is necessary to turn the system in the opposite direction - it is advisable that the outlet pipe runs along the opposite wall.
A single-pipe horizontal heating circuit can also be used in two-story houses; each floor here is connected in parallel.
The larger your home, the more windows it has and the more radiators it has. Accordingly, heat losses also increase, as a result of which the last rooms become noticeably cooler. You can compensate for the temperature drop by increasing the number of sections on the latest radiators . But it is best to install a system with bypasses or with forced circulation of the coolant - we will talk about this a little later.
A similar heating scheme can be used to heat two-story houses. To do this, two chains of radiators are created (on the first and second floors), which are connected in parallel to each other. There is only one return pipe in this battery connection diagram; it starts from the last radiator on the first floor. The return pipe coming down from the second floor is also connected there.
Single-pipe vertical
How else can you heat two-story households with a single-pipe system? There really is an alternative - this is a single-pipe vertical heating system, which is used by many people who are looking for a suitable steam heating scheme in a private home. There are no difficulties in such a scheme; you just need to bring the supply pipe with the coolant to the second floor and connect the batteries located there, and then make branches down to the first floor .
Advantages and disadvantages of a single-pipe vertical scheme
As usual, let's start with the positive features:
In single-pipe vertical heating systems, the coolant flows from the radiator on the top floor to the lower floors.
- greater savings on materials;
- relatively equal air temperature on the first and second floors;
- ease of implementation.
The list of disadvantages is the same as the previous scheme. It included heat losses on the last radiators. And since our coolant is supplied through the upper floor, it can be cooler on the first floor than on the second .
The savings on materials are more than substantial. We only have one pipe going upstairs, from which the coolant is distributed to all the radiators on the second floor (not sequentially). From each upper radiator, pipes go down to the radiators on the ground floor, after which they end up in one common return pipe. Thus, this scheme involves minimal use of materials.
Features of installation of a single-pipe vertical system
When installing a vertical single-pipe system, you will receive as many chains as there are radiators on each floor.
In the previous gas heating scheme in a private house, the pipes sequentially bypassed the radiators on the first and second floors. That is, we got two parallel chains, each of which included several radiators . In the current scheme we also have chains, but they are vertical. For example, if there are four radiators on each floor, then we get four chains connected in parallel.
This scheme assumes one solid supply pipe passing along the top floor. Branches are made from it to each radiator. After passing through the upper radiators, the coolant flows to the lower radiators, and only after that into the return pipe passing along the first floor.
If in the first case the greatest heat losses were observed in the distant radiators of the first and second floors, then in this scheme it will be cooler on the first floor, since part of the heat will be consumed on the second floor.
A single-pipe vertical heating scheme for a private house with a gas boiler can be implemented without forced circulation of the coolant. The thing is that the temperature of the coolant supplied to the radiators on the second floor is the same. A drop in temperature is observed only on the first floor. But if we supplement the radiators with bypass jumpers, then the temperature change will be minimal - it can be neglected.
Thus, this circuit, supplemented by bypass jumpers, will become the most economical and inexpensive among any other circuits. Instead of a gas boiler, any other boiler can be used. The electric heating circuit of a private house is no different from gas heating (except in the type of boiler).
Cost of installation of polypropylene pipes
Prices depend on the contractor, region, complexity and volume of work. In some cases, bargaining is possible.
How much does it cost to install heating from polypropylene pipes:
- Boiler - from 5 to 20 thousand rubles.
- Pump - from 3 thousand rubles.
- Boiler, water heater - 4-7 thousand rubles. (depending on volume).
- Radiator, convector - 2-3 thousand rubles.
- Manifold cabinet - 2.5-4 thousand rubles. (depending on whether it is external or built-in).
- Thermostats - 500-1,000 rubles.
- Valves, taps - 300 rubles.
- Pipe laying - 150-300 rubles (per linear meter).
- Soldering - 350 rubles (per unit). Read Izovol on our website.
Scheme "Leningradka"
The Leningradka heating system is an improved single-pipe system.
Both considered schemes have one common drawback - a drop in temperature in the last radiators. In the case of a horizontal circuit, we have cold radiators in horizontal chains, and in the case of a vertical circuit, in vertical chains. That is, in the latter case it is the entire first floor.
The Leningradka heating circuit in a private house allows you to compensate for the cooling of the coolant when passing through the next radiator . How is it implemented? This circuit provides bypass jumpers located under the batteries. What do they give? The jumpers allow you to direct part of the coolant bypassing the radiators, so the coolant at the outlet is as warm as at the inlet (minor deviations can be neglected).
Advantages and disadvantages of the Leningradka scheme
Leningradka promotes more uniform heating of rooms.
Each scheme has its own advantages and disadvantages. What are the advantages of the Leningradka scheme?
- More even heat distribution throughout the house.
- Relatively simple upgrade.
- Possibility of adjusting the temperature in individual rooms (as in two-pipe systems).
Single-pipe heating is not perfect, so the Leningradka scheme allows you to compensate for some of its shortcomings. But she has negative features:
- limited length of the line - if there are many radiators in a horizontal chain, then there will still be losses ;
- the need to use large diameter pipes for more uniform heat distribution.
The last drawback can be eliminated by installing a circulation pump in the system.
Features of installation of "Leningradka"
Connection options for Leningradka in a single-pipe vertical circuit.
When creating heating systems for private houses with their own hands, many people actively use the Leningradka scheme. How is it laid? To create a circuit, it is necessary to place radiators and lay a pipe under them, from which branches are made to the inlets and outlets of the radiators. That is, a jumper is formed under each radiator. In addition, we can install three taps on each radiator - the first two taps are installed at the inputs and outputs, and the third is installed on the jumper itself. What does this give?
- Taps can be used to regulate the temperature in individual rooms.
- The ability to exclude any radiator without shutting down the entire system (for example, if one radiator is leaking and needs to be replaced).
Thus, the “Leningradka” scheme is the optimal scheme for small one-story and two-story houses - you can save on materials and achieve uniform heat distribution throughout the rooms.
Advantages of polypropylene pipes
Installation of heating from polypropylene pipes is considered one of the cheapest ways to arrange a system, since the price of work and materials is quite affordable. Polypropylene is also not inferior, and sometimes even superior, in quality to other materials. The service life of pipes of almost any class is 50 years, provided they are used in standard (according to GOST) conditions.
Advantages:
- Light weight. Facilitates work and also reduces the load on supporting structures.
- Durability.
- Smooth walls prevent blockages from forming.
- The cost is one of the lowest among heating systems.
- Elasticity - will not burst when the water inside freezes.
- Resistance to high temperatures, which allows them to be used in a number of heating systems.
- No stray currents.
- Easy to install. The cost of welding (soldering) equipment is quite low.
- Soundproofing. You can't hear water hammer or water movement.
- Low thermal conductivity. Allows you to do without insulation.
- Aesthetics. They look neat.
Among the disadvantages, elasticity can be noted: unlike pipes made of cross-linked polyethylene, these cannot be bent; the bending angle is possible only within the framework of existing fittings.
Another feature is the large linear expansion, which makes it difficult to use in closed versions, that is, in walls, and also necessitates the use of expansion joints in open ones. In simple words: when heated, pipes expand, which can lead to both deformation of the wall material and breaks in the pipe itself.
Two-pipe system with bottom wiring
Next, we will consider two-pipe systems, characterized by the fact that they ensure uniform heat distribution even throughout the largest households with many rooms. It is the two-pipe system that is used for heating multi-storey buildings, in which there are a lot of apartments and non-residential premises - here this scheme works great . We will consider schemes for private houses.
Two-pipe heating system with bottom wiring.
A two-pipe heating system consists of supply and return pipes. Radiators are installed between them - the radiator inlet is connected to the supply pipe, and the outlet is connected to the return pipe. What does this give?
- Uniform heat distribution throughout the rooms.
- Possibility of adjusting the temperature in the rooms by completely or partially closing individual radiators.
- Possibility of heating multi-storey private houses.
There are two main types of two-pipe systems - with bottom and top wiring. First, we will look at a two-pipe system with bottom wiring.
Bottom wiring is used in many private homes, as it makes heating less visible. The supply and return pipes pass here next to each other, under the radiators or even in the floors. Air is removed through special Mayevsky taps. Heating schemes in a private house made of polypropylene most often provide for just such wiring.
Advantages and disadvantages of a two-pipe system with bottom wiring
When installing heating with bottom wiring, we can hide the pipes in the floor.
Let's see what positive features two-pipe systems with bottom wiring have.
- Possibility of masking pipes.
- The ability to use radiators with bottom connections makes installation somewhat easier.
- Heat losses are minimized.
The opportunity to at least partially make heating less visible attracts many people. In the case of bottom wiring, we get two parallel pipes running flush with the floor . If desired, they can be placed under the floors, having provided for this possibility at the stage of designing the heating system and developing a project for the construction of a private house.
If you use radiators with bottom connections, it becomes possible to almost completely hide all the pipes in the floors - the radiators are connected here using special units.
As for the disadvantages, they are the need for regular manual removal of air and the need to use a circulation pump.
Features of installing a two-pipe system with bottom wiring
Plastic fasteners for heating pipes of different diameters.
In order to install a heating system according to this scheme, it is necessary to lay supply and return pipes throughout the house. For these purposes, there is a special plastic fastener on sale. If radiators with a side connection are used, we make a branch from the supply pipe to the upper side hole, and take the coolant through the lower side hole, directing it to the return pipe. We install air vents next to each radiator. The boiler in this scheme is installed at the lowest point.
It uses a diagonal connection of radiators, which increases their heat transfer. Bottom connection of radiators reduces thermal output.
This circuit is most often made closed, using a sealed expansion tank . The pressure in the system is created using a circulation pump. If you need to heat a two-story private house, we lay pipes on the upper and lower floors, after which we create a parallel connection of both floors to the heating boiler.
DIY installation
In private homes, installation is often done independently. To do this, you need to draw up a project, acquire the necessary materials and tools.
Drafting
The project is essentially a master plan and a guide to action. Allows you to determine in a timely manner what materials and in what quantities will be needed.
During the development process it is necessary to consider:
- type and number of pipes and manifolds;
- number of pumps and filters;
- number of water points;
- volume of the water heater and expansion tank;
- the location of all elements of the system, the distance between them.
In order to determine the dimensions, you will need a drawing of all rooms and, if necessary, sections of the external part of the structure. The project is drawn up on a single scale.
Required tools and materials
In accordance with the project, materials and their quantities are determined.
Basic:
- tubes;
- fitting;
- shut-off valves, valves;
- radiators;
- expansion tank;
- pump.
In addition, you will need materials for fastening and finishing, that is, various kinds of hardware, clamps, as well as construction primers, putties, and solutions.
You will need two sets of tools: for fastening to the walls and for connecting the system elements. The first set will depend on the materials of the walls, the need to sew up pipes and the degree of readiness of the premises.
Common construction tools:
- perforator, drill;
- Bulgarian;
- roulette, level;
- hammer;
- screwdriver (screwdriver).
Connection tools depend on how they are installed. For welding you will need a soldering iron and nozzles. To connect fittings, radiators and other elements, you will need adjustable wrenches.
Pipeline installation
The pipeline is one of the most important elements of the entire system. It must also be displayed in the project.
Installation sequence:
- Marking.
- Installation of fasteners, clamps, gutters.
- Connecting areas.
- Insertion of fittings, valves.
- Installation to radiators.
Two-pipe system with top wiring
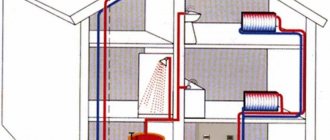
In a two-pipe heating system with overhead wiring, the expansion tank is placed at the highest point.
This two-pipe scheme is very similar to the previous one, only here it is provided for the installation of an expansion tank at the very top of the system, for example, in an insulated attic or under the ceiling . From there, the coolant goes down to the radiators, gives them part of its heat, and then is sent through the return pipe to the heating boiler.
Why is such a scheme needed? It is optimal in multi-storey buildings with a large number of radiators. Thanks to this, more uniform heating is achieved, and there is no need to install a large number of air vents - the air will be removed through the expansion tank or through a separate bleeder that is part of the safety group.
Advantages and disadvantages of a two-pipe system with top wiring
There are a lot of positive features:
- it is possible to heat multi-storey buildings;
- saving on air vents;
- you can create a system with natural coolant circulation.
There are also some disadvantages:
Using vertical wiring will lead to additional difficulties when installing hidden heating.
- pipes are visible everywhere - this scheme is not suitable for interiors with expensive finishing, where elements of heating systems are usually hidden ;
- in tall buildings it is necessary to resort to forced circulation of the coolant.
Despite the disadvantages, the scheme remains quite popular and widespread.
Features of installation of two-pipe systems with top wiring
This scheme eliminates the need to locate the heating boiler at the lowest point. Immediately after the boiler, the supply pipe is diverted upward, and an expansion tank is installed at the highest point. Coolant is supplied to the radiators from above, so a lateral or diagonal radiator connection scheme is used here. After this, the cooled coolant is sent to the return pipe.
Price for 1m2 of work
It is difficult to independently take into account all the nuances and correctly install the heating network around the house. It is much better to entrust this work to specialists who will offer the best option and a set of additional equipment. Based on experience, designers and installers are able to correctly place emphasis depending on the customer’s wishes: to provide heating with maximum efficiency and ease of use, or to strive to save money on work and installation.
The cost of the work includes separate installation of the boiler, connection of additional equipment, pipe routing and installation of radiators. Each item has its own price list, according to which the cost of all work on equipping the heating system in the house is calculated.
| Type of work | units | Cost, rub. |
| Installation of a heating boiler with a power of up to 50 kW | PC. | 12000-20000 |
| Installation of a boiler with a power of over 50 kW | PC. | 25000-50000 |
| Security group installation | PC. | from 1500 |
| Expansion tank | PC. | from 2000 |
| Circulation pump | PC. | from 2000 |
| Installation and connection of the comb (collector) | PC. | from 1500 |
| Pipe routing D16-25 | linear meters | 60-85 |
| Pipe routing D32-40 | linear meters | 75-90 |
| Pipe routing D55-63 | linear meters | 90-120 |
| Pipe routing D75-110 | linear meters | 100-150 |
| Installation and connection of the radiator | PC. | 2000-5000 |
| Installing a thermostat | PC. | 500 |
| Pressure testing according to the requirements of the boiler equipment manufacturer | from 4500 | |
| Commissioning works | from 3500 |
Routing pipes from the boiler to the radiators can average 300-500 rubles per linear meter, taking into account laying, connection, passage and wall grooves. Prices are indicative for Moscow and the region.
Beam system with collectors
Radiant heating system using a collector.
This is one of the most modern schemes, which involves laying an individual line to each heating device . To do this, collectors are installed in the system - one collector is the supply, and the other is the return. Separate straight pipes diverge from the collectors to the batteries. This scheme allows for flexible adjustment of heating system parameters. It also makes it possible to connect heated floors to the system.
The radial wiring diagram is actively used in modern homes. The supply and return pipes here can be laid in any way - most often they go in the floors, after which they are suitable for one or another heating device. To regulate the temperature and turn on/off heating appliances, small distribution cabinets are installed in the house.
According to heating engineers, this scheme is ideal, since each heating device operates from its own mains and is almost independent of other heating devices.
Advantages and disadvantages of beam systems
There are many positive qualities:
- the ability to completely hide all pipes in the walls and floors;
- convenient system setup;
- possibility of creating remote separate adjustment;
- minimum number of connections - they are grouped in distribution cabinets;
- it is convenient to repair individual elements without interrupting the operation of the entire system;
- almost perfect heat distribution.
When installing a radiant heating system, all pipes are hidden in the floor, and the collectors are hidden in a special cabinet.
There are also a couple of disadvantages:
- high cost of the system - this includes the costs of equipment and installation costs;
- difficulty in implementing the scheme in an already built house - usually this scheme is laid out at the stage of creating a home ownership project .
If you still have to put up with the first drawback, then there is no escape from the second.
Features of installation of radiant heating systems
At the project creation stage, niches are provided for laying heating pipes, and installation points for distribution cabinets are indicated. At a certain stage of construction, pipes are laid, cabinets with collectors are installed, heating devices and boilers are installed, a test run of the system is carried out and it is checked for leaks. It is best to entrust all this work to professionals, since this scheme is the most complex.
Despite its complexity, a radiant heating system with collectors is one of the most convenient and efficient. It is used not only in private homes, but also in other buildings, for example, in offices.
Optimization of heating pipelines using insulation
Thermal insulation of heating pipelines
The service life without repairs is affected not only by the correctly calculated diameter of heating pipelines, but also by the adaptation of the pipeline to its operating conditions. Most often, heating pipelines are thermally insulated.
This precaution is necessary to protect the pipes from external influences. They can also be expressed as follows:
- Negative ambient temperature . During crystallization, the water in the line will begin to expand, destroying it. Correctly selected insulation thickness of heating pipelines will protect against this. It is best to use thermal heating cables with it;
- The appearance of condensation . The temperature difference between the heating and the environment can lead to increased humidity on the pipes. This negatively affects their condition - especially for metal surfaces. To eliminate this, you can choose a small thickness of insulation for heating pipelines - up to 8 mm.
Taking into account these requirements for heating pipelines, it can be decided that it will be problematic to carry out work on calculating the selection of materials and their installation independently. It is important to draw up a primary diagram, which should be entrusted to professionals. Installation issues can be resolved on your own by studying the specifics and getting your hands on small sections of the pipeline.
How to choose heating pipes? This issue can be resolved by watching the video:
With forced and natural circulation
All the schemes presented above can be created on the basis of heating boilers of any type. For example, a stove heating scheme for a private house is built on the basis of a wood or coal stove, and pipe routing can be carried out according to almost any of the schemes described above. True, it would not hurt to add forced circulation to many of them. What is it for?
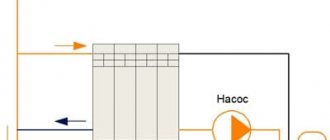
The main difference between a system with forced circulation of coolant and a system with natural circulation is the circulation pump.
As we remember, single-pipe heating systems are characterized by a decrease in coolant temperature as it moves away from the boiler - part of the heat remains in the radiators. These losses are partially compensated by the Leningradka scheme, but in some cases this is not enough. In order to correct the situation, a circulation pump is installed in the heating system, providing forced circulation of the coolant .
Forced circulation is also necessary in many other schemes, including two-pipe ones. The thing is that the small diameter of modern polypropylene pipes, numerous connections and turns create hydraulic resistance. In addition, the use of forced ventilation allows for faster heating of households.
Advantages and disadvantages of forced and natural circulation
Each system has its own advantages and disadvantages:
When heating a room with a large number of radiators, a circulation pump is simply necessary.
- natural circulation is simpler and cheaper - there are no costs for circulation pumps;
- forced circulation makes it possible to improve heating performance in large buildings - in some cases you can get by with natural circulation, but then the system warm-up time increases;
- forced circulation is characterized by a slight hum – natural circulation is completely silent.
That is, everything has its advantages and disadvantages.
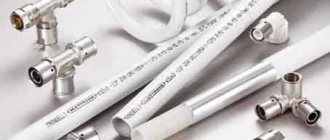
Which pipes to use
Almost all polypropylene products are suitable for cold water supply, but with hot water the situation is somewhat different.
In order to use pipes for the delivery of drinking water, they must have a certificate of conformity. For hot water supply, first and second class hoses are used with operating temperatures up to 70 degrees. For heating and arrangement of heated floors, special products are used that have reinforcing and anti-diffusion (protecting against oxygen access) layers.
The pipes are marked accordingly.
It is necessary to take into account some features. For example, polymers are not used when connecting to solid fuel boilers. At least one and a half meters of the initial supply and return sections must be made of copper or steel pipes.
Prices for polypropylene pipes from different manufacturers
polypropylene pipes
How to choose the right diameter
To accurately select the diameter, a hydraulic calculation of the system is required, however, in houses up to 250 m² you can do without it.
The diameter directly depends on the total power of the radiators, and it should be understood that different sections of pipes serve part of the system, and not its entirety, so the supply often has a smaller diameter than the connection and return pipes.
For accurate balancing, it is still necessary to use a hydraulic calculation, with the help of which the diameter and length of different sections, as well as the radiator valves and circulation pump are selected.
As a result of the calculation, the following data is obtained:
- coolant flow for the entire system, kg/s;
- pressure loss in the system;
- pressure loss from the boiler (pump) to each radiator.
The coolant flow rate is equal to the ratio of the heat loss of the building to the product of the heat capacity of water and the temperature difference between the boiler supply and return.
The speed of movement of the coolant is equal to the ratio of the flow rate through a section of pipe (kg/s) to the product of the density of water and the cross-sectional area of the pipe in square meters.
The pressure loss is equal to the product of the specific friction losses in the pipe and the length of the pipe section. Friction information should be provided in the manufacturer's reference literature.
Resistance losses on fittings, fittings, and equipment are also calculated. The coefficient is indicated by the manufacturer of each fitting. To calculate, the coefficient is multiplied with the density and speed squared, divided by two.
As a result, the resistances of all sections are summed up and compared with the control value.
If independent calculation is difficult, contact a specialist.