Often the concept of “heating” is associated with cast iron radiators, which used to be in every apartment.
Such radiators took a long time to warm up, but kept the house warm for a long time, and, in general, they functioned quite well, the only negative by and large is their unsightly appearance. With the advent of new materials and technologies, everything has changed. Nowadays, a worthy replacement for old heating radiators has become a heated floor system, for which the heating line is installed in the floor. Today, all new buildings are equipped with such floor structures.
Having decided to lay heating pipes in the floor under a screed, you need to decide what type of pipes will work reliably for a long period. This decision at first glance seems quite simple, but practice shows that it depends on many factors.
We also suggest that you read the article - how to choose a heated floor for tiles, where we will look in detail at what types of heated floors there are, their pros and cons, and how to install them.
Correct placement of heating pipes on the floor
Having decided to lay heating pipes in the floor under a screed, you need to decide what type of pipes will work reliably for a long period. This decision at first glance seems quite simple, but practice shows that it depends on many factors.
We also suggest that you read the article - how to choose a heated floor for tiles, where we will look in detail at what types of heated floors there are, their pros and cons, and how to install them.
Principle of operation
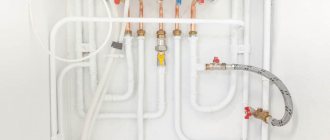
The principle of operation of a water heated floor system: a system of pipelines through which the coolant is supplied is laid in the screed. Warm pipelines heat the screed, the screed transfers heat to the floor covering, and the covering transfers heat to the room. The floor under the furniture is not heated.
Such a heating system creates a favorable temperature distribution over height and helps save the amount of heat consumed (and finances) compared to a radiator system.
With a conventional heating scheme, warm air from the radiators rises to the ceiling, heats it, and only then heats the room - with the convection method, the energy loss for heating the ceiling, walls and windows (batteries are installed under them) is quite large.
It is especially effective to use lower heating in a house if there is second light or high ceilings - in this case, savings increase, according to some data, even up to 50%.
The principle of operation of “warm floor”
Why is laying heating pipes in a screed called the right choice? After all, there is an easier way out - replacing the batteries.
Yes, this is easier to do, but it does not mean it is more effective than this installation, because no one has yet canceled the laws of physics. The operating principle of heating systems is completely different. Traditional heating radiators give off heat.
It then passes along the walls to the ceiling area. It turns out that it is the ceiling zone that warms up first.
Afterwards, the air moves to the lower region, but it gets here already cold. Thus, the following situation arises - in the ceiling area it is warmer, but below the temperature is much lower. The same applies to the convection principle.
But installing underfloor heating changes everything. The maximum heat is located at the bottom, and then, when it cools, it moves to the top. This principle of heat distribution greatly increases the comfort of housing. Accordingly, such a system seems to be the most effective.
Why do pipes in the floor need to be insulated?
Pipes in the floor must first of all be isolated from dynamic mechanical influences when people move and static loads from furniture standing on top.
Although heating wiring is not installed under the furniture, there will still be chairs, dining tables, tables, ottomans, flowers and other easily movable pieces of furniture on top.
Communications in the screed must be thermally insulated from below so that heat is not wasted on useless heating of the floor structures.
It is necessary to distinguish between the laying of a low-temperature underfloor heating pipeline in the floor and the laying of heating pipelines. Heating has a temperature of 70-80-90°C, communications with this temperature strongly heat the floor and screed, causing a temperature difference - this can cause cracking of the screed and concrete structures. Therefore, heating with high temperatures should be insulated.
Connecting a heated floor to a riser
Another technical solution in choosing the connection point is to tap directly into the heating risers (one-pipe and two-pipe schemes). Connection is carried out in 4 ways:
- Parallel;
- Consistently;
- With and without bypass organization;
- With and without installing a valve on the bypass.
It is recommended to always install a bypass line, regardless of the connection type. The bypass will allow you to easily turn off the floors during depressurization, without disrupting the operating mode of the heating riser.
Taps and valves on bypasses are prohibited by management companies. In case of illegal installation, it still makes sense to install the faucet - this will allow for a small adjustment in the amount of coolant passing through the riser pipeline and through the contours of the floors.
Advantages of closed installation
There are many advantages to a closed floor heating system:
- The main advantage is that a correctly installed and well-functioning system creates ideally comfortable conditions in the room: the air above the floor is very warm, the air near the head is warm, and cooler near the ceiling. Parents of small children will especially appreciate this method of heating their homes.
- The second advantage is efficiency - the coolant temperature is lower, heat is consumed more efficiently, the living area of the room is heated - windows, walls, ceilings, air under the ceiling, and the floor under the furniture do not heat up. With a ceiling height of 2.5 m, the savings are about 15-20%, with higher ceilings or second light – sometimes reaching 50%. Quite expensive installation of pipelines pays for itself in several years.
- Durability - a water heated floor system will last about 30-40-50 years (depending on the material. Copper structures will last 100 years). Floor heating operates at a low temperature and low pressure - therefore, all pipelines and collectors operate in a gentle mode and wear out less.
- Easy to install. The only difficulty is in the design work.
- Easy to use.
- The screed has a high thermal inertia - the room slowly cools down when the heating is turned off.
- Saves space indoors.
- Saves the housewife's cleaning efforts.
- The warm floor is not noticeable - and radiators with wiring usually disrupt the design of the room.
- The system is quite easy to combine with an existing radiator system.
- You can only heat floors in separate rooms - children's rooms, bathrooms.
- In the presence of radiators and constant convection, there is quite a lot of suspended dust in the air; when heated from below, such strong convection does not occur, there is less dust in the air - this is especially important for allergy sufferers and asthmatics.
Schemes for installing heated floors where its use is prohibited
Let's take a little look at the schemes that make it possible to install heated floors directly in the apartment.
Cheap and cheerful
Scheme of an unregulated heated water floor
Here we will consider the option of installing heated floors, where it is prohibited to install water heated floors. To use this scheme, it is necessary to use a very weak pump (Flow rate - 5-10 l/min, pipeline - 16mm, pipeline length - no more than 70 meters). This scheme has one drawback - such floors are practically not adjustable. Also, if there are small heat losses from the floor, you can end up with very cold radiators.
Scheme with balancing adjustment
Scheme of a heated water floor manually regulated by a balancing valve.
The installation diagram of a heated water floor shows a balancing valve, thanks to which the flow rate in the heated water floor is reduced, which means it is possible to reduce the temperature of these floors. In order to reduce the temperature of the water heated floor, you need to open the balancing valve to the appropriate pass.
Reducing the influence of heat consumption
“K2” is a three-way valve with a temperature-sensitive mechanism. It gives a constantly unchanged temperature at point “3”. In other words, if your hydronic floor heating consumes a large amount of energy, then it creates a greater likelihood of causing almost cold water to flow into the riser. Which, in turn, can cool the radiators along the riser in neighboring apartments.
Scheme of a warm water floor with a three-way valve
Such a three-way valve can be purchased at specialized plumbing supply stores. It is called: “Mechanical 3-way mixing valve for water supply with thermostat.” That is, we need the presented valve in automatic mode in order to regulate the temperature regime of the hot water flow in the warm water floor circuit of the apartment.
Three-way valve
In the presented diagram, you need to adjust the tap so that at point “3” there is a warm, very high temperature. But if the warm floor from central heating heats very little, you can lower the temperature of the valve, thereby increasing heat loss in the warm floor. Here, to regulate the floor temperature, you can use balancing valves “K1” and “K2”. If it suddenly turns out that the radiator begins to cool below the set temperature, then the temperature will not penetrate your heated floor. The circulation in the warm floor will simply stop.
Scheme for discerning consumers
Diagram of a water heated floor with a three-way valve and bypass balancing unit
K1” - bypass balancing valve. “K2” and “K3” are three-way valves connected differently. The “KZ” valve is used to stabilize the temperature of underfloor heating from central heating using the return temperature method from the circuit. It is this scheme that allows you to make the so-called “climate control”. If your room gets hot, it will reduce the flow of hot water in the floor heating circuit, accordingly reducing the release of heat energy into the room. The warmer the room, the faster the hot water passes through the circuit and cools less and reaches the temperature-sensitive element - the three-way valve, which, in turn, does not allow liquid to flow at a very significant pace.
Heating pipes in the floor under the screed for wiring in a new building: how to install heating yourself
Often the concept of “heating” is associated with cast iron radiators, which used to be in every apartment.
Such radiators took a long time to warm up, but kept the house warm for a long time, and, in general, they functioned quite well, the only negative by and large is their unsightly appearance. With the advent of new materials and technologies, everything has changed.
Nowadays, a worthy replacement for old heating radiators has become a heated floor system, for which the heating line is installed in the floor. Today, all new buildings are equipped with such floor structures.
Having decided to lay heating pipes in the floor under a screed, you need to decide what type of pipes will work reliably for a long period. This decision at first glance seems quite simple, but practice shows that it depends on many factors.
We also suggest that you read the article - how to choose a heated floor for tiles, where we will look in detail at what types of heated floors there are, their pros and cons, and how to install them.
Disadvantages of placing heating pipes in the floor
Disadvantages of the "warm floor" heating system:
Heating pipes in the floor: pros, cons and features
Today, one of the ways of transferring thermal energy that is considered when installing a room heating system is the use of liquid coolants. This could be water, antifreeze, antifreeze. The heated liquid transfers heat to pipes and radiators, which, when heated, increase the air temperature in the room.
Heating pipes are usually installed in the following ways:
- Open method. This includes the classic heating scheme in a house or apartment, which consists of a riser (vertical pipes, their number can reach 8 pieces per entrance in apartment buildings), a heating radiator (the number depends on the area of the room), as well as taps, fittings, pipe fastenings and radiators. The pipeline is located along the walls and connects the riser and radiators.
- Closed method. This involves laying a heating pipeline in the walls or floor. The pipes can be connected either to radiators located above the floor level or located completely below its surface. The closed supply of pipes to radiators is more of an aesthetic nature and does not affect the temperature in the room due to their small area.
Let us dwell on the closed method and consider its advantages and disadvantages.
Positive aspects of closed installation
Uniform heating and economic benefits . These specifications only apply to a radiatorless system that is completely hidden in the floor.
In this case, the heated air rises from the floor . The highest temperature is in the lower part of the room. The area where the person is located is heated, which is economically beneficial in comparison with the classical scheme. As the air rises, it cools down, which is beneficial for the body. It is generally accepted that your feet should be kept warm and your head cold.
Also, in order to save money, you can install a heat meter and pay heating bills according to its readings.
This installation is relevant only for modern buildings in which horizontal distribution of the heating system is used, when pipes disperse from one central riser to apartments.
In buildings with vertical wiring, you will have to install meters on each radiator. In this situation, installation is associated with high costs and is rarely implemented in practice.
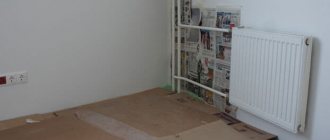
The absence of radiators , although slightly, increases the area of the room. Frees up additional space for furniture. The room benefits from its appearance. There is no need to hide risers and pipes running along the walls.
If only the pipes are hidden in the floor and the radiators remain on the walls, the effect of the closed arrangement will be slightly less.
The floor temperature with completely enclosed installation is always above zero . It is pleasant to walk on it, children can play on the floor without the risk of getting sick. Can be disabled if necessary.
Disadvantages of placing heating pipes in the floor
If you need to make a hole in the floor, for example, to install wooden structures, difficulties may arise. Work must be carried out carefully to avoid damaging the heating pipes. To eliminate such situations, after laying the pipes, a diagram of their location should be drawn up.
Difficulties associated with possible repairs can become an obstacle to laying pipes in the floor.
It is not easy to detect leaks in closed installations . Its first sign is wet spots on the floor. They can go unnoticed under the topcoat for a long time.
The diameter of the stains varies depending on the time of detection and the size of the hole in the pipe. If their size is large enough, it is difficult to detect a leak.
When there are no obvious signs, a leak in the system can be noticed by a drop in pressure (pressure gauge readings) or wet walls and leaks on the ceiling of the lower floor.
After detecting a coolant leak, a rather labor-intensive process awaits. It is necessary to remove part of the finishing coating, carefully open the defect site, install a coupling or replace part of the pipe.
After this, the repair area is filled with mortar again. And yet, after the manipulations done, there remains a risk of leakage, because the system now has a detachable connection.
Therefore, it is advisable to replace the entire circuit.
When repairing pipes laid under a wooden covering, the process is not so labor-intensive, although the finishing coating will still have to be removed.
The possibility of replacement without opening applies, as a rule, to flexible pipes (cross-linked polyethylene, metal-plastic) and is only suitable for radial wiring, that is, when a pair of pipes approaches each radiator from the collector.
- Higher cost compared to traditional installation scheme. Costs will increase 5-10 times. The final price will depend on the cost of the material and the work performed.
- The thermal power obtained only by heating the floor is limited and without wall heaters it may not be enough to heat the room. Will the pipes under the floor heat up the entire room? How effective is its thermal insulation? Is the heating temperature sufficient only from the pipes in the floor if outside the window it is 40-50 degrees below zero? These questions should be answered before installation.
Also, the disadvantages of installation using a closed method include an increase in floor height from 8 to 13 cm and the difficulty of installation in rooms where people already live (you will have to completely clear the space from furniture).
Choosing the placement of pipes in the floor
The temperature in a house, apartment or other room in most cases affects the comfortable living conditions in it. The choice of the correct and reliable heating system can only be made with a detailed consideration of all aspects of the issue.
If the choice is made in favor of a closed system, you should pay attention to the following:
- When installing, you should choose equipment from a reliable manufacturer. Savings may result in problems with operation and repair in the future.
- Before installation, the floor is waterproofed, and a damper tape is laid along the wall to compensate for expansion when heated.
- The length of the contour should not exceed 100 meters.
- There should be no fittings in a closed area (screed, wooden floor).
Compliance with these conditions will help to avoid additional costs and problems with the operation of the heating system.
Convector device
Strictly speaking, there are only three main parts of a floor convector: a housing, a heating element with fins, and a decorative and protective grille. For more efficient heat transfer, a fan is built in - this is the fourth part. Fans usually run on reduced voltage - 24 V or 12 V, so they need a step-down transformer to operate. Pay attention to this. In most cases, it comes “built-in” into the case, but there are those that must have an external voltage converter and to which a reduced voltage must be supplied.
Radiator installation in the floor
Let's briefly look at the main components. They determine the main cost of a built-in convector. If your budget is unlimited, you can simply choose the most expensive German equipment. If you need to choose good quality radiators and have a reasonable budget, you will have to understand the details.
Frame
The body of the in-floor heating radiator is a rectangular metal box. It could be from:
- aluminum;
- of stainless steel;
- galvanized steel.
The best choice is galvanized steel, although sellers claim that stainless steel is better. She's better, of course. Nobody argues. But heating with convectors with a stainless steel body will be very expensive. Good galvanization does its job perfectly. Yes, cement is an active substance that accelerates the oxidation of metals. But during installation, the housing is usually protected with a film or other type of waterproofing, which at the same time protects against the action of cement. So this is not a problem at all.
Installation diagram for a floor-mounted radiator
And one more point - aesthetic. Many people install heating in the floor because it is invisible. So here it is. Devices whose bodies are coated with black paint on the inside attract less attention. All other parts of the convector are also painted black or covered with black shields.
A heating element
In water convectors, the heating element is presented in the form of a copper tube with plates attached to it to increase heat transfer. The tube is bent in the shape of a U. The plates are most often made of aluminum. They are pressed around the pipe. The more tightly they “sit”, the better the heat will be dissipated.
The heating element looks almost the same for everyone: it is a copper tube with heat-dissipating plates
The plates and the method of connection with the copper tube are subject to improvement by each manufacturer. Some make the plates ribbed. This increases the heat exchange area. The direction and shape of the grooves - even these little things become the target of research.
There is one catch in the way the plates are attached. Sometimes the plates are simply installed and then painted. It turns out that the paint is the binder between the tube through which the coolant flows and the fins. But this contact becomes worse over time, which leads to a drop in thermal capacity. How to determine how the plates are attached? Try to loosen them. If you manage to move it, don’t take it. Normally fixed ones do not move even with considerable effort.
Decorative lattice
In principle, the grille is not only decorative, but also functional. Can be made of metal, wood. When calculating heating costs, keep in mind that prices for imported convectors are usually given without taking into account the cost of grilles. That is, you buy additional grilles separately. This seems to be not bad - you can buy it at any company, but the price for them is very high - from $80 per meter of length. What if you need three meters, and what if there is more than one such convector?
It is the grille that defines the appearance. Many manufacturers sell the device without it
Batteries for installation in the floor of domestic manufacturers include the cost of the grille as standard. If you want to replace it, you need to negotiate.
In an attempt to save money, we are looking for cheaper grilles. But they usually come with strips that are installed at significant intervals. The view is no longer the same. It's cheaper though. Yes.
Laying heating pipes on the floor
| Type of work | Unit. | Cost, rub |
| Laying out water supply/heating pipes (metal plastic) | Water socket | From 950 rub. |
| Dismantling of water supply/heating pipes (plastic metal) | Water socket | From 450 rub. |
| Replacement of water supply/heating pipes (plastic metal) | Water socket | From 1400 rub. |
| Layout of water supply/heating pipes (polypropylene) | Water socket | From 850 rub. |
| Dismantling of water supply/heating pipes (polypropylene) | Water socket | From 350 rub. |
| Replacement of water supply/heating pipes (polypropylene) | Water socket | From 1200 rub. |
| Layout of water supply/heating pipes Rehau (Rehay) | Water socket | From 1900 rub. |
| Dismantling of water supply/heating pipes Rehay (Rehay) | Water socket | From 900 rub. |
| Replacing water supply/heating pipes Rehau (Rehay) | Water socket | From 2800 rub. |
| Installation of water supply/heating pipes (copper) | Water socket | From 2300 rub. |
| Dismantling of water supply/heating pipes (copper) | Water socket | From 1100 rub. |
| Replacement of water supply/heating pipes (copper) | Water socket | From 3400 rub. |
| Layout of sewer pipes (depending on diameter) | M.p. | From 750 rub. |
| Dismantling sewer pipes (depending on diameter) | M.p. | From 350 rub. |
| Replacement of sewer pipes (depending on diameter) | M.p. | From 1100 rub. |
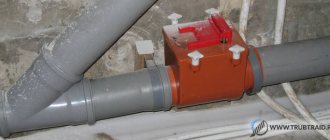
| Connection of sewer pipe with riser | From 650 rub. | |
| Installation of a drain pipe bed D=50mm | M.p. | 650 rub. |
| Dismantling the drain pipe bed D=50mm | M.p. | 250 rub. |
| Replacing the drain pipe bed D=50mm | M.p. | 900 rub. |
| Installation of a drain pipe bed D=100mm | M.p. | 750 rub. |
| Dismantling the drain pipe bed D=100mm | M.p. | 350 rub. |
| Replacement of a drain pipe bed D=100mm | M.p. | From 1100 rub. |
| Installation of a drain pipe bed D=110mm | M.p. | 850 rub. |
| Dismantling the drain pipe bed D=110mm | M.p. | 450 rub. |
| Replacing the drain pipe bed D=110mm | M.p. | 1300 rub. |
| Installation of a drain pipe bed D=150mm | M.p. | 950 rub. |
| Dismantling the drain pipe bed D=150mm | M.p. | 550 rub. |
| Replacing the drain pipe bed D=150mm | M.p. | 1500 rub. |
| Installation of a drain pipe riser D=110mm | M.p. | 1250 rub. |
| Dismantling the drain pipe riser D=110mm | M.p. | 650 rub. |
| Replacing the drain pipe riser D=110mm | M.p. | 1900 rub. |
| Installation of a fan tee D=110mm | M.p | 1150 rub. |
| Dismantling the drain tee D=110 | M.p. | 550 rub. |
| Replacing the fan tee D=110 | M.p. | 1700 rub. |
| Thread cutting (D=1/2) | PC. | 500 rub. |
| Thread cutting (D=3/4) | PC. | 600 rub. |
| Thread cutting (D=1 or more) | PC. | From 700 rub. |
| Installation of shut-off valve (dismantling/installation) | PC. | 500/1000 rub. |
Laying heating pipes in an apartment along the floor is a modern wiring scheme that is gradually gaining popularity. The San-Remo company provides this service on favorable terms, and our clients are not only owners of apartments in new buildings, but also those people who are renovating their old apartment.
Features of the distribution of heating pipes on the floor
Today, not everyone realizes the advantages of laying pipes in the floor screed going to the radiators from the boiler or central pipeline. In fact, this installation option has its advantages:
- Simplifying the task of installing a heat meter. When heating is implemented through risers, this is not always possible.
- If necessary, you can turn off the heating at any time or adjust it to achieve a comfortable microclimate.
- Pipelines laid in a concrete screed in the floor last longer.
- Pipes laid in the floor warm it up a little, creating additional comfort.
- Important advantages include the absence of unflattering boners.
The main thing with such a distribution of heating pipes in the floor is to be careful when installing thresholds or drilling screeds to solve other problems (for example, installing built-in cabinets or installing a toilet).
How to order a service?
You can find out the cost of services for laying heating pipes on the floor and immediately call a specialist at the San-Remo company. Our employees have extensive experience and the necessary equipment to solve this problem.
The surveyor travels to any address to inspect the facility, assess the scope of work and calculate the cost of wiring and the cost of materials. The specialist draws up a suitable scheme taking into account specific conditions, and also advises the customer on any issues. Each of our clients is satisfied with the end result.
We provide our clients with good discounts:
- 5% when ordering services up to RUB 15,000.
- 8% when ordering work with a total cost of 15,000 to 20,000 rubles.
- 10% when ordering services in the amount of 20,000 rubles.
- 10% for pensioners, disabled people, WWII or Labor Veterans.
- 5% when submitting an application through the online form.
All about heating pipes in the floor
Heating in an apartment or private house is, of course, a plus, but the absence of the latter is a minus that cannot be tolerated. However, any heating system, with the exception of those formed from electrical appliances, includes a coolant transmission element - a pipe.
Warm floor
The appearance of the pipeline can hardly be called aesthetic, so home owners take every opportunity to hide it from view.
- Open - the pipeline is laid along the perimeter of the room from radiator to radiator. This is a traditional solution, but far from the most profitable. Firstly, this method involves a lot of fastenings, which is quite expensive. Secondly, if plastic heating pipes are used, then some of the fasteners will not be rigid to compensate: this has an extremely negative effect on the appearance. Thirdly, the formation of a collector type of wiring is completely excluded, since it is simply difficult to place such a quantity of pipeline in an apartment.
- Hidden in the wall - to install heating it is necessary to groove the walls. This is hard and dirty work. It is also necessary to provide thermal insulation, since in this case the heat from the heating pipes is transferred to the wall material and is not used to heat the room. However, the method allows you to hide the most complex communications from view and removes the issue of compensating for thermal expansion.
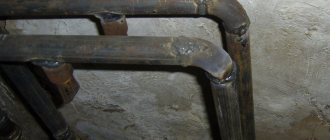
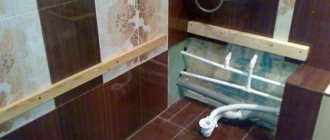
- Hidden installation in the floor has its pros and cons. There is usually no need for gating, although this method is also used in new buildings. An advantage can be considered the lack of insulation - it is enough to protect the pipeline with plastic corrugation. The dissipated heat will be transferred to the floor material, that is, it is still used for heating in the apartment. The disadvantage is the need to somehow provide access to the joints in case of repairs and for routine inspection. The photo shows the working moment of laying in the floor.
Floor structure
In a new building, the floor is most often a reinforced concrete interfloor ceiling. Which means installing heating in the floor only if a concrete screed is being constructed.
In a private house and an old apartment, you can find another solution: a floor on joists. In this case, the pipeline is placed under the coating without any problems. A definite plus is access for repairs and inspection. No less advantageous is the ability to use any types of water pipelines.
It is worth noting that according to SNiP, only a metal pipeline can be installed to the heating point.
Rolled metal products: pros and cons
When installing heating systems, steel water conduits are used - black or galvanized. The latter are much more protected from corrosion and are characterized by a smooth inner surface: over time, the working diameter practically does not change. In a new building, the connection to the central heating is made using black steel pipes.
Advantages:
- high strength;
- resistance to pressure drops and water hammer;
- very low expansion coefficient;
- durability.
Flaws:
- steel heating pipes are laid only in a straight line; fittings are used to form bends;
- galvanized products retain their qualities only with a threaded connection, since welding destroys the zinc layer;
- installation in the floor under a concrete screed requires the same safety measures as when using plastic products.
Metal-plastic heating pipes
Walling them up in concrete is also unacceptable. SNiP describes installation in the floor as follows: a metal-plastic pipe is placed in a metal sleeve of a larger diameter, and then the system is mounted. This provides space for expansion. Judging by user reviews, this technology is not always followed.
Advantages:
- less weight, and therefore easier installation;
- high operating temperature - +95 C;
- possibility of laying at an angle without additional connecting elements.
Flaws:
- high price;
- When installing into the floor, only press fittings should be used. Compression quickly loses their tightness;
- The docking points must remain accessible for inspection.
Plastic reinforced pipeline
The most common options today, judging by reviews, are polypropylene water pipes and heating pipes made of cross-linked polyethylene. The latter can withstand coolant temperatures up to +110 C. Installation of risers from polymer water conduits according to SNiP is not recommended.
Fiber or glass fiber reinforcement significantly reduces the coefficient of thermal expansion. With hidden installation, changes that do occur are perceived by the floor material and have no effect. The pros and cons of the products are:
- Can be installed under any floor;
- the pipeline is flexible, installation is carried out along the most complex contour;
- does not require thermal insulation;
- the material is dielectric and does not require additional maintenance.
Flaws:
Installation of floor heating convectors
Correct installation of duct convectors is preceded by preparatory work with the floor. It is necessary to make a niche where the heating devices will be installed. It is best to do this at the repair stage.
Built-in convector
The dimensions of the niche should be 5-10 cm larger than the dimensions of the heating device. This is necessary for the normal connection of the heating radiator after it is installed in the floor. An additional layer of thermal insulation is installed. To protect the decorative surface, it is recommended to form a niche using concrete pouring.
At this stage, pipes should be installed in order to later connect to the radiator. They are installed on the floor, taking into account possible thermal expansion. For extended sections of the main line, it is necessary to install compensation thermal loops.
The further installation steps are as follows.
- Installation of heat-reflecting material. This will help improve convection and reduce heat loss.
- Installing the heating convector tray into the floor. If there is none, a substrate made of heat-resistant material is installed. The radiator should not hang.
- Connecting pipes to the heating system. It is important to select the correct adapters to ensure a reliable and durable connection.
- Installation of decorative grille.
After the final installation of the heating in the floor, a test run of the system is performed. It is first necessary to perform pressure testing. The coolant temperature should be increased gradually. The same applies to pressure. At this stage, the absence of leaks in the water heat supply to the floor is checked with your own hands, and the operating modes of the thermostats are set.
One of the common mistakes when installing convectors without a tray is filling the niche with construction foam. Its pressure can lead to deformation of the structure.
Heating pipes under screed. Which ones can I use?
Properly selected pipes have a long service life. Such products rarely corrode and do not cause difficulties during installation. In order for the heating pipes in the screed to perform all functions, it is necessary to follow the work recommendations and first create an action plan.
Reasons for using a screed
Heating pipes can be laid indoors using open or closed methods. A closed method is often used, when the pipes are hidden in a screed and filled with concrete. Such actions are carried out for the following reasons:
- aesthetic appearance. Pipes hidden in the screed make the room more neat and spacious;
- there is no risk of burns, since the air temperature in the heating device is high, there is a risk of injury;
- the service life of pipes increases. Since no damage occurs during operation;
- communications do not accumulate dust in the room;
- the room retains heat for a long period;
In the event of a breakdown, it is necessary to chisel the wall to get to the damage site. The work is complex and requires financial investment.
The best pipes for screed
For installation in a screed, heating pipes are selected depending on the size of the room and individual preferences. Varieties of materials have their own advantages and disadvantages that must be taken into account.
Pipes must be selected according to the following criteria:
- long service period. Construction is a painstaking and expensive process; saving on material is not recommended. Choose materials that will last for a long period;
- strength of the material. Durable material avoids the risk of pipe damage due to mechanical stress;
- heat transfer level. The criterion is of particular importance. Since the temperature in the room and the integrity of the material depend on the level of heat transfer;
- possible bending angle. When laying pipes, it is necessary to avoid frequent breaks and cuts, so the material must bend well and be plastic. Often, when bent, pipes develop cracks, which subsequently leak and require replacement;
- no risk of expansion. Material that has a high level of expansion is not used for installation in screeds.
When choosing a material, it is necessary to take into account possible harm to human health. Preference is given to materials that consist of environmentally friendly raw materials and do not emit harmful substances into the air.
Polyethylene PEX
The material is durable and has a long service life. Unlike other types of pipes, cross-linked polyethylene can withstand not only high temperatures, but also low temperatures. Compliance with installation rules contributes to a long service life of the product.
Advantages of the material:
- withstand high temperatures;
- withstand high pressure;
- it is not damaged by impacts or other mechanical influences;
- the material is resistant to corrosion;
- a light weight;
- at high temperatures the material does not expand.
The disadvantages of such pipes include cost, especially if the material is purchased for large premises.
Metal-plastic
Metal-plastic pipes are often used for heating devices. This is primarily due to the affordable cost and long service life. Such pipes rarely corrode. The inner surface is treated with a special substance for a smooth structure, so deposits and debris very rarely accumulate in metal-plastic pipes.
Advantages:
- durable material;
- 3 levels of damage protection;
- long service period;
- suitable for wall mounting or as underfloor heating;
- The pipe diameter is selected depending on personal preference.
The disadvantages of pipes include inconvenient installation. For fastening it is necessary to use a welding method. Another disadvantage of this type of pipe is that at high temperatures the material can change its shape.
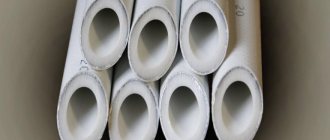
PPR (polypropylene pipes)
Pipes can be used for any purpose, including the installation of heating devices. Such pipes are produced in different colors, however, the quality of the material is generally the same.
The material does not corrode even after prolonged use. PPR can withstand high pressure up to 150 bar.
The material is affordable and can be purchased at almost any hardware store.
Advantages:
- high quality material;
- affordable price;
- simple installation;
- can be purchased at any hardware store;
- light weight;
- simple installation;
- high resistance to corrosion;
- pipes do not emit harmful substances, so the material is safe for human health.
Flaws:
- During the installation process, it is necessary to use a soldering machine to make connections. After installation, a large number of joints remain. If the temperature is incorrectly set, the joints are destroyed;
- During maintenance, care must be taken not to damage the pipes.
Pipes cannot withstand too high temperatures and often melt and crack.
Which pipes cannot be hidden in a screed?
When laying heating pipes in a screed, all criteria must be taken into account so that the device lasts a long period. It is not recommended to use vapor-permeable products.
Also, overly rigid products are not used, which can cause difficulties during the installation process. It is not recommended to use metal pipes and plastic products for screeding. The metal is subject to corrosion and will last a short period.
Plastic is not designed to withstand stress and may crack.
Features of pipe laying
The process of laying heating pipes under a floor screed is not complicated, however, it is necessary to take into account all the nuances and draw up a detailed work plan. During the work process, the following features must be taken into account:
- Before starting work, you must carefully level the surface. The presence of irregularities can cause difficulties during the installation of building materials;
- Avoid joints and cut-ins whenever possible. In order for the structure to be integral, it is recommended to use pipe bends and special corners;
- before starting pipe laying, it is necessary to draw up a diagram according to which the work will be carried out;
- fastening is carried out using special strips with holes. Such tools protect the pipe from damage;
- pipes must be laid in a monolithic section;
- Often several types of materials are used in pipe laying. Therefore, having finished laying the pipes, it is necessary to install reinforced ties that will hold the soft pipes together;
- For additional fixation, special clips and paper clips are used.
Often, during the process of laying pipes under the screed, specialists lay the pipes directly into the insulation. This makes the installation process easier.
Insulation
The thermal insulation layer is important during the pipe installation process. Expanded polystyrene is used as insulation. This material preserves the body well and will last for a long period without reducing its characteristics. The insulation layer must be laid before installing the pipes.
After the polystyrene foam is laid, grooves are made in accordance with the diameter of the pipe. Pipes are laid in these grooves. It is necessary to take into account that the insulation should be several cm thick. 1 cm is considered the minimum, but often such insulation is not enough.
Leak test
During the pipe laying process, it is very important to check all material for defects. Despite the fact that many manufacturers who produce goods provide a quality guarantee, there is a high risk of encountering defects. It is very difficult to see such a defect, so after screeding, problems often appear that require additional costs.
You can check for leaks using the following methods:
- pressure testing with water. In order to check the tightness, it is necessary to fill all pipes with water and bleed off excess air. Leave the pipes under pressure for several hours. In case of defective pipes or poor quality material, a leak will occur. If there are even the slightest cracks, the pipe in this area must be replaced. Otherwise, the leak will increase, and it will be necessary to completely change the entire structure;
- air pressure testing. This method is used if it is not possible to supply water under pressure. To do this, you need to close all the taps and use a compressor to circulate air under pressure. If there are cracks or damage, the air will be released.
In order to check the tightness of the structure, you can use special devices. However, such devices have a high cost. Therefore, if in the future a person does not plan to install pipes, purchasing such a device is not advisable.
First start
Upon completion of the installation of the heated floor, we carry out the first start-up; for this, the pipeline should be thoroughly rinsed with water, and the pressure in the system should be at maximum. After which, this water must be drained and the system must be purged with a compressor.
Then the circuit is filled with working coolant; if there are several loops, they are filled in turn. In this case, the air from the pipeline must be completely squeezed out through the air vent.
To create pressure in the system, the pump is turned on for a short time, this promotes the movement of the coolant, which displaces the remaining air pockets. The process should be repeated (add water and turn on the pump) until the system is completely filled.
You need to start a heated floor starting from a minimum temperature of 20 degrees. Every day add 5 degrees until you reach the working level - +40. After which, the thermostat should be set in design mode.