What material is best to choose pipe rolling materials from?
To install water floors, you can use products from the following materials:
- copper;
- cross-linked or linear polyethylene;
- combinations of aluminum and polyethylene or polypropylene;
- composite of polyethylene and polyvinylethylene (fiberglass).
Copper pipeline has the best characteristics. It has the highest level of thermal output, is very durable and does not corrode. However, copper products are expensive and additional equipment is required for their installation. In addition, such a system must be protected from alkali.
The best option is to choose polyethylene products for installing heated floors. It can be cross-linked (PE-X) or linear (PE-RT).
Product advantages:
- High level of thermal conductivity.
- Long wear resistance.
- Increased flexibility.
- The inner walls are smooth, so they become clogged with deposits very slowly.
- The material does not corrode.
- It can withstand repeated freezing of the coolant.
- Self-installation of such network elements is simple, since their proper installation does not require the use of special tools and devices.
PE-XA is the most reliable. This material has the highest cross-linking density (85%). Thanks to this, it has a pronounced “memory” effect. In other words, after thermal expansion, network elements always return to their original state. This makes it possible to use the axial type of fittings with sliding rings; they can be embedded in the screed without any problems.
PE-RT analogues do not have the “memory” phenomenon. Because of this, only collet-type fittings are used with them. It is forbidden to wall them up. However, when the contours of the system are laid in solid sections, then all connections will be only on the collector. In this case, the use of PE-RT is justified.
Manufacturers also make pipes for water floors from composites. In this case, the top and bottom layers are made of polyethylene, with aluminum foil (PE-X-Al-PE-X or PE-RT-Al-PE-RT) glued between them. The metal reinforces the elements of a warm water floor and serves as a barrier to oxygen.
The disadvantage of aluminum plastic is that it is heterogeneous. Different degrees of thermal expansion of metal and polymer can lead to delamination of the material.
Based on this, the best choice would be polyvinylethylene reinforced polyethylene (EVOH) products. It significantly reduces the penetration of oxygen into the water coolant through the pipe walls. This reinforcement can be a top covering or located between layers of polyethylene. The second option is more preferable.
Water heated floors can be laid from pipes of the following sizes:
- 16×2;
- 17×2;
- 20x2 mm.
What flooring is suitable for heated floors?
A big mistake is made by those who plan to lay parquet or thick wooden flooring on a warm floor. Wood is a poor conductor of heat and will prevent the room from heating up.
The efficiency of such heating may be even lower than that of radiator heating, and heating costs may be too high.
The ideal covering for heated floors is stone, ceramic or porcelain tiles. Once heated, it will keep warm perfectly, and this is the best option for the kitchen or bathroom. Children love to play in rooms where the floor is warm, and walking barefoot there is more pleasant than on wooden parquet.
A slightly worse flooring option, but more suitable for a guest room or bedroom, is linoleum and laminate. These materials transmit heat well and will not reduce the efficiency of water heating. In this case, the laminate should be chosen with a minimum thickness, and linoleum should be chosen without an insulating backing.
Important! When heated, many synthetic materials can emit harmful fumes.
Therefore, floor coverings with chemical components must have a manufacturer’s mark indicating the possibility of their use in residential premises on heated floors.
How to calculate the footage of elements for assembling a system?
Before installing them, it is necessary to calculate water floors. For this purpose, a system diagram with water circuits is drawn up. What to consider when calculating:
- There is no need to install pipes where furniture, floor equipment, or equipment will be located.
The length of contours with a cross section of 16 mm should not be more than 100 m. The length of 20 mm pipes for installing a heated floor should not exceed 120 m. Otherwise, the pressure in the heating network will be weak. Therefore, each circuit should be located on an area of no more than 15 m².
- The difference between their lengths should be no more than 15 m. In other words, they should be made approximately the same length. The voluminous room should be divided into several heating branches.
- The optimal pitch for laying water heated floor pipes is 15 cm if effective thermal insulation is used. In harsh climates and frequent frosts from -20º and below, the gap between the coils at the external walls is reduced to 10 cm.
- With gaps of 15 cm between pipes, their costs are approximately 6.7 m per 1 m² of floor area. When installed in increments of 10 cm - 10 m.
What needs to be done before installation?
Proper installation of a warm water floor requires careful preparatory work. During their course, all the little things must be taken into account, on which the effective functioning of the structure will subsequently depend:
It is best to entrust the design of the future system to specialists, since it is quite difficult to make independent calculations.
It will be necessary to determine the length of the pipe, the pitch of its installation and the power of the heating circuit, if there are several of them, then for each separately. In this case, many nuances and parameters are taken into account. There are special calculation programs that many people use.
However, you need to understand that a flaw in the calculations will lead to a decrease in efficiency or simply the impossibility of functioning of the entire system. Equipment for heated floors must be of high quality, manufactured and purchased from a reliable company that offers good guarantees. It will be cheaper to pay for a quality product than to subsequently constantly shell out decent sums for expensive and labor-intensive repairs. To minimize the thermal load on the screed and prevent it from cracking, the system should be divided into sections of no more than 40 square meters. m. The base for heated floors must be carefully prepared.
It must be clean and level, differences of more than 5 mm are not allowed. To prevent heat loss, a heat-insulating layer must be spread on the prepared base, with a height of 3 to 15 cm, depending on the operating temperature of the coolant. This could be special heat-insulating materials or mats designed for warm water floors. The latter can be equipped with pipe mounts, so-called bosses, which is very convenient.
A damper tape is laid around the perimeter of the room and between the installation areas, which can compensate for temperature fluctuations of the screed.
Mats with bosses designed for water heated floors are very comfortable. They not only act as a heat insulator, but also secure the pipes in place
When drawing up a laying scheme, you need to avoid a large number of pipe joints, which carry the potential danger of leaks under the floor. It is best to arrange the safest option, where connections are present only at the outlet and inlet of the collector. In this case, the length of the solid pipe should not be more than 90 m, otherwise the temperature of the circulating coolant may drop.
Installation diagrams for water heated floors
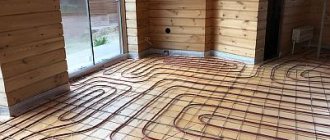
The layout of the heated floor pipe can be made using a “snake”, “snail” or a combination.
Laying a water circuit with a snake is the simplest. It is carried out in loops. This installation scheme is optimal in a room divided into functional zones in which it is planned to use different temperature regimes.
When the first loop is mounted around the perimeter of the room, and a single snake is launched inside it, then half the area will be sufficiently heated by hot water. In another part of the room, the cooled coolant will circulate. Therefore, it will be cool in it.
Another variation of this scheme is used - a double snake. With it, the supply and return water branches run side by side throughout the room.
The third variation of this scheme is the distribution of turns using an angular snake. It is used in corner rooms when two walls are external.
The coils of the snake can be installed evenly. However, the bends of the water loops in this case will be very curved.
The advantage of the scheme is that the layout of the heated floor pipe with a snake is simple. It is easy to plan and install.
Minuses:
- temperature difference in one room;
- the pipeline bends are excessively sharp, which can lead to kinks if the laying step is small.
Installing a water floor with a snail is also called a “shell” or “spiral”. With this scheme, the supply and return branches are mounted across the entire area of the room and run in a spiral parallel to each other. Installation is carried out from the perimeter of the walls to the middle of the room.
The supply branch in the center of the room ends with a loop. From it, a return line is installed in parallel with your own hands and runs from the middle of the room along its perimeter further to the collector. When there is a cold external wall in the room, a double snail can be laid along it (features of the scheme, pros and cons).
Laying heated floor pipes with a snail has the following advantages:
- The room warms up evenly.
- The hydraulic resistance in the system is low.
- Installing a shell requires less material consumption than snakes.
- The bends of the turns are smooth, thanks to this the step between the turns can be made smaller.
The disadvantage of the snail is complex planning and labor-intensive installation.
Not all rooms have a rectangular configuration, and the room may also have two external cold walls. To keep it warm there, you can use combined laying of contours with your own hands.
To make the room warmer along the outer walls, loops of supply pipes are placed there. It is best to mount them almost at an angle of 90º to each other.
Types of heated floors
Today there are three main types of underfloor heating systems:
- water;
- electric;
- infrared.
A water heated floor operates on the basis of water pipes, which are laid directly under the finished floor covering. The source of the coolant is hot water from the heating system (less often, from a separate heating device - boiler and boiler). For installation and connection of pipes, metal-plastic and plastic pipes are used, which are connected to the heating outlet pipeline.
Electric underfloor heating is based on the so-called. heating cable. By passing current through itself, the wire converts its energy into heat due to the high resistivity of the conductor. Any cable is not suitable for installing an electric heated floor - you need a special wire with a conductor of the required thickness, as well as with good insulation.
Infrared heated floors are the rarest variety. It is installed on the basis of special roll films, in which special heating elements are built-in. When exposed to current, they produce infrared radiation, generating heat.
Attention! The most popular and widespread type of underfloor heating system is water. It differs from other varieties in its maximum power and heating temperature range and ease of use. Using devices for automating work - temperature sensors, thermostats - you can flexibly set the temperature regime of the system.
Next, we will talk specifically about the water type of heated floor, which is most often preferred, because... it is much easier to connect pipes to an existing heating system in a house or apartment.
We recommend that you read: Types and applications of double-wall corrugated pipes
Installation methods for heated water floors
Methods for laying pipes for a warm water floor are divided into concrete and flooring.
In the first case, the heating network is immured in a layer of screed. This method requires a lot of labor and time. The drying period depends on the thickness of the concrete coating. Only after the concrete has fully gained strength (about 28 days) can the floor covering be installed on it.
With the laying method, ready-made materials are used. Due to the absence of wet work, such installation of a heated floor with your own hands is quick. However, the cost of arranging the system increases, since the necessary materials are not cheap. With the laying method, the following is used as a base:
- polystyrene insulation;
- wooden modular or slatted panels.
We assemble and integrate heated floors into the heating system
Options for arranging a water heated floor with your own hands: the equipment you will need, options for laying pipes, materials and a step-by-step work plan.
Heating with heated floors has many advantages compared to other types of heating: saving free space, saving resources, absence of drafts, healthy climate in the house.
In addition, water systems are integrated into heating, where alternative energy sources are used: heat pumps, solar panels, condensing boilers.
Before you decide to install a water heated floor yourself, find out from your housing and communal services office what permits you will need, and whether it is even possible to install water heating in the floor in your home with the existing heating system. If permits have been received, you can begin work.
PIPES. The optimal diameter of pipes for a water system is 2 cm. Materials: reinforced (“cross-linked”) polyethylene or multilayer (metalized), preferably with an anti-oxygen coating.
Pipes made of synthetic materials are preferable because they are easier to install, smooth inside and do not provoke electrochemical corrosion. Calculating the pipe footage is quite simple: with a pitch between pipes of 20 cm, 5 linear meters of pipe will be required per 1 m^2 of heated area. The maximum continuous length of the “loop” in the system is 80-120 m.
Also keep in mind that near the enclosing (external) walls and windows at a distance of a meter, the pipes are laid more densely (10-15 cm).
Also take into account the future location of the furniture: if the plan is to install a stationary cabinet, then you should not install heating underneath it. Important parameters: permissible maximum and operating temperatures of the coolant, operating pressure. Recommended parameters: +100° C, 10 bar (± 1 bar)
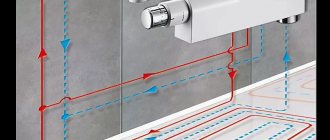
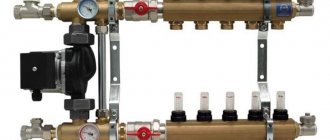
COLLECTOR. The key element of the underfloor heating system.
Some manufacturers offer ready-assembled manifolds and wall cabinets included. If you decide to install a water heated floor system yourself, this is the best option. All you need to know is the number of inlets and outlets of the water floor pipes to purchase the right model.
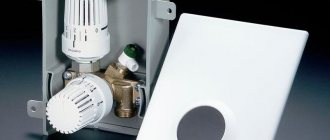
Modern models of control manifolds are equipped with pumps, thermostats, pressure stabilizers and allow you to connect several heating devices that require different coolant temperatures.
THERMAL INSULATION. A layer of thermal insulation is required for heated floors. Under the heating pipeline, you can lay end-to-end dense foam plastic with a thickness of 5 cm, thermal insulation film or thermal insulation boards of various configurations (with pipe clamps, markings, etc.) with a waterproofing coating.
If you decide to use polystyrene foam, then it must be covered on top with plastic film (waterproofing). Thermal insulation prevents heat loss to the floor (ceiling). The required area is equal to the area of the room in which the pipes are laid.
You will also need fittings for connecting pipes to the collector, reinforcing metal mesh (3-5 cm cells) for pouring screed, pipe fasteners, keys, damper tape (its length is equal to the perimeter of the room).
INSTALLATION OF WATER HEATED FLOOR WITH YOUR HANDS
The surface on which the underfloor heating pipeline will be laid must be flat, without slopes or holes. In order to obtain a high-quality surface, you can use self-leveling compounds for filling.
The collector is mounted on the wall.
The wall surface must be strictly vertical, and the distributor itself must be hung and leveled relative to the horizontal using a water or laser level. Any deviation along the axes means future difficulties and failures in the system. A damper tape is glued around the perimeter of the room at floor level.
Thermal insulation is being installed. If the thermal insulation does not have fasteners for pipes, strips with pipe locks are installed every 50 cm.
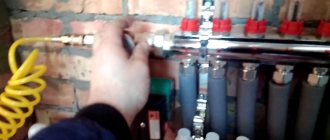
Pipes are laid according to the diagram. During installation, try not to bend them. The pipes are connected to the manifold with fittings. The manifold is connected to the system and a test run is carried out.
During startup, the temperature and pressure are gradually increased over several (minimum four) hours. If there are no leaks, testing is carried out at the maximum permissible (pressure test) pressure.
If you are not a professional plumber, you should entrust the connection of the collector to the system to a licensed technician. After testing the system, a reinforcing mesh is laid over the pipes, and the pipeline system is filled with screed. The higher the power of the system, the thicker the screed layer and vice versa.
The composition for the screed must contain special additives for heated floors, or purchase a ready-made dry mixture for the screed marked “for water heated floors.”
You need to pour the mixture from the edges to the center of the room. Some craftsmen fill the screed with the floor heating system turned on at minimum (20-23°).
The screed dries completely in at least three weeks. After this, the heated floor is started again at the minimum temperature for several hours. After the screed has dried, the flooring can be laid.
Check the surface humidity - it should be between 2% and 4%. Adhesive coatings are glued to special heat-resistant adhesives. When laying stone or ceramic tiles, remember that the thicker the layer of adhesive mixture, the longer it will take for the floor to heat up.
Assembling a water heated floor with your own hands is quite a responsible job. The efficiency and durability of the system depends on the quality of all work at each stage. If you want to be confident in the quality of the work and get a guarantee for it, then you can use plumbers (or craftsmen who will be recommended to you by the sellers of the collector) to connect the collector, and lay the pipes and pour the screed yourself - this saves you half the cost of the work.
DIY water heated floor
Traditional radiators, for many years considered the only possible source of heat, are gradually giving way to systems of warm floors and ceilings. Many people experience innovative methods and are very satisfied. However, heated floors can hardly be called an innovation.
They have proven themselves well and become a fairly common heating method. Such systems can run on electricity or use hot water energy. According to experts, a water heated floor is considered the most effective and practical to assemble with your own hands, but it is quite possible to assemble it if desired.
Installation of circuits on profile heat-insulating mats
This option for arranging a floor heating system is the easiest.
Polystyrene insulation boards are used here as the basis for the water floor. These laying mats have dimensions of 30x100x3 cm. They are equipped with grooves and low posts. The heated floor pipes are snapped into these fasteners with your own hands. The finishing coating is laid on them. This method does not necessarily require the use of a concrete screed. When floor tiles or linoleum are used as a finishing coating, GVL slabs must first be laid on the base. The thickness of the sheets must be at least 2 cm.
Lightweight heated floors for wooden floors
As mentioned earlier, a light heated floor without a concrete pad is installed for wooden floors. In this case, the sequence of work may differ slightly depending on the condition of the old floor and the design of the ceiling.
To prevent heat from escaping downwards, insulation is placed under the pipes. It can be placed between the floor joists, and then it is better to use mineral wool, or it can be laid on an old durable subfloor - here you will need polystyrene foam with a density of 25-35 kg/cub.m. To prevent condensation from forming, a vapor barrier membrane is placed under the mineral wool. The first subfloor is placed on top of the joists.
Just as for a concrete floor, it is advisable to lay a heat-reflecting screen made of foil or foam foam on the insulation. All joints and seams must be sealed with tape.
The logs are laid directly on the polystyrene foam, to which the subfloor boards are nailed.
There should be gaps of about 2 cm between the boards for laying the pipe. Similar gaps must be provided at the ends of the subfloor boards. Otherwise, you will have to choose transverse grooves for the pipe, and this can lead to breakage of the boards.
To ensure that heat is evenly distributed across the floor, the pipe is placed not just in grooves, but in special metal gutters designed for this purpose.
The metal transfers heat over its entire surface and evenly heats the final finish. Recommendations for its choice have already been given above - it can be a laminate with permission to work with heating or a hard polymer coating. Thick parquet and parquet boards are the least suitable for heated floors.
Compared to concrete heated floors, lightweight construction is much faster and costs significantly less. Another advantage is the ability to repair water pipes in the event of an accident. Problems with tubes in a concrete floor can only be eliminated by completely replacing it.
The main disadvantage of a wooden heated floor is its significantly lower thermal power.
Advice! It is possible to supply heated floors from the heating of apartment buildings only with the permission of the heat energy supplier. All recommendations remain in force, although we personally recommend installing a heat-resistant water filter at the pipe inlet.
Properly equipped warmth in your own home is another step towards comfortable and convenient living conditions for the whole family. But, even if you are not able to complete these works and are forced to invite craftsmen, the knowledge gained will allow you to take an active part in this process.
Well, now it's time to finish the article. All the material I wanted to share has been reviewed. I hope it will be useful to you, and you will use it if you need to lay a pipe for a heated floor with your own hands. Improve your own practical skills and gain new knowledge, as they say: “It’s never too late to learn!” That's all, thank you for your attention, successful and easy repair!
Modular and slatted types of warm water floors
Such systems are most often used in wooden houses.
Pipe laying is carried out on a rough floor base or on logs. The modular system uses ready-made chipboard panels for laying pipes. Their thickness is 2.2 cm. The modules have channels for fastening aluminum plates and pipes. Insulation with this installation method is mounted in a wooden ceiling.
The strips are installed at intervals of 2 cm. Based on the pitch between the pipes, strips 15-30 cm long and wide are used:
- 13;
- 18;
- 28 cm.
To prevent heat loss, the plates are equipped with pipe latches. If the final floor covering is linoleum (see which linoleum and which warm floor is best to choose, instructions on how to install), one layer of GVLV slabs should be laid on the pipes. When the finishing cladding is laminate or parquet, you can do without it. The rack type of flooring systems is almost identical to the modular one. The difference is that instead of panels, it uses slats with a width of 2.8 cm. The gap between the slats in the modules must be at least 2 cm. The rack system is laid only on logs. The step between them should be 40-60 cm. In this case, polystyrene foam or mineral wool is used as a thermal insulation material.
Forming the right pie
It should be noted that the word “screed” refers to a concrete layer. The arrangement is carried out using two methods:
- Using a cement-sand mixture M150 or another similar one, to which PVA glue is added in the following proportions - 1 kg = 1 bag;
- The second method is to use ready-made mixtures specially produced for the described system, which are found in a wide variety in construction stores.
As a rule, the system is mounted directly on the old coating, but a heat insulator is placed on top - a foil plug or polystyrene foam. A heat-insulating layer must be present when installing a heated floor, and it does not matter what it will be, water or electric. There are two installation options:
- Vertical - along the walls at the base of the floor. The thermal insulation material here can be a special damper tape or polystyrene sheets (15–20 cm wide, 1 cm thick);
- Horizontal - on top of the concrete base, next to the vertical insulation. Thermal insulation material is selected with a thickness of 2 cm, resistant to temperature influences and quite durable.
The system, if desired, is installed in the bathroom or any other room with a high level of moisture. But in this case, it will be necessary to lay an additional waterproofing layer on top of the thermal insulation. This is necessary to prevent moisture from penetrating into the lower part of the floor. This is especially true for apartments, which will prevent possible problems with neighbors.
Next, heating mats, cables or other selected systems are installed. Finishing work - arrangement of concrete screed. The output is a finished “pie”, where concrete is laid on top of a relatively soft material.
Of course, such a design cannot be strong enough. Therefore, a hole is made for every square meter of thermal insulation area. Another nuance is that 10–15 cm of free space is left along the entire perimeter of the floor. This is done so that the upper tie rests against the lower one, which is convenient if work is carried out in cramped conditions. By the way, the thermal insulation included in the system acts as sound insulation.
The system itself may vary in functionality and features, but the recommended thickness of the screed for an electric heated floor is 3–5 cm. This is enough for the system not only to warm up quickly, but also effectively after it is started (warm areas will not alternate with cold ones ).
Important! If, due to circumstances, it is necessary to equip a screed with a thickness of less than 3 cm, a universal plasticizer is additionally added to the solution. For 100 kg of dry mixture, 1 liter of substance is added. As an alternative, self-leveling mixtures are also used. As a result, the screed becomes more elastic.
The sequence of laying pipes in a concrete screed
Despite all its labor intensity, installation of a heating network in a concrete screed is now the most common. The technology looks like this:
- First, the base is prepared. The subfloor is cleaned of debris; if there are sagging or bumps on it, they are removed with a hammer drill.
- Then waterproofing is laid on the floors of the room.
- After this, thermal insulation is installed on top of it.
- Further, the installation rules require installing a compensation (damper) tape between the pre-calculated areas and along the perimeter of the walls of the room.
- Reinforcing mesh is installed.
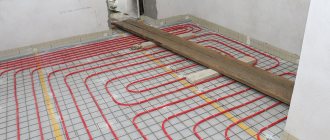
- According to the chosen scheme, the heated floor pipes are laid. They are attached to the fittings with their own hands using harpoons.
- To check the system, it is filled with water and pressurized.
- Then guide beacons are installed.
- Lastly, the cement-sand screed is poured.
Find out what to do if there is a need to connect TP pipes to each other.
Fastening connections for water heating pipes
Pipe fasteners are installed on the thermal insulation.
Its purpose is to secure adjacent pipe branches and position it along the floor in strict accordance with the preliminary plan. The fastener holds the pipe until the concrete screed reaches the desired degree of hardness. The use of fasteners facilitates the installation of the floor and ensures correct placement of the pipe in the thickness of the concrete pad.
Fasteners can be special metal strips, metal welded mesh, plastic brackets that pin the pipe to the foam base.
Metal strips are used when the thickness of the concrete pad is increased.
They slightly raise the pipe relative to the heat insulator, due to which it is closer to the upper surface of the concrete pad. The pipe simply snaps into the shaped recesses of the planks. The metal mesh not only secures the pipe, but also reinforces the layer of concrete pad. The pipe is tied to the mesh with pieces of wire or plastic clamps.
Fastener consumption is 2 pcs. per linear meter. Additional fasteners can be used in places where there are curves. Plastic brackets are installed manually.
They pin the pipe to the polystyrene foam as it is laid. Do-it-yourself semi-industrial heated floors are made using a special stapler. But its purchase is justified only with intensive professional use.
In recent years, manufacturers of underfloor heating systems have begun to offer another very convenient solution. We are talking about special sheets of dense polystyrene foam with a profiled surface. Typically, the surface of such sheets consists of intersections of grooves or rows of protruding elements, between which heating pipes are easily laid.
The surface of the sheets is smooth, extruded, all pores are closed and no additional waterproofing film is required. Having a special thermal cutter, you can cut grooves in polystyrene foam yourself. But to carry out this work you need at least minimal experience.
Important! Metal-plastic pipes are supplied in coils. When laying, the coil rolls out along the pipe placement path. Do not pull the pipe from a lying coil, as this will cause it to twist and may lead to delamination of the internal layers.
Laying a warm water floor with or without reinforcing mesh
There are two options for pouring heated floors with concrete screed - using reinforcing and fastening mesh and without it.
- If polystyrene foam mats with grooves for contours are used as insulation, then the mesh does not need to be used. Concrete can be poured immediately after laying the heated floor.
- When using conventional insulation, you need to use a thin metal or polymer mesh to reinforce and fix the contours. It should be slightly raised above the thermal insulation material.
Preparation stage
Whatever technology for laying heated floors you choose, you need to make an accurate calculation of the required amount of materials to solve the problem in a particular room. To do this, you need to determine the optimal parameter for the power of the heating circuit, the temperature in the system, the amount of heat loss and the flooring option.
You should choose a high-power underfloor heating system if:
- the finishing coating will be massive granite or marble slabs, or any other building materials characterized by high heat capacity;
- the room has poor thermal insulation of the balcony and walls;
- there is a significant number of glazed structures, such as a balcony, bay window or winter garden;
- The room is located on the top or first floor.
Choosing the optimal step
The distance between pipes during installation depends on the type of room (find out what the distance between loops should be), heat losses from it and the calculated heating load. Typically the step is from 10 to 30 cm. It can be variable or constant:
- When the heating load is less than 50 W per square meter, the circuits are laid with your own hands in constant increments of 20-30 cm.
- With a large heating load (from 80 W per square meter or more), the recommended distance between turns is 15 cm.
- In other cases, a variable step is used. For example, along the external walls, through which the greatest heat losses occur, the distance between the network loops is made the smallest (10 cm). In the internal areas of the room, the gaps between the turns of the network increase (20 cm).
The number of turns with the smallest pitch is calculated when designing the heating. A distance of 25-30 mm is most often used in very large rooms. To deliver coolant, they use contours with a cross section of 20 mm.
Feature of a floor without screed
Based on practice, electric heated floors without screed are real. When installing the cable, grooves up to 2 cm deep are made in the base where the wires will run. All that is required is pouring a solution that contains fiberglass or installing a tile floor.
Heating elements do not require screed if the work is carried out using special mats or infrared strips. This is the simplest option, down to the usual laying of the material and connecting the system to an outlet. Of course, the procedure is somewhat more complicated, but still simpler when compared with arranging a screed.
Important nuances of arranging a heating system in concrete
The water heating network must be walled up correctly in concrete. Therefore, some subtleties should be taken into account.
Before installing the system on the first, basement floor, it is necessary to waterproof the floors. This way the room will be protected from capillary suction of moisture from the soil. On subsequent floors, waterproofing will be insurance in case of emergency situations.
In most cases, special polyethylene films with a thickness of 150-200 microns are used as waterproofing. Mandatory rule: their panels on the floor should be laid with an overlap of 10 cm. The joints should be sealed with special tape. The panels are also placed on the walls with an overlap of at least 10 cm.
Extruded polystyrene foam is best suited for thermal insulation of concrete floors. It has the necessary strength and rigidity. In addition, it is moisture resistant, so it does not need protection with a vapor barrier.
For indoor use, polystyrene foam boards 5 cm thick will be sufficient. Only in regions with a very harsh climate is the thermal insulation layer brought to a thickness of 10 cm. The thermal insulation material must be laid out close to each other, and the joints between them must be blown with polyurethane foam.
Before pouring the screed, the perimeter walls of the room, as well as all obstacles (for example, columns, protrusions) and the boundaries of the contours must be covered with damper tape. It prevents cracking of the solution as it dries, shrinks and expands due to temperature. This happens due to the fact that the material forms compensation areas. The damper tape is made of polyethylene foam, has a thickness of 0.5-1 cm, a width of 10 cm, and a roll can range from 15 to 50 m.
Methods for fixing contours
Water heating systems can be mounted using several methods:
- Polyamide clamps. They are used to fix contours to the reinforcing mesh. The cost of fasteners is two pieces per 1 linear meter.
- Steel wire. With it, the network elements are fixed to the grid, the consumption is the same.
- Construction stapler and staples. This method is suitable for quickly attaching circuits to insulation.
- Fixing track. This U-shaped PVC fixture snaps the system elements into place as they are installed.
Installation of beacons
To simplify the work, a screed laying device such as beacons is used. They are planks mounted at the same exactly horizontal level and with the same step from each other. The beacons are a flat metal profile, along the top of which the screed will be poured. The bars determine its future level.
To find level 0, a laser or water level is used. With their help, control points are drawn along the perimeter of the room, on the walls at a height of 30 cm. There are two of them in each corner and 3-4 along the walls. The marks are connected to each other using a bevel, forming a line of precise horizontal level.
Then the height from the floor to the axis of the level is measured in the corners. Its minimum value is laid down from the level line and marked along the perimeter of the room. The marks are then connected by tapping. The highest point is called zero. From there, beacons begin to be installed. This is done using self-tapping screws or mortar.
Heated floor screed solution
The screed mortar is made from Portland cement grade M-400 and coarse quartz sand (0.8 mm) in a ratio of 1:3. Water is added to the dry mixture until it reaches a consistency convenient for easy leveling of the mixture. To increase plasticity, liquid soap can be added to the solution.
It is better to mix the components of the screed for water heated floors not with your own hands, but in a concrete mixer. To increase the strength of the coating, polymer fiber can be added to the liquid solution.
Crimping
Pressure testing is carried out after the circuits have been installed and they have been connected to the manifold. The screed cannot be filled until the end of this procedure.
Pressure testing allows you to make sure that the entire system is working properly, its connections are sealed, and the circuits have no defects. If any problems are identified during the inspection, they are promptly corrected before the screed is poured.
The system is filled with coolant and maximum pressure is applied to it. When tested, the network expands to its working size. This allows you to avoid strong pressure on the screed during operation.
Connecting circuits to collectors
The collectors are placed in a special cabinet:
- the width and height of the box can be 0.5×0.5 or 0.4×0.6 m;
- thickness - 0.12-0.15 m.
When the cabinet is installed, supply (with heated water) and return (with cooled coolant) tubes should be connected to it:
- A manifold supplying hot coolant is connected to the supply branch using a fitting or adapter (for different sections of elements).
- A collector for a branch with cooled water is screwed to the return line.
A shut-off valve should be installed between the pipeline and the collectors in case of accidents and repairs. A drain valve must be connected to the opposite part of the comb. To accurately control the floor temperature, a control valve and a mixing device must be installed on the collectors.
Where can it be mounted?
When installing an underfloor heating system, you should not make common mistakes.
In most cases, underfloor heating is installed in your own home. Heating networks of multi-apartment buildings from Soviet times are not designed for this heating method. There is a technical possibility to implement it, but the risk that you or your neighbors will be cold is great.
Often the entire riser remains cold, because... The hydraulic resistance of the floor network is much higher than that of radiator heating. It stops the coolant flow.
Therefore, management companies do not give permission to install underfloor heating pipes in old houses. If you do this without approval, you will have to pay a fine and dismantle the system.
However, in new buildings, underfloor water heating can be installed and you do not need to take permission for this. Their heating networks are initially designed for higher hydraulic resistance.
Adjusting the coolant temperature
To make your feet comfortable, the water temperature should not be higher than +45º. In this case, the floor covering will heat up to the optimal +28 degrees. Almost all heating equipment cannot produce such temperatures (minimum +60º). The exception is gas-fired condensing boilers.
When using any other type of equipment, you need to install a mixing unit. In it, cool water from the return line is added to the heated coolant from the boiler.
Operating principle of the device:
- Heated water from the boiler flows to the thermal valve. If the set temperature is exceeded, it opens to add coolant from the return.
- There is a jumper with a two-way valve in front of the circulation pump.
- When it is opened, water is added from the return line.
- The mixed coolant flows through the pump to the thermostat. It regulates the operation of the thermal valve. As soon as a certain temperature is reached, the return flow is shut off.
Contour distribution
From the mixing unit, water flows to the distribution comb or collector. It's one thing when underfloor heating is installed in a small room (for example, in a bathroom). Only one turn of the network can be laid in it. Then the instructions recommend not making this node.
When there are several turns, you have to somehow redistribute the water between them. Then collect it and send it back. These functions are assigned to the collector. It consists of a pair of pipes on the supply and return branches. The outputs/inputs of the circuits are connected to them.
When there is underfloor heating in several rooms, the best option is to install a comb with control of the heating of the coolant. Often different rooms do not need the same temperature.
Mounting methods
There are quite a lot of ways to attach underfloor heating pipelines. Over time, new technologies appear, both means and methods of fastening are improved.
Let's consider the most common of them, which have received the approval of professionals who have been tested by time of operation.
Attaching to reinforcement mesh
In laying a warm pipeline, the reinforcing mesh does not play the role of a reinforcing element, but rather the basis for fastening heating pipes. It is laid on various layers of hydro- and thermal insulation made of expanded polystyrene or polystyrene, and plastic bends are mounted on top, attaching them to the welded mesh using various means.
The following fasteners are used:
Nylon ties, clamps of different lengths. Price from 1 ruble per piece.
Wire fastening connectors made of steel. They tie the pipes to the mesh with a special hook at a distance of 75 cm between the fastening points. The price per piece is approximately 2 rubles.
Plastic swivel clips installed on the mesh. Raise the mesh above the insulation by 0.5-0.8 mm, which better connects the mesh to the screed. The pipe is inserted into the clamp and snaps into place. Price from 5.5 rubles per unit of goods.
Any home craftsman can carry out these methods with his own hands, having made the necessary calculations.
Mounting on mounting rails
Special fixing tires are produced in the form of a plastic track 50 cm long with clip clamps on top. The planks can be connected to each other into a single strip of the required dimensions. They are convenient for laying pipes made of cross-linked polyethylene PEX.
They are attached to the insulation with anchor brackets, and to the concrete floor using dowels. Price from 48 rubles per piece.
Securing the pipe with clamps
In the absence of reinforcing mesh, fastening with staples or metal clamps is used. These mounting parts are attached to the screed with dowels and nails, and to the wooden floor with self-tapping screws.
Fastening with a tucker
The use of a tacker, a device that resembles the principle of operation of a stapler, is becoming increasingly popular among professionals. In sales it is often called that. The tool is designed for fixing pipes to polystyrene foam with anchor clamps. The device is equipped with a magazine bar that can accommodate 100 or more harpoon staples. Design features allow the operator to work without bending over, without putting much effort on his arms and back, significantly increasing the speed of operations.
Previously, the price of the instrument was at least 17-18 thousand rubles; now devices costing from 4 thousand have appeared on sale.
Expanded polystyrene boards with fixation
To facilitate the installation of heated floors, thermal insulation boards made of polystyrene foam have been developed. Today, products have appeared on sale that allow the installation of plastic pipes without the use of additional fixing means.
On the slabs there are bosses in rows, 2 cm high and higher, on which special protrusions are made. Thanks to these protrusions, the pipe is securely fixed to the plate. All the technician needs to do is step on the plastic outlet with his foot, and it gently clicks between the protrusions.
The material is highly durable; you can walk on it without fear of damaging the mat configuration.
The plates are equipped with locks, which allows them to be securely connected into a single field, without gaps or the risk of opening. The advantages of this method include the speed and convenience of installing bends, the ability to mount them according to any scheme: “snail”, “snake” or another proprietary scheme.
The cost of such slabs is 680 rubles per meter2.
Advantages and disadvantages
Unlike conventional radiator heating systems, water heated floors have a number of advantages over them, namely:
- Warming the air from floor to ceiling. With this approach, the air above the floor surface will always be warmer than near the ceiling, which is ideal from the point of view of comfort and health. Most heating systems heat the room through convection, when the air, heated by radiators and convectors, immediately rises to the ceiling. As a result, your head sweats and your feet get cold - you must agree, this is uncomfortable.
- Significantly lower heating costs. A water heated floor provides a heat flow of 40-150 W/sq.m at a temperature of the heat-transferring liquid of only 30-50° C.
The most significant disadvantage of this type of home heating is the impossibility of installing it in apartments with centralized heating, since installing a heated floor will lead to an increase in the hydraulic resistance of the system. In addition, due to the fact that liquid of unknown quality circulates in the system, this can cause it to fail.
However, in private homes, nothing prevents the installation of a water-heated floor, but let’s take a closer look at how to install it correctly.
Surface preparation
The installation of a water heated floor begins with cleaning the “sub-floor” of dust and dirt, which will help identify its unevenness. According to accepted standards, the height difference in the room should not exceed ±5 mm. There are two ways to achieve a flat surface:
- Having made a rough screed for a water heated floor - a layer that will hide all the unevenness of the base. It can be made from concrete (M300 grade is enough) or sand concrete;
- If the floor surface has many small irregularities, it can be leveled by scattering several buckets of sand and leveling it with a rule.
Ignoring this requirement will lead to the fact that the operation of a heated floor will be associated with a number of problems, such as airing of the system, an increase in hydraulic resistance, and deterioration in heat transfer.
Description of anchor shackle
Anchor brackets hold the pipes in the desired position.
Fastening of pipes to the floor surface using special brackets is organized according to time-tested methods, which are based on a manual or semi-automatic principle. These methods are especially effective on turns or bends of thermal contours with a significant length of laid routes. On extended sections of the pipeline, the fixing points are located at a distance of about 50 cm from one another, and in fracture zones this interval is reduced to 10 cm. Compliance with this step allows you to fasten the pipes efficiently and reliably, significantly extending their service life.
Anchor shackles are made of material that is highly durable and can withstand significant overloads. The design of the fastening element includes special spacers, thanks to which the teeth and clamps of the pipeline are fixed as reliably as possible. Once the installation of such products is completed, it is almost impossible to release them without an external tool.
We recommend reading: Ventilation in a boiler room with a gas boiler: requirements and rules
System pressure testing
Hydraulic tests of pipes of underfloor heating systems are carried out in accordance with existing requirements.
Before carrying out such tests, the pipeline circuits must be filled with water and the air must be completely displaced. Tests must be carried out before pouring concrete.
When pouring concrete, the pipeline must be under a pressure of at least 3 bar. Leak testing must be carried out at a pressure exceeding the working pressure by 1.5 times.
First, a visual inspection of all existing connections takes place, and it is necessary to make sure that all shut-off elements are closed behind and in front of the collectors. When testing with air, the time required is sufficient for the temperature of the compressed air to return to ambient temperature. All pressure gauges used in the system must provide reliable readings accurate to within 0.1 bar.
Alternative options for mounting heated floors
To fix heated floors, not only a bracket is used, but also other devices:
- Mats with bosses do not require additional fastening. They are easy to install and fix, and their thermal insulation qualities are above average;
- Masonry reinforcing mesh for pipelines is fixed with plastic and metal clamps. The design is reliable and highly durable;
- If the base is made of foam plastic, then the pipes are secured with an anchor bracket;
- Concrete base requires perforated tapes during installation;
- Wooden floors are usually heated with pipes installed on wooden modules.
Mats with bosses
Advantages of using mats with bosses:
- You can make a concrete screed directly onto the mats without making a protective layer. Cement does not enter into chemical reactions with mats that have a protective film on the surface;
- Easy installation - modules are assembled by hand;
- Pipe fasteners are not required; the bosses on the plates themselves firmly fix the pipeline;
- The reverse side with a relief increases thermal insulation, noise protection, and also makes it possible to build the system on an unleveled base.
Some polystyrene boards are supplied without bosses, but with markings for the heating circuit.
Reinforcing mesh
The concrete screed can be additionally strengthened with reinforcing masonry mesh. The design becomes several times more durable. To do this, the grid must be laid in a special sequence:
- Clamps made of plastic or silicone make the fastening easy and simple, so the installation of the pipeline will be completed in a few movements. Connections of this type are very reliable and do not break;
- The use of wire limits the installation process - strong tension should not be allowed, since there is a high risk of damage to the pipe;
- An iron clamp is a compromise between plastic clamps and wire. Iron fasteners are more expensive, but the installation process will be lengthy.
Having considered all the options, we can conclude that the installation of the water circuit pipeline is carried out on a reinforcing mesh using plastic clamps.
What are anchor brackets for heated floors?
An anchor bracket (clip) for a heated floor is a special product with teeth at the end, which is made of high-strength polymer. On straight sections, pipes should be fastened with staples no more than 50 centimeters between clips.
On bends and turns, it is recommended to place such fasteners at a distance of 10 centimeters from each other. Fastenings are installed using a special device - a construction gun or stapler.
It is not difficult to find everything necessary for such installation of a heated floor system on the market today. High-quality consumables in Moscow are presented in a huge variety and at the most affordable prices.
Which way is better?
The choice of the best method is influenced by the quality of fastening and the price of the issue. For professional craftsmen who perform large volumes, convenience and speed of installation play an important role.
Fastening to reinforcing mesh has been used for a long time, its advantages are ease of installation and minimal costs. However, it is difficult to call the method convenient: you have to work all the time bent over, tying nylon ties with your hands. And the use of a grid does not cause unanimous approval. There is an opinion that it gradually cuts the plastic and over time the pipes begin to leak.
More and more craftsmen are resorting to working with a tucker, which allows them to produce large volumes of work in a short time. At the same time, the quality does not suffer compared to other methods.
The same can be said about the use of polystyrene foam mats with fixation. Time will tell which method will become the most common.
This video shows common installation methods
Concrete base
The base of the room is most often made of concrete; the screed is not always covered with a layer of insulation. To fasten pipes to such a base, perforated tapes are used, the structure of which has special recesses for laying pipes.
The profile on a concrete base is fixed with self-tapping screws, the heating elements are installed with special fastening bars. The pipe can be secured to concrete using clips for the water circuit.
A plastic clip is installed to the concrete using self-tapping screws, and a pipe is placed on top of the structure.
For a diameter of 16 mm, staples are chosen with a larger size, and the arcs for connection are cut off. The pipe may wobble slightly when fixed, which is acceptable given thermal expansion.
We recommend reading: Do-it-yourself furnace from a cylinder - drawings, diagrams, videos
Expanded polystyrene boards with fixation
Option 1
A very creative way to install pipes. Since with the help of volumetric protrusions on the coating, pipes can be laid in any pattern as you wish. Despite the small distance between the protrusions, many people think that this is what will fix the pipe, but this is far from the case. For fixation, special clips are also used, which guarantee the reliability of a strong fastening of the pipe.
Advantages: The pipe is protected by special bosses from mechanical damage. Such a system can be freely purchased both on the market and in a specialized store.
Disadvantages: Quite a high price for all components. To fix the pipe, additional elements must be used.
Option 2
This installation method is very similar to the previous one, but there are significant differences. There are special protrusions on the coating that firmly fix the pipe without any additional equipment. You can fix the pipe in a very simple way: by carefully pressing the pipe between these protrusions.
Advantages: This method of attaching a pipe is considered very convenient and reliable. The slab is not damaged when moving across the floor. An excellent combination of functionality, quality and price.
Disadvantages: The cost is much higher than the earlier examples. Such a specimen is quite difficult to find in markets and specialized stores.