In the first part, it was shown how to correctly fill a subfloor made of expanded clay. Now we have a more important task ahead of us, because the owners of the house have put forward several requirements for the water floor: firstly, it is the preservation of the existing heating system based on the AOGV-17.4 gas boiler. This means that we will crash into a system with natural coolant circulation. Secondly, it is possible to turn off the heated floor, ensuring it quickly warms up when starting up. We will have to use a circulation pump and reduce the thickness of the screed. And finally, the third requirement: the ability to operate the heated floor when the power supply is turned off, that is, in natural circulation mode.
Water heating circuit
Let's look at the water heating diagram for the place where we will install the heated floor.
The batteries in the kitchen are powered by a supply circuit that runs along the perimeter of the second floor. The battery output is sent to the so-called return circuit, which is installed in the basement. We will connect the heated floor to the second output of the battery and direct it to the return circuit.
To turn off the battery and the heated floor, install taps 1 and 2, respectively.
Additionally, we will install a circulation pump at the entrance to the return circuit. This is how we implement all the requirements of the owners.
Installing connectors and taps on battery outputs
We begin the installation of the new system with the battery outputs. For old cast iron pipes we will use appropriate fittings.
Plumbing flax and sealing paste are used as a seal. We will install connectors, taps and other fittings. All operations are performed sequentially, with mandatory tightening with keys.
Note that when using more modern heating devices, we would use polypropylene pipes and fittings, but the desire of the owners to maintain the existing heating system imposes certain restrictions. We will install adapters, taps and corners at the battery outlet.
The heating system of this house is assembled on 3/4 inch metal-plastic pipes. Let's install the appropriate adapter to connect the return pipe to the battery.
So, we have a ready output for the return pipe from the battery and in the same way we assembled the second output of the battery for connecting the heated floor.
We have a feed from above, and below the flow is divided into two parts.
Installation
The main method of joining polymer parts with a diameter of up to 40–63 mm is socket (socket) soldering. In the process of how to solder polypropylene pipes, there is a certain technological order:
- The soldering unit must be installed on a rigid, stationary base.
- Provide power supply - use an extension cord with the required wire cross-section (wire core no less than Ø1.5mm).
- The products are prepared: cutting is done at right angles. Dirt deposits are removed. The surface is degreased. When using a reinforced part PN25, the outer layer of polypropylene and the aluminum layer are removed using a shaver. Marks are applied indicating the size of the welding belt.
- The condition of the nozzles is checked - the surface must be clean, without external damage.
- The products to be connected are placed on the corresponding attachments: the pipe is on the sleeve, the fitting (coupling) is on the mandrel.
- Heat the parts to the recommended temperature, maintaining the required time (see table).
- The heated products are removed from the soldering iron and quickly joined to each other. The connection is made along the axis of the pipe, without turning. The part is seated in the coupling to the depth indicated by the internal collar. The mixture is kept in a quiet state until the parts cool down.
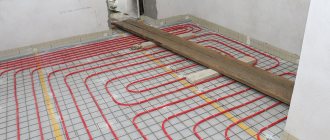
Installing damper tape and laying multifoil
Before connecting the pipes, we will do some preparatory work: along the perimeter of the walls we will install a so-called damper tape, which compensates for the expansion of the warm water floor when heated.
It is easy to make such a tape yourself from ordinary foil isofol with a thickness of at least 5 mm. To keep the tape against the wall, you can lightly glue it or use regular tape.
The height of the tape should be slightly higher than the future floor screed. We installed tape around the entire perimeter of our kitchen. Now let's lay down multifoil - a special foam insulation for heated floors.
The branded insulation has a special marking grid, which can help when calculating the distances between pipes. The multifoil is laid directly on the rough screed, and the joints are taped. To lay out, level and fasten the water pipes, we will use a metal reinforcing mesh with a cell width of 10 cm.
Having laid out the mesh around the perimeter of the room, we connect the individual elements using ordinary wire.
The reinforcing mesh is installed throughout the floor and has certain irregularities, but we will press it against the screed later, ensuring more convenient work on fastening the pipes. So, we have completed all the necessary work to begin installing the pipes - there are exits from the battery, we will use the current supply.
Connecting the return pipe and water floor.
We install and connect the metal-plastic return pipe. We will connect a water floor pipe made of cross-linked polyethylene to the other output of the battery. We chose a diameter of 20 mm to meet the conditions of natural circulation.
We put a small protective plastic corrugation on the end of the water floor pipe.
To connect the pipe, we use connecting elements designed for connecting metal-plastic pipes. We use a special expander to avoid damaging the rubber seals when inserting the pipe. Now carefully insert the pipe and then carefully tighten the nut.
Tighten the nut using an adjustable wrench. Now you need to fasten the pipe to the metal mesh. This work is best done together. One person forms the bend of the pipe, and the second, using plastic clamps, pulls the pipe to the metal mesh.
A metal-plastic pipe is more flexible in turns, unlike a cross-linked polyethylene pipe, but for our purposes it was the second type of pipe that was required.
The critical stage is the formation of the pipe bend.
Breaks are strictly forbidden. To get the knee right, you can use an industrial or even a regular hair dryer. The fact is that when heated with hot air, cross-linked polyethylene becomes plastic. For a pipe with a diameter of 20 mm, the distance between adjacent pipes is about 2 cells, that is, 20 cm. Having finished forming the elbow, we secure it with clamps.
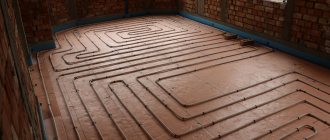
A few words about the resulting pipe pattern. For natural circulation, a “snake” scheme was chosen,
Water pipes took up most of the kitchen space, with the exception of space for the staircase and kitchen cabinets. The ends of the return pipe and the heated floor are directed through metal pipes in the wall to the basement. We seal the outlets of the metal pipes and voids using polyurethane foam.
It's time to perform an important task - to press down the areas of the heated floor that are sticking up. Let's drill a hole in the rough screed, insert a dowel-nail there, and secure the top with a small metal plate.
Let's do this work on all protruding areas of the metal mesh. Let us remind you that when installing the rough screed, we laid out a longitudinal slope equal to 5 mm per 1 m of length, therefore, by pressing the mesh with pipes to the floor, we provide the best conditions for removing air bubbles from them. Let's check the presence of a slope using a level.
So, the underfloor heating pipes are connected to the radiator, pressed against a metal mesh and aligned on a plane. The work on installing the water floor in this room has been completed, and we are moving to the basement.
How to attach metal-plastic pipes to walls
Good fastening of metal-plastic communications extends their service life. When heated, pipes elongate and may “lead”; in addition, poorly and sparsely secured communications are more susceptible to vibration, which has a bad effect on the reliability of the connection. Therefore, metal-plastic pipes must be securely fastened. The clamps must be close to the fitting.
Fastenings are placed in increments of 0.7-1 m, for heating and hot water supply - 0.5-0.7 m. The stores are full of all kinds of clips and clamps of all diameters. You can also use homemade brackets. Fasteners are attached to concrete walls with 6x40 mm dowels, to plastered, gas or foam concrete walls - 6x60 mm or even longer.
Connecting the return pipe and heated floor in the basement
To quickly warm up the heated floor, we need a circulation pump. We connect it to the return pipe using adapters.
Additionally, we will install two taps in this system. The upper valve will shut off the natural circulation, and the lower one will completely block the entrance to the return pipe.
Let's assemble the necessary connections for the return pipe and heated floor.
To simplify the work, we will use detachable adapters for metal-plastic pipes.
This regulating system and the pump itself are additionally attached to the wall.
It should be noted that this system is assembled with a slight slope to ensure air outlet.
We cut off the excess water floor pipe.
Finally, we connect the underfloor heating pipe to our control system.
Flaws
When using polypropylene pipes for underfloor heating, it is necessary to use elements with reinforced walls. The use of conventional materials will reduce the service life of the system. Unreinforced walls cannot cope with the high load from circulating coolant under pressure. Also, a certain impact is observed from the screed and other elements of the heated floor.
How to install polypropylene pipes
Another disadvantage of polypropylene is its instability to high temperatures. Therefore, it is prohibited to use it in areas with a high fire hazard. The normal operating temperature of polypropylene is +75°C (pressure up to 7.5 atm.). It can be operated at +95°C, but in this case the service life is significantly reduced. Therefore, when installing an underfloor heating system, care must be taken to ensure that the coolant reaches the optimal temperature.
System operating modes
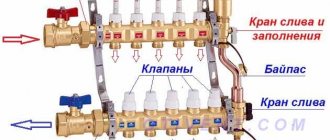
Let's consider the system as a whole and determine its operating modes. In natural circulation mode, the coolant moves directly through the red pipe of the water floor into the return circuit. Both taps are open at this moment. If you turn off the top tap, the coolant from the heated floor pipe will move through the additional pipe towards the pump. In this case, the pump must be turned on. This is a mode for quickly warming up a heated floor.
In order not to disturb the natural circulation in the general heating circuit in the fast heating mode, we can slightly open the second tap. Thus, part of the flow will be reversed. For circulation pumps with precise speed control, this problem can be solved using a mode switch.
Let's close the bottom tap. The pump must be turned off. In this mode, the radiator circuit in the kitchen and the heated floor are completely blocked. If we turn off only the warm floor, then circulation from the battery is carried out along the primary circuit through the return pipe.
This circulation pump model has three power selection modes. For the purposes of our system, we will need the most minimal mode. Its power consumption is 30 W. When the connection to the return circuit is completed, the system is filled with coolant.
For this private house, a system pressure of 1.5 - 2 atmospheres is used. Within the next 24 hours after filling, it is necessary to check the system for leaks and eliminate leaks.
All rights to the video belong to: DoHow
Heated floors are a worthy alternative to standard radiator heating, as they not only allow you to save on utility bills, but also achieve uniform heat distribution in the room. Laying a pipe for a heated floor is the most critical process when installing a heating system, however, all work can be carried out without the involvement of professionals.
Making a heated floor with your own hands
After the calculations, the floor installation is carried out in several stages:
- surface preparation for installation of a heating system;
- pipe layout and connection to the collector;
- system check;
- filling the floor.
Scheme of the finished structure
Manufacturing and connecting the system
Installation of underfloor heating pipes is carried out according to the following scheme:
- laying and fixing pipes;
- connecting pipes to heating equipment.
Pipe laying process
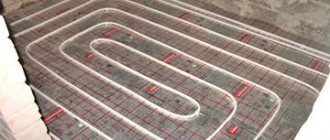
Laying pipes for a warm water floor can be done according to one of the following schemes:
- simple or double snake. Laying pipes in the form of a “snake” is done if there is a need to additionally insulate the coldest areas of the room. When using a simple snake, the heating of the floor is uneven. When laying pipes with a double snake, this disadvantage can be almost completely avoided;
Simple and double snake as methods of laying pipes
- spiral or snail. Snail laying allows for more uniform heating of the floor, which is why it is used more often.
Laying pipes in the form of a “snail”
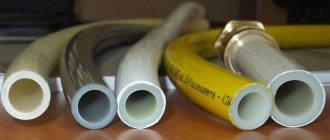
Next, we connect the underfloor heating pipes into a single circuit. For this, depending on the type of pipes used, the following are used:
Pipe connection products
- welding method (polyethylene and polypropylene pipes).
Pipe connection by welding
Pipe fixation can be done:
- anchor brackets. The dowel-bracket is used to fix pipes on mats. A special stapler is used for installation;
Pipe fastening device
- special tires. The fixing bar is pre-installed on the floor surface with dowel bolts, which takes quite a long time. However, after this procedure, pipe laying is carried out faster than by any other method;
Special device for securely fastening pipes
- Pipes can be attached to the reinforcing mesh with wire or clamps. This method is the cheapest and does not cause difficulties for an inexperienced craftsman.
The simplest way to fix pipes
The pipe laying process is presented in detail in the video.
Pipe connection
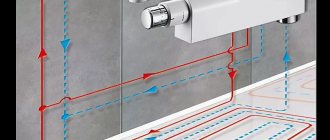
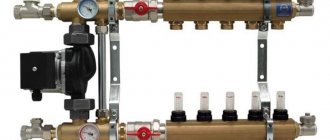
The pipeline is connected to the collector through a specialized distribution unit that performs the following functions:
- increase in pressure in the pipeline system;
- adjusting the temperature of the circulating fluid;
- uniform distribution of fluid supply to all installed circuits.
Distribution unit in the control mechanism
To connect the pipes to the manifold, a special fitting called a Eurocone is used. The fitting consists of several elements:
- union nut securing the pipe;
- a crimp ring that serves to more reliably seal the connection;
- cone, which is a kind of adapter for the pipe.
Fitting for attaching the pipe to the manifold
Calculation of the required pipeline length
Laying pipelines with your own hands in a screed should be reproduced according to a certain pattern. Warm floors made of polypropylene pipes can take the form:
- snakes;
- double snake;
- spirals;
- corner snake (and another). Pipe laying options
To install a heated floor with your own hands, the pitch between turns should be from 10 to 30 cm. In most cases, 30 cm is enough. In areas with significant heat loss, you can reduce the pitch to 15 cm. The high efficiency of underfloor heating is maintained if you make a water circuit in cement-sand screed with a maximum length of 80 m (ideal option - up to 50 m).
Calculation of the length of the water heated floor circuit
To calculate the required number of pipelines, you can use graph paper. On it, a plan of the room is drawn to scale, where a diagram of the heated floor is depicted. By measuring the length of the circuit, you can determine the required number of pipes. It is also easy to find out if you use regular thread. It is laid on the floor according to the pattern chosen for installing a heated floor.
After all the manipulations, it is enough to measure the length of the thread, which will correspond to the footage of the pipelines. When using any option, you need to increase the required volume by 10%.
Floor testing and pressure testing
Before pouring the floor with concrete screed, it is necessary to test and pressure test the water circuit.
The finished heating system is tested as follows:
- the pipeline is filled with hot water;
- for approximately 30 minutes the temperature in the system rises to critical (80ºС - 85ºС).
The final stage of checking the system is pressure testing (high pressure test). For this:
- the pipeline system is filled with cold water;
- all air extractors located in the manifold are turned off;
- The pressure is set at 6 bar for 24 hours.
Checking pipes for leaks and high pressure
If, at the end of the pressure test, no excessive expansion or deformation of the pipes is noticed, and the set pressure has not decreased, then the resulting water circuit is completely sealed and suitable for use.