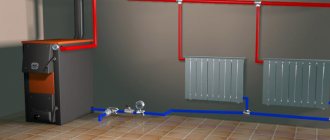
If a decision is made to install a water-heated floor in a house, all the pros and cons for each material are usually carefully considered.
Is it worth installing a heated floor from metal-plastic pipes - is it profitable, is it reliable, and if so, how to do everything correctly with your own hands.
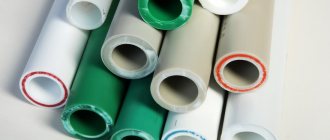
Characteristics of metal-plastic pipes
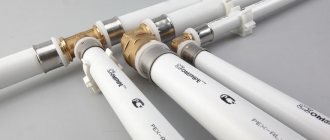
The high consumer properties of this type are due to the multilayer structure of the material. Its structure contains five layers: a load-bearing inner and outer protective layer of polymer, between which an aluminum core is built into adhesive layers (pictured).
Each layer performs its own functions that determine the parameters of the product.
The main characteristics of metal-plastic bends are the following:
- Operating temperature. The maximum value for metal-plastic is 110 degrees, while for water floors this value is 40 degrees.
- Operating pressure. The metal plastic can withstand a load of 10 atmospheres (about 10 bar) at 95. The limit for underfloor heating is 6 bar.
- Minimum bend radius. For the manual method it is 80 mm, using a tool - 45 mm.
- Passability measured by internal cross-section.
Advantages of metal-plastic for heated floors
Acceptable expansion ratio. That is, when heated, the pipes do not expand too much. The aluminum layer makes the pipe both strong and elastic.
Excellent quality, considering that the pipe is simply poured into a concrete slab. The pipes can be bent, but they retain their shape - this is very convenient for heated floors. The snake can be bent from a single piece without resorting to joints, which are the weak point of the system. The temperature at which the pipe can operate stably is + 95 °C, which may be too low for conventional heating, but quite sufficient for a heated floor system. It is usually heated to 28 - 36 °C. The operating pressure is 10 bar, while in the average home system it is 1.5 - 5 bar.
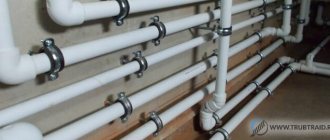
Laying metal-plastic pipes
The glue used is heat-resistant, it provides reliable adhesion of dissimilar materials, they do not delaminate.
It is convenient to connect the pipe - you can do without special equipment. You just need to pick up adapters, fittings and couplings for all connecting points in stores.
Advantages and disadvantages
Consumers and professional craftsmen include the following advantages of metal-plastic channels:
- Good resistance to high temperatures, which resulted in their use in water floors.
- Easy and convenient to install, easier to work with.
- The plasticity of the material, the ability to maintain a given shape, pipes are easy to bend even by hand, which allows them to be laid in various configurations.
- Resistant to all types of corrosion.
- Much lower linear elongation.
- Lack of oxygen diffusion.
The disadvantages include:
- The difference in the coefficient of thermal expansion between polyethylene and aluminum, which over time leads to stratification of the channels.
- Significant bending radius, which is why creases occur if installed inaccurately.
- Loosening of fitting connections due to regular fluctuations in ambient temperature.
Flaws
Like all other systems, water floors have disadvantages:
- complexity of installation;
- installation of a water pump is required to increase water pressure in horizontal pipes;
- reducing the height of the room due to several layers required for the installation of such a system;
- are not suitable for use in apartments, since such a system reduces the water pressure in the risers. For more information about the advantages and disadvantages of this design, watch this video:
Most often, a water floor is used for heating private houses, in which case it is fully justified in terms of durability and economic benefits.
It is best to involve specialists who will perform all the work, strictly adhering to installation technology. They will help you correctly calculate the consumption of materials and pipe laying pitch.
Kinds
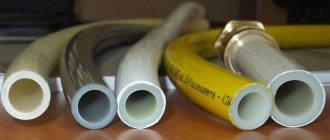
In the construction of water floors, various types of pipe products are used: steel, copper, polypropylene, stainless steel, polyethylene. Today, metal-plastic pipes and REX (cross-linked polyethylene) pipes are ahead of their rivals and are competing with each other. Which of them is better is chosen by the consumer based on his interests and financial capabilities.
The performance qualities of metal-plastic pipes are determined by the following components:
- Type of polymer for the main and protective layers.
- Thickness of the aluminum reinforcing layer.
- Standard size of products.
These parameters distinguish products on the market today.
Of the polymer materials in modern models, cross-linked polyethylene PEX and its varieties - PEX-A, PEX-B, PEX-C, PEX-D - have proven themselves. The advantage of pex is its high strength and ability to return to its original shape after minor deformation.
Another polymer is PE-RT. It is heat resistant and can withstand temperatures up to +124C. The bends can be connected either by fittings or by welding, which is more reliable.
Products using HDPE (low-density polyethylene) are not very suitable for underfloor heating: at a temperature of 70° they are deformed.
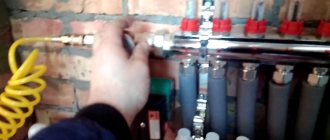
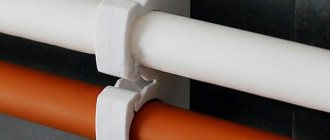
Pipe fastening
The pipe is attached in several ways. You can put the reinforcing mesh on a layer of thermal insulation, and attach a pipe to it using wire. In this case, the mesh serves as a marking and can be used as a reinforcing element of a future screed. The pipe fastening step is 1 m. If the wire fastening method is used, then do not forget that a small gap is necessary. If the pipe is pulled too tightly with a wire, then after several years of operation it will be significantly deformed. This is possible due to the different thermal expansion of the wire and pipe.
Options for attaching pipes to fittings and tape
When hot water flows through pipes, it gives off some of its energy to the surrounding space. As a result, the temperature drops. It may happen that one part of the room will be heated worse than the other. To prevent this from happening, certain conditions must be observed. The recommended length of the laid pipe contour is 50-60 m, it should not exceed 80-90 m. If you cannot meet this distance, then you need to install a collector. If you have two circuits in one room, then you need to purchase a collector with two outputs, three with three, and so on.
Tips for choosing
When selecting material, the following factors are taken into account.
- The size of the budget allocated for the construction of a water floor. It should be borne in mind that this project will require much more pipes than the heating system in the house. An area of 20 m2 will require at least a bay of 100 linear meters of metal plastic.
- Convenience of installation. With products that are easier to bend, faster and easier to connect, there is less risk of getting a crease and a greater chance of making a reliable system.
- The strength, elasticity and thermal conductivity of pipes is determined by the thickness of the aluminum core. The thicker it is, the tighter the wiring. For self-installation, it is better to choose products with a reinforced layer of 0.15-0.2 mm.
- To install a water floor, bends with an internal diameter of 16 or 20 mm are purchased.
Surface preparation
Leveling semi-dry screed
Before installing a heated floor, it is necessary to clean the subfloor from dirt and dust, after which its unevenness can be identified. Indoors, according to standards, the height difference should not exceed 5 mm. If, however, irregularities are identified, then you will have to achieve a smooth surface. This can be done in two ways:
- Make a rough screed. Can be made of concrete or sand concrete.
- If there are a lot of small uneven spots on the floor, you can pour in several buckets of sand and level it using a rule.
If the surface is not leveled, then problems may arise during further use of the floor, such as deterioration of heat transfer, increased hydraulic resistance, and airing of the system.
approximate price
Metal-polymer pipes are sold in cuts and coils. The cost is determined by the quality of the polymer, the cross-section size and the manufacturer.
Thus, metal-plastic products from the Italian company ICMA - 16 * 2 mm (PE/AL/PE-RT) cost 33 rubles per meter. Valtec products (Russia) 16*2 mm with PEX-B can be purchased for 60 rubles. Bends from the Italian company Uni-Fit PEX-b/PEX-c measuring 20*2 mm will cost 175 rubles.
Price
The estimate depends on the area of the room, the condition of the base, and the amount of material. When work is performed by installation organizations, the average price of services is:
- laying one meter - from 350 to 450 rubles;
- the same thing, but with preparation of the base - 600-700;
- you will have to pay 1000-2500 for installation of the collector;
- for installation of a distribution cabinet they will charge 1000-1500;
- a hidden collector box will cost 1500-2500.
In addition to services, you need to pay for 1 meter of pipe, depending on the quality and diameter (35-90 rubles). Compression fittings for connecting straight sections will cost 130-380, and complex ones - 500-700 rubles. The cost of press types ranges from 100 to 250 rubles. Based on the prices given, installing a structure in a room with an area of 12 m² will cost 17-20 thousand rubles.
How much pipe is needed for a heated floor?
To calculate the volume of material, the required heating power for specific areas, a suitable installation scheme, and laying step are determined. For the calculation, the established indicator is taken as a basis: 5 m of pipes are placed per 1 m2. The required number of linear meters is calculated using the formula:
L = S/N x 1.1
Here: S – coverage area; N – laying step; 1.1 – reserve for waste.
The length of the connection to the collector is also added here.
So, for a room of 12 square meters. m with a laying step of 0.15 m and a length from the floor to the collector of 3 m, we obtain:
12:0.15×1.1 +(3×2) = 94 m.
Calculator
On manufacturers' websites and in educational videos, you can use online calculator programs. It is enough to enter the initial data - room area, laying pitch, desired room temperature, type of screed, insulation, type and standard sizes of pipes - and the program will give the calculated heat flow power in watts per square meter. By changing the laying pitch and types of pipes, you can determine the optimal amount of heat flow.
Based on the calculated heat transfer, the amount of material required is calculated. As a rule, at a pitch of 200 mm, 5 meters of pipe are laid per square meter.
Material calculation and diagram
The required pipe length is calculated. The optimal pitch between turns is considered to be 30 - 35 cm. Knowing the dimensions of the room, you can calculate the length of the pipe for it.
It is possible to significantly save length, without compromising the result, if you do not conduct heating under stationary objects, furniture, etc. This will not only reduce pipe consumption, but also avoid local overheating in the future.
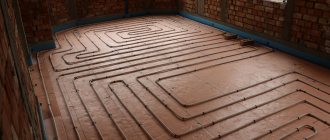
A diagram of laying the heated floor is sketched. There are two options:
Schemes for laying pipes for water heated floors
It is easier to install a snake, but it provides uneven heating - in the far part of the room the water will be hot, and as you move towards the exit, the temperature will become lower. You can take advantage of this by heating the most popular areas, but in small rooms the difference is practically not felt.
The spiral provides even heating, but laying it is a little more difficult; you need to take a double step in order to lay the “return” in the future.
Methods for connecting metal-plastic pipes
The connecting installation of metal-plastic bends is carried out using two types of fittings:
- Compression.
- Press.
When laying flexible pipes they are generally not required. But when connecting to collectors and a number of other cases, you cannot do without them.
The compression method is much simpler and does not require tools other than an adjustable wrench.
Press fittings connect more reliably, but this connection is permanent.
How are metal-plastic pipes installed?
First of all, it is necessary to calculate the maximum length of the circuit, and installation is carried out in increments of 0.3-0.35 m. If you calculate the area of the room, you can calculate the total length of the heating circuit for the heated floor.
Saving on length without loss of system performance is possible if you do not conduct contour heating of areas under furniture or massive objects. This reduces the length of the pipeline and prevents overheating of the system. A project for laying the contour for a heated floor in a spiral or snake is drawn up.
Making a snake is easier, but it is characterized by uneven heating. The back room, for example, will be heated with hotter water than the doorway at the entrance to the room.
This property can be used for heating different areas of the room - in places of frequent use a hotter coolant is needed, and in places of rare use the air may be cooler.
Laying in a spiral will give an even distribution of water, but installation is more difficult due to the need for a double step for return.
Using fittings
Fittings can be collapsible (compression or crimp), as well as press fittings. Press devices are easier to install, but buying special equipment for them is not always advisable.
Fittings for metal-plastic pipes
Collapsible fittings are simpler and cheaper for installation work, but their use makes sense when the area of the object is small. The installation time for crimping or compression devices is usually quite long.
How are compression fittings used:
- The pipe is processed on both sides by a calibrator to a perfectly smooth circle. Use sandpaper to go over the surface and remove burrs;
- The nut from the fitting is twisted together with the union ring. The quality of the seal must be checked especially carefully - there should be no protrusions from the groove;
- The crimp ring (cracker) is put on top of the union nut on the first section of the pipe;
- The fitting fitting is inserted all the way;
- The ring and nut are screwed tightly to the fitting;
- The nut is screwed with an open-end wrench until it stops.
Press fitting installation:
- The edges of the pipe are processed with a calibrator;
- The compression fitting is pushed on as deep as possible;
- The nozzle in the press is selected of the appropriate diameter, the equipment works with rotation of the base, which makes working with it easier;
- A pipe is inserted into the mouth of the press, crimped and sent for installation of the circuit.
When connecting pipes inside one room, it is necessary to avoid placing the fittings in a concrete screed; it is better to bring it into the wall and cover it with baseboards.
Do-it-yourself floor heating installation
The construction of a water floor as an auxiliary source of heating in a small room can be done independently, taking into account our recommendations. It is better to entrust a large amount of work to professionals.
To install on your own, you need to calculate the material, purchase it and prepare the tools.
Required tools and materials
The required materials include more than just pipes. You will need:
- Collector.
- Matching fittings.
- Damper tape.
- Fasteners.
- Materials for waterproofing and insulation.
- Components of a concrete mixture.
The tool is selected according to the type of work:
- Pipe bender or spring.
- Plastic scissors.
- Shovel, trowel, spatula, etc. for concrete work.
Drawings and diagrams
Water floor structure
Options for laying underfloor heating pipes
Installation technology
Pipe laying schemes suggest mainly two options: snake and snail.
The first one is considered simpler and more convenient to install. However, according to this scheme, hot water gradually cools down as it moves through the pipeline and it turns out that the temperature in one part of the circuit will be lower than in the other. The issue is resolved by installing a pump.
The option with a snail allows you to heat the circuit evenly. The method involves fewer bends, which is important for plastic with its possible creases.
Work progress
- First, the concrete base is leveled by all available means.
- Laying lines are marked taking into account the selected step, and fasteners in the form of clips are installed along them.
- Next, waterproofing and insulating materials are laid.
- A special tape is attached near the walls to protect the concrete pouring from cracks in the event of pipe deformation.
- Install the collector, place the ends of the bends there.
- Unwind and install the pipes along the marking lines, snapping them into clips.
- A special spring is used to bend the loops. It is put on the pipe and with its help the product is bent to the desired radius.
- Connect the pipes to the cabinet.
- The installed system is pressure tested by filling it with water under pressure.
- If the result is successful, begin pouring the screed.
Video - installation of a water floor
Installation features
Previously, polystyrene foil was laid as a thermal insulation layer. Now profile slabs made of polystyrene foam have appeared, equipped with special bosses for easy installation of flexible pipes.
In cases where it is not possible to make a screed, a slatted floor is installed. The bars are fastened between the turns and the floor covering is laid on them.
Installation Tools
- Pipe bender or spring jig.
- A cutter (a tool that resembles pliers) helps to make a clear, strictly perpendicular cut without dents or bevels. If it is not possible to purchase a cutter, use a sharp construction knife, but under no circumstances a hacksaw (it leaves a torn cut with many burrs).
- Calibrator (a cross-shaped tool with ends of different sizes for different diameters).
- Open-end wrenches.
- Sandpaper.
- Press jaws. Easy and quick installation with press fittings. Special pressing pliers are used to crimp them. There is also an electric press tool (a gearbox increases the pressing force to several tons), it is classified as professional equipment and is expensive.
Water-heated floors in a private home are the best option for creating a comfortable indoor microclimate. Do-it-yourself water-heated floor – design and installation features.
What kind of warm floor is suitable for laminate, read in this topic.
We will consider options for installing heated floors in a private house here:. Installation with or without screed.
Maintenance Tips
Underfloor heating systems rarely fail. But to prevent this from happening unexpectedly, you should regularly check the fittings and pump that serve the wiring.
If air gets into the system, you will have to carry out pressure testing using a pressure tester, which you can rent for a while, or invite a specialist with this equipment.
You should carefully monitor the temperature. A value exceeding the manufacturer’s value significantly reduces the service life of the metal sheet.
How to eliminate a leak in a structure
A leak is detected by wet spots on the floor or a drop in coolant in the circuit.
You must immediately turn off the water supply and turn off the pump.
The coolant is drained through the drain valve.
At the leak site, remove the layer of concrete with a hammer drill.
Cut out the damaged section and attach a new piece of elbow in its place using two fittings.
After completion of the repair, the system’s functionality is checked and the screed is restored.
Polystyrene installation technology
The key advantage of this method of arranging the system under consideration is the absence of the need to pour concrete. This greatly simplifies both the heated floor design itself and the installation of the structure. The use of the technology in question makes it possible to preserve the height of the room as much as possible. Since the thickness of the floor itself will be small. It is formed using polystyrene slabs, which act as thermal insulation. This method of laying the pipeline is suitable for rooms with restrictions on the load on the floors or with low ceiling levels.
Aluminum plates are installed in polystyrene pipes to promote uniform distribution of heat flow. The pipes are securely attached to them.
If the finishing coating is parquet, I install a gypsum fiber sheet on top of the structure. It is needed as a foundation. If you decide to use ceramic tiles or laminate as the topcoat, it is advisable to lay two gypsum fiber sheets.
The polystyrene installation technology diagram is as follows:
- The base foundation is being prepared. It must be completely cleaned of dirt and dust. Finally, you need to check how level the floor is. This can be done using a level. All existing defects must be eliminated, making the surface as smooth as possible.
- Polystyrene slabs are laid in accordance with the laying diagram.
- Aluminum plates and metal-plastic pipes are mounted. It is important that the aluminum plates cover 4/5 of the floor surface area in the room. This is necessary for the most efficient heating.
- Gypsum fiber sheets are being laid.
- The final flooring is being installed.
Note that this technology for installing heated floors can be carried out on both concrete and wooden bases. If your house is made entirely of wood, then you need to use other piping installation techniques.
Installation of finishing screed
The program for laying the finishing screed is as follows. After carrying out hydraulic tests, we carry out installation. This is the final step of the whole work. The screed is poured using special building mixtures, mortar with plasticizers or special mixtures for self-leveling floors.
Humidity and air temperature in the room must correspond to the values recommended by manufacturers of building mixtures. It is necessary to wait until the finishing layer has completely dried and only then begin to apply the decorative coating.