Those who are renovating a bathroom, changing its design, are interested in information about what is the optimal height of the bathtub from the floor (the standard that exists today, does it allow changing the parameters) and how the installation of plumbing fixtures made of different materials differs.
Bathroom design.
Improper installation may result in equipment leaking, instability, falling or overturning.
Standards and norms according to SNiP
Bathtub with claws, placed close to the wall.
The plumbing installation standards are as follows:
- height of the bathtub with legs (from the floor to the top edge) - 57-60 cm;
- height of legs (necessary for placing and servicing the siphon) -12-15 cm;
- the bath is placed close to the walls or at a distance of 0.6-1 m from the walls.
The height standards for the bathtub from the floor are designed for a person of average height and build. It is believed that by raising his legs to such a height, he will not experience any inconvenience.
It is recommended to select a bathtub of this size:
- so that you can stretch your legs in it;
- the person lying in it must have gaps between the body and the side of at least 5 cm on both sides;
- so that the bather's shoulders are above the water level.
How to install correctly
The recommendations given by SNiP also take into account other parameters. For example, the maximum threshold in a bathroom should be 3 cm. As for the placement of the bath itself, there are two most common installation options:
- in the center of the room;
- close to the walls.
In apartments, many install bathrooms near the walls. This installation is due to the small size of bathrooms. They try to install the bathroom in such a way that there are supports of three walls around it at the same time. This is the correct safe approach. Even after slipping, a person will be able to lean against the wall while maintaining balance.
In private houses and apartments with a large square area, the distance allows the use of the second placement option. Here the bathroom is installed in the middle of the room. This design solution is considered a classic option. It gives the bathroom a more luxurious and sophisticated look. However, there is a strict standard that must be taken into account.
The distance between the edges of the side to the nearest walls must be at least 1 meter. Such passages will allow you to easily walk around the bathtub from any side, without difficulty entering and exiting it. In any case, the decision about which choice to make and where to install the bathroom should be made based on the area and design of the room.
Existing types of baths
Another type of bath.
Different types of bathtubs differ in characteristics, the main of which is the material of manufacture. Devices can be:
- Cast iron. Durable, silent, retain heat well, heavy (up to 130 kg). Most models have simple rectangular shapes. Modern products have a polymer coating that is stronger and more durable than enamel.
- Steel. Lightweight (4-5 times lighter than cast iron), inexpensive, but water makes noise when pouring into them and cools quickly, and is susceptible to rust. Available in rectangular shape only.
- Acrylics. Lightweight, silent. The homogeneity of the material allows you to quickly remove scratches that appear on the surface. Differ in a variety of shapes. It is not recommended to keep water temperatures above 60°C in them.
- Kvarilov. The material consists of acrylic and quartz dust, is lighter than cast iron and stronger than acrylic, warm, does not deform if hot water is kept in it for a long time.
- Starilanov. They consist of 3 layers: at the base there is a steel form, on the outside there is a layer of high-quality acrylic, and between them (for connection) there is a composite polymer starilan. Warm, durable and comfortable. They cost 20-40% more than steel bathtubs.
- Made from polymer concrete. Durable, looks like they were carved from natural stone (onyx, malachite, marble of different shades, etc.). With proper care, the appearance of any stains on the surface is eliminated.
Let's consider other parameters that determine the types of baths.
Form:
- rectangular;
- corner;
- asymmetrical (right- and left-sided);
- round;
- in a quarter circle;
- sessile;
- with sheer walls (made only from modern polymer materials).
Dimensions:
- length of small ones - 100-130 cm, medium ones - 140-150 cm, large ones - 180-200 cm;
- rectangular width - from 65 to 100 cm;
- depth - from 37 to 48 cm.
Round single bathtub made of artificial stone.
Round bathtubs are made in 1- and 2-seater sizes; the product made of artificial stone can have a diameter of up to 3 m.
Wall thickness:
- acrylic - from 2-3 to 5-6.5 mm;
- cast iron - 6-8 mm;
- steel - from 1.5 to 3.5 mm.
Possibility of connecting additional options:
- hydro-, turbo- and aeromassage;
- radio and FM player, retractable speaker;
- chromotherapy lamps.
Let's talk a little about the structure and principle of operation of a jacuzzi
The times are not so far away when the presence of a jacuzzi in a house was a sign of the owner’s wealth. Today, such a hot tub is found in many homes and serves as a necessity, allowing you to relax and recuperate after a hard day at work.
Watch the video
But purchasing such a device is only the first and not the most difficult step. The main thing is to install it correctly. Naturally, you can invite an experienced specialist, but after studying the procedure in detail, you can cope with this task yourself.
The hydraulic massage bath consists of the following main elements:
- a bowl-shaped vessel, also called a font;
- hole for water intake;
- nozzles for releasing water jets and air;
- piping of the hydromassage system and aeration network;
- pumping station for pumping liquid through the hydromassage system;
- compressor for intake and pumping of air in the aeration system;
- drainage hole for transferring runoff to the sewer system;
- adjustment and control unit;
- support system with position regulators during installation;
- mixing device for adjusting the water temperature while filling the font;
- Remote Control.
The operating principle of a hydromassage device is simple - the bathtub is filled with water at the desired temperature through a mixer, and some of the liquid enters the piping of the hydromassage system.
The pump creates pressure, and the liquid bursts out of the nozzles at high speed, exerting a massaging effect on the human body.
In addition to this effect, you can turn on the aerator and get additional air action in the form of a pure stream or mixed with water. The entire process is controlled by a pneumatic or electronic system.
Modern hydromassage installations are equipped with additional functions intended for various purposes - playing music, radio, television, as well as creating color effects. Air aromatization, ozonation and other options are possible.
General installation rules
The strictly horizontal position of the bathtub is checked by the building level.
Before installation you must do the following:
- prepare the place where the plumbing fixtures will be installed - level and dry the floor;
- clean and wipe dry the drain connection pipe;
- determine a comfortable height.
A bathtub of any type is installed like this:
- strictly horizontally, using a building level, controlling the location of the side near the wall, the required slope towards the drain is ensured by the design of the bathtub itself;
- providing free space underneath for the siphon;
- if the floor under the bathtub is not solid, to protect it from subsidence, use metal gaskets in the form of plates with a thickness of at least 5 mm;
- When connecting the drainage system, all threaded connections must be tightened by hand; only the main overflow outlet can be tightened with a fork wrench.
At the end of installation, the structure is checked for stability, drainage and tightness (5 liters of water is enough).
It can be used only after the sealant has hardened well - from 4 to 24 hours.
Bath installation.
Normative base
Definition and functions of screed
According to the definition given in building regulations, a floor screed is an element of its overall structure and is a layer of cement-sand mortar laid on a permanent foundation.
The main purpose of the screed is to form a level base for the floor covering. Also, the primary requirements include high mechanical strength of the layer. In addition, the screed must absorb and distribute the loads transmitted from the coating to the base of the floor.
Other functions of this structural element include:
- Masking and protection of communications (pipelines, electrical cables, heating elements, etc.).
- Uniform distribution of loads on heat and sound insulating materials.
- Ensuring proper resistance of floors to heat transfer.
- Formation or compensation of surface slope.
Due to the fact that during operation this layer is under a decorative coating, it does not have an aesthetic function. It is enough that the filled surface is resistant to damage and deformation, relatively smooth and durable.
Regulatory documents
What standards should one be guided by when performing work on designing and laying screeds?
- Previously, the main SNiP for floor screeding was a document published back in 1988 - SNiP 2.03.13 - 88. Despite the fact that the main approaches to forming a “pie” of multilayer flooring in residential and public buildings and structures remained unchanged, modification of the technology and the emergence of new materials have caused changes in regulations.
- Today, the current document is SP 29-13330-2011. This standard is an updated version of SNiP for flooring from 1988.
- It should be noted that these standards apply only when designing structures. During the work, SNiP 3.04.01 - 87 is fundamental. This provision provides a description of the technology for performing finishing work, as well as the requirements for finished surfaces and permissible deviations.
- Since the rules are currently being gradually modernized, legal conflicts sometimes occur. Thus, SNiP 3.04.01 is not included in order No. 1047 of June 21, 2010, which regulates mandatory standards, therefore today it is purely advisory in nature.
Design marks
Requirements for the screed and its elements
Expanded clay coating
For pouring screeds, SNiP provides the following requirements:
The minimum thickness when laying on a solid concrete floor base is 20 mm, when laying on heat or sound insulating materials – 40 mm. If a pipeline is placed inside the cement layer, then there must be at least 20 mm of mortar on top of it.
Note! If a compressible material is used for heat or sound insulation, then the bending strength of the cement-sand fill should be selected at least 2.5 MPa. In this case, the thickness of the layer should exclude deformation of the underlying materials
- The minimum strength of the solution is 15 MPa (for installation under self-leveling polyurethane coatings – 20 MPa).
- Self-leveling mixtures that are laid to form a flat surface under the floor covering must have a thickness of at least 2 mm.
To control the plane use the rule
To check the geometric parameters of the laid layer, a 2 m long rule is used.
In this case, deviations from the plane cannot exceed the following values:
- For parquet, laminate, linoleum and polymer self-leveling floors - 2 mm by 2 m.
- For other coverings (tiles, etc.) – 4 mm by 2 m.
When carrying out inspections, these deviations from SNiP for floor screed are identified and eliminated first, since they have a serious impact on the quality of installation of the finishing coating.
Installation of bathtubs made of different materials
Depending on the material used to make the bathtub, the following is installed:
- on a frame;
- on legs;
- on the podium;
- on metal corners.
The legs of metal structures are height adjustable.
Oval shaped bathtub.
To attach the support and siphon, the bathtub is placed on its side.
If it is made of metal or sits on a metal frame, it must be grounded using a copper cable. To do this, its body is connected to a metal pipe (water, gas, sewer) or a large cross-section cable is laid into the room.
Grounding will prevent electric shock if the cable insulation is damaged or moisture gets into the terminal box of a heated towel rail, washing machine, hair dryer or other electrical appliance.
The nuances of installing cast iron plumbing
The cast iron bathtub is placed on supporting legs. They are made of durable metal, fastened with bolts and evenly distribute the load. To avoid damaging the floor surface, plastic caps are put on them.
Externally, the support legs look unattractive, so they are hidden behind bronze or polyurethane decor in the form of lion paws, plants, depicting heraldic symbols, or behind an oriental-style ornament.
In most cases, products are equipped with support legs, the height of which is not adjustable, because they are considered stronger and more reliable.
If the set does not include legs, you can purchase multifunctional supports that are at the same time durable, height-adjustable and decorative. They fit most old and modern models. But it is necessary to clarify the maximum load on the legs, because a 20-30 cm difference in the size of cast iron plumbing greatly changes its weight.
Acrylic bathtub on a metal frame.
To ground a modern cast-iron bathtub, a lug is provided into which a galvanized steel bolt is inserted. 2 turns of stripped cable are wound onto it and washers with nuts and a copper cable are mounted.
On old plumbing, the cable is connected to the bolted leg, drilling a hole in it for the ground jumper.
Adjusting the height of the steel bath
The height of the steel bath can be adjusted in the following ways:
- Tightening the bolts on the legs. This is done before gluing the bowl to the sealant. Adjustment range: 1 cm.
- Installing the bathtub on bricks. Additionally, its sides are supported on one side by a groove or wooden blocks fixed on the wall, and on the other by a sheathing made of profiles. The areas where the bowl will rest on the bricks are treated with a waterproofing mixture to prevent the metal surface from coming into contact with the mortar.
- Having selected or made to order a supporting metal frame of the required height - resting on the walls or floor-mounted, installed independently of them.
Errors
The following omissions cause discomfort during operation:
- Failure to comply with recommended levels and spacing between equipment.
- Lack of unoccupied space at the front.
- Problems with installation marks of plumbing fixtures with sewerage and flooring.
- Unaccounted for blocking access, creating obstacles with doors, curtains, and rotating parts of equipment.
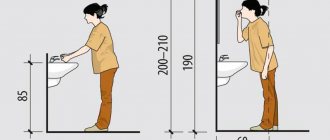
- Ignoring the individual characteristics of users: height, age, physical limitations.
People with disabilities.
Mismatch between bowl and niche sizes . With the right choice of type, the gaps between the cladding and the flanging are covered with a suitable plinth, otherwise you have to sew up the gap.
Grooving the partition.
Unaccounted for or excessive thickness of the finish makes it difficult to fit the bowl in the opening. The groove firmly holds the side, the tiles fit together beautifully, but replacing the product will result in damage to the tiles.
The non-perpendicularity of the lined panels leads to similar consequences if the linear dimensions are calculated without a margin. The corner pallet will have a wedge gap, the distortion will be noticeable under the curb.
Square check.
Slow water flow often occurs due to insufficient slope of the sewer outlet connected to the riser. Mud deposits partially block the cross-section of the pipe and reduce the original angle.
The optimal slope is maintained when assembling the site before installing the font. The gasket is controlled using a bubble level, laser tools or a cord stretched along the extreme marks.
Highly raised bowl . Maintaining the slope of the route with a remote riser results in lifting the structure - suffering when landing in the font. It is advisable to place the tank with the drain neck towards the riser, then the length of the pipe is minimal.
Excessive rise
Solution
The advice to raise the floor with a screed will entail an unwanted additional load on the floor, the difference in the threshold. It is preferable to lower the riser tee, but it will not be possible to implement the plan without destroying the tiles. The idea can be recommended for a shower room being renovated from scratch.
A thorough approach
the slope of the bathroom intentionally towards the drain, so that “the water flows out completely.” Don’t repeat the misconception: modern models have a bottom slope that eliminates any remaining liquid. The drainage problem is solved by proper sewer installation and timely cleaning of the system. An inclined installation is disharmonious with the finish, especially with tiles.
"Slide"
Horizontal alignment.
Container deformation . The situation is typical for acrylic and steel modifications installed on a flexible frame (supports). Don’t skimp on the frame; choose profiles with reserve.
Pliable supports for the acrylic model.
Many practitioners advise placing the container on a brick support and foaming the space between the slab and the bottom with foam. The solution guarantees rigidity, and the foam provides warmth and sound insulation. However, ventilation under the tank is disrupted, and access for cleaning the siphon and pipes may become worse.
"Floating" legs . The standard supports of budget products have a flimsy design; purchase a replacement, taking into account the connection method and the weight of the filled tank.
"Flimsy" supports.
Popular stick-on legs are inferior to classic types of fastening; adhesion strength depends on many factors. Defects in the floor surface are corrected before installation.
The lag of the curb occurs due to the movement of the bowl. The disadvantage is eliminated by increasing the rigidity of the structure, as suggested earlier. The edging is glued by filling the volume with water so that the structures assume a loaded position.
Hidden leaks . The screen is performed after completion of plumbing work. The tightness of the connections and the functioning of the drain are checked by completely filling the container. If the results are positive, stitching begins. They provide an inspection hatch, a movable or removable section.
The hatch (on the right) is not blocked. Sources
- https://kanalizaciyadoma.com/montazh/kakaya-vysota-vanny-ot-pola-schitaetsya-standartnoy-normy-i-pravila-montazha.html
- https://J.Etagi.com/ps/razmery-vanny/
- https://roomester.ru/interer/vannaya/razmer-vanny-standartnoj.html
- https://vplate.ru/vanna/razmery/
- https://o-vannoy.ru/vanny/razmery-vanny/
- https://iseptick.ru/santekhnika/vanny/vysota-vanny-ot-pola-standart-vysoty-ustanovki-avtosoxranennyi.html
- https://remont-om.ru/vannaya/vysota-vanny-ot-pola.html
- https://bouw.ru/article/visota-vanni-ot-pola
- https://santatrade.ru/skol-ko-vysota-vanny-ot-pola-standart/
What do you think of this article?
How many liters of water does it take?
With high tariffs for utilities, people try to save on water, and in the bathroom it is consumed in large quantities. Due to faulty plumbing, up to 15-20 liters are lost.
For one person with a standard rectangular bathtub, up to 100-150 liters of water are required
Showers are usually taken 2 times a day. Then the total amount of water per person is from 70 to 100 liters. To wash off dirt after taking water procedures, up to 10 liters of water are required, if the water is hot, then 5 liters. Rinsing takes from 15 to 20 minutes; without stopping the pressure, up to 50-60 liters will be consumed.
Manufacturers provide information about the composition and size of the material, as well as water consumption, in the product data sheet.
When choosing a suitable bath, you should take into account the build and height of each family member
Installation process
Let's look at it in more detail. There is nothing complicated about connecting plumbing equipment, so anyone who has never done anything like this before can handle it. But in order for everything to work out efficiently, experts recommend adhering to certain rules.
The instructions for installing the bathtub are as follows:
Installation must be done on a flat surface so that the plumbing fixtures have good stability. At the same time, it must have a weight that the floor covering can support. To avoid damaging the bathtub during the work, it is installed last. The location where the plumbing equipment will be located, as well as the installation method, is preliminarily determined. If you have a steel bathtub, then, as a rule, the legs used on it do not meet the performance characteristics, so they are installed on special stands that increase the support area. A key requirement is compliance with height standards.
It is worth noting that many people have absolutely no idea how to install legs on a bathtub. In most models they are immediately attached to the equipment, but they can also be supplied separately. In this case, you will need to fix them on the body yourself, using a special key and instructions given in the user manual.