What determines the height of the sewer outlet under the washbasin? Whether it is a sink in the kitchen or in the bathroom, the sewage system in an apartment and a private house is a network of pipelines connected to each other.
The requirements suitable for one plumbing fixture must correspond to the technological features of the installation of other products. In this regard, the height of the sewer outlet under the washbasin is of particular importance, since it is installed above all other appliances. The issue is quite complex and deserves detailed consideration.
How to calculate the optimal sink height
According to building codes, sinks in residential areas must be installed at a height of 80-85 cm, but studies have shown that this is not the most convenient location.
In this case, most people have to bend over a lot to wash their hands, so it is better to be guided by the anthropometric parameters of men and women. Optimal washbasin installation height (from floor to side) for men, women and children
| Men | 94-102 cm |
| Women | 81-93 cm |
| Teenagers | 65-80 cm |
| Children | 40-60 cm |
If the sink will be used by several people of different ages and genders, it is better to choose an average height - 86-93 cm from the floor, and for children, install a special stand or a second washbasin. True, such an arrangement is only possible for models with the ability to adjust the height - for “tulip” type washbasins or those that cut into cabinets, SNiP parameters are usually used (80-85 cm).
In addition, there are certain technical standards that regulate the location of the sink in relation to other interior items.
| Interior element | Distance to sink, cm |
| 25 | |
| 30 | |
| 25 | |
| 30 | |
| 20 | |
| 60 | |
| 60 |
The distance from the side wall to the edge of the washbasin should be at least 20 cm, and the free zone should be about 70 cm (if the sink is installed in a niche, this figure increases to 90 cm).
Before installing a sink in the bathroom, you need to carefully measure the room, consider the optimal placement of plumbing fixtures and furniture, and then draw a detailed diagram of the interior indicating all measurements. When purchasing a model, it is important to pay attention to the fact that the model’s fastenings correspond to the water supply system. Another important aspect is the choice of a faucet, which is best purchased together with a sink, since they may have a hole for the faucet or be blind.
Tulip-type sinks are equipped with a base of standard length, but it is possible to change the height of the sink at your discretion (though only if its design and configuration are quite simple). To do this, you need to cut the base of the sink or install it on any stand - the main thing is that so that it is reliable and stable. When installing plumbing, it is necessary to take into account the distance between the drain and the siphon: if the siphon is located below the level of the drain, the use of the washbasin can lead to serious problems.
If you plan to place a washing machine under the sink, its height should not exceed 70 cm, since there must be a fairly large gap between the appliance and the washbasin
When spinning laundry, the machine may vibrate, and if its edge touches the edge of the washbasin, the plastic coating of the appliance or the sink itself may be damaged.
Installation of the sink must be done using a level, and it is best to use a laser level, as it allows you to carry out work more accurately.
The easiest option for installing a washbasin for beginners is the overhead model, as it does not require special skills and knowledge. If the dimensions of the room allow, you can install two washbasins side by side. The distance between them should be 94-109 cm, and between the taps - 90 cm.
The correct choice and installation of a sink is the guarantee that the plumbing fixtures will serve its owner faithfully for many years.
SNiP Residential buildings on distance standards
The rules contained in the regulatory document are mandatory for the construction of any type of building - industrial, public, medical, educational and residential. However, there is an unspoken opinion that owners of premises in residential buildings and private buildings can deviate from the dictated standards if they themselves carry out their maintenance and operation.
Basically, such a retreat is made by the owners of premises with bathrooms, combined or frankly small. If the toilet is spacious enough, it is better to adhere to the established rules in order to use special rooms with convenience and safety:
- to the front (front) wall or wall with a door, if we are talking about a small toilet, the minimum distance is 53 cm. This is enough to not feel tightness in the knee joint;
- the maximum required distance from the frontal plane located in front of the seated person is 76 cm;
- the maximum distance from the front does not particularly need to be regulated, and if possible, the functional zone for a person can be more than a meter;
- from the middle axis of the toilet to the side wall, the established minimum is 40 cm. In some sources it is defined as 38 cm;
- the optimal distance from the central axis of the toilet is 45 cm. This is enough for comfortable operation of the plumbing fixture. But no one forbids installing at a greater distance, if the parameters of the allocated room allow it;
- in a separate toilet, the distance between the toilet and the wall on the left in standard buildings is usually equal to the distance to the wall on the right side;
- The location of the toilet in the toilet room is usually the center of the room, because the sewer pipe is supplied here. This also determines the position of the remaining toilets on the riser on the floors above and below;
- The second option for placing plumbing equipment is closer to the back wall. This does not make it possible to equip some kind of shelves or rack, but it is typical for the minimum dimensions of the toilet in apartments of standard construction, where the bathroom is separate;
- The toilet stall in Soviet-era houses was built according to size, when the central placement provided the necessary distances to the side wall and front surface with the entrance door located in it.
When arranging a shared bathroom, there are certain conditions that must be observed. These are standards for the distance of the toilet from other interior items that should be adhered to, even minimally.
But this is not a suitable option if the dimensions of one of the family members do not correspond to the average figures for which the building codes and standards are calculated.
Dimensions for installing bathtubs and showers
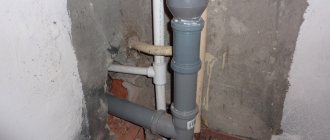
The shower cabin and bathtub are connected to the sewer using specially designed corrugations and pipes or tees with a diameter of 50 mm (see photo below). The level of the outlet from the wall of a pipe with a diameter of 50 mm should be 60 mm (from the level of the floor tiles to the axis of this pipe):
If this distance is higher, then you will have to build a podium for the bath.
By the way, the sequence of all repair measures depends on the type of bathtub. If the bathtub is ordinary, then first it is installed itself (details about installing a cast iron, acrylic or steel bathtub), and then the room is tiled. If the bathtub has a hydromassage device, then everything is done the other way around: the bathtub is installed last.
Selecting a location
The standard installation of a wall-hung toilet with installation is done near a niche with communications. If the tank does not fit into it, the pipes inside must be moved to the sides.
The mounted tank and installation are often covered with a false wall.
The marking is done in advance. A line is drawn on the wall that coincides with the central axis of the device, and the distance from the frame to the wall is measured (standard - 13.5 mm). The location of the toilet cistern is marked. The installation is aligned to the building level, after which marks are made for installation holes at the mounting points.
Hydraulic testing of pipes
After all water and sewer pipes have been laid and all requirements for the placement of water outlets have been met, it is imperative to test the pipeline or, as experts call it, pressure testing.
Pressure testing must take place under increased pressure of 10 atmospheres using a special press. To do this, all water outlets, except the farthest one, are closed with plugs (they will later protect the pipes during finishing), and a ball valve is screwed into the farthest water outlet.
The system is filled with water, then shut off and a special crimping press is connected to the tap. The tap opens and a pressure of 10 atmospheres is injected into the pipeline using a press (all pressure testing machines are equipped with pressure gauges).
If the pressure does not drop within several hours, then the system can be considered sealed and can be safely walled up. If not, then you should find the leak, fix the problem and test again.
CONCLUSION
After laying the pipes and carrying out hydraulic tests, you can begin finishing – tiling the bathroom with ceramic tiles. The installation of plumbing fixtures should be carried out at the final stage.
Properly done piping in a bathroom using modern pipes and technologies will serve its owner for decades.
What dimensions should sewer outlets have to install different plumbing fixtures? Dimensions of sewer pipe outlets for plumbing connections
In previous articles, the rules that must be followed when installing plumbing were discussed. Now let’s figure out what sizes of sewer pipe outlets
.
The shower cabin and bathtub are connected to the sewer using specially designed corrugations and pipes or tees with a diameter of 50 mm (see photo below). The level of the outlet from the wall of a pipe with a diameter of 50 mm should be 60 mm (from the level of the floor tiles to the axis of this pipe):
If this distance is higher, then you will have to build a podium for the bath.
For a washbasin (sink), the height of the sewerage system from the floor (pipe outlet from the wall) should be 530...550 mm from the level of the clean floor to the axis of the pipe:
For an attached toilet – 180…190 mm (depending on the model):
For a wall-mounted toilet – 220…240 mm.
For a kitchen sink without a chopper – 300…450 mm.
For a kitchen sink with a chopper – 300…400 mm.
For washing machine and dishwasher – 600…700 mm.
(all distances are given from the level of the clean floor to the axis of the pipe)
Let me clarify: the above values are common, standard, but with today’s variety of companies and models, it is necessary to approach each case personally.
If you want to install some new, exclusive plumbing equipment, then you should first look at the technical map of installation and connection dimensions specifically for this equipment. This must be done earlier than supplying water and laying a drainage ditch - so as not to have to redo it, therefore it is better to purchase the desired plumbing fixtures in advance (if there is space for storage).
By the way, the sequence of all repair measures depends on the type of bathtub. If the bathtub is ordinary, then first it is installed itself, and then the room is tiled. If the bathtub has a hydromassage device, then everything is done the opposite: the bathtub is installed last.
How many bathrooms are needed? If we are talking about an apartment with an open plan, then first you need to impartially assess the dimensions of the place, as well as the locations of the risers to which all plumbing equipment will be connected. As a standard, it is better to equip two separate bathrooms - a guest and a master (again, if space allows). The guest room will only have a toilet and sink.
Naturally, residents living in houses with a standard layout do not have the ability to make several bathrooms, so you just need to decide the question: is it really necessary to bother with remodeling the bathroom or should you just limit yourself to replacing plumbing equipment and cosmetic repairs?
In the following article there is still little information about installing plumbing fixtures with your own hands.
in the light of water supply and sewerage design. Namely, about electronic sockets in the bathroom.
Accessories for installation of sewer pipes
Let's look at the various corners and joints for plastic sewer pipes used for installation.
Tee 90 degrees, diameters: 32, 40, 50, 110 mm. One of the main and frequently found spare parts. Used to organize drainage to the toilet and in other solutions. You often hear from “very experienced” plumbers that the toilet outlet should not enter a horizontal bench (pipe) at an angle of 90, otherwise there will be constant blockages. I can say with full responsibility: this is not so - in my practice there are a great many toilet connections with such a tee and during operation there is no hint of blockages.
In general, plumbers have a rule: if possible, do not make 90 angles on the “ditch”, it is better to put two 45 angles
. This is indeed true and it is worth adhering to this rule, however, in the case of a toilet, in 9 out of 10 cases it is technically more convenient to make the connection with a 90-degree tee. And there’s nothing wrong with that!
Transitional eccentric coupling 110-50 mm.
, popularly called “bottle”. Designed for transition from the 110th pipe to the 50th. In the bathroom sewer, it is used, as a rule, after organizing the outlet to the toilet - then the 110th diameter is unnecessary and installation continues with the fiftieth.
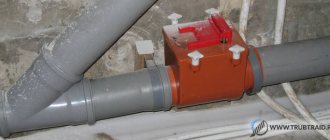
In the photo above we see the assembly: cross 110-110-110-50
and "bottle". This is how the outlet to the toilet is organized, the continuation of the D50 lounger to the left and the D50 outlet up. The upper outlet in the example above is used for the drain of the washing machine.
When purchasing crosspieces, you need to be careful: they differ in left and right.
In addition to the cross and bottle, there are many variations of transitions with 110 mm. by 50 mm. Most of these connectors are differentiated into left and right
. Some examples below:
Unlike tees 110 mm, for a diameter of 50 mm. and smaller is better to use smooth 45 degree angles - technically there is no obstacle to using two 45 angles instead of one 90.
Regardless of the pipe diameter (32, 40, 50 or 110 mm), 45 and 90 degree angles are not the only ones. There are angles of 30, 67, 87 degrees. Thanks to them, various installation problems are solved when the idea is to turn the pipes at an angle other than straight.
It is worth noting that recently a great many variations of angles and transitions have appeared; it is practically impossible to show all the existing ones.
White sewer pipes and fittings are increasingly common
colors. They fit perfectly with gray ones and differ only in color and wall thickness. The walls of these pipes are thicker, so the movement of wastewater is more silent.
Now let's discuss pipe fastening. Standardly, there are two types of brackets for fastening sewer pipes - adjustable and non-adjustable.
Non-adjustable plastic clips are used primarily for mounting on walls, since there is no possibility of creating a slope when mounting to the floor. Although a “savvy” master will find a way to attach the clips to the floor at different heights, if you have no choice, you can attach the clips to bars of different thicknesses.
The clamp sizes are standard, for pipes D32, D40, D50 and D110.
A pipe clamp with a pin gives more room for action: diameter adjustable within small limits, adjustable height of mounting on the floor or mounting on walls. These fasteners are very versatile and are suitable for any pipes, not just sewer ones. Dimensions suitable for plastic sewer:
«1»
(adjustable diameter 32-36 mm. for D32 mount)
«1¼»
(38-43 mm for mounting D32 in socket and for D40)
«1½»
(47-51 mm for socket D40 and D50)
«2»
(57-61 mm for D50 socket)
«4»
(110-116 mm for D110)
The studs for these clamps come in different lengths, with M6-M10 threads. Sometimes it is convenient to purchase a long hairpin separately and make the desired length yourself.
The fasteners should be placed near the sockets (or on the sockets directly). Usually one fastening per horizontal elbow is sufficient. When secured to a socket (as in the first photo of the publication), the assembled pipes will be difficult to disassemble without loosening the clamps, this must be taken into account.
Errors made during the installation process that can cause pipes to become clogged
Pipes from sinks, sinks and other plumbing fixtures must be mounted on a connection at a right angle of 90 degrees. If two devices are installed and the drains are drained towards each other, a blockage may occur in the tee of the pipe, which goes directly into the drain pipe. In this case, it makes no sense to clean the pipes from the side of the sink or washbasin using a spiral or hydrodynamically using a hose. If it comes to two sinks connected next to each other, then it is clear that from one sink the hose will pass to the second sink, but it will not be able to turn in the direction of the main drain pipe
One way or another, it will be quite difficult to clean the sewer. Another important mistake is that the drain pipe coming from the washbasin or sink is too high in the bathroom. As a result, the process of draining wastewater into the sewer pipe becomes difficult.
Many people decide to move pipes and plumbing fixtures, which include bathtubs, sinks and sinks, to another location that is not provided for in the project. If pipes are changed, the main problem may be that the outlet to the device will be rigidly tied to the outlet of the pipe in the riser, and the situation is very difficult to change. When connecting sinks and sinks, everything should be fine, since there is a certain height reserve, taking into account the fact that plumbing fixtures are suspended at a height of approximately 90 cm. But despite this, many inexperienced installers may not take into account or think through such a detail. It is easier to make a mistake with the height when connecting a bathtub and shower. Often the drain is located above the floor surface. It is quite difficult to lift a heavy bathtub yourself, so a simple solution is to install the drain pipe above the siphon outlet. Thus, the pipe is often laid without the required slope, which can also cause clogging of the sewer. You can often encounter a problem in which pipes that are supposed to be attached to the wall from the outside are not fixed correctly. Products may sag, and counterslopes and other practically irreparable cases often form. Of course, this does not in any way affect the proper functioning of the sewer system, but this feature can cause blockages, which will require frequent cleaning of the pipes.
Causes of incorrect height ratio
The main reasons for the discrepancy between the levels of the tee and drain holes should be considered:
- errors made during installation or reconstruction of the system;
- the use of modern types of plumbing that require a different system configuration;
- re-equipment of kitchen or other premises, requiring installation of sewerage under the floor covering.
Owners of cafes or bars that open in unprepared premises often face similar problems. They constantly have to solve plumbing installation issues. For example, how to install a toilet if the sewerage system is higher than the drainage elements. In addition, many modern appliances are equipped with a floor outlet, which requires the assembly of a separate line.
Also read: Do-it-yourself homemade sewer pump - vacuum pump
Schemes and standards for the placement and installation of plumbing equipment and appliances
Previously, waste and overflows were used in bathrooms, but then they became widespread for sinks.
Flat sink drain
In the case where the sink needs to be installed above the washing machine, as a rule, it has a flat shape. This saves space and is the most suitable option in this case.
Such a sink, which is called a “water lily,” must have a special flat drain. It must be included in the package, since it is almost impossible to select it separately.
In addition, the “water lily” is a sink with a side drain. Its peculiarity is that the hole for water drainage is located on the side, and not at the bottom. This may cause some inconvenience as the water may not drain completely. To avoid siphon blockages, you will need to remove the liquid yourself by soaking it with a rag.
If you are willing to put up with these shortcomings, this will allow you to free up additional space in the bathroom.
Therefore, the choice of sink drain should be given special attention as it will ensure the efficient operation of the system. Plumbing measures in the home can be divided into three types:
Plumbing measures in the home can be divided into three types:
- Maintenance work, for example, fixing a leaking faucet or clearing a clogged shower drain;
- Work to replace pipes or broken equipment;
- Installation of new plumbing and pipeline communications.
Routine plumbing repairs are not regulated by any regulations or standards. However, measures to replace pipes or install new plumbing equipment will necessarily entail the need for coordination with the relevant organizations, which will require strict compliance with the rules for installing plumbing fixtures in accordance with current standards.
The motivation of bureaucrats is simple and clear:
- The transfer of utility networks and the installation of plumbing fixtures in a new location is called redevelopment, which may entail changes in the configuration and size of the room, requiring changes to the apartment’s registration certificate;
- Relocating plumbing fixtures is also a remodel.
Naturally, it is easier to do everything according to the letter of the law, then the preparation of technical documentation for housing will not cause problems.
- SNiP 2.08.01−89* “Residential buildings”;
- SNiP 2.04.05−91* “Heating, ventilation and air conditioning”;
- SNiP 3.05.01−85 “Internal sanitary systems”;
- SNiP 2.04.01−85* Internal water supply and sewerage of buildings.
The modern market of plumbing equipment is represented by a wide range of bathtubs, showers, sinks and sinks, toilets and bidets, valves and mixers. Despite all the variety of devices in terms of functionality and methods of controlling their operation, the methods of connecting household sanitary equipment with residential pipeline communications are completely unified and “submit” to the requirements of GOSTs and SNiPs.
It is recommended to install household plumbing after installation of utilities before finishing the room. Water connections for installing appliances must end with water sockets, which are a mandatory attribute of a home’s water supply system. Water outlets are specially rigidly fixed to protect the water supply system from vibration effects that occur during the operation of connected household plumbing fixtures.
The distance between the axes of the outlet fittings provided for hot and cold water must be strictly 15 cm.
Instead of sockets, it is allowed to use elbows, tees, couplings or manifolds for connecting mixers or other types of taps.
Another general requirement for the installation of plumbing fixtures is to ensure free access to the equipment, for which SNiP stipulates the size of the free space around each type of fixture (bathtub, washbasin, etc.).
The height of placement of plumbing fixtures is regulated in clause 3.11 and clause 3.15 of SNiP 3.05.01−85 “Internal sanitary systems”, and pipeline fittings to the devices are installed in accordance with clause 10.5 of SNiP 2.04.01−85* “Internal plumbing and sewerage of buildings."
Mixers common and separate
The faucet for delivering water to the sink, bathtub or shower can be separate for each device or used for two or three at the same time. The most common type is a wall-mounted faucet with a swivel spout and shower head, which is mounted above the bathtub or sink (or between them) and serves both containers.
The height of the mixer above the bathtub is determined by the convenience of adjusting the water when using both plumbing fixtures, and the accessibility of the adjustment lever or valves for a person lying in the bathtub.
The above diagram takes into account the standard height of the bathtub; when lifting it onto a podium, embedding it in a bed, or using another installation system, the parameters change.
Important: a mixer with a thermostat and automatic water temperature control can be installed higher than usual.
In shower compartments and stalls, faucets are usually installed so that other plumbing fixtures are not served by them. At the same time, a distinction is made between devices with a standing (mostly) and a sitting (much less often) user position. Taking into account the production of shower boxes and cabins of standard sizes, it is important to take into account their dimensions when choosing the position of the mixer.
There are no such standards for compartments; here the size of the room depends only on the layout of the rooms allocated for hygienic procedures and the intended design. However, on average, the height of the mixer in the shower from the tray (bottom) is 800...1000 mm. This refers to the position of the housing with the adjusting elements.
To select the correct position, take into account the composition of the users and their dimensions, as well as the usual postures while taking a shower. If a seat is provided in the shower stall (compartment), the mixer body is mounted taking into account convenient access to it for a seated user.
If a bathtub is used as a shower tray, when calculating the distance, the height of the bathtub from the floor with legs (standard) and the distance from the finished floor to the bottom of the bathtub are taken into account.
Dimensions for connecting non-standard plumbing equipment
Let me clarify: the above values are common and standard, but with the current variety of manufacturers and models, it is necessary to approach them individually in each case.
If you intend to install some new, exclusive plumbing equipment, you should first look at the technical map of the installation and connection dimensions for this particular equipment. This needs to be done before supplying water and laying a sewer system - so as not to have to redo it, so it is better to purchase the desired plumbing fixtures in advance (if there is space for storage).
Exceptions to the rules
There are exceptions to the norms that determine the optimal location of the toilet. Their presence is determined by the technical characteristics of the room.
The reason for this may be: insufficient free space, the location of communications or the personal desire of the owner.
Violation of technical regulations for the location of a toilet is not a violation of the provisions of any law if this sanitary point is located in a non-state institution or outside a special purpose facility: hospital, kindergarten, school, military unit and the like. The owner of the premises is free to determine the location of the bathroom.
Sink drain
The sink drain is a necessary element for its installation. It performs important functions, namely: it protects the room from the smell of sewage and prevents the pipe from clogging with solid particles that penetrate through the hole in the sink.
How a sink drain works
The sink drain design consists of the following parts:
- curved siphon;
- sewer pipe.
When the water is flushed, the liquid enters the siphon, passes along the bend, rises up the curved elbow, and then falls down into the general drain. In this case, the water remains in the lower part of the curved elbow. This promotes the formation of a water seal, which prevents odors from entering the room. In addition, small objects and solid particles remain in the elbow part of the pipe, which can fall into the sink. To remove them, this part of the pipe is periodically removed and cleaned.
Sink drain diameter
Depending on the diameter of the sink drain, the siphon holes have the following dimensions:
- 32 mm - designed for washbasins with one hole and small diameter sewer pipes. This is the most common option;
- 40 mm – designed for large sewer pipes.
Sink waste and overflow
Recently, sink drains equipped with an overflow system have become very popular. The advantage of such designs is that the water does not go beyond the edges of the sink. A special overflow hole is installed at a certain level.
Installation of wall hung toilets
How to install a wall-mounted toilet so that the system works properly and does not cause any complaints? The first step you need to take when starting to install a wall-hung toilet with your own hands. There will be installation of a steel frame, called installation. Using dowels, the installation is attached to the wall and floor surface. A 110 mm sewer pipe and water supply must be connected to the place where the toilet will be located. The installation of toilet bowls must be carried out in compliance with horizontal and vertical levels. The installation process itself is quite simple: the design includes special rods and studs that allow you to attach the frame to the wall.
The height of the bowl is adjusted taking into account the height of the residents who will most often use the toilet, so the selection of this indicator should be done in a practical way. As a rule, the installation height of the toilet from the floor is about 40 cm. Further installation of the wall-mounted toilet involves connecting the water supply to the flush cistern. It is advisable to use reliable pipes that can last much longer than flexible hoses. When installing the liner, it is necessary to close the valve located in the tank.
The next step is to connect the toilet outlet to the sewer, for which you will need a corrugation (read: “How to install a corrugation on a toilet correctly”). To check the functionality of the system, the bowl must be placed on the installation and drained. There is no need to securely fasten the bowl, since its final installation is done last. The installed frame is covered with pre-purchased plasterboard, which is attached directly to the frame and to the wall.
To make the correct cuts on drywall, you should use the instructions for the attachment: it usually contains a diagram that greatly facilitates the process of creating technological holes. When the frame is installed and covered with plasterboard, you can begin cladding, for which ceramic tiles are used. When choosing a tile, you need to take into account its aesthetic qualities and the planned interior of the bathroom. The installation of the wall-hung toilet is complete and it can now perform its functions.
Errors made during the installation process that can cause pipes to become clogged
Pipes from sinks, sinks and other plumbing fixtures must be mounted on a connection at a right angle of 90 degrees. If two devices are installed and the drains are drained towards each other, a blockage may occur in the tee of the pipe, which goes directly into the drain pipe. In this case, it makes no sense to clean the pipes from the side of the sink or washbasin using a spiral or hydrodynamically using a hose. If it comes to two sinks connected next to each other, then it is clear that from one sink the hose will pass to the second sink, but it will not be able to turn in the direction of the main drain pipe
One way or another, it will be quite difficult to clean the sewer. Another important mistake is that the drain pipe coming from the washbasin or sink is too high in the bathroom. As a result, the process of draining wastewater into the sewer pipe becomes difficult.
Many people decide to move pipes and plumbing fixtures, which include bathtubs, sinks and sinks, to another location that is not provided for in the project. If pipes are changed, the main problem may be that the outlet to the device will be rigidly tied to the outlet of the pipe in the riser, and the situation is very difficult to change. When connecting sinks and sinks, everything should be fine, since there is a certain height reserve, taking into account the fact that plumbing fixtures are suspended at a height of approximately 90 cm. But despite this, many inexperienced installers may not take into account or think through such a detail. It is easier to make a mistake with the height when connecting a bathtub and shower. Often the drain is located above the floor surface. It is quite difficult to lift a heavy bathtub yourself, so a simple solution is to install the drain pipe above the siphon outlet. Thus, the pipe is often laid without the required slope, which can also cause clogging of the sewer. You can often encounter a problem in which pipes that are supposed to be attached to the wall from the outside are not fixed correctly. Products may sag, and counterslopes and other practically irreparable cases often form. Of course, this does not in any way affect the proper functioning of the sewer system, but this feature can cause blockages, which will require frequent cleaning of the pipes.
During the renovation process, a lot of questions arise. I will highlight the most common ones that arise when renovating bathrooms.
What is the slope of the sewer pipe?
– for a pipe with a diameter of 100 mm – at least 2 cm/meter – for a pipe with a diameter of 50 mm – at least 3 cm/meter
At what height is the sewage system installed...
– for a wall-hung toilet 160-190 mm (depending on the manufacturer and model), local fitting will give the most correct answer – for a wall-hung toilet 220-240 mm from the floor – for a shower cabin with a tray 60 mm – for a washbasin 500-550 mm – for bathtubs 100-150 mm – for kitchen sink 300-400 mm – for washing machine and dishwasher 500-650 mm
If, for technical reasons, the sewer outlets for the bathroom (shower stall, toilet) are made higher, then under the bathtub (shower stall, toilet) you can make a podium to the required height. Perhaps this situation will upset someone, but on the other hand, this podium can play a decorative character.
An example of a podium for a shower stall.
At what height is cold and hot water discharged...
– for a wall-mounted toilet 400-600 mm (depending on the water supply to the tank – bottom, side or rear), local fitting will give the most correct answer – for a shower cabin with a tray 1200 mm from the bottom of the tray, and shower heads – 2100-2250 mm (from the bottom of the watering can to the bottom of the tray) – for a bathtub 750-800 mm from the floor – for a washbasin 550-650 mm – for a kitchen sink 500-600 mm – for a washing machine and dishwasher 500-750 mm
Distance between water outlets...
– for a shower cabin and for a bathtub 150 mm from the central axes – for a washbasin and for a kitchen sink 100 mm (not so rigidly tied, as they are connected by flexible hoses)
The bathtub is mounted at a height of 600 mm, the washbasin is 850-900 mm. These sizes can be changed and depend on the height of family members. And they drag along with them the adjustment of other sizes (output of water outlets)
And do not forget that the floor level in toilets and bathrooms should be 15 - 20 mm below the floor level in adjacent rooms, or the rooms should be separated by a threshold. And also do not forget about waterproofing in the bathroom and toilet.
It is advisable to purchase all the plumbing before the installation of plumbing begins. communications. This will simplify the plumber’s task and reduce the risk of mistakes.
About installation schemes for household sinks
Modern industrial production has established the production of sanitary sinks of various configurations. At the same time, the variety of appliances for baths and kitchens affects not only the design component. Schemes for installing sinks in bathrooms and kitchens may also differ.
Thus, the usual installation scheme for a simple sink involves installing two brackets on the wall. Then the device is simply “laid” on the brackets, the water inlet/outlet lines are connected, and that’s the end of it.
However, even the simplest installation requires adherence to established installation rules:
- Height calculation: floor – top edge of the bowl.
- Alignment with a building level along the horizon.
- Calculation of the optimal distance between brackets.
- Easy-to-maintain communications supply.
The designs of earthenware (porcelain) plumbing fixtures are heavy and quite large. These factors should be taken into account during the installation process. Therefore, installation plans for sinks in rooms with a bathroom are usually built taking into account all expected loads.
The mounting brackets that support the sink are secured with screws designed to support at least twice the weight of the installed product. You should also make reliable seats for the mounting screws. The walls where the brackets fit must be strong
The diagrams indicate fastening methods and parameters of fastening fittings. For example, the same support brackets for a simple sink need to be secured with screws (dowels, bolts, screws) of the appropriate size and load capacity.
Installation of sinks on a pedestal
Suspended structures with a simplified configuration give property owners more freedom to manipulate the installation height. Regarding sink models that are placed on a pedestal, such benefits are no longer noted. The installation height of the tulip sink here is tied to the height of the pedestal.
The so-called “tulip” limits movement in height, but hides communications under the sink, while simultaneously serving as a support. The last two factors explain the popularity of such plumbing among the people.
Circuit solution for installation:
- choice of location;
- horizontal and vertical alignment;
- marking the attachment points.
The recommended basic height for sinks of this type is 850 mm from the floor to the top edge of the bowl. The distance from the floor surface to the wall attachment points is 780 mm. The optimal horizontal distance between the mounting points is 280 mm.
The recommended article will introduce you in detail to the rules for installing plumbing fixtures with a pedestal.
The indicated values are relevant for medium-sized plumbing fixtures. Installation of larger models will require adjustments. In any case, the documentation for the new device contains installation criteria for all sink sizes.
Installation of the bowl and connection of communications are completed. The master only needs to place a pedestal under the sink, after which the system will be ready for use. Thanks to the pedestal, details of technical connections are hidden, which is no less important
Typically, fasteners and mounting hardware are included with the device. If these are not available, they can be purchased separately. A standard installation kit of fasteners contains a pair of spacers and the same number of screws and dowels.
It should be noted that there are models of bathtub sinks with decorative pedestals on sale. This design eliminates the function of the pedestal as a supporting component. It simply covers the sink siphon and connection points to communications.
Installation of plumbing fixtures with a decorative pedestal is carried out as follows:
- A sink is attached to the marked surface of the wall.
- A mixer tap is installed.
- The device is connected to the cold water/hot water supply lines using flexible hoses.
- A siphon system is installed.
- The pedestal is installed according to previously marked landmarks.
Attaching a sink to the wall does not seem to be a difficult process. But here it is important not to overtighten the fasteners. Earthenware or porcelain is a fragile material. The standard installation scheme for bathroom sinks involves fastening with two screws.
There are special holes for this on the back wall of the device. The softness of the suspension (shock absorption towards the wall) is ensured by silicone gaskets.
Circuit solutions in the “Moidodyr” style
Complex installation diagrams with markings and adjustments do not threaten the floor-type "moydodyr". This is one of those bathroom plumbing options that is actually done on a turnkey basis. That is why Moidodyr floor systems have won consumer sympathy.
The installation basics here come down to assembling the furniture cabinet and then laying the sink on the countertop. The installation height of the sink, in this case, depends on the height of the cabinet. But what is noteworthy is that furniture, as a rule, has support legs equipped with a height adjustment mechanism.
The convenience of the floor-standing “Moidodyr” series devices is an obvious fact. With this installation option there is no need to mount the sink to the wall. However, there are devices of the same type that are mounted according to the wall hanging scheme
Meanwhile, there are also suspended-type moidodyr structures. Moreover, there are two types of such products - for installation in the corner of a room with a bathroom and for installation on a flat wall. Such a project will have to be installed according to a full installation scheme - with marking, drilling, and creating fasteners.
True, with any “moidodyr” installation, the standard dimensions remain relevant:
- distance from the floor to the outlet point of the sewerage system (510 - 590 mm);
- distance from the floor line to the cold water and hot water outlet points (560 - 650 mm);
- distance between the cold water and hot water outlet points (80 - 150 mm).
As can be seen from the specified standard parameters, there is sufficient headroom when manipulating the installation. Nevertheless, each sink of a specific “moidodyr” model is often distinguished by individual circuit solutions. Projects contain several components, and the sink is only one of them. Moreover, there are models of sinks with or without space for a mixer tap.
Here is shown one of the possible schemes for attaching a mixer tap to the underside of a bathroom sink. Two studs, a thrust washer and two M6 nuts are used. A scheme with one M22 nut is also often used
Installation and connection of the mixer tap is carried out in the traditional way:
- place a gasket on the threaded end switch;
- insert the mixer tap into the hole in the sink;
- place the second gasket on the end switch from below;
- screw and tighten the lock nut;
- connect flexible hoses to the cold water/DHW lines.
According to the standard scheme, the siphon output is also connected to the sewer line. Typically, a corrugated tube with a diameter of 40-50 mm is used for these purposes.
Rational installation of water lily shells
The installation scheme with rational use of the space under the sink seems interesting. Obviously, this space can be usefully used to accommodate some household equipment related to the bathroom.
For example, place a compact washing machine there. You just need to choose the plumbing fixtures of a suitable configuration.
Such sinks include models of the “water lily” series and similar ones. The design feature is that the drain pipe is located as close as possible to the rear wall of the device (in the center, left or right). The bowl shape is flattened (height 130-160 mm)
If you plan to place it under the washing machine sink, it is recommended to choose models that use a horizontal drain pipe.
But the recommendations here are justified by the fact that the horizontally located drain pipe allows you to push the machine closer to the wall. That is, the use of free space is maximized.
Judging by the operation, the horizontal drainage scheme does not seem entirely successful. This arrangement is fraught with frequent congestion.
Both from the point of view of design and in terms of comfortable operation, the installation diagram for installing water lily sinks requires a clear combination of two objects in terms of overall dimensions. That is, in width and length from the back wall to the end part, the sink and washing machine should be almost level.
An even more convenient installation option is considered to be a project where the length of the water lily sink extends 50-60 mm beyond the line of the front panel of the washing unit.
Installation diagram with rational use of free space in the bathroom. This option is especially relevant for small rooms, where every meter of space is in short supply.
Installation of a plumbing fixture must be carried out on special mounting brackets. There is always a small gap between the top cover of the machine and the bottom of the sink, allowing you to move the machine freely if necessary.
The optimal height size for a washing unit is 650-700 mm. With these parameters, installing a sink within the height standards of 800-850 mm will not be difficult.
Siphons for water lilies are slightly different in size (they are smaller), but the installation diagram is no different from the usual version.
Sink-countertop as a single project
To place a washing machine in tandem with a sink, complex solution schemes have recently begun to be proposed. The design of two different elements forms a single whole.
The functionality and convenience of such solutions are attractive, but their purpose is large bathrooms. If desired, you can receive a draft individual plan. However, the cost of such solutions is not affordable for everyone.
The choice of such designs is limited to two options:
- the tabletop is one piece with the bowl;
- tabletop with mortise bowl.
This design is installed in the same way as is done with other types of devices. For example, if there is a countertop with a built-in sink, the board is installed first, then the sink bowl is installed.
The tabletop is laid on mounting metal corners. The location of these elements is preliminarily marked taking into account the future location of the upper part of the tabletop at 850 mm from the floor level.
Strong corner brackets and wall corner supports are required to secure the elements of the sink-countertop scheme. Such projects are usually built on stone countertops, the weight of which requires reliable fastening.
The supply of communications is carried out based on the power supply of the washing machine and sink, as well as taking into account the load on the sewage system from two devices simultaneously. The entry/exit points of communications must comply with the parameters indicated in the technical documentation for the machine and plumbing.
Standards for installation dimensions are usually taken as follows:
- height from the floor to the top edge of the bowl (850 mm);
- height from the floor to the bottom of the siphon (700 mm);
- height from the floor to the cold water/hot water supply and sewerage points (600 mm);
- distance between cold water/hot water points (at least 150 mm)
It is recommended to install countertops based on natural or artificial stone. Wood, and especially drywall, even with strong protection against moisture, will not last long in a bathroom.
How to install an overhead sink on a countertop, as well as how to choose it correctly, is described in detail in the following article.
Siphon connection diagrams
Regardless of the design of bathtub sinks and methods of their installation, siphons are traditionally used:
- single-turn;
- double-turn;
- bottle.
The use of a one- or two-turn siphon is typical for “water lilies”, when it is necessary to free up as much free space under the sink as possible to accommodate a washing machine or other household items.
The name “single-double turn” was obtained due to the presence of one or two pipe bends in the circuit. Due to such bends, a hydraulic seal is created inside the line.
Another option, “bottle”, is the most common. It differs from the first in the absence of bends, the functions of which are performed by a special “bottle” with a drain pipe diverted from the top of the structure. This scheme is more convenient than the first when performing maintenance - cleaning the line in case of a blockage. At the bottom of the “bottle” there is a technical cap that can be easily unscrewed.
How to choose a stove for a summer house
The most convenient stoves for cottages made of cast iron are considered to be convector options. However, choosing one oven from the entire huge range of convection ovens is not as easy as the others.
- Water-heated furnace - the best furnaces and schemes with a water circuit. Tips for choosing and do-it-yourself installation features (95 photos)
- Exhaust furnace - installation, selection and necessary equipment for exhaust furnaces (85 photos and videos)
- Ceramic kiln - review of the best models and tips for using them at home (130 photos)
To make the right choice, you need to determine several different parameters.
In addition, you need to pay attention to the size and purpose of the stove
Another selection rule is to determine the additional functions that the stove should have. For example, the presence of an oven or hob. Thus, choosing a cast iron stove for your home or cottage is not at all difficult.
Marking, scoring and laying
After choosing the type of wiring, you can begin marking the pipeline routes. For polypropylene and copper pipes, all connections occur at right angles.
And for metal-plastic and cross-linked polyethylene pipes, the grooves can be laid with curves at the corners.
The grooves can be hollowed out with a hammer drill, cut with a wall chaser or a grinder with a diamond disc for stone. This is the dirtiest and dustiest stage of the work.
When laying pipes, it should be taken into account that it is customary to lay the hot pipe on top and the cold pipe on the bottom.
The size of the grooves should be such that the pipes can easily fit into the groove with thermal insulation made of foamed polyethylene placed on them, which, after walling, will compensate for the thermal expansion of the pipes.
In the space under the bathroom, it is not at all necessary to trench the wall for laying pipes; this place is already closed. To fasten pipes in grooves, you can use standard clips, but they take up a lot of space, so dowels and copper wire are often used.
In order to accurately align the water sockets of the bathtub mixer for all types of pipes, there are special mounting strips where the pipe outlets are located at a distance of 150 mm. It is recommended to use them.
When laying horizontal sections of sewer pipes, a slope of 3 cm per 1 meter of length should be observed.
When turning 90 degrees, it is better to use two 45-degree corners, with the exception of the exit to plumbing fixtures.
When assembling sewer pipes, do not forget about the cuffs, which should be lubricated with technical petroleum jelly.
Advantages and disadvantages
In general, the installation has the following advantages:
- beautiful appearance, accordingly, this is reflected in the overall design of the room;
- convenient to clean the room;
- takes up little space;
- good sound insulation;
- Warranty period – from 10 years.
The Geberit brand has many obvious advantages. The main ones are: ease of maintenance of the equipment, as well as the use of structures made of high-quality and reliable materials.
Here are a number of advantages of the installation from the manufacturer Geberit, namely:
- the structure is made of steel;
- toilets are tested - they are loaded with a load of up to 500 kg;
- the tank is made of HDPE, it is a one-piece, seamless tank;
- the unit is 100 percent sealed;
- the flush elbow is welded three times;
- functional units have comfortable access;
- spare parts will be supplied under warranty for 25 years;
- The device is easy to install.
It is worth noting such negative aspects in using the installation as:
- high price;
- complex installation;
- it is difficult to immediately understand that there is a leak, since all hoses are covered with false panels;
- legal component - utility services do not allow closing the riser, so you have to get the approval of these services so that there are no problems in the future.
Should I follow the standard?
Most builders, finishers and plumbers are well aware that the standard, optimal height of a bathroom sink is 85 cm.
These standards were developed and tested back in Soviet times, but are still observed, especially when arranging bathrooms in administrative and commercial buildings. When renovating a private apartment, if necessary, you can deviate from the generally accepted installation standard.
In conclusion, I would like to say that inside your apartment, and even more so in a private house, you have the right to install a sink inside the bathroom at any height convenient in specific conditions.
Whether or not to follow installation standards is up to you to decide. However, years of practice and scientific research confirm that, after all, a height of 85 cm is the most optimal option for the convenience of all family members, proven over the years.
Conclusions and useful video on the topic
A few sink installation tips will help you install it at the right height.
Installation work on installing sinks inside bathrooms, carried out taking into account existing standards and schemes, is a guarantee of convenience and comfort.
Existing parameters, height, width, length, etc. values. calculated based on operating practice. You can deviate from these parameters and values to some extent, but it is not recommended to ignore them completely.
Tell us about your guidelines for choosing the height of the sink in the bathroom. Share useful information, opinion about the information we provide, photos on the topic of the article. Please write comments in the block below.
At what height should the sink be installed?
An ordinary plumbing fixture in the form of a sink without any auxiliary accessories should be fixed at a height of about 85 cm. At a certain level, it is required to draw a horizontal line corresponding to the level of the highest boundary of the plumbing fixture.
If a support is provided or if the sink is in a cabinet, there is no need to determine the installation height, since it depends on the level of the support or the height of the cabinet.
Features of marking fixation points on the wall
Before installing the fasteners, you need to mark the points on the wall according to a special pattern. There are holes in the sink cavity for fasteners, which must coincide with the markings. The sink is applied to the wall, aligning its upper border with the line that was previously marked on the wall. In this way, the location of future mounting recesses in the wall is determined. It is better to carry out work processes together, as it is much more convenient. During the marking process, one worker will hold the sink at the level of the mark, and the second will fix from below the places where it is planned to fasten.
Installation of fasteners
Installation of fasteners should be done as follows:
- holes in the wall must be made according to clear markings;
- dowels are driven into them;
- special pins are screwed in for fastening.
In the process of connecting a sink in the bathroom and kitchen, the use of dowels and special pins is implied. You may also need nuts and plastic inserts supplied with the plumbing fixture.
When screwing in the studs, you need to monitor the depth of entry. The depth at which you can hang the sink and screw the nut is considered sufficient. In other words, the stud should protrude from the wall to the thickness of the device plus one and a half centimeters for the nut.
On the floor or above the floor
In advertising brochures talking about the advantages of wall-hung toilets, the following main points are given:
- Hanging plumbing does not interfere with cleaning, leaving the entire floor area accessible.
- It makes a compact toilet spacious, allowing you to save space due to the tank.
- It allows you to completely hide communications, thereby improving the appearance of the bathroom.
Let's try to find out how much truth there is in marketers' statements.
Free floor
The statement is true without any qualifications. Installation - the frame to which the toilet is attached is hidden behind a false wall, leaving the entire floor area accessible.
This indicates that in your bathroom there will no longer be black and damp places under the tank, that the base of the toilet bowl will not really interfere with cleaning, and to change the tiles you will not need to dismantle it. In addition: the vacated floor will give more scope to your imagination when choosing a flooring pattern.
Compactness
Console plumbing will indeed make the room more spacious, but only visually. The dimensions of a wall-hung toilet with a concealed cistern and installation are at least no smaller than the floor structure: due to the thickness of the false wall, they are likely to be larger.
Visual space will be associated with the highlights of a person’s perception of the size of the room. They are unconsciously assessed by the area of two planes - the floor and the ceiling. Because the floor in our case is not cluttered, the toilet, regardless of the actual reduction in floor area, will begin to seem less cramped.
Hidden communications
Yes, they really will be completely hidden. In addition to the toilet bowl, only the flush button will remain visible. Yes, it will be beautiful, but defiantly impractical.
You see, dear reader, the creator of this article, over a decade of working as a plumber, became convinced that every structure certainly lacks repair, be it a water supply system, a sewer system, a drain tank or a valve. Making communications difficult to access is guaranteed to create difficulties for yourself in the future. Even if it happens in 10 or 20 years.
In addition: in a compact municipal apartment, the back wall of the toilet, which in most cases is hidden by a false wall along with the installation, is decorated with sewerage and water supply risers. In addition, if you are not too lazy to first replace them with durable polymer or metal-polymer pipes, who can guarantee that they will not be damaged during a pressure surge? Or, as an option, there will be no need to replace a section of the riser in the ceiling (which more than happens)?
Conclusions? Anyone can make them for themselves. Let's put it this way: the author never once had the thought of choosing something other than the classic floor design.
Video tutorial on installation and connection of a sink on a pedestal
When installing the washbasin and connecting the system, consider a number of points:
When planning to connect a double sink, choose a special siphon that has an outlet to two pipes. The height of the sewer outlet under the bathroom sink should not exceed 500-550 mm
When connecting to a sewer, it is important to reliably seal all joints, otherwise unpleasant odors will appear in the bathroom over time.
If, when checking the tightness of the connections, you notice water leakage, remove the cuff and, after allowing all the elements to dry, lubricate the connecting cuff with sealant and “put” it in its original place.
Installing and connecting a sink is not particularly difficult, but quite labor-intensive work. At some stages of installation you cannot do without an assistant. But in general, if desired, any home craftsman can easily cope with installing a washbasin on his own.
| Name | Europe, mm | Russia, mm |
| Sink | 850 via VK | 850 via VK |
| Mirror over the sink | 1200 according to NK | — |
| Soap stand (sink) | 950-1000 according to Tax Code | — |
| Towel holder (sink) | 800 C | — |
| Toilet paper holder | 750-950 on VK | — |
| Spare toilet paper roll holder | 300 according to NK | — |
| Brush holder | 200 according to VK flasks | — |
| Wall-hung toilet | 400 via VK | — |
| Bidet | 400 via VK | — |
| Towel ring (bidet) | 800 C | — |
| Soap stand (bidet) | 700 C | — |
| Bath | 600 on VK | 600 on VK |
| Hand shower head (bathtub) / hose must not be in the bathtub / hose length 1.25 m / 200 mm from the vertical axis of the mixer | 500 for NK bracket from VK bath | — |
| Inlet for hose (bathtub) / with hose length 1.25 m / 200 mm from the vertical axis of the mixer | 700 C from VK baths | — |
| Soap stand (bath) | 100 according to NK from VK baths | — |
| Bath mixer | 300 C from VK bath | 800 N from the floor surface |
| Overhead shower head (shower cabin) | 2100-2250 according to NK from the surface of the floor covering | |
| Hand shower head on a bar (shower cabin) | 2095 via VK from the pallet area | — |
| Side shower nozzles (3 pcs.) | 600 / 1000 / 1400 N from the pallet platform | — |
| Side shower nozzles (2 pcs.) | 700 / 1300 N from the pallet platform | — |
| Shower faucet | 1200 N from the pallet platform | 1200 |
| Hose outlet (shower cabin) | 1400 N from the pallet platform | — |
| Pen | 1000 according to Tax Code from the pallet platform | — |
| Shower tray | — | 400 via VK |
- Unless otherwise stated, all values are based on the finished floor
. For example, the value “Sink: 850 mm on VK” contains an instruction to install it so that the upper edge of the sink (VK; top of the side) is at a height of 850 mm from the surface of the finished floor (covering). - NK
- the value is indicated along
the lower
edge. - VK
- the value is indicated at
the top
edge (at the top of the side). - C
- the value is given according to the mark of the corresponding
center
line (horizontal or vertical).
When did toilet paper appear in Russia?
We think that you will be interested in learning the history of toilet paper production in our country. Here's what information was published as part of TheQuestion project:
“The production of toilet paper in the USSR began only in 1968, when two English paper-making machines were installed at the Syassky pulp and paper mill (Leningrad region). The launch took place on November 3, 1969, but the first batch of hygiene products encountered zero interest from consumers: Soviet citizens simply did not know what it was intended for. Only after a large-scale advertising campaign (videos about toilet paper from the Syassky plant were shown before screenings in cinemas) did a real boom begin. The personal hygiene product, so familiar all over the world, immediately became in short supply in the USSR and until the 80s it could only be obtained by standing in a huge line.”
So, the need for a toilet paper holder arose relatively recently.
Depending on the slope angle of the sewer pipe:
- for a pipe with a diameter of 100 mm - at least 2 cm per meter
- for a pipe with a diameter of 50 mm - at least 3 cm per meter
At what height is the sewer line for plumbing fixtures installed?
For a wall-mounted toilet 160-190 mm (depending on the manufacturer and model), local fitting will give the most correct answer.
In other cases:
- for wall-hung toilet 220-240 mm from the floor
- for shower cabin with tray 60 mm
- for washbasin 500-550 mm
- for bath 100-150 mm
- for kitchen sink 300-400 mm
- for washing machine and dishwasher 600-700 mm
If, for technical reasons, the sewer outlets for the bathroom (shower stall, toilet) are made higher, then under the bathtub (shower stall, toilet) you can make a podium to the required height.
Frame
The installation scheme for a wall-hung toilet provides for a separate and hidden placement of the tank and fixation of the bowl on a steel frame (installation), which, in turn, is attached to the floor and main wall. The installation is installed after the water pipes have been laid and brought out. High-quality installation of a wall-hung toilet primarily depends on the correct installation of the frame.
The installation is leveled.
- The height of the wall-hung toilet from the floor may be greater if family members are tall. The remaining parameters are selected according to the instructions.
- The frame is attached to the floor and wall with anchor bolts so that the structure is stationary. If necessary, additional fastening is made, which the instructions may not provide for.
- After assembling the structure, the tank with communications is sealed with plasterboard or decorative panels. The material should be moisture resistant.
- The bowl is attached to special pins at the last stage of installation.
Installation standards
According to SNiP 3.05.01, developed back in 1985, the standard height of a bathroom sink is 85 centimeters, while during installation a deviation of 20 mm up or down is allowed.
This value is a compromise between a washbasin level that is comfortable for use by men and women, who are traditionally slightly shorter. That is why most Russian and foreign manufacturers produce sinks on a pedestal and cabinets with built-in sinks with a height of 83-87 centimeters.
The correct choice of distance from the floor to the top edge of the sink has a significant impact on the comfort of using the plumbing fixture:
- How convenient it will be for a person to use them depends on whether the plumbing fixtures are installed correctly. If the sink is installed too low, you will have to bend over when washing, which can cause spinal pain. If the washbasin, on the contrary, is too high, then children will not be able to use it.
- The distance between the floor and the sink affects their connection to the water supply and sewerage system. As a rule, under the washbasin there is also a water meter, sometimes filters for cleaning and other devices, the installation of which takes up a lot of space. The need to install additional equipment must also be taken into account when choosing the washbasin level.
Mounting the washbasin on the wall
The sink is secured after completing the connection to the water supply:
- the sink with the mounted mixer is placed on mounting studs that are screwed into the wall;
- insert plastic inserts into place;
- Finally, tighten the nuts.
As for washbasins that have a support, their connection begins with installation on a pedestal or bedside table.
Connecting hoses to the water supply system
. A gasket is placed between the tap and the sealing nut. The nut does not need to be tightened too much, since the rubber gasket usually seals well. It can be tightened after the test (after turning on the water supply). If a leak occurs at the connection, the nut will need to be further tightened.
How to install a sink in the kitchen with your own hands - step-by-step diagram
Step 1: Marking
Most mortise sinks are sold with a ready-made template; it acts as a packaging container. It is enough to cut out such a template from cardboard and attach it to the countertop at the location of the sink - and the contour of the seat is ready.
If there is no template, you will have to make it yourself. To do this, it is better to use thick cardboard (for example, from a TV or monitor). After measuring the inside of the sink, transfer this measurement to the cardboard surface and cut off a few centimeters more. It is better to cut a piece of cardboard several times than to look for a new piece.
Step 2: Location
The proverb about the need to measure seven times before the first cut is very relevant for our work. You can move the finished template around the tabletop easily and freely - until you start sawing right through it. So consider how the tap will open, where the filter will be, how kitchen utensils will be positioned, etc.
The cardboard template should be traced as evenly and accurately as possible. To do this, attach it to the tabletop with ordinary tape and draw one thin line with a pencil. After which the “cardboard assistant” peels off and goes into waste paper; we will no longer need it. We cover the perimeter of the future hole from the outside with masking tape for 8-12 cm in order to prevent it from being damaged by mechanical tools.
Step 3: Drill and saw
Yes, yes, the first mechanical tool will be a drill, not a saw. A drill with a diameter of 2 mm is selected and several closely spaced holes are drilled in the place where it is convenient to start cutting out the contour. The holes are connected into a single groove using a chisel.
It is convenient to saw the tabletop with a wood jigsaw. Just don’t forget to stock up on extra blades - thick tabletops are difficult to saw, and the blade is likely to break if it deviates slightly from the vertical. Take your time and move the jigsaw confidently - it is more difficult to correct a crooked cut than to immediately cut a hole along a plumb line, with a strictly perpendicular cut.
Step 4: Complete the installation
Apply sealant to the end of the fresh mounting hole and insert the sink tightly. We hold the sink under load for 10 to 60 seconds (depending on the type of sealing compound)
Carefully remove excess glue from the outside and inside of the sink and wait several hours until the sealant has completely hardened. We connect hoses, pipes, sewerage, install a faucet and use the new sink for your pleasure
Installation of sewerage in a bathroom
With this publication we are opening a series of articles “piping in the bathroom”, which will touch upon the issue of installing rough plumbing in the bathroom. The first stage is the design and installation of the sewer system.
Why sewer? Yes, because all subsequent wiring depends on it. If water supply pipes are usually not difficult to extend to any point in the bathroom, then with sewer pipes it is a little more difficult. The presence or absence of boxes depends on the drain pipes; due to the need to maintain a slope towards the riser, you need to take into account all the little things, including the height and location of the bathtub. In other words, the entire layout of rough plumbing directly depends on the sewer pipes.
On the floor or above the floor
In advertising brochures talking about the advantages of wall-hung toilets, the following main points are given:
- Hanging plumbing does not interfere with cleaning, leaving the entire floor area accessible.
- It makes a compact toilet spacious, allowing you to save space due to the tank.
- It allows you to completely hide communications, thereby improving the appearance of the bathroom.
Let's try to find out how much truth there is in marketers' statements.
Free floor
The statement is true without any qualifications. Installation - the frame to which the toilet is attached is hidden behind a false wall, leaving the entire floor area accessible.
This indicates that in your bathroom there will no longer be black and damp places under the tank, that the base of the toilet bowl will not really interfere with cleaning, and to change the tiles you will not need to dismantle it. In addition: the vacated floor will give more scope to your imagination when choosing a flooring pattern.
Compactness
Console plumbing will indeed make the room more spacious, but only visually. The dimensions of a wall-hung toilet with a concealed cistern and installation are at least no smaller than the floor structure: due to the thickness of the false wall, they are likely to be larger.
See: the back wall of the toilet room will move forward by about 20 centimeters, thereby depriving you of the opportunity to use the space behind the toilet for shelves or a small cabinet.
Visual space will be associated with the highlights of a person’s perception of the size of the room. They are unconsciously assessed by the area of two planes - the floor and the ceiling. Because the floor in our case is not cluttered, the toilet, regardless of the actual reduction in floor area, will begin to seem less cramped.
By the way: mezzanines also visually make the room smaller. If you want to use part of the space in a small bathroom to store rarely used items, it is better to build a flat cabinet that spans the entire wall and equip it with mirrored doors.
Hidden communications
Yes, they really will be completely hidden. In addition to the toilet bowl, only the flush button will remain visible. Yes, it will be beautiful, but defiantly impractical.
You see, dear reader, the creator of this article, over a decade of working as a plumber, became convinced that every structure certainly lacks repair, be it a water supply system, a sewer system, a drain tank or a valve. Making communications difficult to access is guaranteed to create difficulties for yourself in the future. Even if it happens in 10 or 20 years.
In addition: in a compact municipal apartment, the back wall of the toilet, which in most cases is hidden by a false wall along with the installation, is decorated with sewerage and water supply risers. In addition, if you are not too lazy to first replace them with durable polymer or metal-polymer pipes, who can guarantee that they will not be damaged during a pressure surge? Or, as an option, there will be no need to replace a section of the riser in the ceiling (which more than happens)?
Conclusions? Anyone can make them for themselves. Let's put it this way: the author never once had the thought of choosing something other than the classic floor design.
What sizes are toilets?
Standard toilet sizes are designed for people of average height and build. Not everyone is like that. And a toilet with a shelf, which is described in GOST, is far from the best choice in terms of aromas. Also, most of the products in stores today are imported. And they have their own standards. For example, the European standard toilet size is 680*360*400 mm (this is the length, width at the widest part and the last number is the height). The Americans went even further - their usual “depth” is 768 mm, width 380 mm, the height of the rim above the floor is still the same - 36-38 cm. As you can see, the standards are different, and not everything is made according to the standards. People have different needs and the market is trying to satisfy them.
There are very interesting models
Dimensions of floor models
As you understand, floor-standing toilet models are different and their sizes are also different. We will give a range, but we do not guarantee that there are no narrower or wider ones. Most likely, if you set a goal, you can find both.
Different styles, different sizes
Compact
The Compact type toilet (with a tank attached to the back) has the following dimensions:
Note that the narrowest bowls are more like a rectangle. They are not as round as we are used to. They are quite convenient to use. There may just be problems when buying a cover. This form is rare.
Dimensions of Compact floor-standing toilets
Without tank
A toilet without a shelf with a wall-mounted or separate tank has the following dimensions:
As you can see, they are more compact, despite the name given to the previous version. But such models are less popular, since the tank must be secured, and this is an additional headache. Previously, this type was considered a “relic”; now it is stylish and interesting. There are very interesting models (though they have interesting prices).
Standard toilet sizes and minimum toilet size
GOST 30493-96 standardizes the dimensions of toilets with a shelf only. There are also those that are installed in cars, but we don’t need them. The standard dimensions of a toilet with a shelf are prescribed for two options: with a solid cast and with an attached one. The second model is used in conjunction with mounted/wall-mounted tanks or without them at all. There are also standard sizes for children's toilets. They (children's) come without a shelf. All sizes are shown in the table. And to understand what we are talking about, look at the drawings.
Drawing of a toilet with a solid cast shelf and an oblique outlet from GOST
| Toilet design | H | h | h1 | l | l1 | L (depth or length) | b | B (width at widest point) |
| With a one-piece shelf for installing a tank (Compact) | 150 | 330 | 435 | no less than 605 (maybe 575 mm) | 260 | 340 and 360 | ||
| Without shelf (mounted tank) | 370 and 400 | 320 and 350 | 460 | |||||
| Children's | 335 | 285 | 130 | 280 | 380 | 405 | 210 | 290 |
So, the standard size of a toilet with a shelf (usually called “Compact”):
The height of toilets is not standardized, but usually within the range of 370-390 mm. So, according to the standard, the narrowest toilet is 340 mm, and the shortest model “compact with shelf and oblique flush” is 575 mm. Based on these values and the minimum permissible distances from the previous paragraph, we can determine the minimum dimensions of the toilet for installing such a model. Let's start by calculating the width: 340 mm + 2 * 250 mm = 840 mm. That is, the distance between the walls cannot be less than 84 cm. Better, of course, more.
And the length of the toilet should be 575 mm + 600 mm = 1175 mm. But this does not take into account the fact that it is also necessary to lay a sewer pipe and somehow connect the drain. We will allocate another 20 cm for this. In total, we find that the minimum length of the toilet room is 1175 mm + 200 mm = 1375 mm. In meters it is 1.375 m.
Standard dimensions of a toilet without a shelf (with a hanging cistern) from GOST
The standard dimensions of a toilet with a wall-mounted cistern are significantly smaller: length/depth 460 mm, width 360 mm and 340 mm. That is, the room may be shorter. Its minimum depth is 1060 mm - this is only for a comfortable installation of the bowl, but you still need to connect the pipes, so we’ll add another 20 cm. In total, we get that to install a toilet with a wall-mounted cistern, the room must be at least 126 * 84 cm. A if you have a longer room, you can move the miracle of plumbing back, and make a cabinet with shelves behind the toilet and/or above it.
Preparation
First you need to install the sink in its place and connect it to the water supply. The sink is connected to the sewer only after this.
You should start with measurements and calculations. It is necessary to measure the distance from the sink drain to the sewer riser (vertically and horizontally). Then you need to decide on the type and material of the siphon and pipes.
The choice of siphon is important for one reason: it determines the further ease or complexity of operation and cleaning. Pipe siphons are made in the shape of the letters U or S and serve as excellent water seals. A lot of viscous waste and solids accumulate in bottle siphons. This is especially true for kitchen systems. But cleaning such a siphon is quite easy.
From the siphon to the sewer, wastewater flows through pipes. There are two options to choose from here. Plastic corrugated pipe for sewerage is more versatile; it can be stretched to the desired size and bent in different ways. Such a pipe is ideal if you have to connect the sink to the sewer according to some complex or non-standard scheme.
Smooth PVC sewer pipes for external sewerage will have to be carefully and accurately measured; they will require various fittings (connectors and adapters). You will have to carefully consider the route from the sink drain hole to the sewer outlet. But there will be much fewer problems with wastewater.
Important! The “accordion” of a corrugated pipe becomes clogged much faster than what happens with smooth pipes. If the drain elements are hidden, then special beauty is not required
In this case, they usually stop at plastic structures. With open systems, owners often want greater aesthetics. For such cases, metal pipes with various coatings are produced. And even here there are design solutions, sometimes very expensive.
If the drain elements are hidden, then special beauty is not required. In this case, they usually stop at plastic structures. With open systems, owners often want greater aesthetics. For such cases, metal pipes with various coatings are produced. And even here there are design solutions, sometimes very expensive.
Stage 4 connecting the sink to the sewer
How to connect a washbasin to the sewer? This stage is final. A siphon is connected to the plumbing fixture, to which a pipe is attached - corrugated or rigid with a bend. Then the pipe is connected to the sewer. If its diameter does not coincide with the sewer outlet, use a special rubber adapter.
When the work is finished, all that remains is to check the tightness of the connections. To do this, open the taps and run them through the pipes with a dry hand or a white napkin. If everything is normal and there are no leaks, the plumbing is ready for use.
Connecting the sink siphon to the sewer