Here you will learn:
- Advantages of a warm water floor
- Data for calculating pipeline length
- Water circuit installation diagrams
- Methods for laying pipes for warm water floors
- Modular and slatted types of warm water floors
- Connection diagram of the heating water pipe to the collector
- The sequence of laying pipes in a concrete screed
- Pressure testing and balancing of water heated floors
- What flooring is suitable for heated floors?
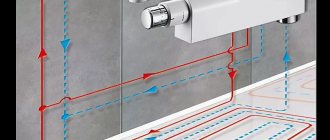
Laying pipes in a heated floor can be done using different methods - snake, snail and mixed types. The pipes themselves are laid either on a reinforcing mesh, or on insulation, or on profile mats with bosses.
What is the beauty of heated floors?
Due to the fact that the underfloor heating pipes are laid out over the entire area of the room, the most uniform heating of each area is achieved. Wherever you are in your home, you will be equally comfortable.
With water floors, in most cases you get rid of heating radiators, which previously took up extra space in your home. For all these features, water-heated floors are loved in private homes. Let's take a step-by-step look at laying a water-heated floor with your own hands.
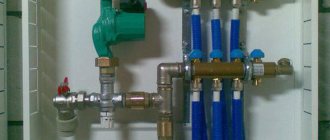
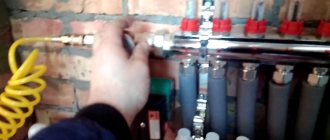
Connection diagram of the heating water pipe to the collector
Installing a concrete screed, laying a water heating pipe - engineering and technological aspects of installing a heated floor. The main stage of installation is connecting the pipeline to the mixing unit and to the manifold.
It has already been said above about where and how best to locate the manifold cabinet. Together with the installation of the mixing unit, the manifold and circulation pump make up the heating system control unit.
Usually the cabinet has dimensions of 50x50 cm. For better combination with the interior of the living space, the manifold cabinet is made in a recess of 10-15 cm. Accordingly, it is better to hide the water circuits at the connection points in the wall.
Having installed the collector, the necessary lines are connected to it. Traditionally, the connection diagram looks like this:
The difference may be in the heating method used. This can be the use of coolant supplied through a centralized heating system, or an autonomous heating system powered by a boiler.
Note: If you use underfloor heating and heating radiators at the same time, then you can get by with installing one pump. When it comes to a complete heating system, a warm floor for the entire building, a collector, a pump and the installation of a mixing unit are mandatory attributes.
The supply pipe and return pipe are connected to the manifold using special fittings. If the diameters of the pipe and the manifold inlet socket are different, adapters are used.
A shut-off valve must be installed in the system, which shuts off the supply of hot water to the water circuits. A drain valve must be installed on the return pipe.
To ensure precise regulation of the heating temperature of the heated floor, special valves and a mixing unit are installed on the collector. If you have the funds, you can purchase a ready-made, complex collector, the design of which includes all of the listed elements. Collectors may differ in their design, depending on the number of connected water circuits and the volume of heated rooms.
For reference: in houses where heated floors are installed in all living areas, collectors service all rooms at once. Under one condition, if the layout of the heating pipe is the same everywhere.
When using one pipe laying scheme, the collector has one number of inlet and outlet connection points. Using a combined installation, you will have to have a manifold with a large number of inlet and outlet pipes.
Cost of installing heated floors
Many people are interested in the cost of installing heated floors. Let's share some numbers. If we take into account everything described above, then without pouring the screed and without taking into account the boiler room, the cost of components will cost approximately 1000-1200 rubles per square meter. You add the cost of the installer’s work in your region and get the final cost per square meter. If the areas are large, then in some cases this amount includes collectors for heated floors.
Taking into account the boiler room, turnkey installation of heated floors will cost approximately 2,500 rubles per square meter. This cost takes into account a boiler room with one boiler, an indirect heating boiler and related equipment. The figures are relevant for houses from 150 square meters. With a smaller area, the amount may be slightly higher due to the high cost of boiler equipment.
Cochlea wiring
After all the elements are prepared, all that remains is to install the entire system.
Step-by-step instructions for laying a snail floor:
- Make a concrete screed. Attach reinforcement and a heat-insulating layer or special rubber mats with bosses to the floor, which serve as fasteners.
- Laying the circuit must begin from a heat source. The contour is laid from the large perimeter to the center. The step between the elements with a double snail doubles, since the pipes will then go back.
- When laying, the heater is immediately fixed using special fasteners to the fittings or substrate.
- A 180 degree turn is made in the center. The coolant is laid back in a spiral.
- The pipes return to their original exit point - to the collector or distributor.
- Before pouring the floor and installing the decorative covering, the system is tested.
Advice. When laying the contour, you must first make chalk markings. This will significantly speed up and facilitate the process.
Choice
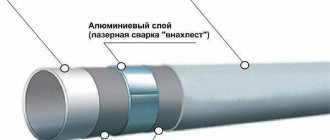
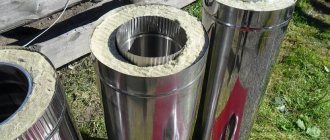
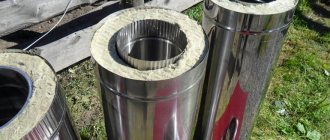
Polypropylene pipes are presented on the market in several versions. They are divided into single-layer and multi-layer. For multilayer ones, reinforcement is carried out using aluminum or fiberglass. In a heated floor system, multilayer pipes must be used. They exist in three types:
- With an aluminum layer, which is located on the outside or between layers of polypropylene.
- Composite ones are reinforced between layers with a mixture of aluminum and fiberglass.
- With a layer of fiberglass they are optimal for installing heated floors. They do not deform due to temperature changes, are characterized by increased durability and strength, and lie well in the screed.
Mounting methods
There are quite a lot of ways to attach underfloor heating pipelines. Over time, new technologies appear, both means and methods of fastening are improved.
Let's consider the most common of them, which have received the approval of professionals who have been tested by time of operation.
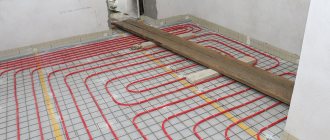
Attaching to reinforcement mesh
In laying a warm pipeline, the reinforcing mesh does not play the role of a reinforcing element, but rather the basis for fastening heating pipes. It is laid on various layers of hydro- and thermal insulation made of expanded polystyrene or polystyrene, and plastic bends are mounted on top, attaching them to the welded mesh using various means.
The following fasteners are used:
Nylon ties, clamps of different lengths. Price from 1 ruble per piece.
Wire fastening connectors made of steel. They tie the pipes to the mesh with a special hook at a distance of 75 cm between the fastening points. The price per piece is approximately 2 rubles.
Plastic swivel clips installed on the mesh. Raise the mesh above the insulation by 0.5-0.8 mm, which better connects the mesh to the screed. The pipe is inserted into the clamp and snaps into place. Price from 5.5 rubles per unit of goods.
Any home craftsman can carry out these methods with his own hands, having made the necessary calculations.
Mounting on mounting rails
Special fixing tires are produced in the form of a plastic track 50 cm long with clip clamps on top. The planks can be connected to each other into a single strip of the required dimensions. They are convenient for laying pipes made of cross-linked polyethylene PEX.
They are attached to the insulation with anchor brackets, and to the concrete floor using dowels. Price from 48 rubles per piece.
Securing the pipe with clamps
In the absence of reinforcing mesh, fastening with staples or metal clamps is used. These mounting parts are attached to the screed with dowels and nails, and to the wooden floor with self-tapping screws.
Fastening with a tucker
The use of a tacker, a device that resembles the principle of operation of a stapler, is becoming increasingly popular among professionals. In sales it is often called that. The tool is designed for fixing pipes to polystyrene foam with anchor clamps. The device is equipped with a magazine bar that can accommodate 100 or more harpoon staples. Design features allow the operator to work without bending over, without putting much effort on his arms and back, significantly increasing the speed of operations.
Previously, the price of the instrument was at least 17-18 thousand rubles; now devices costing from 4 thousand have appeared on sale.
Expanded polystyrene boards with fixation
To facilitate the installation of heated floors, thermal insulation boards made of polystyrene foam have been developed. Today, products have appeared on sale that allow the installation of plastic pipes without the use of additional fixing means.
On the slabs there are bosses in rows, 2 cm high and higher, on which special protrusions are made. Thanks to these protrusions, the pipe is securely fixed to the plate. All the technician needs to do is step on the plastic outlet with his foot, and it gently clicks between the protrusions.
The material is highly durable; you can walk on it without fear of damaging the mat configuration.
The plates are equipped with locks, which allows them to be securely connected into a single field, without gaps or the risk of opening. The advantages of this method include the speed and convenience of installing bends, the ability to mount them according to any scheme: “snail”, “snake” or another proprietary scheme.
The cost of such slabs is 680 rubles per meter2.
Basic norms and SNIPs
In order for the floor to serve for a long time, and also to make the room cozy without overheating or cold pits, it is important to take into account the basic rules or SNPs.
It is important that they were developed primarily not for comfort, but for the proper operation of the room and fire safety.
- Warm floors should not be placed under heavy interior elements or furniture.
- Heating elements must not intersect or touch. This will lead to their overheating and overheating of the floor surface, which can damage the structure and even lead to a fire.
- If furniture is not planned to be installed near the walls, then the contour should be located no closer than 15 cm from the wall.
- Before creating a heated floor scheme, it is worth taking temperature measurements 10 cm from the floor at different points in the room. It is better to take measurements with a digital thermometer. The permissible difference is 0.5 degrees. The rest will be considered uneven heating.
- When laying the water circuit, be sure to use a waterproofing layer. For any circuit, you need to lay thermal insulation underneath it. This will direct all the heat into the room.
If installed correctly, a warm floor will last for decades and will delight several generations with coziness and comfort.
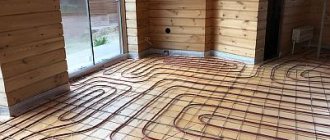
Filling the screed
When the system is checked for leaks successfully, it is considered that the pipe installation has been completed completely.
The screed is poured: its height is at least 3 cm on top of the pipe. Only under this condition will the screed protect the cross-linked polyethylene pipe and allow the heat to be evenly distributed over the floor. A solution based on M300 cement is poured.
Craftsmen disagree on the issue of reinforcing the screed.
If you have no experience in the correct installation of reinforcement, then it is better to bypass this stage. Warm floors work without a reinforcing layer.
Reinforcement makes the screed stronger and more reliable. A 100x100 mm mesh is used. It is correct to “drown” it in the screed solution so that it is inside the screed and not lying on the pipes.
The floor can be installed in operating mode a month after pouring the screed.
Any covering can be used for floor covering.