Principle of choosing paint for pipes
Before we talk about how to properly paint heating pipes, it is necessary to determine the criteria for choosing the right composition suitable for such work.
In this case, it is important to consider the following requirements for the coloring composition:
- the material must withstand high temperatures (from 100°C and above);
- another important property that the composition must have is wear resistance;
- the toxicity of the painting mixture should be minimal;
- the paint must be resistant to aggressive environments.
Painting nuances
Today, modern materials are used in the construction of houses and laying communications: plastic, stainless alloys, non-ferrous metals. And the communications themselves - sewerage and water supply - remain mostly hidden.
Heated towel rails are made of stainless steel or have a galvanic coating. But in old houses there are still pipes made of ferrous metal (cast iron and steel).
They are susceptible to corrosion, do not look aesthetically pleasing and require increased attention, including proper regular painting.
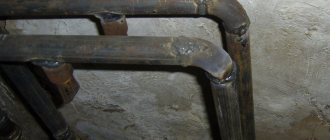
Metal pipes
Before painting, metal pipes need preparation, which consists of washing and removing old paint and rust. It is recommended to prime metal pipes before painting - the primer will perform protective functions, extend the service life of the pipes and create conditions for good adhesion of the coating to the metal.
If the pipes are cold, you need to make sure there is no condensation before applying paint.
If possible, it is better that the pipe is not hot at the time of painting. On a hot surface, paint dries very quickly, and if you are not experienced, it may be difficult to get the perfect result right away.
Galvanized pipes
They do not need to be painted, except for areas where the coating is damaged (threads or welds), such areas must be protected.
Polymer pipes
Plastic pipes do not need protection. Their painting can only be caused by the desire of the owner and interior considerations, since the standard colors of plastic pipes (white or gray, sometimes green or beige) do not always go well with the interior.
It is recommended to treat plastic products with non-aggressive compounds that do not contain acetone. This applies to solvents, primers, and paints. Speaking about the usefulness of a primer for plastic pipes, it should be noted that this is not the most essential element. Properly selected paint fits well on a polymer pipe.
How to level the walls in the bathroom for tiles? Step-by-step instruction.
Read here about the advantages and disadvantages of epoxy grout for bathroom tiles.
Types of paint for heating pipes
When deciding what paint to paint heating pipes with, you should pay attention to the following types of compositions, which are most popular among consumers today:
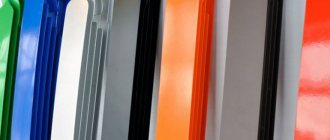
- acrylic enamels
. This paint is based on organic solvents, which explains the not entirely pleasant smell when it dries. However, such a sample will provide a perfectly smooth and glossy surface and will last a very long time; - alkyd type enamels
. These compounds also emit an unpleasant odor, which may periodically appear in the future when the heating system is actively working. However, such paint will be very resistant to any mechanical damage and will not change its structure under the influence of high temperature. Do not forget that on the modern market there is a wide selection of shades of such enamel, so choosing an option suitable for a particular interior will not be difficult; you will only need to study the photos of samples provided by the manufacturer; - water-dispersion based paints
. Painting heating pipes with this composition is the most common option among consumers. This composition does not emit an unpleasant odor; in addition, this paint for hot heating pipes dries very quickly.
It is also impossible not to mention such an option as oil paint, which, however, is used extremely rarely today for painting pipes.
What and how to paint heating pipes is, of course, up to the consumer himself, however, in order for such work to go smoothly and without any difficulties, one should pay attention to a number of recommendations regarding surface preparation procedures before painting.
How to choose paint?
The final result of your work depends not only on how the paint is applied to the metal, but also on how high quality it is and how suitable it is for such work. Paint for heating pipes must meet the following requirements:
- heat resistance from 100°C;
- resistance to abrasion and aggressive cleaning agents: pipes and radiators have to be washed quite often;
- non-toxic: during the heating process, the paint coating should not release odors or harmful substances into the air.
Types of paints
Today on the market you can find paints with different component compositions.
Acrylic enamels are produced on the basis of organic solvents, so painting pipes is inevitably associated with an unpleasant, pungent odor. However, the result will be a durable glossy finish that will retain its integrity and attractive appearance for a long time.
Alkyd paints are also in great demand for transforming pipes and radiators. Their downside is the pungent odor not only during the painting process, but also during operation. But the layer turns out to be really durable. Alkyd paints are distinguished by a richness of shades.
Water-dispersed enamels are attractive because they do not require much time to dry pipes and radiators, and the painting itself takes place without emitting a pungent odor, because these enamels do not contain caustic solvents.
Preparatory work before painting heating pipes
As mentioned earlier, before painting heating pipes, you should carefully prepare the surface for such work.
The entire procedure should follow the following instructions:
- First of all, you should clean the surface of the pipe by removing the remnants of old paint from it using a spatula and a special solution and cleaning the areas with rust to a shine. After this, use a wet cloth to remove dust and dirt.
- Next, the rinsing solution must be applied to the pipe and covered with a film so that it softens. After some time, removing the remaining paint will not be difficult either with a spatula or a drill equipped with a special metal brush.
- Then the surface of the pipe should be treated with sandpaper and degreased with an alcohol solution.
- After this, a primer is applied to the pipe, the main function of which is to protect against corrosion. In addition, this composition also increases adhesive properties, improving the bond of the coloring composition with the metal pipe. In this case, it is best to use an alkyd-based primer.
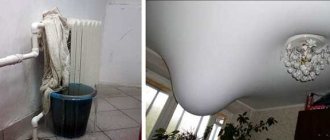
How to get rid of condensation on pipes - basic methods of combating
Having discovered dampness, you must first dry the cold flow pipe and try to prevent further appearance and accumulation of moisture by eliminating the cause.
Perhaps the issue can be resolved by simply changing the gasket on the tap or adjusting the valve of the drain tank.
You can prevent further formation of condensation on pipes using homemade products or more expensive professional materials, for example, heat-insulating paint.
Installing an exhaust fan in the bathroom
If it turns out that the ventilation system in the room is not functioning well, you should check the hood. After removing the ventilation grille, remove accumulated debris, dust, and cobwebs. Instead of a grille, it is recommended to buy and install a compact fan, which will provide more intense air circulation.
The market offers a large selection of devices of different configurations, power and cost. With their help, the ventilation problem will be solved.
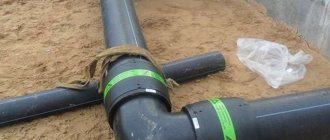
Installation of insulating tubes
If the cause of fogging of cold pipes is a temperature difference, then it’s time to start insulating them. One option to do this quickly and inexpensively is to use special linings. They look like tubes with a longitudinal cut. Made from foamed thermal insulation material (thermoflex, energyflex, polyethylene).
The cover is placed on a pre-dried pipe, straightened, and the ends are glued with metallized tape. The main subtlety is to select the tube exactly in size so that it fits tightly, leaving no voids, but at the same time it can be closed and glued. This is the easiest way to isolate a cold water system.
Application of epoxy putty material
Another option, used to combat condensation on cold structures, is more labor-intensive, but also more effective. You will need acetone or solvent, epoxy putty, rust converter, strips of fabric 5-7 cm wide, spatula, roller or brush, sandpaper, strong thread.
- Sand the cold water pipe to remove dirt, rust and improve adhesion.
- Treat the surface with acetone to degrease.
- Wipe with rust converter and wait until completely dry.
- Apply a layer of epoxy putty and immediately wrap tightly overlapping strips of fabric. Secure the edge of the fabric with thread.
- Repeat the step of applying putty and wrapping with cloth two or three more times.
- Finally, coat the fabric again with a layer of putty.
- Wait for the entire structure to dry completely.
- Sand the dry, cold pipe and then paint it.
Temporary methods
If you don’t have the necessary materials, time or ability to do repair work right now, simple methods will do. Here's how you can temporarily fix the situation yourself:
- provide additional air access without closing the door to the room;
- establish moisture removal from a cold pipe - wrap it with a bandage or a strip of cloth, and lower the end into some container that is emptied regularly;
- Place moisture absorbers in the room; you can use both special products and improvised products as filler, for example, salt or cat litter.
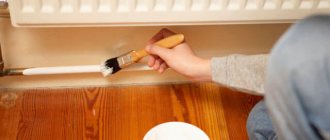
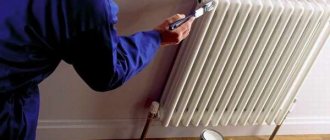
How to paint pipes correctly
Having figured out how to paint copper heating pipes and steel elements, you need to decide on what principle the painting process itself will take place.
There is always the opportunity to hire a qualified craftsman for such work, which, of course, will be significantly more expensive than painting it yourself. Therefore, in order to save a significant portion of financial resources, it is worth studying the following painting algorithm:
- Initially, care should be taken to protect the floor surface. Alternatively, you can use old newspapers, paper or fabric. Moreover, this material must be placed directly under the elements to be painted.
- A very important tool for this type of work is the right paint brush. It is extremely important that its size is small and the structure of the bristles is soft.
- The application of the coloring composition should be carried out vertically from top to bottom, and after the first layer has dried, the second must be immediately applied. Only in this way can a smooth and high-quality surface be achieved.
Some owners prefer more modern paint guns and spray guns to traditional brushes.
When using this type of equipment, it would be best to completely dismantle the heating device so that access to the pipe is free and there are no unpainted areas left. Compliance with these simple, but extremely important requirements will allow you to paint the heating pipe with high quality, protect it for a long time from any harmful microorganisms and give it a beautiful appearance, and you can choose one or another shade by contacting painting specialists, who always have many photos available depicting ready-made painted structures.
Video tutorial on painting heating pipes:
Pipe insulation at home
Most thermal insulation work can be carried out independently, without special knowledge or the involvement of outside forces. This concerns the replacement of a section of a plastic pipeline, coating with special compounds, and the use of insulating linings.
Another popular method is to place a larger corrugated pipe over the unfavorable cold area, and fill the empty space inside with foam. When the foam hardens, you get a waterproof box with heat-insulating properties that reliably covers the cold section.
In the apartment
It is advisable to pre-coordinate all plumbing work carried out in an apartment in an apartment building with the management company.
Since risers, drainage and ventilation pipes are common property, it is not recommended to carry out repairs or other operations yourself. Moreover, temporary water shutdowns are carried out only by a specialist from the local housing office.
Plumbing equipment, flexible hoses and connections belong to the owner of the apartment, and their replacement can be carried out without approval.
In a private house
If the house is private, then responsibility for all communications lies with the owner. This applies to the filling of the house and to all external systems. The wiring, hydro- and thermal insulation of the water supply system must be properly designed. And during the construction process, they are no less competently designed.
Otherwise, you will have to constantly deal with condensation or carry out large-scale work to correct the situation, spending time, effort and money on this.
Calculation of the required amount of paint
Before painting the pipes, it is necessary to calculate the amount of paint. On the packaging, manufacturers indicate the approximate consumption per square meter of surface when applying one layer. It is easy to calculate the surface area of a pipe by remembering a simple mathematical formula. The surface area of the pipe will be equal to its length multiplied by the diameter and by the number Pi. Be sure to take into account that the paint will be applied in two layers and thus the required amount can be easily calculated.
Rating of the best
Now let's look at what is the best paint for metal and rust for exterior use.
In first place you can put paint from the HAMMERIT company. This is a universal 3 in 1 composition. That is, it performs the functions of paint, primer and inhibitor. It can be used to paint metal surfaces, both clean and once coated with paint. This is the most durable rust resistant paint for exterior use. Although the manufacturer recommends using it indoors as well. And this is a big plus.
So, the advantages of this material:
- versatility;
- ease of application;
- good hiding power;
- long term protection;
- excellent external data.
The only downside is the high price.
So, the product from HAMMERIT can be called the best anti-rust paint for exterior metal work.
Rust paint HAMMERIT Source m-delivery.ru
The difference between rust paints and regular metal paints
For structures with complex shapes or highly labor-intensive work (roof, bathtub, loader arm), it is best to use multi-component compositions of the “three in one” type. They are able to modify rust particles when applied, while simultaneously covering the pores and forming a protective layer.
The approach of “however to paint the iron so that it doesn’t rust” is extremely contraindicated here! Such paints are more expensive, but have a number of undeniable advantages:
- Allows you to protect an already affected area of metal;
- The finished coating has high performance characteristics - it does not allow water to pass through and does not retain dirt;
- Processing quality. High adhesive properties and uniformity of the layer show that before painting metal outdoors, it is not necessary to clean it until it shines;
- Durability. On average up to 10 years (harsh winters and frequent rains can shorten this period).
For structures with complex shapes or highly labor-intensive work, it is best to use multi-component compositions of the “three-in-one” type.