When planning the installation of ventilation, you probably thought through and decided how best to install ventilation pipes on the roof of the house. This needs to be done correctly: firstly, so as not to damage the roof and prevent leaks; secondly, so that the output provides maximum traction.
We will talk about how to properly ventilate to ensure regular air exchange. We will introduce you to modern and easy-to-install solutions offered by manufacturers to domestic consumers. We'll show you how best to do this work yourself.
Purpose
When arranging the ventilation outlet on the roof, you should know about the main subtleties of the upcoming work, understand the types of structures and their purpose. Roof ducts can be used in different types of ventilation systems:
- 1. In the interior rooms of the cottage.
- 2. In the drain pipe of the sewer riser.
- 3. In the attic under-roof space.
Moreover, sometimes these passages are necessary for laying smoke shafts and television antennas. At the end of the air exhaust system there is a special ventilation outlet, which is equipped taking into account all the requirements for the system.
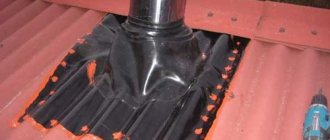
The purpose of such a design is to ensure effective exhaust of air from the room and prevent any leaks. At those points where it is necessary to make a ventilation passage through the roof, special passage elements are placed that correspond to the specific roofing material.
Currently, it is possible to buy ready-made sets of ventilation outlets for their further installation on roofing structures made of hard and soft materials. Such products allow you to quickly and efficiently build a ventilation riser to protect the roof from possible leaks, as well as maintain its aesthetic appeal. Moreover, such devices are a natural protection of ventilation ducts from the penetration of various dirt and precipitation.
The height and shape of the passages through the roof are determined by the individual characteristics of the roof structure. In addition to pipes with a round cross-section, rectangular structures are used.
To ensure that the ventilation pipe does not lead to a violation of the roof’s tightness, it is necessary to follow a certain sequence of actions and take into account the established requirements.
Jumpers
Functions
Regardless of which risers are connected by jumpers - heating or hot water supply - the jumpers perform one function - they ensure continuous circulation of water. Why it is needed in the heating system - I think there is no need to explain.
In hot water supply, connecting two or more risers with jumpers solves two problems at once:
- Provides almost instantaneous supply of hot water after opening the tap. In houses with dead-end DHW risers, water has to be drained for a long time to heat it;
- Ensures continuous operation of heated towel rails. In new buildings they are installed in the gap of the riser, and not in the hot water supply line.
The towel rail is a bend in the riser.
Installation
There are more than a few requirements for installing lintels in the attic:
- An air vent (Mayevsky tap or regular valve) is mounted at the top point of the jumper. It is needed to remove air plugs from risers;
- If there are brackets (bends in the vertical plane), the air vent is installed at the top point of each bracket;
- The lintel above the ceiling level is thermally insulated.
How does a roof ventilation system work?
Ventilation of the under-roof space is of two types:
- Natural.
- Forced.
Natural ventilation operates without the use of mechanical devices, only thanks to the laws of physics. Air movement here occurs due to the difference in pressure in the interior space and outside the house. Through the exhaust openings, air from the under-roof space is drawn out along with the steam particles filling it.
The air exchange rate is directly affected by the difference in the height of the supply and exhaust openings. The larger it is, the stronger the resulting thrust will be. Therefore, exhaust ducts are often installed at a height exceeding the location of the ridge, and the supply openings are located in the eaves.
In forced ventilation, ventilation devices are used to create a directed air flow. They can be located at the exhaust or supply openings, or at both points simultaneously. Such modifications are more efficient compared to natural ventilation systems.
Attention! In order for roof ventilation to work in a balanced manner and as efficiently as possible, the volume of supply air must correspond to the volume of exhaust air. This indicator is regulated by selecting the correct cross-section of the supply and exhaust openings.
Forced ventilation
Supply valves together with a ventilation grille are the main method of effective supply ventilation.
They are designed on the front part of the room. The valve, equipped with a thermostat, reacts to fluctuations in outside temperature and automatically changes the air flow. Of course, the thermostat can be adjusted manually as needed.
We solve problems during the work
The main problem is the lack of traction in the system. Then circulation will not occur. Solving the problem at this stage will be difficult, but possible. One of the methods was mentioned above - using a deflector. This is a device that rotates under the influence of wind, creating the necessary draft in the pipe.
In general, the traction force depends on the difference in air temperature inside and outside. This is pure physics. This is why the system works more efficiently in winter than in summer. Freezing of the ventilation system can disrupt draft. Condensation accumulates on the walls, and under the influence of negative temperatures it freezes. That's why we recommend insulating pipes using any available method.
Note! To get rid of the problem with draft and freezing of the ventilation system, the pipe can be installed near the chimney or heating system.
Many people face another problem - the pipes inside are not smooth enough. In this case, the resistance increases and the air begins to slowly flow upward. But condensation stays on the walls for a long time. That is why ventilation pipes must be smooth, and joints and connections must have smooth edges.
It is clear that there is no question of traction when there is a bird’s nest inside, leaves or debris have flown in. Therefore the outlet must be closed. If there is no deflector on the ventilation, then an umbrella or drip is installed.
Roof ventilation methods
There are several variations of the mechanisms by which roof ventilation is carried out in country houses:
- ventilation of ridges on a roof consisting of two slopes;
- ventilation of eaves and chimney;
- roof exhaust fan;
- single components with holes for ventilation;
- skates equipped with a special design;
- clearances for ventilation provided when installing roofing material;
- dormer windows in attics.
Each material has different designs, which you should familiarize yourself with before purchasing.
Types of assemblies: which duct passage to choose?
Manufacturers recommend using individual roof penetration units for different types of roofing. After consulting with the sellers of specialized stores, you can purchase the necessary passage structure along with the roofing material.
Modern specialized passage units are equipped with advanced air flow control systems. Such equipment more closely meets current comfort requirements. Installing such systems requires more skills than conventional devices.
In arranging a roof passage without a factory-made element, metal or reinforced concrete glasses are used, in which a sleeve is fixed - a piece of pipe with a larger diameter than the ventilation outlet
Before purchasing a high-tech passage unit, evaluate the feasibility of its purchase. If the premises are small, it is better to opt for conventional mechanical models.
The passage unit is a pipe with a plug. But different models may differ in their parameters and appearance.
Table of types of air duct on the roof of a house:
| Design differences | short description |
| Valveless / with valves | The price of designs without valves is cheaper, but there is no provision for adjusting the air outlet to block the flow. It is installed more often in private buildings. Valve samples have a damper to regulate the passage of air. Installed in administrative and industrial premises where regular ventilation is not required. |
| Insulated / without insulation | Insulated options can be equipped with a basalt or glass wool layer. Convenient if the ventilation pipe to the roof of the house is located mainly on the street or is located far from the ridge. Non-insulated models are suitable for mild climates. A layer of insulation helps get rid of excessive condensation that appears due to temperature changes and escaping gases. |
| Mechanical / Automated | Mechanical units are equipped with a special cable that allows you to manually control the air flow. The automatic ones are equipped with a controller that completely controls the ventilation system. |
All models have individual markings, which makes it easier to understand the types of equipment. This is a combination of letters and numbers corresponding to a specific instance, for example UP1-03.
On flat roofs, the passage is equipped with a skirt made of waterproofing carpet and a sealed cap or similar device installed on top
The two numbers at the end indicate the size of the structure. They range from 01 to 10. The first digit indicates the design features of the product.
In this case, the unit demonstrates that the unit is without a valve and a condensate ring. A two indicates that there is no condensate ring, but there is a mechanical valve. The presence of a three indicates a model with a ring + mechanical valve.
Features of roof ventilation organization
Under-roof ventilation systems come in several types, differing in design features and the range of ventilation devices used.
A typical moisture-heat-protective roof pie consists of several layers, each of which is protected from the accumulation of condensation. Therefore, the design of the “pie” directly affects the choice of ventilation devices and the nuances of organizing the ventilation system.
The materials used to construct the roof of a building differ in their performance and technical qualities. The modern building materials market offers a large number of roofing coatings - metal (corrugated sheeting, metal tiles), asbestos-cement (slate), polymer (soft tiles).
Each of the listed roofing materials has different thermal conductivity indicators, which affects the intensity of condensation formation in the attic.
A correctly selected and installed under-roof ventilation system should provide:
- Stable temperature balance throughout the attic space.
- Effective removal of steam entering under the roof from residential premises.
- Reducing the level of heating of the roof under the influence of sunlight.
- Increasing the service life of both the roofing structures themselves and the entire building.
To create air exchange in the under-roof space, the following devices and devices are used:
- Vents located in the eaves and ridges of the roof.
- Aerators.
- Roof fans for forced air circulation.
- Exhaust holes in roof slopes.
- Dormer windows of attics.
- Ventilation ducts. Relevant for residential attics and attics, divided by partitions into separate rooms.
Note! Incorrectly selected ventilation devices, installation with technological errors, incorrect location of ventilation ducts and exhaust devices - leads to a decrease in the efficiency of the entire ventilation system.
Insulation and thermal insulation rules ↑
Internal insulation not only prevents the formation of condensation, but also improves the aerodynamic performance of the entire system, making its operation more efficient. In addition, external insulation is also possible, thanks to which the operational parameters of the ventilation duct can be significantly increased.
The importance of carrying out insulation measures ↑
External insulation of the outlet box allows you to obtain the following:
- makes it impossible for ice and mold to form due to excess condensation;
- minimizes thermal output, which has a positive effect on the level of traction;
- reduces the risk of fire and fire;
- reduces vibration and noise that accompany system operation.
When choosing a thermal insulation layer, the following factors must be taken into account:
- presence of “dew point”;
- dimensions of ventilation ducts on the roof and their configuration;
- temperature difference between the structure and the internal base of the ventilation complex;
- indicators of thermal conductivity of the materials used.
Please note: systems made of brick are not prone to condensation, so their insulation is not necessary.
Technology of insulation work ↑
For external insulation, facade slabs based on mineral or gypsum slag are most often used; the procedure includes the following steps:
- The surface for insulation is prepared - cleaned, weak areas are removed, and then thoroughly covered with soil.
- An adhesive composition is used to fix the plates. With its help, they perform edging and install patches.
- After the glue has completely hardened, the façade dowels are put in place.
- A reinforcing base made of fiberglass material and glue is installed.
- The surface is coated with a primer (after waiting for the adhesive solution to dry), after which it is finished with decorative plaster or other material.
The external finishing of the ventilation shaft makes it possible to carry out a set of measures to maintain the system without much effort, especially in those aspects that are related to the formation of fungus and microorganisms inside, the negative impact of which can cause delamination of the heat insulator and the loss of basic technical and operational parameters.
Ventilation of the under-roof space
Moisture is always absorbed in the under-roof layer. This happens due to:
- water condensation inside the living space,
- absorption of moisture on the inner surface of the metal roof,
- accumulation of moisture from the external environment.
The service life of the roofing substructure is reduced due to the negative influence of excess humidity, which causes the spread of mold and harmful fungi.
Differentiation of pressure and air flow is the basis of ventilation. In this regard, it is recommended to create a sufficient supply of air from under the eaves and gable overhangs of the roof.
It is necessary to take into account the type of roof covering when choosing ventilation for the under-roof space.
The components of the roof covering include: KTV valves, ventilated ridges and ventilation outlets with a deflector cap.
The importance and purpose of ventilation devices in the roof structure of pitched roofs.
The load-bearing structure of a pitched roof - rafters, mauerlats, struts and braces, as a rule, are made of wood (wood in this case was chosen not on the basis of its availability and cheapness, but on the principle of its ability to maintain strength and high deformability) and in some cases from steel purlins. Both wood and steel work well in a dry state, but when immersed in an aggressive environment, they become deformed and lose their load-bearing abilities. The most vulnerable aspect for all structures without exception is moisture: wooden structures in conditions of excess moisture begin to deform and become covered with fungus, which leads to rotting, resulting in the destruction of longitudinal fibers and loss of strength. As for steel, moisture causes corrosion of the metal, which also leads to loss of load-bearing capacity.
To avoid the destructive effects of moisture on load-bearing structures, a very important aspect is the installation of continuous ventilation of units. If the structure is ventilated correctly and sufficiently, moisture will not accumulate in the components and have a destructive effect. So, below are the recommendations of the BRAAS roofing system for installing ventilation gaps in roof structures.
To avoid the destructive effects of moisture condensing in the thickness of the insulated roof slope, its multilayer structure must be made ventilated.
Modern roof designs, as a rule, require, in addition to the main roof covering, to install an additional layer of under-roof waterproofing using so-called diffusion membranes (market sellers unprofessionally call this membrane a hydro-vapor barrier, but this is incorrect from a professional point of view, so WE will call this membrane diffusion membrane, that is, a membrane that is capable of releasing moisture in the form of steam from the structure onto its surface, but not allowing the condensed water back into the roof structure, and sending drops of condensed water along its plane down to the roof eaves )
.
What is needed to install a roof ventilation outlet
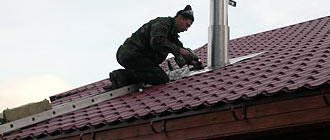
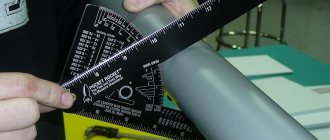
To perform installation work on a ventilation pipe above the roof, you need to have all the necessary tools. It is recommended to prepare them in advance so that no unforeseen circumstances arise during installation.
Pipe installation is carried out using the simplest tools
List of materials and tools that will be needed when installing the ventilation pipe:
- scissors for cutting metal;
- insulation;
- Screwdriver Set;
- marker (for marking);
- special sealant;
- self-tapping screws;
- sealing elements;
- passage unit;
- work gloves.
- drill or hammer drill;
- level;
- electric or manual jigsaw.
What to consider when installing a ventilation pipe on the roof
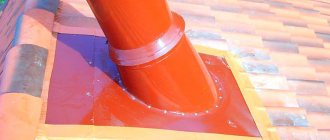
The ventilation duct exits to the roof so that water does not get under the roof covering. Reliable sealing of the joint is a very important undertaking. If it is not done correctly, problems may arise in the future due to the fact that water will flow down the ventilation structure into the house. The sealants needed in this case can be purchased at any hardware store.
Particular attention should be paid to sealing the pipe where it exits through the roof.
Important! The upper end of the pipe must be covered with a protective cap, which will prevent precipitation from entering the system. There is a more functional way - equipping the end of the pipe with a deflector.
The lower end of the ventilation structure, which goes to the roof, is connected to the air duct. Docking is usually carried out using connecting flanges. To improve the tightness, you can equip the outlet with a special support ring. In addition, a valve is mounted directly into the pipe body, which will regulate air movement.
Ventilation pipes on the roof are mounted using auxiliary elements, which are offered in a huge range. If you wish, you can consult with specialists who will tell you which parts to choose in order to simplify the work as much as possible.
Additional devices that increase the performance of the ventilation system
Additional elements can be used to improve the performance of the system. The most popular device of this type is a deflector; it looks like a nozzle and is attached to the edge of the pipe.
A special device is placed on the edge of the pipe - a deflector.
Important! The deflector is usually installed on ventilation pipes or above exhaust openings. This depends on the specific case and type of construction.
The deflector works thanks to the force of the wind. The element is equipped with a special device that discharges air - a diffuser. Depending on the size of this device, its performance characteristics increase.
To prevent the entry of debris and precipitation (rain, snow), special caps are used. Typically, such a device consists of two parts:
- a visor that covers the exit hole of the ventilation structure;
- dripper used to remove water from the top of the visor.
In addition to the ventilation outlet, the roof can be equipped with special devices - aerators. They circulate air between the thermal insulation layer and the outer covering of the roof. They are used in cases where the length of the slope exceeds 3 m and there is not enough natural draft for normal air circulation.
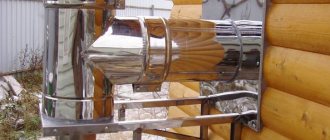
Types of roof ventilation outlets
Ventilation outlets operate in conditions of high humidity. In winter, this causes a lot of condensation to appear on the inner walls of the pipes, and under certain conditions it freezes, which reduces the effective diameter and negatively affects the technical parameters of ventilation systems. In addition, condensate flows through pipelines and can accumulate in large volumes. Such operating conditions are taken into account during the design and manufacture of devices; manufacturers make every effort to ensure stable and reliable functionality of roof ventilation outlets. Which ones exactly?
- The actual capacity of the exits significantly exceeds the design requirements for ventilation systems. The reserve is created to minimize the negative consequences of condensate freezing in the winter.
- The inner surfaces of the walls create minimal resistance to the movement of air flows. This also has a positive effect on the cost of maintaining the ventilation system.
Air flows through elements with minimal resistance
- Light weight and high strength indicators reduce the operating forces. Currently, roofs made of metal sheets are often found: profiled or metal tiles. The thickness of such coatings is only 0.45 mm; the material cannot withstand significant additional loads. Moreover, if they stagger under gusts of wind and create multidirectional dynamic forces.
- Resistance to negative climatic factors. The material used to make the outputs should not oxidize and withstand significant temperature fluctuations from minus to plus values. Do not be afraid of harsh ultraviolet rays, do not react to aggressive chemical compounds.
The material used to make the exits is extremely resistant to most negative factors.
Only a few manufacturers enjoy well-deserved respect among numerous consumers.
| The company's ventilation outlets are widely known in many countries around the world and fully meet stringent requirements for quality, safety and reliability. The company is located in Finland, and Vilpe Vent roof ventilation outlets have been on the market since 1998. They have a modern design and various color schemes, the elements are interchangeable, and special autonomous noise dampers are installed. This is very important when installing equipment on metal roofing. The manufacturer's minimum warranty is 10 years, but in practice the devices last 15 years or more. |
| Made from modified types of plastic with increased resistance to hard ultraviolet rays. The polymer has the ability to maintain plasticity even at significant negative temperatures - ventilation outlets are allowed to be installed in the Far North. The systems have an excellent appearance and are compatible with many architectural styles of buildings. They can be insulated or non-insulated, with electric fans, ordinary or rotary. The diameter and height are selected taking into account the initial data. |
Material
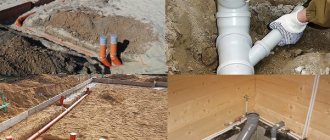
To remove the ventilation shaft, structures made of several types of materials are used. In the production of ventilation pipes, plastic and galvanized steel are considered the most popular.
- Plastic products are one of the most popular ventilation parts in the home. They are often installed for a number of advantages, including corrosion resistance and a smooth wall surface. Both qualities increase the efficiency of the ventilation shaft and its service life.
- Products made of galvanized steel are elements of high strength and a good protective coating that prevents the formation of corrosion on the material.
Requirements for ventilation structures
There are different designs available on the market. Regardless of the material of production, ventilation elements with suitable properties are selected. This is necessary to increase the quality of the entire system.
General requirements:
- The number of connections between elements. The smaller this parameter, the higher the throughput of the pipe.
In addition to the number of connections, it is recommended to minimize the number of turns of the smoke exhaust duct Source en.decorexpro.com
- The smooth inner surface reduces air resistance. This increases the efficiency of ventilation.
- Sufficient rigidity of the material . In this case, the walls of the structure themselves should be thin. This combination increases throughput.
- Moisture and corrosion resistance . When the air temperature drops, condensation forms on the walls of the ventilation shaft, which begins to spoil the material. That is why designs with sustainable characteristics are chosen.
See also: Catalog of companies that specialize in ventilation.
General recommendations for the placement of ventilation elements
Let's look at some general rules that are recommended to be followed when installing roof ventilation.
- When installing embedded elements, waterproofing aprons are used; the junctions between them and the roof surface are coated with mastic. Poorly performed waterproofing can lead to leaks in the future.
- Be sure to install protective grilles to protect the roof space from birds and debris.
- It is recommended to think through the number of necessary components in advance; it is also advisable to purchase them from the same manufacturer as the roofing material.
- The height of the ventilation pipe above the roof must be at least 50 cm. If the pipe is located at a distance of more than 3 m from the ridge, then its length must be at the same level as the ridge.
Determining the height of the pipe relative to the roof.
- In cold regions, it is recommended to insulate ventilation elements to avoid the formation of condensation and icing.
- Roofs with complex shapes require a large number of ventilation elements.
Ventilation shaft arrangement
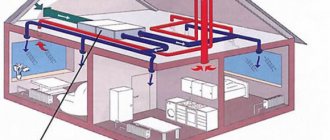
The structure is usually similar to a cylindrical trunk. It is located strictly vertically and contains three parts:
- one large one – about 300x600 mm;
- two small ones - about 150 mm.
It is the large part that is the trunk, which crosses all floors of the building, from the basement to the attic. The design may be non-standard. Increased dimensions must be taken into account when selecting fans.
Through special windows located in rooms such as the kitchen or bathroom, polluted air enters not very large channels and, rising through them to a height of about three meters, ends up in a common shaft. Thanks to such a device, the spread of used air through the air duct from one room to another, for example, from the kitchen to the bathroom, and then into the rooms, is practically eliminated.
In outbuildings, say, farms or poultry farms, an ideal design for air circulation is considered to be a ventilation shaft near the ridge. They run the entire length of the building's roof in the direction of the ridge.
To block access to raindrops, an umbrella is mounted above the outlet of the box. As a rule, in natural air exchange structures a deflector is mounted directly at the mouth. When there are gusts of wind, a vacuum is created here, which contributes to increased traction. But first of all, of course, the deflector prevents the air flow from “tipping over” in the box. When calculating the system, the vacuum created by the wind is not taken into account.
Options with artificial air exchange, which help remove aggressive air impurities of the first and second classes, work somewhat differently: polluted air is emitted to a fairly significant height. This type of emission is also called a flare emission.
Pipe height
The size of the pipe located above the roof is indicated by SNiP:
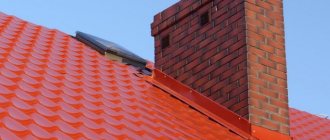
- When installing a ventilation outlet next to a chimney, its height should be equal to it.
- On a flat roof, the height of the pipe must be selected taking into account its diameter, but within 50 cm.
- For a pitched roof, the distance of the ventilation outlet from the ridge is important: if the pipe is located further than one and a half meters, then its height should be 50 cm or more.
- If the ventilation unit is located at a significant distance from the roof ridge (from 3 meters and further), it is necessary to draw an imaginary line from the top point of the roof down along the roof. The top of the pipe should touch the conventional intersection line from the ridge to the horizon.
Choosing a location for the pipe
The installation of the pipe outlet to the roof must be thought out in such a way that it has a minimum slope or bend.
Ideally, the pipe should be installed strictly above the internal riser of the ventilation shaft. If this is not possible for any reason, it is advisable to use a flexible corrugated pipe to connect the nodes.
Fire safety
When organizing ventilation of a building, all rooms and floors are connected to each other by a network of channels and air ducts, which in itself is dangerous from the point of view of fire safety. Therefore, these elements themselves and the gaskets between them are made of materials that meet SNiP, according to which explosion and fire safety is ensured. In particular, the shaft is separated from the air duct by a partition made of non-flammable and moisture-resistant material.
Technical factors
The quality of functioning of the ventilation system depends not only on the materials that were used for its construction. Of great importance is the extent to which the completed design complies with existing standards and regulations. First of all, it is necessary to take into account the most important aspect - fire safety.
Sewerage
Functions
Why do you need a sewer outlet to the roof?
Sewer fan outlets can be seen on the flat roof of an apartment building.
A draft is inevitably created in the sewer riser: moist air, heated upon contact with the drains, rises upward. If the riser is hermetically sealed at the top, it will saturate the kitchens and bathrooms on the upper floors with sewer aromas. Of course, provided that the connections between the plumbing fixtures and the sewerage system are leaky.
During a volley discharge of water (for example, during simultaneous flushing of two toilets along a riser), the vacuum that occurs after the passage of the water front can disrupt the operation of the water seals in the siphons of plumbing fixtures. Then the smell of sewerage will penetrate even into those rooms in which all connections to the sewerage system are carefully sealed.
Free air exchange with the street solves both problems: the draft transports the aromas of wastewater outside the house, and with a volley discharge of water, the sewerage system will be able to suck in air through the fan outlet.
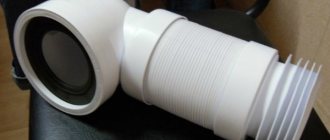
Installation
Sealing of pipe outlets outside the roof is carried out using the same methods as in the case of ventilation.
One solution to the waterproofing problem is to install a rubber cap over the sealant.
A few nuances:
- Up to four risers can be united by a common fan outlet;
- Horizontal sections of the vent pipe should not have counterslopes. The price of failure to comply with this rule is the accumulation of condensation in areas with a negative slope. Water filling the pipe will disrupt the normal operation of the ventilation of the risers;
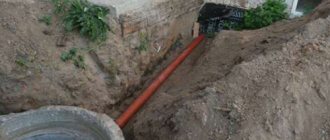
- In a private house, a waste outlet is installed at the top point of the sewerage system. I have it mounted on a sewer pipe running along the facade of the house, transporting wastewater from the attic floor to the septic tank.
Insertion of a drain outlet into the attic floor sewer system.
The fan pipe itself has a deflector.
Step-by-step installation instructions
The procedure for installing a ventilation duct on a roof structure is not too complicated. Anyone can easily do it, but to do this you need to follow these instructions:
- First of all, you should figure out where to install the passage unit on the roof.
- On the upper wave of the metal tile, you need to draw the contours of the future hole, applying the template that comes with the element itself.
- After this, you should cut a hole on top with a chisel and metal scissors, and also make several holes in the lower layers of the roofing pie.
- Following the template, you need to drill several holes for the screws.
- Then all that remains is to clean the roof surface from any remaining moisture and dust.
- A layer of sealant must be applied to the bottom of the sealing gasket.
- Then you need to place the gasket in the right place and secure the passage element in it. After making sure that the structure is secure and correctly positioned, you can begin fixing it. Screws are used for this.
- Finally, it is necessary to ensure the tightness of the ventilation outlet to the roof from the attic.
By following the above guidelines, you can perform high-quality, reliable and durable installation of the ventilation outlet. In this design, it will serve the owner of the premises for a long period of time.
Based on the above, there are practically no difficulties in installing a ventilation duct on the roof. If you draw up the correct project in advance, carry out calculations and study the installation instructions, the future ventilation system will work best. At the same time, the service life of the roof, which has gone through a lot of changes due to the appearance of a new unit, will not be reduced in any way. But for this you need to take the upcoming work responsibly and follow the basic installation rules.
Methods for calculating pressure loss in a ventilation pipe
In addition to the height of the pipe, the pressure loss occurring in the duct is also calculated. Several formulas are used for the calculation:
- Air pressure loss can be calculated using the formula P = R*L + z . In this case, R is the pressure loss directly due to friction, z is the pressure loss due to local resistance, and L is the length of the air duct.
- To calculate the pressure loss for a round duct, you need to use the formula Ptr = (x*l/d) * (v*v*y)/2g . The notation in this formula is deciphered as follows: x is the coefficient of frictional resistance, g denotes the acceleration of gravity (it is equal to 9.8 m/s2), d is the diameter of the air duct, y is the air density and v is the air flow velocity.
Operating principle and secrets of mine efficiency
The principle of operation is quite simple, but at the same time very effective - through special windows, the exhaust air enters small channels, where, rising about three meters, it smoothly passes into a large shaft. Such a device almost completely eliminates the transfer of polluted air from the room to other rooms with subsequent distribution throughout the building.
To prevent snow and raindrops from penetrating into the air duct, it is covered with a special umbrella on top. Designs with natural air exchange are additionally equipped with a deflector, which, during gusts of wind, creates a vacuum that enhances traction. In addition, it prevents the “overturning” of air masses inside the box.
It is worth remembering that when carrying out calculations, the vacuum created by the wind is not taken into account. If the ventilation of the mine is carried out forcibly with the removal of impurities included in the first and second categories, then the exhaust air is emitted to a significant height. This technology is also called flare technology.
Nuances of operation and cleaning of ventilation ducts ↑
Carrying out cleaning activities in multi-storey buildings without the involvement of specialists is strictly prohibited. As for private buildings, here all the work can be done on your own. All you need for this is a brush with the stiffest bristles, securely fixed to the cable.
The work is performed in the following order:
- remove the protective cap from the shaft;
- lower the brush down to the very base of the shaft, and carry out successive movements up and down along the entire height until it is completely cleaned;
- after cleaning the main channel, move on to the exhaust air ducts;
- exhaust grilles are removed and thoroughly cleaned;
- sweep the air duct from the inside using the same brush - instead of a cable, you can install a long handle;
- remove all the debris accumulated in the pipe, for which they use a vacuum cleaner.
Sanitary standards also recommend, in addition to cleaning, periodic disinfection of ventilation ducts.
Without a ventilation shaft, it is very difficult to imagine any building, both private and industrial. Despite its apparent simplicity, the design has a number of aspects and features that only professionals can take into account at the required level. They should also be entrusted with the construction of the mine - it is not only safer, but also economically feasible.
Why does the check valve sometimes not work and close?
On the kitchen side, a check valve is mounted on the tee. In the factory version it will be quite long. In this case, it is better to shorten it so that this “gun” does not stick out too much.
The valve is inserted inside a section of a standard air duct d-125mm, and this air duct is put on and siliconized onto the tee.
If this whole structure seems too cumbersome to you, and the protruding pipe with the valve is not very aesthetically pleasing, you can do it a little differently. You make the air duct not with a round pipe, but with rectangular channels.
In this case, you install the above check valve on a straight section, as close as possible to the turn.
You can't achieve a factory connection here, so you'll have to farm collectively. Buy a rectangular tee with a round outlet on one side. Next, this round timber is cut off and a check valve is glued in its place.
The valve is placed strictly at an angle (2 degrees). Otherwise, it will open every once in a while or not open at all.
Many people have encountered this problem and easily solved it this way.
The damper itself is also mounted with a vertical deviation. The upper turning point, based on the hour dial, is at 13.00 (1 o'clock), and the lower one is at 17.00 (5 o'clock). This is if your flow direction is from right to left.
Otherwise, the circle is placed at the 11 o'clock - 7 o'clock position.
For more reliable operation and stable opening of the damper, you can stick some kind of weighting material (no more than 2 grams) on one side. Glue it close to the edge.
By the way, do not throw away the previously cut round pipe. It is tightly inserted onto the valve from above, after which a decorative grille diffuser is mounted on it.
What nuances might there be with this method? If your hood stands exactly above the entrance to the ventilation shaft, and the duct pipe goes straight, without any turns in the horizontal plane, then the valve installed on such a straight section does not work normally, at least at 1st speed.
You will simply have nowhere to get the increased pressure to close it. The air will fly through this “turn” in a straight line. You definitely need an angle.
The valve cover and its rotating mechanisms are easy to clean and do not be afraid of them becoming overgrown with grease. For this to happen, you will have to fry huge wild boars on the stove and stew them in your oven for several hours a day, no less.
If you don’t want to see a protruding “hollow” under the ceiling at all, then, as an option, you can install a tee so that the middle elbow rests against the wall, otherwise, where the valve is located, it would look to the side. In this case, also close the hole with a decorative cover.
Everything will look much nicer. However, due to the additional rotation, the performance of natural ventilation will deteriorate slightly. And the grill will reduce it by another twenty percent.
In addition, it will no longer be possible to clean the channel by hand or with a vacuum cleaner. But many do this deliberately and even hide the entire structure in a wooden or plastic box.
As they say, beauty requires sacrifice.
Heating bottling
Functions
What are the benefits of moving the heating supply bottling to the attic?
- Extremely simple start of the heating system. You just need to fill it, open both house valves in the elevator and bleed the air from the expansion tank in the attic. For comparison: in the case of bottom filling, you need to bleed the air in the jumper between each pair of risers;
- Uniform heating of all heating devices on each floor. The drop in coolant temperature as it moves from top to bottom is compensated by an increase in the size of the radiators.
Schematic diagram of a heating system with top filling.
The only inconvenience is that it is more difficult to reset and start a separate riser with your own hands: in the case of top filling, it must be turned off both in the basement and in the attic.
Installation
The filling is installed with a constant slope along its entire length. An expansion tank is placed at the top point, collecting air when the circuit starts. Each riser is equipped with:
- A valve that allows you to turn it off independently of the others;
- A plug. It will allow the riser to suck in air during discharge and prevent water from hanging in it.
Discharge of riser from bottling. Instead of a plug, a relief valve is installed - a ball valve.
In ventilated attics, both the bottling and the sections of risers located above the attic floor are thermally insulated. As a rule, glass wool or mineral wool, rags and knitting wire are used for this purpose. Thermal insulation reduces both non-target heat loss and the likelihood of circuit freezing during short-term circulation stops during winter cold.