What determines the choice of passage unit design?
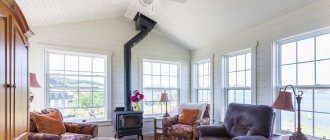
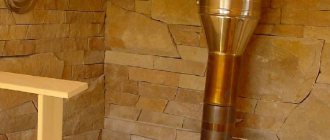
Stainless steel pipe, lined with brick, insulated with mineral wool
. What the final design of the passage will be is determined by several factors. The final decision is influenced by the performance characteristics of the heating unit and the roof itself.
Flue pipe material
Most often, these structures are made of refractory brick, stainless steel and other metals. Ceramic and asbestos-cement chimneys are less common. The materials used impose certain requirements on the choice of the shape of the unit.
Fuel combustion temperature
Different types of fuel burn at different temperatures. This influences the raw materials chosen. For example, if you use solid fuel (firewood, peat briquettes, compressed coals), you cannot install a metal pipe.
External finishing of the chimney
The usual practice is to line the pipe with bricks or cover it with plaster. The finishing method influences the design of the unit, since a chimney lined with decorative bricks is heavier.
Type of roofing
It is more profitable to build a configuration with a section shaped like a rectangle or square. For such options, ready-made additional components are produced that are used when arranging the connection with the roof.
Features of pipe passage through insulation
Roofs in bathhouses are always insulated, which ensures heat retention inside the room. The material used for these purposes must be continuous and solid. The passage of a pipe through the roof of a bathhouse violates the integrity of the insulating materials, which negatively affects heat and moisture protection. Moreover, fire safety standards aggravate the situation, since they require a distance from the pipe to materials prone to fire of at least 13 cm.
This situation must be resolved in such a way that the room is safe and warm. The best way out of this situation would be to build a pipe box. We install rafter legs on the sides of the chimney. There are cross beams above and below the pipe.
In a situation where the pipe is located on the rafters, it is necessary to cut the rafter leg. Next, additional rafter legs and cross beams are installed. As a result, the pipe from the bathhouse is routed through the roof through a special box.
There is free space between the pipe and the rafters. To prevent heat from leaving the bathhouse through it, it is necessary to carry out insulation work. Basalt wool is best suited. This material is convenient to use, it does not burn and is not afraid of moisture.
To ensure that the roofing pie does not lose its tightness, it is necessary to make an envelope-shaped cut at the location of the chimney. The edges of the resulting cut are wrapped towards the beams and rafters. You can use sheathing strips, staples or nails to secure the edges of the cut. At the junction of wood and materials, insulation is required using tapes with an adhesive base or special sealants. The option of gluing the roofing pie can be used in case of low temperature on the pipe, not higher than 60 degrees. In this case, there may be an additional tank for heating water or an additional heater. Sandwich pipes are not considered in this case. We have not yet figured out how to secure the pipe on the roof of the bathhouse, so we continue further.
Care must be taken to remove condensate. For these purposes, it is necessary to organize a groove for drainage. This design is sold ready-made, but you can build it yourself. The last option will require a thick film. The structure is fixed around the pipe, and its free end is moved to the side so that water flows down the slope.
Thermal insulation materials
Metal chimney pipes must be insulated to prevent condensation from forming.
When arranging a chimney in a bathhouse, the type of heat insulator is of great importance. Most often used:
Mineral wool that can withstand heating up to 600°C. Among the disadvantages of this material are the release of formaldehyde when heated and the deterioration of protective properties when wet.
Minerite, which contains cement, cellulose and mineral fillers. The material heats up to 600°C without releasing any substances harmful to health and does not lose its qualities when exposed to water.
Asbestos also has good heat-insulating properties, but when heated strongly, it releases substances harmful to health.
Useful tips for stove makers: pay attention...
- Be sure to use a ceiling passage box, even if you are using a sandwich. Fill it with expanded clay, foam glass or mineral wool. Do not fill the space around the pipe with earth, especially sand. Sand tends to get very hot and retain heat for a long time.
- The most optimal chimney height is 4.5-5 meters. Try to stick to these parameters.
- The upper edge of the pipe should rise above the ridge by at least 50 centimeters. But, if the roof is flat, then the height here should be at least a meter. For large chimney heights, special guy wires are installed.
- In a steam room, if the pipe passes near a wall or partition, then a protective screen must be installed on the wall. It can be in the form of stainless steel or basalt cardboard.
- When installing a flash drive, it is recommended to use a special thermal and weather-resistant sealant. He copes well with the task assigned to him. By the way, during the assembly of a chimney sandwich, the same thermal sealant, and sometimes crimp clamps, are often used.
- If flammable roofing material is used, a spark arrestor is required. You can do it yourself by using a used KAMAZ air filter.
- Try to avoid sandwich pipe joints in the ceiling passage. At this point the smoke channel must be solid.
Wisdom Quote: If you want the world to change, be the change.
Safety regulations
To ensure that the bathhouse is comfortable and safe, and that the heating device operates without interruption and does not cause a fire or injury, the following safety rules should be followed when installing and operating the chimney:
- Sagging and warping of the elements of the smoke exhaust system are not allowed.
- Turning the pipe is allowed, but not more than three.
- The distance from the chimney to the walls must be at least 50 cm.
- All connections must be made in such a way that none of them end up inside the wall, ceiling or where the roof passes.
- The margin for thermal insulation in the ceiling and roof made of combustible materials is made at least 100 cm when installing a single-wall pipe, at least 20 cm when installing sandwich sections and 6 cm for a smoke shaft or combined chimney. To pass a non-combustible roof, a margin of 13 cm is sufficient.
- If the chimney rises above the roof by more than 1.2 m, it must be additionally secured with braces.
- All connections must be reliable and tight. If a unit is found to be depressurized, it should be repaired immediately. If smoke appears at the junction of pipes or shaft elements, the operation of the heating device is stopped and the joint is repaired.
- During operation, it is necessary to carry out preventive maintenance: cleaning the pipe from soot deposits, discharging condensate from the drip line. This will extend the life of the chimney and heating device.
- When the draft decreases or reverses, as evidenced by smoke in the steam room or boiler room, as well as sparks and hum in the firebox, it is necessary to clean the chimney.
- After a long break in using the sauna, the chimney and heating device may become clogged or airy. In this case, it will not be possible to light the bathhouse. It is better to carry out inspection, repair and cleaning of the chimney before starting up the heat generator.
We recommend that you read: Features of using a single-pipe heating system with forced circulation of coolant
Cleaning the pipe in the bath
Chimney cleaning tool
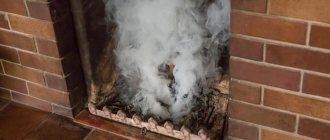
If the chimney becomes clogged, the draft deteriorates and smoke appears inside the bathhouse. A question arises regarding how to clean a pipe in a bathhouse. This can be done using a special tool, or the stove can be heated with a certain type of wood.
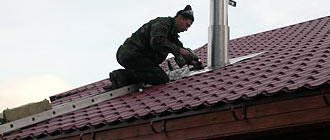
Mechanical cleaning involves the use of a special scraper and a stiff brush with a link handle. The work is done from the outside, from the roof, through the top of the chimney.
Over time, a serious layer of soot can form
Considering that a lot of soot gets inside the firebox, it is necessary to protect the room from it. One option is to cover the firebox with a thick cloth.
The second method is to heat the stove with aspen wood, and the pipe cleans itself. It is recommended to do this at least once a year.
Ideally, the chimney should look something like this
Attention: Do not use any chemicals when cleaning the chimney. This method causes great harm to the environment
It is necessary to install a pipe for a bath carefully, not missing even small details, and if this process is being done for the first time, it is worth inviting an experienced craftsman to control and assist in the installation work
It is very important to comply with safety regulations and recommendations of specialists
Types of chimney pipes and types of chimneys
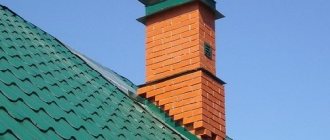
A brick chimney is considered the least dangerous.
Chimneys are designed to remove combustion products from the firebox. A properly selected chimney design increases the efficiency of the fuel combustion process.
Types of chimneys:
- brick;
- ceramic;
- metal;
- polymer.
Brick chimneys are installed inside and outside the walls of the building. According to building rules, they require a foundation, and the chimney itself is made of solid red brick. In this case, the seam between the bricks should not exceed 10 mm. Sometimes an asbestos-cement pipe is placed in a brick structure.
An acidic environment must not be created in a brick chimney. In this case, the brick crumbles and over time is capable of collapsing inside the chimney channel.
Ceramic chimney is a ready-made modular design with a high degree of safety.
Ceramic chimneys are a completely ready-made modular system that is manufactured in a factory. They can withstand high temperatures, are acid-resistant and can last for a long time. However, due to their heavy weight, a foundation is required during their construction.
Polymer chimneys are made of special materials that are highly flexible and light in weight. However, they are used only in cases where the temperature of the exhaust gases does not exceed 250°C.
Metal chimneys are made of stainless steel or cast iron. They are a modular system, which includes adapters, tees, bends, etc. Such systems are mounted inside brick channels and separately.
Types of chimney pipes
Stainless steel is used to make chimney pipes. Products are:
- smooth single-walled;
- corrugated;
- in the form of a sandwich.
Corrugated and sandwich pipes are only round. Smooth single-wall pipes, in addition to round ones, can also be oval and rectangular. The latter are intended only for installation inside brick chimneys. Steel chimney pipes are made from steel grades AISI 304, AISI 310 and AISI 316.
When choosing a corrugated pipe, it is necessary to take into account the heating temperature
AISI 304 steel is used in the manufacture of single-wall or sandwich structures used as part of low-temperature heaters. Their feature is their high resistance to aggressive gases at temperatures up to 250°.
Pipes made of heat-resistant steel AISI 310 can heat up to 1000° without changing their shape. However, this material has low resistance to aggressive environments, so it is used in systems equipped with solid fuel boilers.
The best material for the manufacture of chimney pipes is AISI 316 steel. Products made from this material are characterized by high heat resistance and resistance to acidic environments.
Corrugated pipes are a wire spring wrapped in thin foil. They are mounted in a fireproof shell, which extends its service life.
Single-walled smooth pipes are best suited for arranging chimneys in bathhouses. However, it is recommended to use them in systems with boilers whose efficiency does not exceed 90%.
Sandwich systems are quite expensive, but are versatile and have a long service life. They are recommended for use when installing chimneys inside buildings.
Selection of chimney pipes
A chimney pipe is selected based on the characteristics of specific types of fuel, which differ from each other in combustion temperature, exhaust gas temperature, and chemical composition of the smoke.
If the pipe is paired with a wood-burning sauna boiler, it must withstand temperatures of 700-1000°C. When working with a sawdust or pellet boiler, their operating temperature should be from 250 to 400°C.
It is also important to choose the correct thickness of the inner wall of steel pipes. For wood-burning sauna boilers this value is 0.7-1.0 mm, and for pellet boilers 0.5 mm will be sufficient.
Useful tips for stove makers: pay attention...
- Be sure to use a ceiling passage box, even if you are using a sandwich. Fill it with expanded clay, foam glass or mineral wool. Do not fill the space around the pipe with earth, especially sand. Sand tends to get very hot and retain heat for a long time.
- The most optimal chimney height is 4.5-5 meters. Try to stick to these parameters.
- The upper edge of the pipe should rise above the ridge by at least 50 centimeters. But, if the roof is flat, then the height here should be at least a meter. For large chimney heights, special guy wires are installed.
- In a steam room, if the pipe passes near a wall or partition, then a protective screen must be installed on the wall. It can be in the form of stainless steel or basalt cardboard.
- When installing a flash drive, it is recommended to use a special thermal and weather-resistant sealant. He copes well with the task assigned to him. By the way, during the assembly of a chimney sandwich, the same thermal sealant, and sometimes crimp clamps, are often used.
- If flammable roofing material is used, a spark arrestor is required. You can do it yourself by using a used KAMAZ air filter.
- Try to avoid sandwich pipe joints in the ceiling passage. At this point the smoke channel must be solid.
Wisdom Quote: If you want the world to change, be the change.
We run the chimney through the ceiling
The first thing to do is determine the exact location where the stove will be installed. Although, this issue must be resolved at the planning and design stage of all premises. What should you consider?
We remove the chimney from the ridge
Firstly, the chimney passing through the ceiling should not be located near load-bearing beams and rafters. Otherwise, the question may arise: how to remove them (which is extremely problematic) or how to protect them from fire. In order not to worry about this, think about this nuance in advance.
Secondly, the stove should be located in a place convenient for you. The correct location of the firewood, some stove accessories, open doors, etc. should not cause you any inconvenience. Here you should also consider where the hot water tank will be located and whether there will be one at all (maybe you have an electric or gas boiler).
Okay, we decided on the location and installed the stove. Now we prepare or buy the chimney itself and all the “bells and whistles” that will be required. Here I mean sandwich pipes and additional elements, which you can read in detail in another article. A chimney for a bath of this type is the most practical and in demand today. We will consider this option further...
In order to accurately mark the ceiling, we take a regular plumb line (I think there is no need to explain what it is) and raise it to the ceiling. In this case, the weight of the plumb line must be in the middle of the smoke exhaust channel of the furnace. We mark on the ceiling the place that the “smart device” showed us. This is the center where the bath pipe will pass.
Installation of a ceiling passage box
Next, we take the ceiling passage box, which is included in the “necessary gadgets” category, and mark the hole in the ceiling according to its size. This hole can be made 1-2 centimeters larger. There is nothing wrong with this, since from below everything will be closed by the design feature of the box itself, and from the attic side, the remaining cracks can be closed with the same stone wool.
Next, cut a hole of the required size in the ceiling. Here everything depends on what tool you have. The best option, of course, is a chainsaw. Fast and effective. Just first check that there are no nails, screws or other metal objects in the cutting area of the wooden ceiling. Any insulation should also be absent, especially flax or jute. Using a chain saw on these materials is unacceptable; you can ruin the tire (I already have a bad experience). Go ahead…
How to install?
For constructing a chimney with your own hands, the ideal material option is metal pipes. They reduce construction costs as well as labor costs. Installation of the chimney begins with the stove already installed in the bathhouse. An ordinary iron pipe is installed up to the first elbow. Proper fastening will be ensured by special structures with fire-resistant characteristics.
The initial part is connected to the stove pipe. Immediately install a gate valve, which will allow you to increase or decrease the traction force. Then a hole is made in the roof, which can be square. Next, a metal box with a through hole corresponding to the size of the structure is assembled. Through it the chimney will be led to the attic. The height of the box should be greater than the ceiling finishing materials.
The box is securely fixed in the ceiling. The free space of the box is filled with mineral wool or expanded clay. In the attic, the structure is covered with a lid with a hole for the pipe. A sheet of heat-resistant material is fixed at the chimney passage point. The top pipe is protected with sheets of mineral wool or asbestos. A special waterproof cuff is used as thermal insulation. The gaps can be treated with sealant.
Installation of an external metal chimney will require even less labor costs. The device requires the presence of a suitable hole in the wall (not in the roof). To turn the pipe from the furnace, a special elbow is purchased. There are different types of bends, choose the option that suits you.
The outlet is installed on the stove pipe. Then a tee is installed on the outside. From it, the chimney is routed up along the wall, and down if necessary. To insulate the wall, it is correct to use a similar metal box filled with non-flammable bulk material.
When arranging an external structure, it is important that it rises 50-60 cm above the ridge: such an installation will guarantee good traction. To protect the chimney from small debris and rain, put a special umbrella on top
Brick chimneys can be root or mounted. The best option for sauna stoves is the root one. If the stove is made of brick, then a structure made of the same material is attached. If the stove is made of metal, the brick chimney is connected to the pipe with a special pipe.
A brick chimney is arranged in the form of a square pillar, which is equipped with a well-shaped section. The cross-sectional size is related to the power of the sauna stove; it can be half a brick, a brick or two bricks. The basis for a brick structure is a foundation of the same thickness as the sauna stove, forming a single whole with it. The pipe is raised to the required height, where a valve is installed.
Immediately mark the location for the structure on the ceiling and roof. To maintain strict verticals, use a level. Start the work by laying the top part, for which there is already a point on the stove. Carry out the passages of brick rows evenly: any unevenness will impair the quality of the traction force. Control the placement of each row. For control, a tensioned thread between the corner of the starting row and the corner of the hole in the roof is suitable.
To protect the ceiling from fire, fluff is laid. Fluffing is an expansion of the outer walls of the pipe, which also ensures the stability of the structure. The widest point of the fluff should be located at the level of the ceiling material. After the installation of the fluff is completed, the chimney is secured with edged boards. Then the fluff narrows, the pipe is aligned to the initial value.
The outer perimeter of the chimney is laid out until the roofing material appears. A structure is being built at the top that will serve to drain rainwater. It has increased dimensions by about a quarter of a brick. Lay out the structure according to a similar principle with fluff. Its height is related to the angle of the roof.
Next, lay out the neck of the chimney. It is allowed to install a metal cap on top of the structure
It is important to carefully seal the joints between the brick chimney and the roof structure. Choose methods of work and additional elements depending on the type of roofing material
The methods of this work are different; decisions on the use of one method or another are made at the site of pipe installation.
It is difficult to install a brick chimney correctly with your own hands. In addition, the design is expensive. Therefore, you should not start bricklaying if you have only seen a brick and a trowel in a video. Modern materials make it possible to construct simpler and more efficient pipe designs for bathhouses.
Installation method
Installation is carried out from the outside and inside. Each installation method has a number of advantages and disadvantages, but the choice depends on the desired result. A list of pros and cons will help you make your choice.
Through the wall
The chimney structure is completely mounted through the wall, and extends above the bathhouse, but does not take up space in the bathhouse itself.
- saves space in the bathhouse;
- reduces the risk of fire;
- will not cause burns due to absence from the steam room;
- Easy to install, no need to pass through the roof.
Flaws:
clarity in installation, it is important not to deviate from the dimensions, to measure the opening in the wall and the pipe. does not protect against heat consumption, vapors immediately escape; the chimney has sufficient heating; high price tag compared to installing a pipe through the roof
Exiting the pipe through the roof
When equipping a pipe passage through the roof, care must be taken to ensure that two conditions are met:
- passages through the roofing pie must be fireproof;
- the under-roof space should be protected as much as possible from moisture penetration.
Exiting the chimney through the ridge makes all the work quite simple. Due to the fact that the formation of snow pockets on the ridge is impossible, it is possible to achieve better protection against leaks. But at the same time, this method of installing a roof passage means that in the design of the rafter system the ridge beam will not have load-bearing functions. And this requires additional strengthening of the rafters themselves. If there is an attic, installing additional rafter supports may be undesirable or simply impossible.
That is why developers prefer installing a chimney passage on the slope, directly at the ridge. A snow pocket also does not form in this place, and besides, the rafter system does not need additional strengthening. But besides this, the choice of location for the roof chimney is also influenced by the location of the heating equipment. It should be remembered that the horizontal sections of the chimney should not be more than 1 meter in length. In some cases, it is the location of the boiler that becomes the reason for choosing the method of passing the chimney pipe through the ridge.
Professionals recommend avoiding installing a passage element in the valley (the point where two slopes meet an internal corner), since it is especially difficult to install a roof passage at this point. As a result of rain and snowfall, the junction may not be able to cope with moisture and, as a result, the roof will leak.
It is important to maintain a distance between the rafters and the roof in the range of 25-30 cm. If the roof is made of combustible materials (various types of roofing felt, soft roofing), then a gap of 13-25 cm must be maintained between the material and the chimney wall. If the material is resistant to high temperatures, then this gap can be left minimal, and the pipe on the roof of the house is removed only from the sheathing
If the material is resistant to high temperatures, then this gap can be left minimal, and the pipe on the roof of the house is removed only from the sheathing.
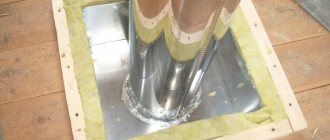
If the roof is a “pie” consisting of hydro-, steam- and thermal insulation, then when installing the passage element, some difficulties may arise due to the violation of the integrity of this layer. As a result of an error, the protective properties of the roof can be significantly reduced. In this case, the chimney can be installed in a separate box, which will isolate the roofing materials from the hot walls. The distance between the inner wall of the box and the chimney should be about 15 cm, while the free space is filled with non-flammable heat-insulating material. It is recommended to use mineral or basalt wool, as it is resistant to moisture.
The waterproofing and vapor barrier is applied to the box using the standard method: the “pie” is cut in the shape of an envelope. The film sheet is brought to the rafters and cross beams, where they are fixed with nails or staples. Then the waterproofing layer is pressed on top with bars, and the vapor barrier is pressed with the base frame under the finishing materials of the attic or attic. After this, the joints of the films and the box are treated with sealant and glued with a special tape.
Sandwich chimney roof penetration
Fundamentally, the arrangement of the roof penetration of a sandwich pipe is not much different from the cases described above. When making indentations and junctions, the requirements of SNiP 41-01-2003 must also be observed. Let's look at a standard case for a bathhouse with a chimney crossing the attic floor and the slope.
Drilling a sandwich pipe through the thickness of the attic floor is most reasonable and easiest to do with the help of polyurethane foam - a factory-made ceiling-pass assembly. The walls and planes of the finished product are made of mineralite or galvanized steel. In order to save money and if you want to show your own abilities, you can make a similar metal box yourself. The task of PPU is to fill the space around the pipe, which must not only be filled, but also provide proper thermal insulation.
The finished factory assembly is attached to the end sections of the penetration. Before fastening, the surfaces that will be in contact with the box are first edged with basalt cardboard. Then basalt wool or similar non-flammable insulation is laid along the contour.
The article /uteplenie/minvata-ili-bazaltovaya-vata-chto-luchshe.html will tell you which is better: mineral wool or basalt
The space between the chimney and the wall of the box facing it is also filled with basalt wool, and an air gap is left outside between this wall and the insulation to improve insulation. From below, on the side of the bathhouses, the penetration is covered with a box-shaped casing made of galvanized or stainless steel. For the final design, a steel sheet is first installed from the attic side, then a casing.
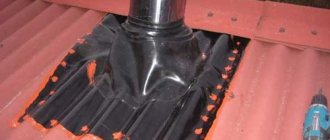
The arrangement of the passage through the slope from the side of the bathhouse is made using a metal roof sheet with an oval hole. It is attached with self-tapping screws to the elements of the rafter system. Before installing the sheets, basalt cardboard and cotton wool are laid in the cut-out opening. The free space is filled with non-combustible thermal insulation. A lead roof trim is installed on top. It is adjusted to the roof surface by tapping it with a mallet.
What thermal insulator to use
After the device is fixed to the ceiling, they go up to the attic or second floor and fill the gap between the outer wall of the pipe and the beams with heat insulator.
Basalt wool can be used as thermal insulation. But be sure to check that the operating temperature range should be greater than 600°C.
You can use mineral wool or clay to insulate the pipe.
Some people think this option is not the best. Firstly, during production, resins are used as a binder, which release formaldehyde when heated. Secondly, condensation sometimes runs through the pipe. And mineral wool (and basalt wool too) lose their heat-shielding properties when wet. And when they dry, they are only partially restored. So this option is really not the best.
The penetration is also covered with expanded clay of medium and fine fractions. This is a natural material that is relatively light in weight. Even if it gets wet, it then dries and restores its properties. When wet, the thermal conductivity increases slightly, but it is already worse for expanded clay than for mineral wool.
In the past, sand was often used. The option is not bad in all respects, except for one detail: it gradually wakes up through the cracks. Refilling the sandbox is not difficult, but constant sand on the stove is annoying.
If we talk about natural heat insulators, then you can use clay. It is diluted to a paste-like state and the entire gap is covered. Sometimes expanded clay is used as a filler.
One of the heat insulators is expanded clay
Here is a review of the use of clay when passing a bath pipe:
Not everyone recommends using insulation in the passage unit. There is an opinion that it is better to leave the gap unfilled: this way it will be possible to avoid overheating and burning out of this section of the pipe - it will cool better due to air blowing. This may be true, but the radiation from the heated pipe will dry out the nearby wood, and in this case the temperature of spontaneous combustion is significantly reduced - to +50°C.
As you can see, the pipe burned out
There are several ways to avoid overheating. The first, and most rational, is to use the heat that flies out into the pipe and heats it to extreme temperatures for your own needs. There are three options:
One way to avoid overheating is to place stones on the pipe
- Make a water jacket on the metal chimney and use hot water for showering or heating. The system is not so simple; it also requires a remote tank, as well as pipe connections, cold water supply, etc. But temperatures above the water jacket will not be nearly as high, and the pipe will not burn out.
- You can also heat water, but it’s easier: install a samovar-type tank. Hot water is also provided, the chimney does not overheat and is protected. But there are some nuances here: do not let it boil, drain the heated one in time, add the cold one. And doing this is not entirely convenient, since the tank is located quite high: above the stove on a pipe.
- Adapt a net for stones. The water will have to be heated in a different way, but the advantage here is this: after the procedure is completed, the stones dry the bath. Here, too, difficulties may arise: the weight of the stones is considerable, it is unlikely that you can do without support, unless you use the factory version (on the right in the figure). In a homemade version, a structure will be needed to redistribute the mass.
When using any of these methods, the pipe temperatures in the ceiling passage are significantly reduced. The likelihood of burning becomes very small. That's not all. There is a way - simply cool with air. To do this, another one of larger diameter is put on the heat-insulated pipe. A grate is made at the bottom and top through which air enters/exits. For a steam room this is not an option - it will draw out all the steam, but for a washing room it can be used. The method is especially good in the attic and when passing through the roof.
Connections to a brick pipe
The tightness of the chimney penetration depends on the quality of the roof connections. It is necessary to reliably protect both insulated and cold structures from atmospheric water, dust, and heat loss. A properly prepared assembly for the passage of a chimney through the roof should not contain flammable materials such as polyethylene film. It is undesirable to have slowly decaying and melting materials there.
Standard ways to organize a passage
The vapor barrier layer must be cut ahead of time with an envelope above the penetration. Its edges must be stapled to nearby elements of the rafter system. A continuous sheathing is installed around the roof passages and an additional waterproofing carpet is laid. A water-repellent carpet is similarly cut with an envelope. Then about 10 cm is laid around the perimeter of the hole to insert them onto the vertical walls of the pipe. The excess is cut off.
You can learn how to install a pipe in a bathhouse over the roof from the article
When laying almost all types of roofing coverings, pipe cuttings are carried out according to similar schemes. A gap of 2-3 cm must be left around the chimney for free movement of structures during shrinkage. In addition to the classics described above with an apron made of galvanized metal, the following can now be used in arranging junctions:
- Self-adhesive tapes with the Wakaflex trademark paired with Vaka strips.
- Self-adhesive lead strips.
- Additional parts produced specifically for a specific brand of roofing.
An exception is bituminous shingles, when using which it is possible to make an apron not from roofing steel, but from a waterproofing carpet. It can simply be glued to the walls of the chimney with mastic. Before laying the flexible piece covering, a plinth or a triangular strip is installed around the pipe to ensure water drainage. Then the components of the apron are mounted or glued.
Self-adhesive tape with strips
The waterproofing agent “Vakaflex” is a polymer mastic reinforced with aluminum mesh. Supplied in the form of a 28cm wide tape with strips of adhesive applied to the back side. To prevent the material from sticking together prematurely, its back is covered with a protective film. The tape is glued to the coating by rolling it with a roller.
The procedure for gluing waterproofing tape is carried out in the following order:
- We cut the strip to the size of the pipe with 5cm overlaps on both sides.
- We bend the cut piece along the long side so that we get something like a metal corner with a width of the top shelf of 15-16cm.
- We apply our “corner” to the bottom wall of the pipe with its wide part.
- Carefully remove the protective film and roll the tape with a roller to the adjacent surfaces of the pipe and coating, without gluing the overlaps.
- By stretching the material, we achieve a tight fit to the profile surfaces, if any.
- We cut the overlaps at 45º, not reaching the intersection of the pipe line and the slope by approximately 1 cm.
- We place the pieces of material remaining on the sides onto the adjacent walls of the pipe and roll them.
- To try it on after the fact, we will attach a roll of tape to the bottom edge of the already glued strip. The part of the “corner” glued to the slope is approximately 10-12 cm. The side part of the junction should be extended by this amount of cm. According to the resulting size, the parts are identical.
- We make a “corner” from both parts. We empirically select the size of the shelves. It is desirable that the edges of the lower and side parts of the frame at the joining points are almost at the same level.
- A rectangle was cut off from the bottom side for gluing on top of the existing strip.
- To attach to the upper wall, the pipes were cut in the same way as in the case of fixing the edges of the first strip.
- They tried it on, adjusted it, stretched it where necessary, rolled it in, glued it on.
- We try on the back strip in place, glue it and place it under the covering.
Planks are installed on top of the glued waterproofing, the upper side of which, after installation, is filled with a sealing compound. It is mounted according to an equivalent scheme. First, the lower part is cut out and attached with overlaps of 5 cm on each side, then the side parts, and finally the top part. Only for the overlap of the top and side elements leave 1-2 cm. The planks are cut according to the results of actual fitting and fastened with screws to the walls of the chimney.
Framing with lead strip
After installing the chimney through the roof, the lead strip should be glued onto a dry surface free of dust and technical contaminants. In wet weather, before work, primer should be applied to the base to optimize adhesion. When the thermometer readings are below +8ºС, lead strips are not used. Lead framing is not an elastic material. Therefore, it needs to be attached only to one of the adjacent surfaces in case of shrinkage.
Algorithm for pasting with lead strip:
- We cut out the lower part of the lead frame with a minimum overlap of 10 cm on both edges.
- Without removing the protective film from the back, we apply the cut strip to the pipe so that there is about 10 cm on the vertical wall.
- We profile the strip, trying to completely replicate the surface located underneath it. We perform profiling, moving from the central part to the periphery.
- We remove the film from the back side, put the apron piece in place and, gently pressing, glue the lead strip to the area where the roof meets the pipe.
- Draw a line to trim the excess glued sheet. Let's step back 3 cm from the top edge and draw a line to the point of intersection with the pipe.
- We cut along the drawn line and glue it.
- Cut out the side sheets. We apply the strip to the side of the pipe so that the line of the end cut of the material coincides with the lower edge of the glued part. From the opposite edge, the strip cut out should be 15 cm longer than the pipe.
- Based on the noted fitting results, we cut out two symmetrical side parts. We apply them one by one to the installation site, taking into account that it is advisable to place the upper edges of the parts at the corners of the pipe at the same level. We profile, remove the film from the back, and glue it.
- We bend the protruding parts of the side strips, forming lying folds from them.
- We bend the upper edge of each side part with a fold and place it behind the upper wall of the pipe.
- We trim the top edge of the side piece at an angle. Let's step back from the edge of the top edge 3-5 cm, draw a line from them until it intersects with the pipe.
- We cut out the back strip, taking into account the fact that its edges must overlap the side parts. The upper part should extend 15 cm onto the vertical wall of the pipe. And another 2 cm should be left to form a folded seam. We profile the part, peeling off the film and gluing it.
- We bend the upper edge of the back part around the protruding parts of the side strips according to the principle of creating a recumbent fold. Let's tap the seam with a mallet for beauty and reliability.
- We will strengthen the upper part of the lead apron by gluing another strip to it, from each edge of which we will add a 5cm overlap for a strong connection to the roof.
If necessary, the fastening of the protective apron made of lead strip can be strengthened with galvanized self-tapping screws.
Elastic penetration
Most often in private construction they are faced with the installation of round metal pipes. To ensure the tightness of the passage, a special device is used - an elastic penetration. This is a product made of high-strength silicone or rubber, shaped like a funnel with a wide flange in the form of a square or circle, called an apron. Thanks to its properties, the elastic penetration takes any shape, adapting to the angle of inclination of the slope. It can withstand extremely high or low temperatures, exposure to aggressive chemicals and comes in a wide range.
When purchasing an elastic penetration, they are guided by the diameter of the pipe and the color of the roofing material. Universal models, in the form of a stepped pyramid, are suitable for any size; adjustment is carried out by trimming the penetration to the desired level. Installing an elastic apron on the roof is very simple, you need to place it on the chimney passage, apply a metal circle with holes for fasteners, treat the joint with fire-resistant sealant and secure it with a screwdriver. For roofs with steep slopes, a special type of plastic penetrations with a specified flange mounting angle is used.
Conclusion
As you can see, finishing a chimney in a private house is quite within the power of a home craftsman; there is plenty to choose from, if only there is a desire. In the photos and videos in this article I have selected additional material on the arrangement and finishing of chimneys. If you still have questions after watching, write them in the comments and we’ll talk.
Original design of the chimney.
November 21, 2021
If you want to express gratitude, add a clarification or objection, or ask the author something, add a comment or say thank you!
- February 27, 2021
- February 21, 2021
- February 20, 2021
- February 16, 2021
- February 15, 2021
- February 13, 2021
Latest replies on the forum
- Cinder block walls How to cover cinder block walls
Question added: February 09, 2021 - 19:32views
- Walls Hello. Tell me, can I put decorative stone on a putty wall?
Question added: August 03, 2021 - 12:25views
- Question about wall cladding in the bathroom Good afternoon. Having studied quite a lot of information, I could not come to a clear conclusion. Maybe you can help me. Situation …
Question added: May 20, 2021 - 11:50views
- Mysticism... scary Dear forum users, I want to know if anyone has had anything like this... I’ll say right away that alcohol and nothing else that clouds my brain...
Question added: October 20, 2021 - 08:44views
You might be interested
Why do you need to remove the pipe from the bathhouse?
The heart of the Russian bathhouse is considered to be a stove, which is traditionally heated with wood. As a result of the combustion of solid fuel, smoke containing wood combustion products is generated. If these harmful substances are not removed from the steam room, then concentrated carbon monoxide poisoning can occur within 15-25 minutes. Thus, the main purpose of the pipe, i.e. the stove chimney is a means of getting rid of carbon monoxide. In addition, for efficient combustion of fuel, an influx of oxygen is necessary, and the draft necessary for combustion is provided precisely by the pipe.
In other words, the question of how to remove a pipe in a bathhouse through the roof is related to the safety of the bathing procedure and the efficiency of using the stove. The main problem in organizing the pipe outlet through the roof of the bathhouse is the temperature of the rising flow. At maximum mode, smoke can heat up above 4500C, which creates a risk of ignition of flammable materials. This circumstance requires the adoption of fire prevention measures. In addition to safety requirements, there are certain requirements for the size of the chimney to create the necessary draft.
How to choose the right location for a chimney on the roof ↑
The best option, according to boilermakers and roofers, would be to install a smoke exhaust on the roof near the ridge.
- This makes it possible to ensure minimal accumulation of snow around the chimney pipe in winter and the absence of snow pockets near the ridge, that is, leakage in the junction area is eliminated.
- The height of the chimney above the roof
is small, which reduces the impact of external unfavorable external factors on its design. - The low height of the chimney relative to the ridge creates favorable conditions for the formation of the smallest amount of condensation.
It should be taken into account that the lower the chimney pipe is located along the roof slope, the greater, according to building regulations, the height of the chimney above the roof should be.
If there is a common wall with a multi-story building, then the pipe is installed above the roof of the multi-story building.
Where it is not recommended to install a chimney ↑
It is better not to install passage units in the following places:
- next to the attic windows, since any gust of wind will bring carbon monoxide and smoke into the attic;
- valleys, the junction of two slopes that form an internal corner, where it will be difficult to ensure a high-quality connection to the pipe, in addition, a huge snow pocket will form there.
The chimney cannot be rigidly fixed to the roof, since if the integrity of the roof is damaged, there is a danger of destruction of the chimney, and therefore a fire.