Purpose and functions of the chimney
Before we start learning how to build a passage through the ceiling for a chimney, it wouldn’t hurt to get to know the main “hero” for whom, in fact, this work is being carried out. So, you already understand that the chimney is important and necessary. Why? How does it function? Thanks to this miracle pipe, clean air, separated from gases, enters the firebox.
Where do the harmful compounds that appear as a result of burning wood go? They go through the pipe into the sky. Moreover, without any motors, levers, current or intervention of human hands, but in a simple way - under the influence of traction of natural origin. Here is a magical device that seems extremely simple, but to achieve this natural simplicity, you will have to work hard. Ready?
Immutable rules
What are the requirements for the chimney and its passage through the ceiling of the bathhouse?
So, remember this important list:
- the most suitable pipe length is 5 meters;
- the prefabricated structure should not contain protrusions (the main guideline is the vertical position);
- the optimal height above the roof level is up to 1.5 meters (otherwise stretch marks will be required);
- the distance between the pipe and the ceilings must be at least 13 cm with cutting the passage and 30 cm without it;
- Smoke elements cannot be joined in roof or ceiling structures;
- contact of the pipe with communications (plumbing, ventilation, wiring, sewerage) is unacceptable.
This is important to know! To avoid unforeseen situations, inspect the chimney at least once a year. An excess of soot, accumulation of soot at seams and joints can damage the structure.
Work plan
Now that you are familiar with the design and the basic requirements for it, you can learn how to construct a chimney passage through the ceiling. Learn a step-by-step case study:
- Surface cutting and marking.
- Box installation.
- Sheet installation.
- Arrangement (insulation) of the opening.
This, as you understand, is a theory that needs to be put into practice, and that’s what we’ll do.
Safety regulations
When installing a chimney in a bathhouse through the ceiling, you must follow the recommendations of Sanitary Norms and Rules 41 – 01 – 2003. According to clause 6.6.22, it is necessary to ensure a distance of 130 mm in the case of a brick pipe passing through the ceiling for a chimney, which provides protection for wood. But given that in most cases metal pipes are used in baths, you need to focus on the following standards:
- It is necessary to maintain a distance of more than 380 mm to flammable objects protected by insulation;
- The minimum distance to flammable objects without insulation must be more than 500 mm.
In this case, these distances must be ensured before the pipeline comes into contact with the tree.
Ideally, these distances would not be covered with anything at all, but this option will contribute to increased heat loss, which is economically unprofitable. Therefore, this volume is covered with non-combustible materials.
The maximum length of the pipe passing through the ceiling in the bathhouse should not be more than 1000 mm. The chimney cannot be fixed to the roof in a rigid manner, because when the temperature changes, the pipe may change slightly in size, which can lead to deformation of the ceiling.
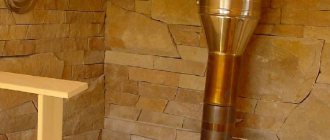
The bathhouse often uses pipes of a special design, called “sandwich”. They are two pipes of different diameters, one of which is located inside the other. The space between them is filled with a layer of insulation. Not many people know that the outer part of such a structure has almost the same temperature as the inside of the chimney.
Often, in order to quickly heat the bathhouse, owners allow the stove to overheat. If the temperatures of the external part of the pipe exceed the permissible values of 400 ºС, then this threatens the failure of the external part of the sandwich, which will lead to a fire hazard. Therefore, under no circumstances should the distance between the pipe and surrounding objects be reduced.
SNiP 2.04.05-91 (clause 3.83) gives the following recommendations.
The distance to combustible structures when using brick or concrete pipes must be at least 13 cm. For ceramic pipes not equipped with insulation, the corresponding distance will be more than 25 cm, for pipes with insulation - 13 cm.
It is advisable to set these parameters at the bathhouse design stage, since the step when installing floor beams is usually not large. If it is 60 cm, then it will be possible to use only insulated pipes.
The diameter of the outlet part of the pipe is often 11.5 - 12 cm. If a sandwich uses 10 cm thick insulation, then we get a diameter of the outer part of 31.5 - 32 cm. We add the distance recommended for insulated structures of 13 cm on each side, we get a width of 57, 5 cm. That is, this design fits perfectly into the existing distance between the beams of 60 cm.
Now let's see what distance between the beams should be when using an uninsulated chimney. If the internal diameter is 11.5 mm, then we add to it the distance required by safety rules on all sides of 25 cm, we get 61.5 cm. The result obtained does not fit into the existing distance between the beams. Moreover, the diameter of the pipe can be even larger, and then the discrepancy between the size of the chimney and the pitch of the beams becomes even more noticeable.
Practical lessons
And now about each action in detail.
Some pioneers in bathhouse construction are wondering: how to determine the location of the pipe? To avoid further frustration, remember: this location is determined at the stage of drawing up the steam room design.
When marking, it is important to determine the vertical axis of the pipe. The beginning of the layout is the outlet pipe coming from the stove. The axis starting from this structural element, resting on the ceiling, is the center of the skylight that you have to make. If the steam room has an attic, then the axis extends all the way to the roof.
And don’t forget about the rule: the distance from the chimney to the ceiling is at least 13 cm.
Worth paying attention! Before installation, structural elements (pipes, adapters, bends, etc.) must be prepared. Remove the film, stickers, price tags (which many people forget to do) and degrease the surface of the parts.
What dimensions should the ceiling trim for the chimney have? Many people think that these parameters depend on the materials from which the chimney is made. This is not so, the only important thing is that the structure does not touch the ceiling, but is not too far from it, since the hole will be difficult to repair, and besides, the heat that is so necessary in the steam room may subsequently evaporate through it.
You probably already remember about the gap of 13 cm, now understand one more indicator - the thickness of the insulating sandwich should not exceed 5 cm. Are you afraid that the insulation will slip out and fall down? Don't worry, the iron sheet that you attach below will serve as insurance against such situations.
This is important to know! When buying iron sheets, keep in mind that galvanized material is not very suitable for a bathhouse, because heated zinc is a source of harmful substances formed after the decomposition of the substance.
Many people confuse the purpose of the insulating layer, thinking that it is done for beauty, to make it cozy inside. Not only that, its main mission is to protect the steam room from fire and cold. The ideal materials are fiberglass, asbestos, mineral or basalt wool.
However, insulating the hole is not enough; you need to additionally create a heat-reflecting screen around the chimney, which we already briefly mentioned above. A piece of polished stainless steel, ideally with a mirror coating, will do an excellent job as a screen. Creating the greatest possible reflective effect for infrared waves is your goal when installing an iron surface.
To reduce the opening, a ceiling-passage assembly is constructed, providing a kind of air gap, which serves as additional insurance against heat leakage from the steam room.
Construction assembly details
You already know the wisdom of the process, let's assemble the device? So, the cutting of the bath consists of:
A galvanized box with parameters 40x40 cm is installed from the attic side. And from the inside of the bathhouse, an iron sheet is attached to it, the dimensions reaching 50x50 cm. The pipe at the lining is covered with a clamp in order to avoid stress on the stove. And only after that, insulation is placed into the hollow part of the body - usually the surface is covered with insulation and covered with expanded clay. Then you can install the final fragment - part of the pipe going through the roof to the street.
Worth paying attention! In order for the chimney to serve for a long time, the joints of the clamps should be sealed, and parts of the structure susceptible to corrosion should be coated with heat-resistant paint.
Ceiling cutting for the chimney is a troublesome, but necessary stage of the bathhouse construction work.
Installation of sauna chimneys
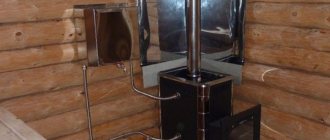
If you have an iron stove, then the beginning of the chimney is put on the pipe, which is removed from the firebox just for this purpose.
We will not disassemble a brick stove; its gases usually travel a long way from the firebox to the chimney, and then - in a straight line - are discharged through a brick pipe, led through the ceilings, to the street.
So, if you are not making a sandwich, then an iron or ceramic pipe runs vertically from the stove nozzle up to the roof. It can be insulated because the temperatures there are high - several hundred degrees.
In the area up to the ceiling, a damper - a damper that allows you to change the degree of openness of the pipe during the combustion of wood, which affects the amount of exhaust gases, and, accordingly, the amount of oxygen in the firebox. The latter affects the speed and temperature of combustion of fuel - wood, gas, coal. However, sauna stoves are not heated with coal. Firewood and gas are fine.
The gate comes in two types - retractable and rotating. Both can be comfortable and inconvenient - who is used to what.
retractable
rotating
Next, the pipe approaches the ceiling and passes through the cutting box; this will be discussed in more detail below. In the attic, the monopipe may or may not turn into a sandwich before it passes through the roof.
An important point here is where the stove is installed, how close the pipe will be to the roof ridge. Its height depends on this.
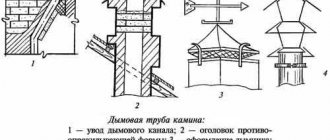
Height of pipe above ridge
The height of the pipe above the ridge of the bathhouse roof depends on the distance from this ridge it is located.
In principle, it also happens that the pipe is passed through the ridge, but such a solution is permissible where this will not reduce the load-bearing capacity of this important element of the roof structure (this is only possible when installing additional supports on both sides of the “gap” of the ridge). Because this is the basis of the rafter system. So it’s better to do it either close to or at some distance from the ridge.
If from the axis of the pipe on the roof of the bathhouse to the ridge is no more than one and a half meters , then it should rise at the ridge by half a meter or a little more.
If the bathhouse pipe comes out through the roof 1.5-3 meters from the ridge , then it will already be exactly level with the ridge.
And finally, if you bring a pipe in a bathhouse through the roof at a distance of more than three meters from the ridge , then it will be lower than the ridge, but the exact height will have to be calculated using trigonometric functions ( a leg and an opposite angle are given, find the second leg) . Illustration below:
Let's say, at a distance of 3 meters from the ridge it will be 52 cm lower.
BY THE WAY! There is one more recommendation that should be combined with the previous ones: the total height of the pipe from the stove to the deflector should be 5 meters - this is necessary to maintain the draft at the proper level.
Pipe passage through the ceiling of the bathhouse
The passage of the chimney through the ceiling between floors - ceiling cutting - is one of the most critical stages in the construction of a bathhouse. This is due to the high frequency of fires due to the ignition of wooden structures near chimneys, and this is exactly what the floors and ceilings in baths are like.
Pipe passage through the ceiling of the bathhouse
Safety regulations dictate the need to avoid unprotected contact between a hot pipe and flammable materials. To comply with them, when installing a chimney in a bathhouse, you need to build a special ceiling passage unit in the form of a box using fire-retardant materials, and carry it out in strict accordance with the standards.
You can make a passage through the ceiling with your own hands
Fire safety standards and regulations
Any developer can become familiar with what chimney equipment is considered safe according to SNiP 41-01-2003.
Construction norms and rules of the Russian Federation SNiP 41-01-2003
We are interested in clause 6.6.22, which dictates a setback of 130 mm in the area of passage through the floors for a brick pipe made with wood protection. It is known that brick and concrete pipes have lower heat transfer than modern metal pipes, which are most often used in baths. This means that when arranging the cutting of a single-walled metal pipe without thermal protection, you should be guided by other deviation numbers that are indicated in Appendix “K”:
- 500 mm to wood without thermal protection;
- 380 mm from the heated pipe to the flammable pipe behind a layer of thermal insulation.
These figures should be considered as distances from the smoke inside the chimney to the tree.
Errors in arranging a ceiling passage assembly
Manufacturers of stoves and chimneys provide documentation that necessarily indicates the possible value of the distances to ceilings made of various materials. They should be used as a guide when independently constructing a passage for a bath pipe through the ceiling.
What materials can be used for fire protection when installing polyurethane foam?
Both brick, ceramic, and metal parts of interfloor cutting units are heated to temperatures that create a risk of wood fire. To reliably isolate the flammable elements of the ceiling pie, you need to make a gasket made of protective materials.
These are materials that can protect wooden parts from charring and fire at high temperatures in a high-heat zone. But the primary cladding of the ends of the floor, if the necessary indents are observed, can be carried out not only by them. For these purposes, it is allowed to use materials with flammability class G1 (low flammability).
Glass-magnesium sheet (GML)
The choice of thermal insulator can play a decisive role. It should be remembered that ordinary mineral wool, which is sometimes recommended to be used for filling the passage unit, sinteres when heated and quickly loses its fire-retardant properties.
Stone wool has a fiber sintering temperature of over 1000ºС
High temperature leads to a change in its structure - while remaining unchanged in appearance, it can heat up significantly and can no longer cope with thermal insulation. To ensure reliable thermal insulation of the chimney, it is necessary to use basalt wool, designed for operation at temperatures of 800-1000°C.
An example of insulating a ceiling groove with basalt wool
The PPU box is filled with heat-insulating basalt fiber
It is also safe to lay mineralite, asbestos or basalt cardboard. There is also a time-tested budget option for thermal protection - sand was used for it (the passage box was filled with it) and clay. For example, sufficient thermal insulation of the part of the ceiling to which the box is attached is achieved by applying an even layer of clay about 2 cm thick to a metal sheet with a flange.
Comparison of materials for fire resistance
Features of using a “sandwich” chimney when passing through the ceiling of a bathhouse
Modern metal sauna stoves are often complemented by steel pipes made of ferrous or stainless metal. Wanting to reduce hard IR radiation and make the contact point between the chimney and the ceiling above the stove safer, bathhouse owners use a “sandwich” - a double pipe with a thermal insulation layer.
Important! In no case should the connection of the chimney elements be at the level of the ceiling passage.
Contrary to popular belief, the outer casing of a stainless steel sandwich is not much cooler than the main chimney. This pipe design, in principle, does not serve to protect the bathhouse from fire - the sandwich provides the best conditions for stable traction, this is precisely its main task. When considering fire protection measures, one should not hope that the use of a sandwich at the passage point makes it possible to reduce the distance of indentations.
It is known that due to the burning out of volatile compounds in the pipe itself, the temperature in it increases for some time as the altitude increases. If at the level of the furnace exit the gases have a temperature of 800°C, at a level of 1.5-2 m the measurements will already show 850°C. The outer casing under these conditions can be heated to 300°C, as evidenced by the tarnished colors on its surface.
Wanting to heat the bathhouse faster, overheating the stove, it is easy to exceed the optimal regime for the passage of combustion products through the pipe. According to the standards of the Ministry of Emergency Situations, the temperature in stainless steel chimneys should not exceed 400°C; tests for certification are carried out precisely at these values. Most steam lovers far exceed these parameters. The metal quickly burns out due to overheating, and you need to understand that the sandwich can turn into a single-walled sandwich at any moment. The insulation with which the sandwich is stuffed also does not serve as a panacea for fire. If you assemble a chimney “for smoke” and not “for moisture”, the thermal insulator heats up during combustion, and after cooling it is saturated with condensate - as a result, over time it loses its useful properties.
All of the above leads to a certain conclusion - you should not frivolously reduce the recommended margins, hoping for a protective sandwich casing.
Drawing of a ceiling passage unit
Important: when using metal stoves and stainless steel chimneys when installing a ceiling passage, the optimal distance from the smoke to the wooden structures is 380 mm!
Rules for installing a chimney pipe
The health and life of your family and friends depend on the fire safety of chimneys and the complete removal of flue gases - carbon dioxide, carbon monoxide, toxic substances, smoke, soot. Therefore, when installing chimneys, you must strictly follow the rules for their installation. These rules are defined by regulatory documentation - SP 7.13130.2013.
The main rules when installing chimneys for a bathhouse:
- Maintain distances to the nearest structures - walls, ceiling structures, roof.
- Sufficient but not excessively high chimney height.
- To determine the cross-section of the internal chimney channel and its height, calculations are necessary.
- Durable fastening to the walls and ceilings of the bathhouse.
- Reliable sealing, good insulation during installation.
- Protecting hot structures from possible contact and burns: this is especially important for a bathhouse with its small size.
- Assembly of modules for condensate. Sandwich pipe elements are appearing, designed for simultaneous assembly of smoke and condensate.
The distance from pipes to combustible structures - wooden rafters, lathing, bitumen materials - must be at least 130 mm, from uninsulated ceramic pipes - 250 mm. The passage unit must be at least 70 mm greater than the thickness of the ceiling structure. The steel structures of the passage unit must be separated from the ceiling structures by non-combustible materials - slabs of mineral wool, mineralite.
Standards for clearances from pipes to walls
SP 7.13130.2013 determines the minimum size of setbacks - the distances between the outer surface of the chimney and the walls. If structures are made of flammable materials, then the offset should be from 260 to 500 mm. If non-combustible or combustible materials are covered with plaster, reinforced with metal mesh, heat-insulating non-combustible materials - from 200 to 380 mm.
The amount of indentation depends on the thermal insulation of the chimney (thickness of the brick wall or insulating layer). Before installing a stove with a pipe for a bath, you need a drawing indicating the exact dimensions of the pipe and the distances to the structures.
Stages of ceiling cutting installation
The main tasks that the builder faces when arranging the passage of a chimney through the ceiling of a bathhouse are fire protection for the ceiling and an even vertical installation of the pipe. The work takes place in three stages:
- determination and arrangement of the location of the cutting unit;
- installation of a ready-made or self-made protective casing;
- final thermal protection gasket.
These are general rules, and specific methods of work depend on many factors - the allocated budget, preferences in the choice of materials, even whether the technologies were followed during the construction of the bathhouse.
Preparing a place for the chimney passage through the ceiling
Preparing a place for the chimney passage through the ceiling
The center of the pipe passage is determined using a plumb line. The cutout is made according to the markings, slightly reducing the size of the sides so that the future decorative panel completely covers it.
A self-made passage, as a rule, is decorated on the steam room side with a sheet of metal - galvanized or stainless steel, which also serves as a heat shield. The dimensions of the sheet must exceed the size of the cutout for the pipe.
- A vertically positioned chimney will pass through both the ceiling and the roof. When marking the chimney, you should start from the highest point and use a plumb line.
- When using ready-made polyurethane foam structures, they are guided by the hole sizes recommended by the manufacturer.
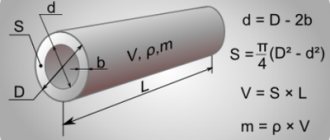
- By passing the chimney through the ceiling independently, without an industrially manufactured unit, a preliminary calculation of the passage duct is made. Strictly above the passage of the pipe in the ceiling pie, it is necessary to make a through hole, the dimensions of which allow the required indentations to be observed. They are calculated as follows: for example, a pipe diameter of 120 mm, a sandwich with 50 mm insulation will pass through the ceiling. The resulting outer size is 230 mm. We will find the permissible distance by adding the two distances of indents with the internal diameter to the smoke. According to safety standards, this is 2*380+120=880 mm.
Important! It’s good if the exact location of the sauna stove and chimney is thought out while drawing up the project. In this case, it is easy to calculate the installation of load-bearing floor beams in order to provide the necessary space for the safe passage of pipes between them.
Construction of an opening for the chimney
Otherwise, the first thing you need to start work with is changing the design of the ceiling above the stove. Part of the beam that is too close to the hot chimney is cut out and strengthened by installing jumpers firmly attached to the resulting ends. Then the ceiling is covered.
Installation of a finished cutting unit - feedthrough pipe
The advantages of using a factory design are the ease of installation and the obviously aesthetic appearance of the ceiling in the steam room.
It is assumed that a sandwich will be used as a chimney when inserted into the finished polyurethane foam. The dimensions of standard devices are small to ensure reliable insulation of a single-wall chimney.
Ceiling passage units of various configurations are available for sale. The design is based on a box of rectangular or round cross-section, rigidly connected to a sheet that serves both for protection from heat from below and for decorative finishing. In the center there is a cutout for the pipe; the unit is selected according to its diameter. Ready-made walk-through structures are made of metal, most often stainless steel, and mineralite, with or without a thermal insulator gasket. The best in terms of their properties are combined ones, having an internal metal box and an external mineralite box with an air fire-retardant layer between them.
Install the floor passage unit in this way.
- The ends of the hole cut in the ceiling are covered with a layer of heat insulation, beating wood around the perimeter.
- The bottom sheet of the device and all places of possible contact between metal and wood are laid with a layer of non-combustible sheet material. Good ones here: mineralite, asbestos and foil basalt cardboard.
- The finished structure is placed on the elbow, which will be located in the passage unit, and brought to the hole cut in the ceiling. From the steam room below, the finished unit is fixed to the ceiling with self-tapping screws; usually the holes for them are provided in advance by the manufacturer.
- The diameter of the bore hole is always greater than the diameter of the pipe. Rigid binding is unacceptable due to thermal deformations; a gap of at least 5 mm is required. Based on what material will be used as fire protection near the pipe, a decision is made on the advisability of insulating the gap. If necessary, the pipe at the junction is wrapped with asbestos cord.
- From above, on the ceiling of the attic, additional thermal insulation is carried out. The box is filled with expanded clay or fire-resistant mineral wool.
- In the attic, the cutting unit is left without external decoration. If the upper floor is residential, the passage structure is decorated with a metal sheet.
Homemade pipe passage through the ceiling of a bathhouse - step-by-step instructions with photos
- tin for making cutting boxes;
- minerite;
- stainless steel sheet;
- sheet of gypsum board or basalt cardboard;
- The material for filling the box is expanded clay, but dry clay can also be used.
The pipe passage in this example is carried out at the stage before finishing the ceiling. This is not important; the sequence of operations does not change.
Passage through the roof depending on the roofing material and type of chimney
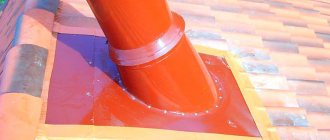
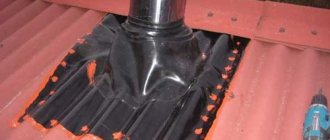
When passing through the roof, the most important thing is to remove the water flowing down the roof and the pipe itself. To protect against precipitation, protective aprons are used, the upper edge of which is placed either under the sheet of roofing material located above, or under the ridge.
The apron is placed either under the sheet of roofing material located above or under the ridge
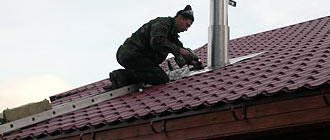
When venting the chimney through the roof, it must be fixed, but so that it remains movable relative to the roof. Otherwise, due to thermal expansion/contraction, the integrity will be compromised and leaks will certainly appear. For example, a round pipe can be given direction by metal strips or corners.
When installing, check the verticality using a plumb line - this is important so that soot does not accumulate and there is good traction.
The pipe should not be fixed rigidly when passing through the roof.
Brick pipe passage through the roof
If the chimney is brick, rectangular or square in shape, you can use the materials included with the roofing material.
When passing a brick pipe through the roof, you can use elements offered by roofing material manufacturers
If the roof is made of metal tiles, then the companies that produce it offer special tapes for sealing the joint with the pipe, on one side of which an adhesive layer is applied. These elastic bands are a complex compound containing aluminum and/or lead. One edge of such a tape is glued with the adhesive side to the base of the chimney, the other - to the roof sheathing. The upper edge is additionally fixed with a metal strip, which is attached to the brick with heat-resistant dowels.
To reduce the likelihood of water flowing along the wall, you can make a recess under the bar - a groove. Then the tape and bar will be in the recess. To completely eliminate water seepage, a heat-resistant sealant is applied to the joint.
They practically also seal the passage of a pipe through a roof made of soft tiles or roofing felt. But in this case, instead of an elastic tape, the tiles or roofing felt themselves are placed on the chimney.
When a pipe passes through a roof covered with soft tiles, its edges are placed on the chimney or apron
You can make an apron for a square or rectangular pipe yourself. Roofers usually use sheet metal for this, but sheet aluminum works well. Four separate parts are made of metal - two side, front and back.
An apron for a rectangular or square pipe is easy to make yourself
The metal strips are bent so that one part fits onto the pipe, and the second is attached to the sheathing. In a brick chimney, in the upper part of the apron, an edge is made, which is inserted into a special groove and coated with sealant. To prevent water flowing down the apron from getting onto the sheathing and insulation pie, a sheet of metal of large width is placed under the front part of the apron, with curved sides along the edges. It goes under the roofing material and is called a “tie.”
If metal tiles are used on the roof, then an apron is made from a smooth sheet of the same color, the upper edge of which is tucked under the row of roofing material located above so that water flows onto the apron and does not flow under it. If the pipe comes out close to the ridge, you can either tuck it under the ridge itself, or bend it to the other side.
There is one important nuance: if the width of the brick chimney is more than 80 cm (its size is perpendicular to the rafters), you need to make a slope - a small gable roof located higher. It removes sediment, reducing the likelihood of leakage. But such a width of chimneys in a bathhouse is the exception rather than the rule.
Passage of a round pipe through the roof
Modern round chimneys in bathhouses are usually a sandwich pipe. Occasionally, you can still see asbestos pipes on the roofs of bathhouses, and even more rarely - a single pipe without thermal insulation.
A simple single wall, which is discharged through the roof, carries a very high probability of a fire. Therefore, using this option is extremely undesirable.
Modern round pipes are usually sandwich pipes
The video below shows an option for sealing a pipe when installed on a metal tile roof.
If metal tiles are used as a roofing material, then manufacturers often offer roofing passages. They are made from a sheet of the same color and connected to a special cap through which the pipe passes.
Pipe passage through a metal roof
It is easy and simple to seal a round pipe on the roof if you use a factory penetration. It consists of an aluminum flange to which an elastic part made of rubber or silicone is attached.
Factory-made penetrations are the easiest option for sealing the junction of the pipe and the roof
They come in different sizes and have different slope angles. You can choose it for any diameter, roof type and installation location. The penetration flange is coated with a composition similar to the composition of the corrugated part; there are grooves along the edges into which they are filled with sealant. One of the penetrations, “Master Flash,” has 11 sizes that cover diameters from 3 to 660 millimeters.
Walkthrough "Master Flash" MASTER FLASH
When installing such a penetration, part of the corrugation is cut off in accordance with the required diameter. Then it is put on the pipe. The rubber must move with force to ensure a tight fit. Since the hole is about 20% smaller than the diameter of the pipe, you have to pull hard. To make less effort, you can lubricate both with soapy water.
How to install a factory penetration
After the corrugation is pulled to the desired location, the flange is given the required shape - the material is plastic and you can use a hammer, but you need to work carefully.
Using a hammer, give the flange the required shape
Then the grooves located on the inside are filled with sealant, the edges are pressed against the roofing material and secured (self-tapping screws are included in the kit). If the roofing material is not iron, self-tapping screws are not suitable. You need to use either long screws that will reach the sheathing, or dowels for the floor slabs.
Split model of penetration
There are quite a few options for factory-made penetrations, and there are detachable models. They are used when there are thickenings on the pipe or when they have to be mounted on an already assembled chimney of great height. In this version, the kit includes clamps that connect the parts of the passage to each other. The rest of the installation is similar.
The video shows how to seal a penetration through a regular slate roof using a MASTER FLASH corner penetration.
Cutting functions
The main function of cutting is to pass the pipeline through the fence. By fencing we mean the ceiling or the roof itself. The passage must be sealed.
When cutting is carried out correctly, not a single drop of external precipitation enters the room, not to mention the interior space of the room.
Fire safety is a special consideration. The fact is that the flue gases heat the pipe to significant temperatures. Even after passing through all the heat exchangers, the exhaust gases have significant temperatures, which, if the pipe comes into contact with a flammable surface, can serve as a source of fire.
Therefore, the space between the cutting elements and the pipeline is filled with sealant. In most cases, this is basalt-based mineral wool. In addition, the internal cutting elements include a metal apron, which protects the surrounding surface from elevated temperatures.
When cutting is done correctly, not a single drop of precipitation gets into the room.
Construction of a crossing over the ceiling
Let's look at how to make a chimney in a bathhouse through the ceiling. This can be done in two ways.
- Use ready-made cuts;
- Install the pass-through unit with your own hands.
Application of ready cuts
In order to fully protect the roof elements from the effects of high temperatures that arise when combustion products pass through the chimney, and at the same time secure the pipe in the required position, the so-called ceiling cutting is used.
To construct a chimney passage through the ceiling, you need to purchase a chimney passage through the ceiling at a hardware store. It is a box made of mineralite or metal connected to a stainless steel plate. There is a hole in the center of the structure into which the sandwich is placed. Such a device also performs, among other things, a decorative function. A plate attached to it covers the ceiling hole, giving it a more aesthetic appearance. In addition, insulation rests on this plate, which fills the space between the ceiling elements and the pipe.
They come in two types:
- with insulation, looking like two plates combined with an insulated pipe;
- without insulation, which is a box made of metal, which must be filled with insulating materials with your own hands and a hole intended for installing pipes.
Cuttings come in different forms. Sometimes they look like a metal cylinder, in which case the plate is significantly larger than it. If such a device is used, and the ceiling hole is square in shape, then it is still necessary to comply with all the listed parameters required to ensure the fire safety of the structure. At the same time, it is necessary to strengthen the protection of wooden bath structures using metal strips.
https://youtube.com/watch?v=OloeKgcB2Yo
Installation of a ready-made adapter
- Cut a hole in the ceiling, taking into account the overall dimensions of the cut;
- If necessary, carry out insulation;
- Install the chimney passage unit into the ceiling;
- Bring the pipe to the ceiling, and its length should be 100-150 mm less than the height;
- Connect the section of pipe located on top of the roof;
- Seal all joints that occurred during the passage of the chimney through the wooden ceiling.
Installation of an adapter made by hand
It is possible to carry out a chimney through the ceiling in a bathhouse without factory components.
Let's look at how to make a ceiling passage unit with your own hands. To do this you will need:
- chimney pipe;
- material chosen for thermal insulation of the pipe passage through the bathhouse ceiling;
- metal plates.
The pipe in the bathhouse through the ceiling and roof is installed following the recommendations described below.
- Cut a hole in the ceiling that is 13-18 mm larger than the size of the pipe;
- One edge of the pipe is inserted into the hole made;
- From inside the room, a plate is placed on the ceiling;
- The chimney passage through the ceiling is insulated. It is optimal to make thermal insulation for the ceiling passage unit from mineralite.
- The space remaining between the ceiling and the plate must also be filled with a layer of insulation.
- The plate is attached using self-tapping screws.
When considering how to install a pipe in a bathhouse through the ceiling, be sure to pay attention to such an important factor as choosing a suitable location for the passage of the ceiling for the chimney. The main function of the adapter is fire protection
The main function of the adapter is fire protection
It can be installed either directly on the ridge, providing good traction and no accumulation of sediment; or next to the ridge.
Cutting a chimney installed by yourself will require a little more time than purchased in a store, but will help save money, which is so necessary during construction.
When installing a chimney in a ceiling-roof slab, craftsmen are often faced with such a difficulty as the need to make a chimney in a bathhouse through the ceiling strictly vertically, placing it in the center of the passage. To do this, we can recommend using a plumb line. It is lifted up and lowered into the center of the chimney. This point is marked on the ceiling and used as an appropriate mark before making a pipe passage through the ceiling of the bathhouse.
Basic rules and regulations
In fact, there are not so many standards in cutting. To be honest, only one thing is correct, everything else is purely recommendations obtained through long construction experience. The rule dictated by SNiP states: when making a chimney made of concrete or brick, as well as any other insulated materials, the distance to the rafter beam and any other flammable surface must be at least 13 cm. In any other case: at least 25 cm.
Experienced roofers advise that when making a passage through the roof on the inner surface of the roofing pie, make an apron made of rectangular metal with indentations from the end of the passage opening of approximately 30 cm.
Subtleties of organizing a brick chimney through the roof
The main requirements for the passage of a brick chimney through the roof are tightness and fire safety. To achieve efficiency in the second point in the area of contact of the chimney with flammable materials, it is important to monitor the temperature level, not allowing the thermometer to rise above 50 degrees Celsius. In the case of brick structures, this problem is solved simply - by increasing the thickness of the walls with a special penetration and taking into account the slope of the roof.
When designing the passage of a brick pipe through the roof of the bathhouse, it is reinforced on each side with a special box.
An important point is to comply with the requirement regarding the distance between the wooden elements and the pipe; it should not be more than 25 cm. If it is not possible to achieve the required distance, additional elements are installed, thus minimizing damage to the waterproofing and thermal insulation layer when the pipe is subsequently brought to the roof.
During installation of the chimney, it is placed in a separate box. The membranes and films inside are carefully cut. In the corners, the film is cut at an angle, and the edges are folded and stapled to the elements of the rafter system. To improve sealing, edges and cuts are reinforced with adhesive tape. Not only the reliability and durability of the structure, but also the safety of the entire premises will depend on the conscientiousness of the work at this stage.
Another option is worth considering in the case when the temperature of the pipe in the roof area does not exceed 50 degrees. Only then can the edges of the diapers be fixed to the pipe using adhesive tapes and sealants, placing special emphasis on the quality of sealing. The space between the brick pipe and the rafters is filled with heat-insulating materials resistant to moisture and high temperatures, including the basalt wool with a foil surface described above.
In conclusion, it remains to be noted that the principle of constructing a passage unit through the ceiling to the second floor, attic or through the roof differs slightly and depends on the material of manufacture and diameter. The main condition for the safe operation of the stove in the bathhouse will be the installation of reliable thermal insulation of the passage at the base with materials resistant to high temperatures and open fire and compliance with the rules regarding its tightness when the pipe is brought outside.
Types of ceiling penetrations
Pass-through units are divided by shape, depending on the insulation used, as well as the main structural material.
According to the main material there are:
- Steel components made of steel with a thickness of 0.5 mm. The most popular option, since metal components combine ease of installation, strength and resistance to mechanical damage.
- Asbestos. Asbestos is a cheap and reliable, but fragile material. Any mechanical damage can ruin your purchase.
- Minerite. New material on the construction market. Very often, the manufacturer recommends this material for installing aprons and protective surfaces, but many buyers remain dissatisfied with the quality of the product. Therefore, it is better to be careful and purchase the usual steel assembly.
Ceiling passage for round pipe
Depending on the insulation, structures with materials are distinguished:
- Expanded clay
- Vermiculite
- Basalt mineral wool with foil. It is used more often than others, as it is easier to use, more suitable for self-installation and has managed to establish itself in the building materials market.
Any node always has a rectangular base, but the shape of the passage itself varies, so there are two types of node according to the shape of the passage:
- With double cylinder
- With double rectangular box
The best choice would be a steel passage unit with mineral wool insulation. The shape of the passage unit is selected based on the shape of the pipeline and the personal preferences of the owner.
Roof cutting for round pipes
Preparation and installation
Preliminary work consists of cutting out a square in the ceiling or wall, depending on the future location. The dimensions depend on the selected components and design, often 0.5 or 1 meter. The passage is lined with mineralite slabs from the inside, after which the hole is once again adjusted to size.
Objects on the roof that can easily ignite are carefully sealed; for this, non-flammable materials will be needed, which will be easier for the owner to work with. Wood can be coated with previously specially developed compounds, but you should not rely entirely on heat-resistant paint.
Choosing a location
This point should also be approached responsibly; if the rafters are located very close to the planned location of the structure, it would not be superfluous to make an additional box and cover it with non-combustible material.
Most experts pay attention to checking the load-bearing capacity when choosing a location for installation, because the ceiling must withstand the load. If in doubt, this area can be strengthened; for this purpose, a frame is constructed from timber, but the crossbars of this device must be securely fixed.
Tools and materials
If we consider the algorithm of actions with a wooden floor, which happens quite often, then from construction accessories you may need:
- Hammer.
- Jigsaw.
- Screwdriver.
- Screwdriver.
- Gloves.
Depending on the chosen design, the list should be supplemented with a set of keys; the connections may be on different twists; in some situations, it is easier to tighten the cross clamp with pliers.
It will be quite easy to choose materials, because there is quite a large assortment on the market. I would like to note a few very good options and consider temperature conditions, which is equally important to consider when purchasing components; materials that are in demand look like this:
- Technical sample basalt wool. Thermal conductivity is low, the protective function is at a high level, and can withstand increases up to 900 degrees.
- Kaolin wool. The maximum temperature for use is considered to be 1250 degrees, this is due to production; melting of silicon-oxide raw materials occurs at 1750 degrees.
- Building grade basalt wool. This component is created at the enterprise by melting mica; the temperature is allowed at 450 degrees.
Node installation
Before supplying the PPU with protective materials, it is worth carrying out the work directly in the room, then going up to the roof and continuing work. But we should not forget about the outer wall and the mounting apron, which is designed for greater aesthetics; it is also necessary to place the selected non-combustible element in it. After careful installation, all screws need to be screwed into the ceiling, thereby securing the main structure. To facilitate the process, embeds are pre-created so that the device is held securely.
Sealing of docking units
This stage is considered not only the most important, but also quite difficult, because the process will require maximum care and concentration. It would not be superfluous to use specially designed plugs for working on the roof; they will allow you to achieve maximum results when sealing.
Often, sandwich elements are planned to be installed with access to the roof; if the floor is soft, then there will be no special problems, but this point is worth paying attention to. The canvas can be bent onto the pipe and treated with one of the modern fusible connectors; the sealant also performed quite well, it should be used for such purposes.
Factors influencing chimney cutting
The shape of the chimney cut is primarily influenced by the type of roof: flat or pitched. A flat roof does not accept the techniques inherent in a pitched roof. Typically, cutting on a flat roof is made of concrete, while materials for cutting a pitched roof vary, but most often it is made of metal.
The shape of the chimney is of particular importance, since the shape of the passage opening depends on it. The round shape is better for the chimney itself, but if we talk about passage holes, then it is much easier to make a rectangular chimney. For a round cross-section you will have to make the correct cut in the roofing pie; for a rectangular chimney this is much easier to do.
The choice of installation technology is also influenced by the presence of cladding and the shape of the roofing. The lining makes cutting much more difficult. The fact is that the cladding can allow moisture to penetrate inside the roofing pie, which is unacceptable. Therefore, it would be logical to make the groove wider using cladding, but the groove itself also needs to be hidden somehow. Therefore, structures under cladding remain the domain of professionals. You need to have too many specific skills to do everything unnoticed and really beautiful.
If we talk about the type of coating, then it is better to use corrugated sheets for cutting. Other types are associated with certain difficulties. You have to calculate the coverage. Since the apron is supposed to be tucked under the finishing roof covering element, and because of this, some types may sit on the roof at an angle or become bristling, which makes the coating leaky.
What thermal insulator should I use?
Having finished installing the passage unit on the ceiling with your own hands, work continues in the attic or second floor, where it is necessary to seal the space between the outer wall of the pipe and the beams with insulation.
Basalt wool
Basalt wool can serve as a heat insulator. Before purchasing, be sure to check that it can withstand temperatures over 600°C.
There is an opinion that this is not the optimal option for such work. This is explained as follows. This insulation is made using resins as a binder, which, when exposed to high temperatures, begin to release formaldehyde . In addition, condensation sometimes begins to flow through the pipe. As a result of the interaction of mineral wool with moisture, the former loses its heat-shielding properties. As the moisture evaporates, the properties are only partially restored. Therefore, basalt wool cannot be considered an ideal option.
Expanded clay
In addition to the insulation, it is necessary to lay expanded clay of medium and fine grain into the passage space in the bathhouse. Builders know it as a natural material that is quite lightweight. Its main advantage is that even after getting wet it restores its properties . But after contact with moisture, its thermal conductivity characteristics increase slightly, although they are already very low even in comparison with mineral wool.
At one time, instead of expanded clay, sand was used as a sealant. In principle, it suited everyone, except for one thing: due to its fine grain, it constantly spills through the cracks. As a result, the owner has to monitor the amount of sand and replenish it if necessary. However, it is unlikely that anyone will enjoy collecting sand from the stove.
Among natural insulation materials, you can choose clay. Before use, it is mixed with water to a paste-like state, and then the entire gap is sealed with the mixture. Sometimes expanded clay is used as a filler.
According to some owners, using a pass-through heat insulator in a bathhouse is not very correct. It is believed that nothing will happen if the space is left unfilled. This will help prevent this part of the chimney structure from overheating and burning, and thanks to the ventilation created in this place, the pipe section will cool faster. This may be true, but you need to take into account that the hot pipe radiates heat, which will cause the nearby tree to dry out. And then fire can occur at a lower temperature of + 50°C.
Installation technology and roof access
Installation technologies for cutting round and rectangular pipes are different. The fact is that the very shape of the passage unit is changing, which means the technology for carrying out the penetration is changing. The shape of the chimney is determined only by the wishes of the owner. The fact is that soot will not accumulate on a round pipe. In addition, the outer part of such a chimney has a more streamlined shape, which improves the aerodynamic protection of the pipe. But a rectangular pipeline is easier to hide. It is more advantageous from an aesthetic point of view, so it is sometimes used.
Installation of a ceiling passage unit
Round pipes
For round pipes, it will not be possible to make the passage parts yourself, so you will have to use purchased elements. Aluminum-based flanges enjoy well-deserved popularity in the market. A movable silicone or rubber corrugation is attached to the round base using rivets, which is pulled onto the pipe. On the inside and outside, the passage elements are connected to each other, resulting in a reliable and strong connection.
For cases where it is not possible to tighten the connection onto the pipe, there are split flanges that, thanks to special technology, can be wrapped around the pipe and tightened with a minimum gap between the groove and the pipe.
Rectangular pipes
Rectangular pipes are popular for a variety of design projects. In addition, the main cutting parts can be made independently from sheet metal. This:
- Wall profile or internal apron
- Tie
- External apron
All these elements are corners with cuts at the bend. The upper part of the apron is bent inward, so from the corner an element of a wall profile is obtained, which will overlap the adjacent element.
A tie is a triangular flat sheet of metal that protects part of the counter sheathing under the pipeline from soaking.
Scheme for cutting a rectangular pipe
Types of chimney pipes for baths
The chimney for a bathhouse is selected depending on the material of the stove - steel and sandwich structures are installed with metal heaters, sometimes old asbestos-cement ones are found. A sauna heater is usually small; neither brick nor ceramic chimneys are used in conjunction with steel stoves. An exception is if an old house with a brick chimney in the center is converted into a bathhouse.
It is allowed to install chimneys of any type on brick stoves: brick, sandwich, ceramic, steel, asbestos-cement. Brick structures are more bulky; brick or ceramic pipes are more often used for them. But you can also install insulated steel pipes or sandwich structures on them. A rather serious drawback of brick and ceramic pipes is that they require a stationary foundation.
For a bathhouse, it is practical to install steel heaters - they heat up faster, transfer heat faster to the stones, the water in the heating tank, and the bathhouse itself. The sauna is used infrequently and not for a very long time, so it is metal structures that optimally satisfy the requirement of quickly heating the heater and the sauna room.
Metal pipes in a bathhouse are easier to bring up through the ceiling and roof, and they can also be used for additional heating. A bathhouse usually does not require long-term heating; there is no need to install modern long-burning stoves. After the bath procedures, the bathhouse needs to be dried - the bathhouse is heated for some time with hot stones (they have a very high heat capacity) and a hot tank of water.
So, the types of chimneys for a bathhouse:
- Indigenous with their own separate foundation, usually brick or ceramic.
- Mounted. The chimney is mounted vertically onto the outlet pipe. Above structures are usually hung on the wall.
- Built into load-bearing walls. A typical example is the installation of a chimney in the wall of old small houses and summer kitchens with stove heating.
- Hanging. Lightweight sandwich pipes are usually hung from the walls of the house.
- Now they have begun to use coaxial chimneys - “schidel”, or “pipe in pipe”. The exhaust gases heat the air entering the fireplace or boiler. A typical example is horizontal pipes for gas boilers. Vertical coaxial structures are used for large heating units; they are usually not used in bathhouses. In most cases, they try to transfer the heat from the exhaust gases to water in a heating tank or to stones in a heater.
Chimneys for baths are made of the following materials (the materials determine their design):
- Brick. They are rarely used; sometimes they use ready-made built-in chimneys from dismantled stoves. The brick box requires installation of a stainless steel box. Old brick hogs in the attic and above the roof surface need to be insulated.
- Ceramic. A foundation is needed; they are rarely used for heaters in bathhouses.
- Asbestos-cement. Installing new asbestos-cement pipes is undesirable, but sometimes old chimneys made of asbestos-cement pipes are found. If possible, they should be replaced with a modern sandwich.
- Steel. Sometimes they install single-layer pipes with homemade insulation, but this is already the last century. It is better to overpay and install high-quality three-layer sandwich chimneys.
How to install the most fire-hazardous section of a chimney: the passage unit
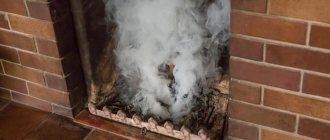
I will talk about the most fire-hazardous part of the chimney: the cutting of the wall - the cutting of the ceiling, aka the passage unit or passage box. Based on what I know from the Internet and from my own experience, illiterate cutting is the cause of most fires. Especially in the baths.
What does the problem look like?
The chimney pipe passes through the wall or ceiling, heats the unit, the wood is charred and, on the second, third or hundred and third kindling, it ignites. Moreover, it flares up meanly - in the attic or from the street. That is, you are sitting in a room, and at this time a building is burning where you cannot see.
Now about why it turns out this way.
1) The passage unit is passed through not with a sandwich, but with a bare pipe
2) The passage box is filled with sand or earth, and not with expanded clay or mineral wool, or at worst with brick broken into small pieces. For those who don’t really understand why sand or soil is not suitable - a video of making coffee on sand
3) cutting was done without. boxes! Very thrifty fire victims like to do this kind of cutting.
So what? Wrap it in asbestos and ok!
4) Make all the mistakes from the first three points at the same time!
It was a good bathhouse, but the stove was expensive!
This is what the cause of the fire looks like - little by little, day after day, a charred beam, which one day bursts into flames
5) Lack of desire to understand how the tunneling is done.
There are 2 types of penetration: Homemade and industrial and 2 categories: Gost and non-Gost.
Determined by guests and snips. If you are interested in reading guest snips, then please do so
The Internet is full of links to these materials.
What is the trick of the Gostov passage unit?
Here is the link to the Gost guide.
Non-GOST ceiling passage for the chimney.
A box half a meter by half a meter with a hole. The bottom is stainless steel, and it itself is galvanized. There are 3 types (no preference).
A box made of an oval is cut in exactly the same way as a regular box: a square is cut out on the sides not of the oval, but of the flat part, the device is inserted into it and secured with self-tapping screws.
Any of the non-GOST boxes can be mounted in the following ways:
A picture to attract attention: make sure to mount the unit so as not to burn out!
A) Take Minerite or flama and beat the passage, after which it is inserted into the cutout.
All distances are filled with mineral wool or expanded clay
B) A cutout in the ceiling or wall is lined with mineralite from the inside and only then is the passage inserted.
Well, all distances are filled with mineral wool or expanded clay.
Homemade chimney passages. There are Gost ones: a meter by a meter, and there are non-Gost ones - half a meter by half a meter.
Look up and you will see a homemade passage in the previous photo. Industrial inside - there purely for reinsurance.
It’s even easier to trim the cutout on all sides with mineralite or flama, and cover it with “lids” made of flama and mineralite, the main thing is to cut holes in the “lids” for the chimney.
Remember: it is better to go overboard with the installation of the unit than to underdo it.
If it seems that there is not enough thermal protection, definitely add it.
So now the most delicious thing is what you came here for: to see how the cutting unit is installed!
Please note that nowhere inside the wood is coated with thermal protection. But I disassembled my unit in the bathhouse and saw that, despite the expanded clay and mineral wool, there was a little charring of the wood, the penetration was half a meter by half a meter. So I beat it and now I’m calm.
What I advise you to do is line the inside of the cutout with thermal protection, and then insert the box.
Installation of a Gost chimney - pay attention to how huge the hole is. But another passage would not have fit - the diameter of the fireplace is 200mm!
Please note: the bend was necessary so that the wood would not catch fire, and also so that if the chimney stood in a straight line, it would vomit snow, because the angle of the roof is very sharp
Same thing in the photos:
Now let's see what not to do
You can’t just stuff mineral wool into a hole in the wall, like this:
Here's a test video!
If you carefully read everything that is written above, then after watching the video you will find editing errors yourself.
If you haven’t found it, it’s better to re-read everything again, you’ll be safer.
I found a photo of a perfectly made, in my opinion, non-GOST pass-through unit bought in a store. I’m silent about the photo of the pipe, because it’s not related to the topic.
The passage is made on the basis of such a box
It is sewn up not with a stainless steel lid, but with a sheet of mineralite, this is probably at the request of the owner
Or maybe they put a lid on top.
In short, do what you saw, so do it.
Here’s another person who burned down due to a tunnel, as he himself writes
Installation of a passage in two-story buildings
If we are talking about a two-story building, then upon completion of the transition on the first floor they move to the second. How to install a pipe in a bathhouse through the ceiling in this case?
This procedure can be broken down into the following steps:
Laying waterproofing after the chimney exits to the roof will prevent moisture from entering the attic space, with subsequent flow down the pipe. The passage of a sandwich pipe through the roof is also carried out in compliance with the regulatory provisions of SNiP.
How to pass the ceiling in a bathhouse without fire safety: installation of PPU-N from Ferrum
In one of the previous articles, I talked about PPU-N as a ready-made option for a fireproof ceiling passage in a bathhouse.
Yes, you can make a similar design yourself, for this we will need metal polyurethane foam and mineralite, or you can purchase ready-made polyurethane foam-N and install it in the ceiling of the bathhouse. But it also requires a competent approach to installation!
The hole in the ceiling must be finished with finishing, i.e. a vapor barrier must be made (foil on paper), lathing for the lining and the lining itself must be made.
Next, we cover the entire hole with ceramic fiber, wrapping it onto the lining from the side of the steam room and onto the wooden structures on top of the ceiling.
As for the use of ceramic fiber, I have already talked about its advantages more than once. This material can withstand direct fire from a gas burner! This means that it will help make a fireproof floor passage!
After this, you can install PPU-N in the prepared opening.
All that remains is to figure out the filling and sealing of the polyurethane foam inside. The manufacturer himself does not recommend filling PPU-N with insulation inside. This is due to the fact that the sandwich chimney must cool, and blocking will interfere with this. But we must insulate this unit so that steam and heat do not pass from the steam room into the attic
(or second floor).
Source
Do-it-yourself sandwich chimney in a bathhouse - assembly diagram and recommendations
This chapter will discuss only important issues regarding the installation of a chimney from a wood-burning stove. These are preparatory work, methods and order of assembly, as well as passage through the wooden floor between the steam room and the attic, and through the roof of the bathhouse.
Methods for connecting modular elements in a chimney
Installation of a chimney made of steel pipes is carried out in one of two ways: “by condensate” or “by smoke”.
The first method (“condensate assembly”) is designed to ensure that condensate, formed as a result of the temperature difference between the outside and inside the pipe, flows freely down the pipe. At the same time, the insulation located in the space between both pipes of the sandwich remains reliably protected from moisture.
The second method (assembly “by smoke”) is used when it is necessary to provide a 100% guarantee that carbon monoxide will not enter the steam room or other bath rooms through the gaps at the joint between adjacent internal pipes.
The figure on the left shows a method for connecting chimneys using condensate. In this case, the inner pipe of the upper sandwich is inserted into the socket of the lower sandwich. As can be seen from the figure, the resulting moisture cannot get inside the chimney. But smoke, finding the slightest crack, can enter the area where a person is located.
The figure on the right shows the “smoke” connection method, in which the inner pipe of the lower sandwich fits into the socket of the inner pipe of the upper module. The smoke, rising up the pipe, does not encounter resistance, freely passes through the junction, and under the influence of draft is removed from the bathhouse to the outside. However, condensation, if the joints are sealed carelessly, can get inside the sandwich. This circumstance will significantly disrupt the protective properties of the insulation and accelerate the failure of the entire sandwich.
So which method should you choose? We must keep in mind that carbon monoxide can harm our health, and condensation can only harm the durability of the chimney. What is more important is up to us to decide! In any case, sealing joints and cracks must be carried out with special care. If this is done, then the “condensate” connection method is preferable, since our health will not be affected, and the chimney will serve for a long time.
To Contents
The procedure for assembling a vertical sandwich chimney
Preparatory work
Before you begin installation, you should prepare all the elements: pipes, adapters, bends, etc. It is necessary to remove the protective film, remove all stickers and labels, and, if necessary, wipe off oil and grease stains with a rag.
The next step should be to determine and mark the vertical axis of the chimney, starting from the outlet pipe of the sauna stove and ending with the passage through the roof. The location of this axis should ensure the creation of openings both in the ceiling and in the roof, taking into account the required dimensions for their thermal insulation. In this case, wooden floor beams and rafters should not pass the cutting plane. To exclude this possibility, it is necessary to arrange them already at the design or construction stage of the bathhouse, taking into account the location of the wood-burning stove.
Sandwich chimney assembly procedure
Assembly should begin directly from the stove socket in the upward direction. First of all, you should calculate the first connecting element of the chimney in such a way that the joining of the first sandwich pipe with the subsequent pipe is above the ceiling cutting plane. The ideal option is its symmetrical arrangement. In any case, the docking points must be accessible to visual inspection.
The assembly will be carried out using the “condensate” method, in which the inner pipe of the upper sandwich will be inserted into the socket of the inner pipe of the lower (previous) sandwich. Lightly strike the top tube with a wooden mallet to achieve a tight fit. The upper outer pipe, on the contrary, is fitted with a socket onto the lower pipe.
The gaps between the connected elements are sealed with heat-resistant sealant for stoves and chimneys, designed for temperatures of at least 1000 ˚C. The sealant is applied in the following order:
- for the inner pipes of the sandwich - on the outer surface of the inner pipe of the upper sandwich;
- for external sandwich pipes - along the outer surface;
- in connections of a single-wall pipe and other single-wall modules, as well as in transitions from a single-wall to a double-wall pipe - from the outside around the circumference.
The chimney above the attic floor is assembled only using sandwich pipes, leading it through the roof to the required height.
Docking connections are additionally fastened as follows:
- connecting sandwich pipes to each other using crimp clamps;
- connecting the sandwich pipe with other modular elements (adapters, tees, bends...) - crimp clamps on both sides.
To reduce the load from the weight of the entire structure on the lower elements of the chimney, supporting wall brackets should be installed every 1.5-2.0 meters. But in our example they will not be needed, since their role will be played by the nodes of passage through the ceiling in the steam room and the roof.
To Contents