Additional types of deflectors
For some types of chimney, reflectors, which are also deflectors, may be suitable.
They are mainly used on heating appliances running on liquid fuel. Additional fastenings are installed on these devices, because they are exposed to strong winds. However, this device must be made in accordance with the characteristics of the gas installation.
It is important to take into account that if you make a large reflector, it will not be able to provide the necessary thrust, and what’s worse, it will slow down the combustion itself. This is due to the fact that a large deflector can allow large masses of air to pass through, which, in turn, extinguish the flame. An additional device similar to a fan is built into this type of device
Inside the body itself there are blades bent at a certain angle. These blades are connected at a central hub, which serves as the axis of rotation.
This type of device contains an additional device similar to a fan. Inside the body itself there are blades bent at a certain angle. These blades are connected at a central hub, which serves as the axis of rotation.
Where does moisture come from?
Many people wonder where moisture can come from in a nearly sealed system. This is due to the fact that there is always a small percentage of moisture in the air masses. If there is increased humidity, which occurs during fog, rain or in heated rooms, the amount of moisture increases noticeably.
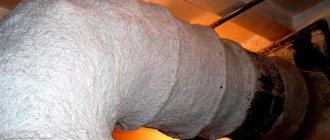
Some moisture can penetrate through the vapor barrier, foam concrete or brickwork. It is almost impossible to create a vacuum between the layers. Due to the influence of temperature changes, water vapor will settle on the cooled surface and penetrate into the insulation material. Due to these processes, the wood structure begins to deteriorate, so roof ventilation must be properly equipped to minimize damage.
Protection of deflectors from low winds
Due to the presence of this feature of wind flows, deflectors began to be equipped with special protective devices that help increase the level of draft in the pipe in any weather. To do this, an axis is installed inside the chimney on two bearings located at different levels.
A semi-cylindrical screen, a weathervane and a cover are installed on the axis. It is this design that protects the entire chimney from the effects of the lower wind flow.
After the direction of the wind flow changes, the weather vane rotates, thereby closing the chimney from the wrong wind flow. Thus, any direction and strength of the wind is not able to block the path of the exhaust smoke, and the draft in the chimney remains the same power.
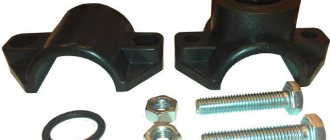
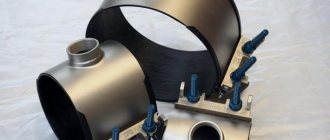
Do not forget that the deflectors are designed for round pipes, which can become a problem if you have an old brick pipe with a square cross-section. In order to solve this problem, special pipes are used that act as adapters.
For chimneys with a large square cross-section, which are built for fireplace heating systems, it is necessary to use adapters in the form of spacer legs that connect the pipe and the deflector itself. These legs are made of metal strips that can be galvanized or high-quality painted.
Brick pipes require an appropriate transition with an inlet in the desired direction, which allows you to connect a round deflector and a square chimney. In other words, it is not difficult to secure this element of the chimney system in the presence of any type and shape of chimney structures.
You don’t have to buy a deflector at a hardware store, because you can make it extremely easily with your own hands. To do this, you need to calculate the size and shape of the element, after which you can begin the manufacturing process.
On galvanized steel sheet it is necessary to draw the upper and lower cylinders of the future deflector, which can be easily done using an ordinary pencil. You can cut out the necessary elements using metal scissors, which can easily cope with this task.
Once these two parts have been cut and filed, which is required to properly join the two edges of one part, you can begin to secure these edges. As a rule, a welding machine, bolts or rivets are used for this.
It’s worth noting right away that connecting a galvanized steel workpiece using a welding machine is extremely difficult, because it burns through thin metal quite quickly. It is for this reason that rivets or small bolts are most often used.
The finished cone cap must be secured to the upper cylinder of the deflector. This is done using small brackets made of the same sheet steel. The brackets are secured to the pipe using rivets. Do not forget that the brackets should be attached only to the outer side of the deflector, so as not to create additional interference in the internal part for proper air flow and smoke extraction.
A reverse type cone must be attached to the element umbrella. In addition, the assembly of all parts of the deflector must be carried out directly on the pipe itself, which will allow for high-quality installation and fastening of each individual part of the structure.
Otherwise, it is possible to connect two elements of the system poorly, which will subsequently cause a malfunction of the structure and the entire chimney as a whole. In some cases, it is simply impossible to make this design on your own.
As a rule, this happens with brick chimneys, which require high-quality adapters or stands. From this we can conclude that it is much easier, more profitable and faster to buy this inexpensive element of the system than to try to make it yourself.
It is worth recalling that only galvanized steel can be used to make the deflector, which successfully resists the formation of rust, which negatively affects the life and quality of service of such a system element.
DIY making
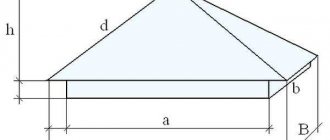
To make a chimney canopy with your own hands, it is better to choose a simpler model. To work, you will need galvanized steel sheets, metal scissors, bends, a marker, cardboard, and a welding machine. The process is performed in the following order:
- Making a protective cap with your own hands begins with taking measurements from the chimney. To do this, it is more convenient to use a metal ruler or measuring tape. Measurements are taken accurately, without haste.
- The next stage is creating a pattern on cardboard. Please note that the umbrella should be put on the chimney easily, without force, so a gap of 4-5 mm is added to the dimensions of the pipe.
Important! The easiest way to make a chimney cap with your own hands is to make it from a sheet of metal curved in an arc. When creating a drawing, keep in mind that in winter the weight of the snow cap falls on the brackets, so choose metal of sufficient thickness and strength.
When making your own umbrella to protect the chimney from moisture penetration, accurately measure the dimensions of the pipe. A correctly selected deflector model improves the appearance of the roof and optimizes the operation of the smoke removal system.
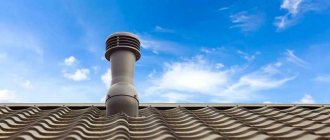
What is it and what is it for?
Thanks to fungi installed on the roofs of buildings, carbon dioxide, unwanted odors and excess moisture are removed from the rooms.
Normal ventilation is necessary to maintain a healthy and comfortable microclimate in the house. By removing exhaust air, fungi protect air ducts from rain, snow, debris, insects and small animals. At the same time, modern designs prevent the formation of backdraft in strong winds.
How does a fungus work?
This structure is installed on the roof of the building in accordance with building codes and regulations.
Fungi for ventilation consist of the following parts:
- cap,
- gas exhaust pipe,
- passage node,
- corrugated pipe for connection with horizontal sections of the air duct,
- aerator,
- insulating layer,
- fan to remove air when the draft decreases,
- deflector,
- fastener
Fungi are an essential element of the design of buildings where people are located or materials susceptible to dampness are stored.
Principle of operation
The construction of a ventilation system is based on the property of warm and light gas to rise up, and cold gas to fall down. The greater the distance between the object producing polluted air and the upper edge of the air duct, the stronger the draft and the more effective the cleaning of the premises.
To prevent ice formation, the exhaust pipe and umbrella are insulated in various ways.
Types of shape and design
According to their purpose, fungi are divided into ordinary and heat-resistant. Conventional ones are used to extract air from bathrooms, kitchens and cellars. Heat-resistant devices are installed on pipes that remove combustion products from boilers and furnaces. The dimensions of the air ducts and hoods directly depend on the volume of exhaust gases. Their diameter varies between 100-300 mm.
The simplest and most inexpensive designs consist of a pipe with an umbrella made of sheet metal attached on top. Modern products are more practical and aesthetic. They are initially designed for mounting on sloping and flat roofs, have a glass for collecting condensate, and a layer of insulation that prevents the formation of ice.
Advantages and disadvantages
Installing fungi on the ventilation system allows air to be removed efficiently, regardless of the area of the slopes and weather conditions.
The advantages of these designs are as follows:
- use of modern lightweight and durable materials,
- preventing foreign objects and liquids from entering the air duct,
- insulation of the line from reverse draft and stove smoke.
As for the disadvantages, factory-made modules are expensive. This affects the construction estimate when several fungi need to be installed.
Service life and approximate price
If you do not take into account extreme situations associated with mechanical impact on the fungus (hurricane, falling branches), then these products have a long service life.
It depends on several factors:
- corrosion resistance,
- strength,
- presence of a glass for moisture,
- installation quality,
- state of thermal insulation.
The simplest design made from an asbestos-cement pipe and a tin umbrella will last at least 15 years. Modern products made of polymer plastic with UV protection will perform their tasks for 50 years or more.
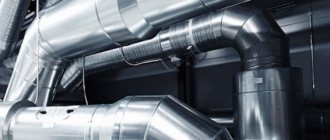
Specifications
PVC pipes are UV resistant and can be quickly installed
Ventilation pipes presented on the domestic market have technical characteristics depending on their type. Asbestos and conventional sewer products are described by the following parameters:
- Main standard size (working diameter).
- The degree of resistance to mechanical loads and chemically active environments.
- The temperature range in which they remain functional.
- UV resistance.
Plastic pipes are characterized by approximately the same indicators, tied to the characteristics of a particular material. For example, polyvinyl chloride (or PVC) is resistant to UV rays, is not very expensive, and the operating temperature range of pipes based on it is from -10 to + 70 degrees. It is most suitable for installing ventilation systems in bathrooms and kitchens.
Polypropylene is slightly superior to PVC in terms of its technical characteristics, since it can withstand temperatures up to + 85 degrees. In addition, it is resistant to chemically aggressive environments and is available in a fireproof design. Fluoroplastic has an increased heat resistance (up to + 200 degrees), is also UV resistant and easily tolerates contact with active chemicals (alkalies and acids).
Additional types of deflectors
For some types of chimney, reflectors, which are also deflectors, may be suitable. They are mainly used on heating appliances running on liquid fuel.
Additional fastenings are installed on these devices, because they are exposed to strong winds. However, this device must be made in accordance with the characteristics of the gas installation.
It is important to take into account that if you make a large reflector, it will not be able to provide the necessary thrust, and what’s worse, it will slow down the combustion itself. This is due to the fact that a large deflector can allow large masses of air to pass through, which, in turn, extinguishes the flame. This type of device contains an additional device similar to a fan.
Inside the body itself there are blades bent at a certain angle. These blades are connected at a central hub, which serves as the axis of rotation
This type of device contains an additional device similar to a fan. Inside the body itself there are blades bent at a certain angle. These blades are connected at a central hub, which serves as the axis of rotation.
Installing a ventilation duct on the roof through ondulin
Ventilation pipes can be selected in combination with ondulin roofing sheets. They are sold in similar colors. They are easy to install. The ventilation pipe can be selected from ABS polymer.
The pipe can be polymer - it is durable
For example, its length is 860 mm, and its height above the roof is 470 mm. Installation of the ventilation duct is carried out as follows:
- ondulin sheets are attached around the place where the pipe is supposed to exit from the roof hole - the exception is the sheet that will be located above the pipe;
- it is necessary to attach a base sheet with fasteners for the ventilation pipe to the installation site of the ventilation pipe;
- it is necessary to install the ventilation duct taking into account each wave of ondulin coating;
- ondulin, which is mounted above the ventilation duct, is attached with an overlap of approximately 10 cm on the base sheet;
- it is necessary to insert the ventilation duct vertically into the base sheet and secure it with plastic pins.
Important! The ventilation pipe must not be located below the ridge. Ventilation will not function properly due to lack of proper draft.
Selection rules
You can select the optimal deflector based on the goals and tasks assigned to it. It is also worth considering the conditions in which it will operate.
A simple chimney is a cap on a wood-burning chimney, made in the form of a regular umbrella, and has the following advantages:
- maintains the necessary traction both in calm conditions and in the movement of air masses with a power of up to 10 points;
- does not create excessive pressure on the pipe, due to which even in a severe storm the chimney remains in its place; rather, the umbrella itself can break off and fly away;
- has a simple and understandable design;
- practically does not coke or clog, and is quite easy to clean;
- due to the imperfection of the aerodynamic structure, it is insensitive to the shape of the umbrella; if the building is located in the wind, then the chimney can be made in the form of a tent, this greatly simplifies its use and opens up great opportunities for the implementation of design ideas.
At the same time, there are serious disadvantages, such as:
- in weak winds it reduces draft, and the stronger the heating element works, the weaker it is. This is quite dangerous, since in cold winter weather, in the absence of wind, the stove can “choke” and breathe fumes into the living quarters;
- in strong winds, on the contrary, it creates too much draft. This significantly reduces the efficiency of indoor stoves and fireplaces;
- in gusty winds it can cause blowing into the pipe and creating a reverse draft effect.
The aerodynamic open model maintains sufficient draft in any wind for efficient operation of stoves and boilers using liquid fuel and gas. Such deflectors can freeze, they easily become littered and quickly become covered with soot and soot, however, they are easy to clean.
The disadvantages include the following:
- complex body of rotation;
- as a result of the load created by air masses, the umbrella itself can easily fly off the chimney, and at the same time, the direct mechanism of the device can collapse the pipe itself;
- with strong gusts of wind from force 8, the lateral pressure on the structure increases significantly and further increases in accordance with the power law;
- open structures are quite poor at reducing strong dynamic loads resulting from gusts of wind, which is why in no case should such a model be placed on pipes made of brick;
- the modification cannot be used for pyrolysis heat-generating mechanisms, otherwise, when wind occurs, all pyrolysis gases will be sucked out and the stove or boiler will simply go out;
- not suitable for creating design elements, since it is unsuitable for decoration; all kinds of blotches and figures only worsen the overall aerodynamic status of the structure as a whole.
By the way, an interesting study was conducted in the USA. There, at one time, they studied issues related to open deflectors and installed them on locomotives to check the degree of increase in efficiency at low speed. At the same time, the result was the most depressing - at mid-speed, fire began to burst out of the pipe and not a single train was able to reach its maximum speed. In general, the open version of the deflector should be recommended for all types of heating devices, with the exception of pyrolysis ones. At the same time, it must be checked and cleaned at least once a quarter. It is optimal for a chimney with low draft force, it is most effective for wood-burning sauna stoves; not a single case of people burning out due to the ventilation deflector in saunas has been recorded.
The closed or as it is called “perfect” type has such advantages as:
- provides stable draft, which is sufficient for stoves and boilers of any type;
- not prone to freezing and clogging from the inside;
- Dust and ice formed on the outside do not significantly change the operation of the device.
There are also disadvantages, however, users claim that they are not so significant, namely:
- when exposed to strong winds, it gives maximum pressure on the pipe, and then increases linearly, so the chimney under the deflector should be further strengthened with guy wires;
- has rather complex design and technological parameters;
- cannot be used as a design element, since any additional elements significantly reduce the overall level of aerodynamics.
Models may differ in appearance, purpose and material. Most often, plastic, stainless steel or aluminum are used to produce deflectors. In rare cases, copper may become a raw material for production. Many users prefer the sandwich model.
Making your own chimney cap
Making a cover for a fireplace or chimney yourself is not difficult.
- Sheet of galvanized metal, copper or stainless steel,
- Cardboard and markers,
- Metal scissors,
- Devices for bending sheets,
- Welding machine.
Before starting fabrication, it is important to carefully measure the chimney pipe. Then you need to make a model of an umbrella from cardboard. Pattern drawings:
The umbrella should fit onto the pipe without much effort, so when drawing up the drawing you need to leave an overlap of half a centimeter.
After trying on the layout, the drawing is applied to a metal sheet. The workpiece is cut out with scissors. Using bends, the material is given the desired shape. The joints are fastened with 3-4 rivets. Making droppers is similar.
The brackets are cut from metal plates and attached to the apron and top by welding. Welding points must be treated with a primer. The entire cap is additionally coated with anti-rust compound and paint.
Afterwards all that remains is to put it on the fireplace chimney. All joints must be treated with fire-resistant sealant.
The umbrella must cover the entire plane of the chimney. Some structures have a half-brick protrusion, which also needs to be covered from rain.
Please note: in winter, ice or snow may form on the cap. It is important to choose the thickness of the metal so that it does not get pressed under such a weight.
An excessively high or too low lid will not fully remove smoke, so it is worth making drawings taking into account all the necessary parameters. It is not difficult to use a cap to correct defects in the chimney, for example, if it is not of sufficient height.
You can decorate the deflector using a forged weather vane. This will be a durable and practical solution.
Even novice craftsmen can make a chimney cap on their own. It is important to take measurements carefully and choose high-quality metal. A well-made deflector will correct shortcomings in the operation of the chimney and provide constant draft in any weather. And if you apply a little creativity in your work, the product will become a decoration for the facade of the house.
Roof ventilation in a cold attic
In any room where there is no ventilation, a normal microclimate is impossible. Insufficient air exchange causes air stagnation and high humidity; at the next stage, mold begins to grow on structural elements and fungus starts to appear. All these factors negatively affect the structure; over time, it will begin to deform and lose its purpose. In a private house, the room under the roof can be warm or cold.
Differences between cold and warm roof ventilation
In the first case, the ventilation duct is installed over the entire area of the slope using sheathing and counter-lattice. Warm air masses enter the under-roof space at the eaves, rise and exit through the aerator in the roofing strip. Condensation also escapes through it.
Many owners of private houses, where the room under the roof is not heated, wonder whether roof ventilation is necessary in a cold attic, because no one lives there? Such a system should exist in this case as well, since it will ensure the safety of the structure itself.
Only for an unheated room it is arranged differently. In this case, vents are created in the under-roof eaves for cold air to enter, while warm air goes into the aerator and dormer windows in the attic of a private house.
Arrangement of roof ventilation for a cold attic
For the attic space this is the eaves level. Here you need to create holes
It is very important to correctly calculate the size of the vents in the attic, so that the inflow and outflow of air is the same. Often, owners of private houses use perforated soffits
To create an outflow of air from the attic, there are roofing elements such as aerators and a ridge. The direction of flow is determined depending on the characteristics of a particular house:
- if the roof of the house has two slopes, ventilation ducts are made on the gables - loose lining of the overhangs or holes in the wall, the area of the ducts should be 0.2% of the area of the attic space,
- if slate or ondulin is used as a roofing material and no vapor barrier has been used, then no additional structures are needed, since the air will circulate along the waves of the coating, the ridge will serve as an outflow element,
- if the roof of the house is flexible or made of ceramics, a “turtle” (valve) is formed,
- The system of two gratings has shown itself to be good, one is installed with holes pointing downwards, the other can be adjusted,
- on a hip roof, ventilation can be created using two holes, one of which is located at the bottom of the lining, the other at the top of the ridge,
- also on a hip roof, provided that the overhangs are wooden, you can place beams with a gap of several millimeters.
Sequence of work
- Calculation of air exchange. According to SNiP, in cold attics, as in basements, dormer windows or vents are necessary for air flow. Their total area should be 1/400 of the total area of the room.
- Selecting an air outflow and inflow system. After performing the calculations, you need to choose a system that will be optimal for your home: an aerator or a ridge, windows or vents. Next, a diagram is drawn up, that is, how many ventilation elements there will be, their sizes, how they will be located.
- Execution of work. When creating an attic ventilation system, you should strictly adhere to the diagram.
Let's summarize
From the above it is clear that the work is not difficult for a home craftsman who knows how to hold a tool in his hands and strictly follow the project recommendations. But it is still better to entrust the development of documentation to specialists. They will make calculations of the size of the vents in the attic, their location and quantity, according to the characteristics of a particular room. A professionally created project will save you from mistakes and shortcomings, the consequences of which can be disastrous.
Roof ventilation in a cold attic
The need to create effective roof ventilation in a cold attic is associated with the formation of the necessary level of comfort in residential premises. Otherwise, heat loss and the formation of condensation are inevitable, followed by the appearance of fungus and mold, and even deformation of the house.
Life time
pipe cap If the product is made from stainless steel or asbestos concrete mixture, it will last about 10 years. But only on condition that the installation is carried out in a calm atmospheric zone, where there are no strong winds or hurricanes. This impact significantly reduces the service life.
Modern polymer products can last at least 50 years. But they cost several times more, so they are less often chosen by consumers.
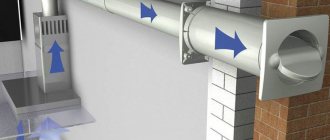
What is the principle of the ventilation passage structure?
The design features of the ventilation passage, in addition to the removal of dirty air, make it possible to ensure a strong sealing of the roof and protect against the penetration of precipitation into the attic. Each unit consists of an adapter of a certain diameter that is inserted into a pipe mounted on a concrete glass.
The assembly systems are secured with anchors, which are included in any standard kit. The fastening is also carried out on a metal base, however, instead of a concrete glass, a similar metal one is built in
The support ring, which is part of the structure of the unit, guarantees a perfect connection between the structure and the roof surface. Clutch flanges ensure reliable fastening - the lower one is connected to the air duct, the upper one supports the ventilation hood, which protects the pipe from precipitation. A ring is placed inside the pipe to ensure condensate drainage.
Vilpe valves
| Vilpe Muotokate KTV valve Roofing valve for ventilation of tiles with Monterrey profile. Dimensions 33x26.1cm. The kit includes a valve with a glued gasket, a water seal ring, instructions, a template, sealant and a set of fasteners. Colors: chocolate, burgundy, black, brown, green, gray, red, brick, blue. | Valve Vilpe Pelti KVT/HARJA Ridge valve for ventilation of metal roofs. The valve hole is 16cm in diameter. Includes valve cover with filter, seal frame, end seals, instructions and 2 sets of fasteners. Colors: chocolate, burgundy, black, brown, green, gray, red, brick, blue. |
| Vilpe Pelti KTV valve Roofing valve for ventilation of tiles with a profile height of up to 3.8 cm. Dimensions 34.4x46cm. The kit includes a valve, a water seal ring, a rubber seal, instructions, a template, sealant and a set of fasteners. Colors: chocolate, burgundy, black, brown, green, gray, red, brick, blue, eggplant. | Vilpe Decra KTV valve Roofing valve for ventilation of Decra type tiles. Dimensions 37.4x29cm. The kit includes a valve, a water seal ring, instructions, a template, sealant and a set of fasteners. Colors: chocolate, burgundy, black, brown, green, gray, red, brick. |
| Vilpe Universal KTV valve Roofing valve for ventilation of cement-sand and ceramic tiles. Dimensions 52.9x39.8cm. The kit includes a valve, a water seal ring, a rubber seal, instructions, a template, a stop strip, sealant and a set of fasteners. Colors: black, brown, green, gray, red, brick. | Valve Vilpe HT Alipai Roof valve for ventilation of tiled roofs. Dimensions: height 30 cm, length 42 cm. Includes deflector, adapter, set of fasteners, instructions and valve. Colors: black, brown, green, gray, red, brick. |
| Vilpe Huopa KTV valve Roof valve for ventilation of pitched bitumen roofing. Dimensions 45x38cm. The kit includes a valve, a template and a set of fasteners. Colors: black, brown, green, gray, red, brick, blue. | Vilpe Huopa KTV/Hajra valve Roof valve for ventilation of pitched bitumen roofing. Dimensions 43.9x43.9cm. The kit includes a valve with an inserted filter. Colors: black, brown, green, gray, red, brick, blue. |
| Vilpe Classic KTV valve Roof valve for ventilation of pitched bitumen and seam roofs. Dimensions 35.1x26.6cm. Includes valve and template. water seal ring and fastener set. Colors: black, brown, green, gray, red, brick, blue. |
We install ventilation elements correctly
It is important to install roof penetrations correctly. To do this you need to follow a simple step-by-step algorithm:
Mark a hole in the metal tile for the pipe. Then carefully cut it out. Secure the passage element into the tile. Use self-tapping screws for fastening. Don't forget to apply sealant before attaching it. Carefully insert the outlet into the passage element. The exit can be sewer, ventilation, etc.
It is important that the outlet is positioned absolutely vertically. Use a level to check
When you are sure that the outlet is installed correctly, secure it with self-tapping screws. Connect the exhaust hood outlet to an air duct located directly inside the house. To do this you need to use a corrugated pipe. It will be pulled through layers of vapor and waterproofing, as well as through insulation. Be sure to provide good waterproofing in the places where it passes. To do this, you need to use adhesive tape, as well as a sealant or sealant.
You must understand that the penetration must withstand a certain load, including vibration, atmospheric pressure, and temperature changes. Different materials are used to make penetrations. This is most often silicone or rubber. The advantage of these materials is that they are not afraid of corrosion and the scorching sun. They will fit tightly to the roof. Remember that this is one of the main barriers that will protect the rafter system. If you do not provide good protection, the tree will quickly begin to rot.
Important! When selecting passage elements, take into account the material of the roof itself and the diameter of the object that you plan to remove. When installing ventilation, it is important to properly arrange the passage of the shaft through the roof
Here you will need to install a passage unit. There are several types of it. They have differences in installation. Each type has its own installation features.
When installing ventilation, it is important to properly arrange the passage of the shaft through the roof. Here you will need to install a passage unit
There are several types of it. They have differences in installation. Each type has its own installation features.
When choosing a unit, consider the type of ventilation.
Air ducts are most often installed on reinforced concrete cups. They are secured with anchor bolts or nuts. Such units will carry air if the humidity is not higher than 60%.
Why air circulation is so important
Each house usually has several types of ventilation:
To ensure the movement of air masses, draft is required. To create a draft of the required force, you need to carefully calculate many factors, take into account the type of room, the material of the walls and roof, the presence of insulation and waterproofing. However, the main factor in calculating draft is the installation location of the ventilation duct and the outlet of the pipe to the roof.
If you violate the rules for installing ventilation shafts and ducts, you can nullify all efforts to install them. The consequences of this will be sad:
Using a deflector. Its operating principle and design
The TsAGI ventilation deflector performs several functions: it enhances the exhaust in the ventilation system, prevents reverse draft, and protects the ventilation system from precipitation. The principle of operation of the deflector is based on the laws of physics: air blows on the product from the outside, while the pressure inside the deflector drops below atmospheric pressure. Air masses tend to the low pressure zone, i.e. draft is generated in the ventilation system and the air is drawn out. Most often, the deflector is used in natural ventilation systems.
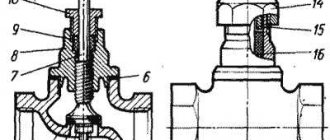
The TsAGI deflector consists of the following parts:
- A pipe that attaches to a duct or passage assembly. It serves as an exhaust shaft.
- Diffuser - an expanding cone that goes from the nozzle to the top of the deflector
- External pipe/shell
- A cap that protects ventilation from precipitation
- Claws for fastening the cap
Building regulations
The rules for arranging ventilation systems are set out in SNiP 2.04.05-91.
The basic requirements for installing fungi are as follows:
- mandatory air conditioning in bathrooms, living rooms, food preparation areas, and vegetable stores;
- presence of fresh air supply;
- the location of the fungus above the roof ridge;
- installing an exhaust fan in a long duct;
- installation of a separate flue for heating boilers;
- if the hood is vented into the attic, it must be ventilated;
- the ability to output individual channels to a common one, provided that the difference in their height is no more than 2 meters.
In areas with cold climates, not only insulation of the channels is provided, but also their heating.