The passage of a chimney through the ceiling is a very important moment in the construction of a private house or any other building (for example, a bathhouse). This is primarily due to the fact that work related to the installation of a chimney must comply with fire safety standards and other requirements described in SNiP. Many fires in various private buildings occur due to non-compliance with fire safety rules when installing a chimney.
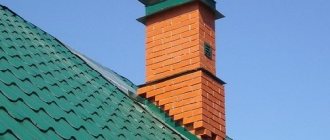
The chimney outlet through the ceiling and roof must be carried out taking into account fire safety rules
Basic provisions
The wiring of the chimney structure through the ceiling and roof must be carried out taking into account all fire safety standards and regulations described in SNiP 2.04.05–91. For a pipe in a private house or bathhouse, a necessary condition is the installation of a special passage unit. Let's consider the main provisions specified in the Rules:
- the distance from the surface of a brick or concrete pipe to rafters made of flammable materials must be at least 13 cm.
- the distance from a ceramic pipe (without thermal insulation) to combustible rafters should be at least 25 cm, and from similar pipes with thermal insulation - 13 cm.
Note! The above provisions must be taken into account when installing beams. Their pitch, as a rule, is approximately 60 cm. To obtain the required distance from the chimney structure to the ceiling with such pitch parameters, it is necessary to use insulated pipes. Special sandwich pipes, which consist of several layers, including insulating material, are excellent for such purposes.
The cross-sectional area of the furnace outlet pipe is usually 115–120 mm. If the sandwich pipe has an insulating material 100 mm thick, the outer diameter will be 315–320 mm and the distance will be 13 cm.
The chimney must be equipped with insulation made of non-combustible material of a certain thickness; ready-made sandwich-type pipes meet similar requirements.
For baths, pipes with an insulation thickness of 100 mm are relevant. If necessary, you can use 50 mm insulation for a bathhouse, but this is not recommended by experts. The most common pipes on the construction market are sandwiches, which have an insulation thickness of 35 to 50 mm. You can find a product with a ten-centimeter layer of thermal insulation material in a specialized store that sells bath equipment.
A chimney that is not equipped with insulation must have a distance of at least 250 mm from combustible ceiling materials.
Do-it-yourself installation of polyurethane foam
The hole should be approximately 0.5 mm larger than the thickness of the channel diameter. This will ensure ease of insertion. Thermal insulation is packed along the outer and inner walls. The distance between them is 1-2 cm.
If you do not have a ready-made kit, you can perform high-quality stove heating in your home without it. To do this, the free space in the ceiling is sealed with fire-resistant thermal insulation, on top of which steel strips are installed. A plate made of heat-resistant metals is installed on it, in which a suitable hole is cut. This plate is secured with a bolted connection. It is most convenient to make it from metal.
When installing it, we comply with all requirements and maintain the established distances to fire hazardous objects. The resulting voids on the side of the second floor or attic should be filled with expanded clay or other non-flammable insulation.
Passage of a brick chimney through a wooden ceiling
Laying out a stove chimney is a complex process where many nuances must be observed. Therefore, it is better to entrust this matter to specialists. In addition, errors during construction can lead to poor draft and fire.
An important point: simple building bricks are not suitable for laying individual parts and the entire chimney. A prerequisite for long-lasting and trouble-free operation of a brick pipe is the use of a ceramic heat-resistant type of brick.
When building structures, it is necessary to lay them out in a special way in the places where the floors pass. The ideal option would be to cut the chimney on the ceiling. The height of this section of the masonry must be at least three rows of bricks. The thickness of the chimney walls when passing through the roof or wall (partition) should be greater than along the main height. The distance to flammable materials must be at least 25 cm.
Two passages of a brick chimney are possible. In the first option, the passage unit is mounted by increasing the thickness of the masonry, the so-called “fluff”. The second option for passing a brick pipe through the attic floor without laying out the “fluff” is carried out in almost the same way as for a metal pipe. In this case, the chimney along its entire height has the same cross-sectional size, without increasing the thickness of the walls.
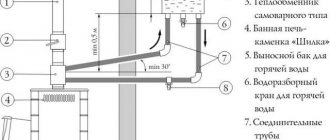
The hole in the ceiling is secured with a stainless steel sheet or mineralite slab. A window is cut out in the center of the sheet through which the chimney will pass. The length and width of this opening should exceed the similar parameters of the pipe by literally 3–5 mm. When laying a chimney, approximately three or four rows up to the ceiling, a sheet with a prepared opening is placed on it, and then the laying is carried out further up to the height of the finished attic floor. Wooden floors are laid with mineral wool to reduce heat transfer from the pipe. But a more reliable way would be a stainless steel box into which a brick chimney will pass; the distance from the pipe to the walls is also laid with mineral or kaolin wool at 5-7 cm.
Sealing joints
This stage is considered the most difficult when removing through the roof. To do this, install a lower apron made of tin.
A “tie” made of metal is placed under it, the purpose of which is to drain liquid into the drain. Outside, you can install a decorative apron, the purpose of which is to create an aesthetic appearance.
When using a flexible coating, the task of waterproofing is greatly simplified. It is quite easy to bend such material onto a pipe that has been pre-coated with impregnation to create a better fit. It is also recommended to treat the joints of the wall and roof with sealant.
Video tip - assembly of a chimney pipe passing through a wooden ceiling
From the following video you can learn how to properly lay the structure without spending extra effort.
Standards for the distance from the pipe to the walls
According to SNiP (Appendix 16), there are certain standards for the distance from the surface of the pipe to materials prone to fire, described in the table below.
Table 1
| Sandwich pipe thickness, mm | Indentation for the partition, which is protected from fire, mm | Indentation for partition not protected from fire, mm |
| 120 | 200–260 | 260–320 |
| 65 | 380 | 320–500 |
This appendix describes the norms for the distance between pipes and walls. The wall material may not be fire resistant, so they, like ceilings, need insulation. For this, mineral wool and a sheet of galvanized steel are used, mounted on top of the insulation.
Installation technology
Increased requirements are imposed on buildings made of combustible materials. When venting a chimney through a wall in a wooden house, you must take into account all fire safety standards.
Step-by-step instructions on how to make a chimney correctly:
- For the pipe, a passage is made through the wall in accordance with SNIP standards. The distance from the pipe to a wall built from fire-resistant building materials is at least 25 cm. To a surface made from materials susceptible to combustion - 45 cm. In the second case, it turns out that you need to punch a fairly large hole. To make the hole for the chimney through a wooden wall smaller, the surface is sheathed with metal or other fire-resistant material. Make a hole of 25 cm, since the surface is insulated from fire.
- A metal box is mounted into a hole in the wall.
- The pipe is passed through a metal box, secured in the middle, and taken out. The pipe must be solid; elements cannot be joined inside the wall, as they will be problematic to maintain.
- All free space in the wall is filled with non-flammable thermal insulation material.
- The hole on both sides is covered with metal or other heat-resistant raw materials.
- A support platform for external pipes is mounted outside, which is held by metal brackets attached to the wall.
- An adapter in the form of a tee is installed on the outgoing segment.
- The lower part is removable. It functions as a glass to collect condensate. Some models are equipped with a fitting with a tap to which a hose is connected, through which the water accumulated inside is poured out.
- A chimney is connected to the upper part, which is brought to the desired height. To prevent debris from getting inside the pipe, a cap is installed on it.
The pipe brought out is secured to the wall using stainless steel clamps.
In a frame house, it is recommended that instead of a support platform, build a small foundation that will hold the outer pipe in order to relieve the load from the wall.
For more details on how to install a chimney through a wall, watch the video:
Pass-through options
It is worth paying attention to protecting the materials of the ceiling “pie” from possible fire. The protective function in this case is performed by the ceiling cut or, as it is sometimes called, the passage unit.
The passage unit can have a different shape, but a prerequisite is its fire resistance
Such passage units can be installed independently or purchased an industrial design. Industrial units are a metal box with a stainless steel plate (in some cases galvanized steel is used). In the center of the box there is a hole through which the sandwich pipe is passed. Such a unit also performs a support-forming function for the heat-insulating material, which fills the voids between the pipe and the ceiling beams.
Important! In the bathhouse it is allowed to use only stainless steel pass-through units. This is due to the fact that galvanized steel releases substances harmful to the human body at high temperatures, which are typical for steam rooms.
Installing the ceiling trim is quite simple. First, at the desired point on the ceiling (necessarily between the beams), a square hole is made, which should be 1–2 cm smaller than the decorative panel of the passage unit. Next, the beams and boards are covered with insulation. Sometimes it is necessary to line the insulation with metal strips.
When installing a pipe for a stove in a private house, the product is fixed on a straight section of the chimney in the place where the sandwich chimney will pass through. Then the mounted cutting is raised to the required level. At the end, the edges of the assembly are thermally insulated and the resulting structure is secured with self-tapping screws.
On sale you can find passage units of various configurations that require thermal insulation or are already equipped with it.
Passage units may have different configurations depending on the manufacturer. There are models in which a metal cylinder is located around the hole for the chimney, and the edges of the decorative element protrude beyond this cylinder. There are also units with outer sides located around the hole. The material used to make such units can be different: metal, mineralite. Metal sides must be thermally insulated, and mineralite ones themselves are a good insulator.
Ceramic chimneys
When manufacturing an internal chimney, the following requirements are imposed on it:
Ceramic pipe installation
- the minimum distance from the chimney to the load-bearing beams, if laying asbestos sheets in two layers between the pipe and the ceiling is provided - 250 mm, without laying asbestos - 380 mm.
- if there is asbestos insulation, the distance from the pipe to the wooden wall is taken to be 250 mm or more; if insulation is not provided, the distance is taken to be at least 380 mm.
- when using mineral wool for insulation, the distance from the pipe to the rafters is taken to be at least 130 mm;
- when using flammable materials - 260 mm;
- for roofing in places of contact with the pipe, materials resistant to high temperatures (steel, ceramic tiles, slate) should be used. If materials such as flexible bitumen shingles are used, it is necessary to prevent their contact with the pipe. The distance from the bitumen coating to the chimney in plan should be at least 50 cm.
All the requirements described above are relevant for the manufacture of an internal chimney, but sometimes it is better to choose an external outlet. It avoids complications and increases the safety of the structure, since combustion products cannot enter the room.
This installation is only suitable if the boiler is located directly on an external wall. The design will not allow for an extended horizontal section. The advantages of use include the attractive appearance of the building. This option is best suited for boilers running on liquid and gaseous fuels. The disadvantage of the design will be the increased formation of condensation, which leads to the deposition of substances on the walls that destroy the pipe.
The external chimney is made in the same way as the internal one, but insulation of its walls in contact with cold air should be provided. The thickness of the thermal insulation is up to 10 cm and is assigned depending on the climatic characteristics of the area
It is important that in most cases the pipe will still pass through the roofing, so it is worth following the recommendations for internal connections. A hole is provided in the lower part for inspection and cleaning, and a drip line is installed.
Under the brick pipe you will have to make a separate foundation or a support ledge for the house.
It is worth considering the following masonry requirements:
- providing dressing;
- production of ceramic solid bricks using lime (cement-lime) mortar inside the house;
- after exiting through the roof, the masonry is carried out using cement mortar;
- the thickness of the seams should not exceed 10 mm;
- Plastering the inner surface of the pipe is prohibited.
Selection of thermal insulation material
Today, the building materials market is distinguished by a variety of thermal insulators, which have different technical characteristics and may differ in price. Let's consider the main materials that are used for thermal insulation purposes when laying sandwich pipes through the ceiling and roof:
Basalt or mineral wool. Such materials are used quite often when constructing sandwich pipes. The temperature that these insulation materials can withstand reaches up to 600 °C. Let's consider the main disadvantages of basalt and mineral wool:
- Such materials are not environmentally friendly and may cause harm to human health. When heated, such cotton wool releases harmful substances - formaldehyde;
- mineral and basalt wool have a rather poor coefficient of water resistance. When wet, they lose their protective qualities.
- Over time, wool can cake and lose its thermal insulation characteristics.
Expanded clay. It has high insulating characteristics. When condensation forms, followed by wetting, expanded clay, unlike mineral wool, quickly restores its protective properties. The disadvantage of this material is that when installing pass-through units, special containers are required for it.
You can insulate cuttings with different materials, but it is better to choose those that will not harm human health
Minerite. The composition of such insulating material includes: cement, cellulose and various mineral additives. Minerite is resistant to temperatures up to 600 °C. When wet, it does not lose its insulating properties, and when heated, it does not emit carcinogens harmful to human health.
Asbestos. Asbestos itself has fairly good thermal insulation properties, but when heated it releases carcinogens. The use of asbestos as insulation is recommended by experts only as a last resort.
Sand or clay . Such materials were used long before modern thermal insulators appeared. The thermal insulation properties of these natural products are inferior to specially developed modern insulation materials, however, some owners prefer to use natural ones as thermal insulation.
Calculations and installation rules
Installation rules imply careful consideration of all stages of future work:
- You should make sure that the pipe itself will not come into contact with any flammable materials, which, under the influence of high temperatures, may begin to smolder and release toxic fumes.
- When installing the system directly externally, it is necessary to remember the deflection angles, which will act as active guides for smoke removal. The chimney pipe should not be located parallel to the wall of the house, since in this case smoke stasis will occur - it simply will not be removed from the system.
- Special tees must be installed in the lower and side parts of the pipe, which will be used as a place to install mechanisms for condensate drainage. If this step is not completed, then moisture when lighting a fireplace or stove will simply enter the firebox and extinguish the flame. All this will significantly complicate the kindling process!
- The upper part of the pipe should rise above the edge of the roof to ensure that smoke and soot are blown away in an area of more rarefied air. Typically, such zones are formed at a distance of 15-25 cm from the roof sheet.
Rules for passing a sandwich pipe through the ceiling
When developing a plan for future installation work, it is worth paying special attention to the dimensions of the chimney. In this case, you should familiarize yourself with some rules:
- if the pipe is being installed for a sauna building, you must remember that after leaving the stove, only pipes with thick walls that are not equipped with insulating material are allowed to be installed. The height of such a pipe should be at least 1 m. It is advisable that the pipe be made of stainless steel, since this material is more heat-resistant than galvanized steel. After one meter of galvanized thick-walled pipe, installation of a sandwich product is allowed;
- pipes passing through the ceiling must necessarily have a layer of insulating material;
The insulated part of the chimney is installed on a thick-walled pipe coming out of the firebox
Important! It is strictly prohibited to join pipes in those areas that pass through the ceiling.
- the length of the horizontal sections in the structure directly affects the draft and other operational characteristics of the chimney. The longer the horizontal sections are, the worse the traction performance in the system will be. The maximum recommended length of horizontal sections is no more than 1 m;
- the number of bends in the system also affects its performance. There should not be more than three;
- It is prohibited to rigidly fix the pipe where it passes through the ceiling. The connection must not interfere with the linear expansion of the heated structure.
General rules and location selection
How to route a stove pipe through a wooden ceiling - this must be done so that there are no problems, as in the photo. The main task of the preparatory stage is to determine the location of the stove installation and the installation of the chimney to the street. Depending on the materials of the floor slabs and chimney pipes, work will need to be done taking into account several sizes:
- the maximum distance from the ridge to the pipe canopy is 1000 mm, and the minimum protrusion is 350 mm;
- distance to wooden wall surfaces – at least 250 mm;
- length of the horizontal section of the chimney up to 1000 mm;
- When choosing a passage location, take into account the passage of the pipe through the roof structure. This place should be located between the rafters;
- When passing steel pipelines through wooden slabs, finishing elements and roof structures, we must use homemade, industrial boxes or couplings with an internal layer of thermal insulation.
Stages of installing a ceiling cut for a bath
The main two tasks that a builder must perform when laying a sandwich pipe through the floors and roof are protecting the floor from fire (insulation) and ensuring the normal structure of the pipe. Let's consider the three main stages of arranging the ceiling trim for a bath structure:
- First of all, it is necessary to determine and prepare the place where the hole for wiring the sandwich chimney will be made.
- installation of a protective unit.
- At the end we install thermal insulation material.
What is it used for?
PPU is designed for pipe passage through wall and ceiling ceilings; it is a round or square box with a hole. The main task is to ensure the protection of wooden floors from overheating, since during operation the temperature of the external contour of the chimney increases and heats objects in the immediate vicinity.
Such a device can be purchased in specialized stores or assembled with your own hands. When choosing a finished product, it is necessary to take into account the diameter of the chimney, as well as the location of the stove and ceilings.
For thermal insulation of the unit, basalt cotton wool rolls with a foil screen, which can be used at high temperatures, are perfect.
Preparing the area for ceiling cutting
The central point at which the sandwich pipe will be installed is found using a plumb line. The location that has been chosen for the passage of the pipe is marked, and then a hole is made. If it is made with your own hands, it is recommended to decorate it from the side of the steam room to preserve aesthetics. To do this, you can use a stainless steel or galvanized sheet. The size of the sheet should be larger than the size of the hole for the chimney.
The hole for the chimney should be slightly wider than the pipe that will pass through it
When preparing the site, you should pay attention to several important points:
- When installing a sandwich structure vertically, it is worth remembering that the holes are marked first at the top point, and then at the bottom points. That is, first of all, markings must be carried out on the roof. When marking, be sure to use a plumb line to determine the center;
- when using production models of units, it is recommended to carefully study the instructions, which usually indicate tips and preferences for installing a specific model of ceiling cutting;
- Do-it-yourself ceiling passage units for chimneys are made using stainless steel sheets. The hole in the sheet is 1–2 mm larger than the sandwich pipe.
Helpful information! The ideal option is when the location of the heating equipment and chimney structure is calculated at the very beginning when creating a construction project. In this case, you can calculate the installation of beams in advance and provide the necessary distance between them for installing a sandwich chimney.
If the installation of the chimney will be carried out in an already finished building, then it is considered necessary to make changes to the design of the ceiling above the stove. Part of the beam (closest to the chimney) is cut out and reinforced with special jumpers.
Modern chimneys
However, thanks to the achievements of modern technological progress, it was possible to solve this rather difficult problem by using such an acid-resistant material as stainless steel.
Due to the low fire resistance of wood, it is considered optimal for wooden houses to install chimneys made of sandwich pipes, since such elements have low thermal conductivity, which completely eliminates the possibility of fires.
Let's face it, the use of sandwich pipes for arranging outlet channels is the best material option for forming such structures.
Sandwich pipes are elements consisting of two pipes inserted into one another and an insulating layer located between them, which is most often basalt fiber, which has low thermal conductivity and high resistance to temperature influences.
If the chimney is formed from several elements, then the joints of the pipes are fastened with a special locking connection and additionally treated with a heat-resistant sealant.
The thermal insulation layer can have a thickness from 2.5 to 6 cm. The outer pipe can be made of steel or galvanized iron, a more expensive option is brass or copper.
The installation of a chimney in wooden houses is carried out in strict accordance with the design documentation. The chimney pipe is installed strictly vertically, but its deviation from the axis by no more than 30° is permissible. The minimum height of the chimney above the ridge should not be less than 50 cm, and the element should be located at some distance from the ridge purlin.
When installing a coaxial chimney, it is recommended to replace the part of the wall where the hole will be formed with any fire-resistant material, for example, foam concrete
Particular attention should be paid to the wooden wall next to which the pipe will be installed
If the distance between it and the pipe is less than 60 cm, it is enough to treat its surface with fire retardants.
If this distance is less than 60 cm, then it is recommended to plaster the wall surface or line it with metal sheets or ceramic tiles to reduce the possibility of its ignition.
Stages of installation of a finished pass-through unit
Today, there are pass-through units with a round or rectangular cross-section on sale. Installation of such a unit is carried out in stages. Let's consider the main stages of arranging the ceiling trim:
- First of all, the ends of the holes made in the ceiling are covered with a layer of heat-insulating material.
- Next, you need to cover the bottom sheet of the passage box with insulation, as well as all places that come into contact with the ceiling. The insulator can be foiled basalt cardboard or mineralite.
- Then a pipe is passed into the passage unit, and the structure is brought to the hole made in the ceiling. The structure is fixed with special screws in the right places. As a rule, units are sold with ready-made holes for self-tapping screws, which simplifies installation.
- The cross-sectional indicator of the opening of the passage unit must be larger than that of the sandwich chimney. A tight fit of the pipe to the passage unit is not recommended. It is desirable that there is a gap of at least 5 mm from the wall of the unit pipe to the wall of the sandwich chimney. If necessary, you can insulate the gap using a special asbestos cord.
- The insulation is then carried out from the attic side. After this, the box is filled with expanded clay or any other heat-insulating material.
- After the pipe has been installed, you can decorate the cutting unit in the attic (if necessary).
The cutting unit in the attic is arranged in the same way as on the ceiling
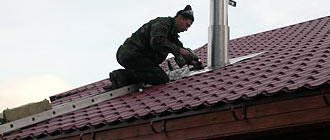
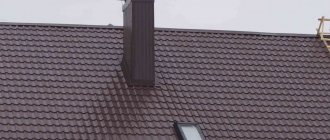
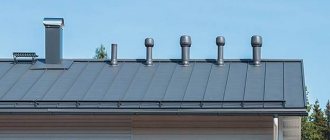
Chimney on a metal roof
Bypassing a chimney with metal tiles is a complex process. It does not bend like ondulin and is difficult to install hermetically.
Sealing includes the following steps:
- Roof waterproofing is installed on the side walls of the pipe
- Behind the pipe, at a distance of 80 cm, a gutter is built into the waterproofing material to drain moisture
- A box is installed in the roof and the chimney is removed
- A groove is made for the wall profile
- Set up a profile. The process is described above
- Set language
- The roof is covered with metal tiles. Around the pipe it should overlap the profile and the tiles that flow around the pipe
- Install the apron. For metal tiles they are made smooth. It should be secured to the protrusions of the coating with self-tapping screws.
Installation of passages for two-story buildings
If the building is two-story, then in this case, after installation on the first floor, it is necessary to work on the second. How to install a sandwich pipe through the second floor? Let's consider the main points of wiring a sandwich chimney through the second floor:
- As a rule, the second floor of the baths is equipped as a rest room. Also, laying a sandwich chimney can take place in a private house. In such cases, a transition is made from a sandwich pipe to a single-wall pipe. This is done so that the heat from the chimney spreads and warms the rooms. The transition to a single-wall pipe should be carried out at a height of 1 m from the floor of the second floor.
- In front of the attic passage unit, a transition is made back to the sandwich pipe.
- The attic passage unit is installed in the same way as the previous one.
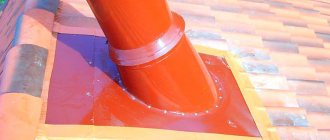
Note! It is strictly forbidden to seal the joints of the chimney waterproofing apron using ordinary construction silicone. For these purposes you need to use a special sealant.
- It is necessary to route the chimney through the waterproofing coating and the roof. It is imperative to carry out thermal insulation and install a protective apron, which will serve as waterproofing for the chimney sandwich. Homemade aprons and heat-resistant sealant may be suitable for these purposes.
Waterproofing after running the pipe through the roof is necessary to ensure that moisture does not penetrate into the attic and does not flow down the structure. When passing a sandwich pipe through the roof, it is also necessary to comply with the standards described in SNiP.
Waterproofing a chimney on the roof
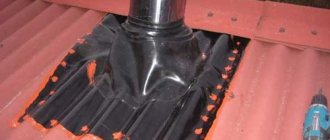
When making a passage through the roof, it is important to comply with SNiP standards. A gap should be left between the roof elements and the chimney, the size of which is regulated by documents. At the point of passage through the roof, a box (wooden or galvanized metal) is usually installed, in which all the free space around the pipe is filled with non-combustible material - stone or glass wool
At the point of passage through the roof, a box (wooden or galvanized metal) is usually installed, in which all the free space around the pipe is filled with non-combustible material - stone or glass wool.
Sealing a chimney on the roof can be done using improvised means or using standardized elements. Around the chimney you should make a so-called collar, or flashing - a trim made of strips of metal, about 40 cm wide, in accordance with the dimensions of the pipe. The bend angle of the steel strips must correspond to the angle of passage of the chimney pipe through the roof. To calculate the length of the section, you need to take into account
:
- slope angle;
- chimney dimensions;
- chimney finishing type.
If the flashings are made of galvanized sheets, then they are interconnected with an overlay and soldered. Elements made of sheet steel are connected by a double standing seam. The rebated seam connection is used to seal the passageway on roofs made of corrugated slabs and tiles. If the roof slope angle is more than 30 degrees, a special beam should be installed behind the chimney - a “bumper”, which will protect the pipe from rainwater flows and excessive snow pressure in winter
.
A protective elastic apron for a chimney can be made
:
- from flexible metal tape (lead or aluminum);
- made of galvanized metal with polymer coating.
The apron is installed around the pipe in two layers around the entire perimeter. The bottom layer of the apron is placed under the roofing, and the top layer is mounted on top of the roofing material. To cover the top layer of the apron, a waterproofing film and metal profiles are used.
The top curved edge of each apron should fit into a groove cut around the perimeter of the chimney. After installing the edge into the groove, the joint is filled with polymer sealant or silicone for roofing.
Ready solutions
Sealing a chimney on the roof is a rather complex task, the quality of the solution of which determines the reliability of the thermal and waterproofing of the roof. You can make the passage assembly yourself, using various materials and special strips, or mount a ready-made structure, which includes a wide protective apron.
Ready-made roof cutting on the construction market is presented in many versions - models differ in material and manufacturing method, as well as the angle of inclination of the element that protects the place where the pipe passes through the roofing pie from water. The angle of inclination can be from 15 to 55 degrees, therefore, the cutting of the chimney on the roof is designed for the most common slope options.
To install such a structure, a hole of appropriate dimensions is made in the roofing pie. A seal made of rubber is attached to the outside of the structure using silicone. The distance between the pipe and the collection passage is filled with non-combustible insulation. The roofing penetration covers the passage unit, after which the penetration can be attached to the roof with self-tapping screws. To ensure a tight connection, it is recommended to use a sealant.
When choosing the option of how to seal a chimney on the roof, you can use other ready-made solutions, for example, Master flash roofing penetrations.
https://youtube.com/watch?v=rL-_Irakk4s
Types of polyurethane foam
On the modern market you can find various chimney passages. The most common forms are:
- square,
- round.
It is easy to make such a device yourself if you have the skills to work with simple tools. The material can be stainless steel sheet, and basalt or expanded clay can be used as thermal insulation.
Our production
Single wall chimneys
Double wall chimneys
Mounting elements
If you decide to use a homemade pass-through unit, you should strictly adhere to the established rules to simplify further installation and ensure all standards. Below in the section we will tell you how to install it yourself.
Other ways to avoid severe overheating
As some private property owners note, there is no point in thermally insulating the passageway. In their humble opinion, you can do without it. In addition, if the space is not filled with anything, this will prevent overheating and burning of a certain part of the chimney. And due to the ventilation created in this place, the pipe section will cool down noticeably faster.
In reality, this option for organizing a ceiling-passage assembly can be successfully challenged. The thing is that a hot pipe emits heat, which causes the nearby wood to dry out, which ultimately does not benefit the material. Fire can occur even at lower temperatures (+ 50°C). Therefore, it is necessary to take care of the necessary measures, for which you can resort to several methods:
- Installation of a water jacket on the chimney - the heated liquid can be used for heating. You just need to install a special tank and remove water from the pipes.
- You can simply install just one container where the water will be heated. You just need to make sure that it does not boil, and also periodically drain and add liquid.
Ultimately, the temperature in the chimney can be significantly reduced, as well as the risk of fire in building materials.
In addition to water, you can resort to air cooling of the ceiling-passage unit. To do this, you need to place another pipe on top of the chimney (so that one is in the other). And in their upper and lower parts you should put a grille for the passage of air flow.
Preparation for installation work
Installation may vary depending on the chosen design, the diameter of the pipe and the material from which it is made.
Before you begin installation, you must complete the following work:
- Cut a square measuring 1.0 x 1.0 m or 0.5 x 0.5 m in the ceiling or wall (if the rafters run close to the planned pipe, you can make an additional box from wood, sheathe the inside with mineralite. Attach the box itself to the joists and then attach polyurethane foam to it ).
- Line the inside of the passage with mineralite slabs.
- Prepare a diameter hole in the ceiling. All flammable roof elements located in close proximity to the furnace equipment are insulated using non-combustible objects.
Often wooden surfaces are coated with special compounds that prevent ignition. However, no heat-resistant paint will protect wooden floors from fire; the service life of such paint is a maximum of 1 year.
Drywall box
In this case, the instructions for installing the ceiling-passage unit look the same as with a metal box, with the exception that other materials are used. The procedure itself looks like this:
- It is necessary to make a square hole in the ceiling. In this case, the distance from the walls of the ceiling to the surface of the pipe must be at least 200-250 mm.
- Using heat-resistant plasterboard, make a high box. It will cover the pipe from blocking.
- On the ceiling side, a metal sheet with a circle in the middle (in accordance with the diameter of the chimney) is also fixed to the hole made.
- A metal pipe is pushed through the sheet.
- In the interfloor ceiling, a heat insulator is laid around the entire perimeter and along the entire height of the box.
As noted earlier, when installing a ceiling-passage assembly, expanded clay and other materials can be used instead of mineral wool.
Using basalt wool
Basalt wool can be used as a heat insulator, but before purchasing you need to make sure that it can withstand high temperatures (more than 600 °C). Many experts tend to agree that this is not the best option. And there is a certain explanation for this.
The fact is that during the manufacture of this insulation, resins are used as a binder, which, when exposed to high temperatures, begin to release formaldehyde.
In addition, after attaching the ceiling-passage assembly, condensation sometimes forms in the chimney, and when moisture interacts with mineral wool, it loses its heat-protective properties. These qualities can be restored as moisture evaporates, but only partially.
Organization of passage
In most cases, a special sandwich pipe is used to construct chimneys. It is a structure of two pipes of different diameters, nested one inside the other. Between them, non-flammable heat-insulating material is laid. The outer shell is made of thin metal, and the inner part is made of thicker steel.
The passage through the ceiling of such a sandwich chimney is carried out in the same way as a regular pipe. Perhaps there will be a little less work on arranging the passageway. You can use either a ready-made solution already made at the factory or assemble the required unit yourself.
In any case, it is necessary to first prepare the place where the entire device will be installed. A square hole is cut in the ceiling, with a side of about 45 centimeters. This size is large enough to fit a standard chimney through.
The ceiling assembly itself for the passage must be lined outside and inside with a heat insulator capable of withstanding high temperatures. The most popular for such purposes is special basalt wool.
According to the size of the square part of the assembly, approximate lines are drawn on the ceiling. The opening should be located strictly above the stove pipe. The hole itself is cut out slightly smaller than the connecting square plate. It is necessary to leave such a gap so that it is possible to attach it to the ceiling with self-tapping screws. The finished opening is lined with the same heat-insulating material as the passage unit.
The finished assembly must be inserted into this hole to check all connections. Before bringing the chimney through the ceiling and finally securing it, you need to make sure that the pipe is vertical and that it is located exactly in the center of the opening.
If you look from the top floor or attic, you can see that there are voids in the passageway. They are filled with non-flammable heat insulator. You can use expanded clay, clay or leftover basalt wool. The main thing is to fill the void very tightly.
To have a more complete idea of what the entire assembly looks like in section and what the passage for the chimney through the ceiling looks like, you can look at the drawing below.
The diagram shows the main elements of the chimney and passage unit, as well as parts of the ceiling through which the passage was made. The pipe is passed through the roof in a similar way. The only difference will be the hole in the square metal plate - it will not be round, but oval, since it will be located at an angle.
Selection of material for thermal insulation
There are several types of thermal insulation materials for any occasion. Let's look at the most popular of them.
- Technical basalt wool is used most often. Obtained by melting certain rocks. In addition to low thermal conductivity, it also retains moisture and can withstand high temperatures from 700° to 900°.
- Kaolin wool is produced by melting silicon oxide materials at a temperature of 1750°. It has a low thermal conductivity coefficient and does not melt or crumble at high temperatures. Maximum temperature of use is 1100-1250°. It has a long service life and can withstand many starts and cool-downs without losing its qualities.
- Construction basalt wool is obtained by melting mica. The operating temperature of such thermal insulation is 400-450°.
If you find it difficult to choose, it is recommended to order mineral wool. Since such a product is time-tested, universal in use and widely available on sale.
In this article we looked at how to make a passage unit for a chimney through the roof and other slabs. Any person skilled in handling hand tools can do this. To do this, take the time to familiarize yourself with all the rules and strictly follow all the points specified in the instructions.
If you are not confident in your abilities or want to save time, then it is better for you to seek help from a professional who has extensive experience in this field.
Self-production of the adapter assembly
It is not necessary to buy a finished product if you want to do everything yourself. The design will remain virtually unchanged. It is also necessary to cut a square hole in the ceiling.
The next stage is the preparation of a plate of non-combustible material, which will be attached from the inside of the room. A round hole is cut in it, equal to the outer diameter of the sandwich pipe.
The inner surface of the cut opening is lined with heat insulation and sewn up with metal strips. A sandwich pipe is passed through it, with a prepared mounting plate put on it. It must be securely fixed in the opening with spacers made of a material that can withstand high temperatures and does not burn.
Between the mounting plate and the ceiling plane, a sheet heat insulator is often laid to prevent heating. This is not the most mandatory measure, but such a precaution certainly won’t make things worse.
From the side of the upper room, the void in the ceiling is filled with a heat insulator. As in the previous case, it can be expanded clay, clay or special basalt wool. Some people use sand, but it’s better not to do this - its thermal conductivity is higher than even expanded clay, and its loose structure will lead to the fact that sooner or later it will start to fall out.
You can also read about how to close the chimney passage on the ceiling in this article.
This material provides only general information on how to install a sandwich chimney through the ceiling. There are also more technically complex designs. However, the general principles of ensuring fire safety and efficient operation of the chimney will not change.
Self-construction of chimneys
The technology for installing a smoke duct has much in common with the installation of a conventional air duct. The difference lies in the presence of more stringent requirements for the operation of the chimney. Therefore, the process of arranging pipes for furnaces requires accurate calculations, selection of building materials, fasteners, refractory putties and other things.
Modular pipe
In the case where the chimney is planned to be laid in the wall of the house, this nuance should be taken into account at the stage of wall construction, otherwise the hole will need to be punched using a jackhammer. It is possible to install a stove duct in an already equipped ventilation duct, but as a result, the fire safety of the smoke exhaust structure will significantly deteriorate.
To implement a hidden pipe scheme, you need to use the services of an experienced architect, since during the operation of the furnace, temperature deformations are possible - the dimensions of the channel increase from the influence of hot gas, thereby exposing the walls to destructive processes.
Chimney sections inside load-bearing structures can be constructed from multilayer blocks. They are placed over the entire surface of the wall, using a temperature-resistant adhesive for fixation. This material is able to level out thermal deformations, thanks to damper gaskets, and thereby ensure the integrity of the building.
The main advantage of this design is that there is no need to insulate the pipe on the roof of the house - the channel will go outside above the roof level inside the gable.
Mounted steel chimney
Installing steel chimneys does not require special skills or a lot of time, so they are often preferred by homeowners, and such structures are relatively inexpensive.
It should be taken into account that:
- Any metal pipe must consist of at least two parts and must be disassembled accordingly. After a few years, the first section burns out from high temperatures, not the entire structure will need to be replaced, but only a section of it.
- Where the chimney will be brought out through the roof and wall, fire-resistant insulation is laid, otherwise the building may catch fire.
- The section of the pipe located in an unheated room must be properly insulated so that cold air masses do not cool the gas and thereby affect the performance of the heating unit. As a result, condensate will not collect on the surface of the pipe and it will not rust.
- It is imperative to waterproof metal pipes using non-combustible materials.
Install the metal shell structure in stages:
- The first elbow is placed on the screen pipe or on the outlet of the furnace air duct.
- The second ring is brought out through the attic into the room and fixed on a fire-resistant spacer.
- Connect both knees.
- The third segment is led out into the attic through a through opening in the roof. The place where the pipe exits to the street is covered with a spherical casing.
Root brick pipe
This type of brick stove chimney will last for many years. The main pipe is installed on a foundation, which is laid separately during the construction of the basement floor.
The installation technology of this chimney is more complex than that of a mounted metal structure. The fact is that the main pipe must withstand the longitudinal load from the weight of the entire unit, so it is laid out from baked bricks.
Features of the structure:
- To build a chimney channel, leave a hole the size of a brick or half a brick. To lay one layer, 4-6 bricks will be enough.
- The layers are laid out so that the bottom joining seam of the row is under the whole brick.
- Before the chimney pipe is brought out through the roof, a special module is made in the place where it passes through the ceiling to shift the axis of the section piercing the roof relative to the axis of the part of the chimney located in the room.
The design of this type is complex, and it is installed when there are no other options.
External chimney
A pipe mounted from metal or asbestos-cement modules is installed along the facade of the building, moving in the direction from bottom to top.
External structures have the following features:
- in the place where the pipe enters the building, a hole is made, through which a horizontal segment of the chimney is then brought out;
- the junction of the horizontal and vertical sections is designed in the form of a tee, one part of which is closed with a plug. This element is used when cleaning the chimney;
- the pipe is attached to the facade using detachable metal clamps. The lower part of the chimney is strengthened with a superstructure specially erected on a separate foundation.