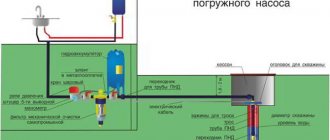
In individual water supply, the main sources of water are wells and boreholes; drilling the latter is more profitable from a financial point of view and has no alternatives when the aquifer is located at a large depth. The main problem of well sources is silting during long periods of inactivity or over time; to free the bottom from silty contaminants from a mixture of sand and clay, a well-made bailer is often used to clean the well.
There are several options for making a bailer; this may require household power tools and a welding machine, as well as some plumbing and welding skills. Some homeowners use a self-made bailer to drill shallow wells on their property in order to save money or in cases where access to special drilling equipment on private territory is impossible.
Working with a bailer
Bailer design
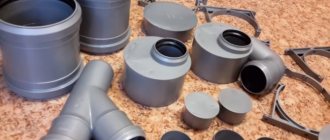
A bailer is a piece of pipe up to 4 meters long. A shoe with a valve is installed at the bottom of it. In large-sized shells, flat valves are installed, cut from a steel sheet with a rubber seal, strips of leather, sometimes without a seal. Those that are smaller in size and diameter use ball valves. These devices are also called mechanical bailers - they work due to gravity.
This is a homemade bailer with a flat valve - one of the options for its design
Through a window in the upper part of the body, rocks are removed, which are stuffed there during drilling of a well or its cleaning. When drilling viscous rocks - clay or loam, you have to make the window long and narrow - almost the entire length: it is very difficult to remove such a load through a small hole.
Flat valve designs for homemade bailers
A ball valve is easier to make. The diameter of the ball should be equal to approximately half the diameter of the pipe (a little more is possible). A washer is installed in the lower part, the internal diameter of which is smaller than the diameter of the existing ball. At a certain height inside the bailer (three or four radii of the ball), a limiter is welded - it prevents it from rising too high. If this is not done, most of the soil that gets inside may spill out (pouring out). This is due to the excessive time it takes for the weight to descend and close the hole in the bottom.
Design of a bailer with a ball valve
At the bottom of the pipe in both versions, fangs are sometimes welded or cut out, or the edge of the pipe is ground off, making it sharp. This breaks up the soil or silt better. But due to too high fangs, too little soil gets inside. When using a ball valve, the length of the fangs should be such that the ball does not protrude. The same picture - a small amount of soil collected at a time - can also be observed in bailers with a flat valve. In this case, reduce the depth of the shoe.
A too small internal hole in the washer installed on the bottom with a ball valve can lead to the same result. The solution is to squander it.
A loop or bracket is made in the upper part of the bailer, to which a cable or rope can be secured. Using this rope, the projectile is removed from the hole, and it is lowered back on it.
You might be interested in reading “How to make an antenna for a summer house with your own hands.”
Best tool
The most effective way to clean is with a bailer. This tool is used as a cleaning device and as a device for drilling wells located in loose sandy soils.
The device looks like a pipe with a cutting edge at the bottom and a valve located inside. The cutting edge is made slightly wider than the main body to make it easier to grip the ground. When taking soil or sand from the bottom of the well (when cleaning it), the valve is in the open position. The filled pipe is pulled up, and under the influence of gravity the valve slams shut, providing a secure grip. After this, the bailer can be pulled out by the cable attached to the top and the dirt can be poured onto the surface.
To operate in an aquifer, the valve must be equipped with rubber seals. In this case, it becomes possible to extract silt and liquid mud.
The cutting edge of the lower part is always attached to a shoe, which is screwed onto the main body using a thread or attached in some other way.
Standard dimensions of the device: height from 70 centimeters to 3 meters, diameter from 7 to 16.8 centimeters. The diameter is selected depending on the internal size of the well. For free movement, a gap of 2-3 centimeters is left between both diameters (devices and wells).
How does it work
The bailer is used when drilling loose, sedimentary and granular materials (pebbles, sand, gravel, etc.). It is also used when cleaning wells from silt or sand plugs to increase flow rate. In any case, the principle is the same: the projectile is dropped into the well. Under the influence of the impact force, the valve opens and a certain amount of soil falls inside. Usually there is not much of it. Therefore, they lift it up a little and drop it again. This is repeated until the entire inside of the pipe is filled.
Take out a full bailer, turn it upside down and pour out the soil. This is where the hole in the side comes in handy: it makes cleaning easier and you can reach the valve with your hand.
By sharply dropping the bailer into the well, soil is collected into it. The valve prevents him from falling back asleep
This technology is called shock-rope technology (it’s clear why). Both drilling and cleaning require repeating this operation many times. Just cleaning the well may require several days of work - from two or three to seven or eight, and even more for drilling.
The work is hard: if a piece of pipe one meter long is enough to clean a well, then for drilling using the shock-rope method the bailer is 2-4 meters long. Moreover, the heavier the projectile, the better: the soil is loosened and extracted more efficiently, and the well is drilled faster.
To make the work a little easier, set up a tripod and pass the rope through a pulley system. This installation, even without a drive, makes the job much easier.
Tripod for bailer
Sometimes a homemade bailer is not heavy enough: the impact force is insignificant and the work proceeds slowly. In this case, weighting is required. There are several ways to weight it:
- Fill the top of the pipe with concrete.
- Attach a weight in front of the bailer (as in the photo above). Just teach that the connection should be strong, but movable.
- When making a bailer with your own hands, use a thick-walled pipe. If you find one with a wall thickness of 1 cm, no other methods of weighting will be needed: the projectile will be heavy.
Maintenance, operating tips
The following signs will indicate that it is time to seal:
- For some reason the well was not used for several months.
- The pump is missing air.
- Water contains impurities.
- After several minutes of running the tap, the water stream visually becomes thinner.
When starting to clean a working well, and this can happen every 3-4 months, be sure to make a visual assessment of its internal surface. The work may be complicated or made impossible by significant deformation of the shaft walls, loss of their integrity, or severe siltation.
Then the condition of the working equipment is checked: wear and strength of the cable, free (without jamming) operation of movable joints, reliability of fasteners. A tripod installed above the well with a block onto which the cable is placed will help make the work easier. The result is strictly vertical operation of the device, easy lifting through the block, especially with an additional winch used.
To ensure that a device torn off during operation does not create a serious problem and does not stop the process for an indefinite time, it is advisable to weld a pair of hooks to the pipe. They will come in handy for quickly removing it from the well in case of force majeure.
All work with the device ends with thorough cleaning of the internal cavity from soil. The square window at the top of the pipe will help make this faster and easier. For clayey or dense viscous soils, such a window is made along the length of the entire pipe.
It is advisable to store a clean and dried bailer in a dry utility room until the next use.
On moist, sandy, loose, soft soil, you can independently drill a well or make a diagnostic puncture using a device. If the soil structure does not meet the specified characteristics, the work is entrusted to specialists using professional equipment.
Tell us about your own experience gained while cleaning a well from silt and sand, share the nuances of the work known only to you. Please write comments in the block below. Ask questions about the topic of the article.
Sources: strmnt.com, aqua-guru.ru, mfc04.ru.
DIY bailer
If you have a welding machine and some skills in working with iron, you can make a bailer with your own hands in a few hours.
DIY bailer with a ball valve (without turning)
This version of the ball valve is assembled from spare parts that can be purchased in stores. A water pipe with a diameter of 89 mm was used for production. We also purchased a concentric adapter 89*57 mm, and a ball from a bearing with a diameter of 60 mm.
Everything you need to make a bailer with a ball valve
The ball fits perfectly inside the adapter and gets stuck there. But it doesn't fit tightly. To make everything fit better, the inner surface of the adapter is sanded - it fits almost perfectly.
This is what everything looks like half assembled. Below on the right is a photograph of a ball in the transition - this is how it will be inside
The narrow part of the transition is inserted into the pipe and welded. The ball is thrown inside, a stopper is welded. And the final touch is to make an attachment for the cable or twine. That's it, the do-it-yourself bailer is ready.
You may be interested in reading about how to purify water from a well.
How to make a bailer yourself at home
If you need to clean a well, but you don’t have sheet metal or welding tools for serious work on hand, there is a solution: a bailer with a valve made from a plastic bottle.
Homemade bailer with a valve from a plastic bottle
This option is suitable for cleaning a well, but not for drilling. You need a bolt, the length of which is slightly longer than the diameter of the pipe for the bailer, and a nut. Having retreated two or three centimeters from the edge of the pipe, one opposite the other, two holes are drilled. Their diameter coincides with the diameter of the bolt.
The valve is cut out of plastic. It is an ellipse. The smaller diameter of the ellipse is equal to the diameter of the pipe. You need to cut it very precisely so that when inserted inside it fits snugly against the walls. The cut valve in the middle will be attached to the bolt; for this, four holes are made in the plastic through which the wire is threaded. How it all comes together is shown in the photo below on the left.
Only such a fastening, as in the photo above, is very unreliable. After a few hits, your projectile may come off, and you will have to figure out how to get the bailer out of the hole. The best fastening option is one-piece, without seams or twists. How to do this will become clear if you watch the video. By the way, there is an important thing there - how to make hooks so that, if necessary, you can pull the bailer out of the well.
Read about organizing autonomous water supply from a borehole or well here.
Operating principle and device
Any bailer is a hollow pipe, at one end of which a check valve is installed, and the other side has holes or ears for attaching the cable. There are two main versions of the valve: in the form of metal valves and a ball. In a design with plates, a transverse pulley is installed in the center inside the pipe, on which two petals are attached, blocking the passage channel.
When the device is lowered into the borehole, pressure from the liquid fractions of sand and clay is applied to the valves, and they rise upward, while the internal space is filled with a mud mass. When rising upward, the sedimentary rock puts pressure on the plates, they fall down, blocking the passage channel and preventing dirt from escaping out. After curing, the pipe is turned over and freed from dirt by pouring it onto the area or into a container, then the lowering operation is repeated again.
The second popular design option for a bailer is placing a ball inside the pipe cavity, which plays the role of a check valve. In this design, one end of the pipe is rolled, a metal ring is welded on the outside or inside, which reduces the flow area of the channel, and a lightweight metal or polymer ball is placed inside. The principle of operation of the device is similar to the design with a damper - when lowered, the dirt squeezes out the ball, it rises up and the internal cylindrical cavity is filled. When lifting the pipe, the ball lowers, blocks the outlet, preventing the flow of dirt back into the shaft, then on the surface the device is freed from the raised sediment, and the excavation process is repeated.
Design and installation of bailers
Features of use on different types of soils
When drilling sandy soils with a bailer, it is necessary to use casing pipes - without them the well will fail. When drilling in such soils, you need to ensure that the projectile does not go deeper into the sand without a casing pipe for more than half its length. This can lead to a collapse, the bailer will fall asleep, and you will not be able to pull it out.
To make it easier to pass sand, water is poured into the well, it prevents landslides and makes work easier. If during work the sand is compacted and not grabbed, use a chisel.
They work with quicksand sands only by constantly deepening the casing pipes. Moreover, only if the aquifer is located below the quicksand layer, otherwise the well may turn out to be inoperative.
To pass quicksand, a bailer of at least 2 meters long is used. It should have a flat, well-fitting valve with a leather sealing gasket. You need at least two people to work: when pulling the bailer out of the quicksand, you need to turn the casing pipe, lowering it down. The faster the casing is lowered at this moment, the faster this layer will be passed. At first the casing is lowered easily, then it becomes more and more difficult. Sometimes there comes a time when they stop moving completely. In this case, almost the entire pipe is filled with sand. In this case, the pipes are lowered under pressure. To do this, a platform is installed on the pipe on which a load (sandbags) is placed. And all this happens together. Usually this method is quite effective.
https://youtu.be/0N_KOvdK2xU
When passing through pebble and gravel layers, a chisel is used in conjunction with a bailer . First, a chisel is lowered into the shaft, crushing the rock, then it is removed with a bailer. The bailer on such soils rises only 5-10 cm, the blows are small and frequent.
For faster passage, a platform is made on the casing pipe, the worker does not stand on it. It is located above the well, gradually raising and lowering the bailer. As the soil is collected, the casing pipe is lowered under the weight of the worker.
In viscous clay soils it is possible to work without casing pipes. If the clay is too dense, first they also use a chisel, loosening the soil by about 50-70 cm. Then it is removed with a bailer. A flat valve with a rubber or leather seal is also used.
If the clay is dry and dense, each time you pull out the bailer, pour several buckets of water into the well. Once water appears from the aquifer, there is no need to add it from above.
If the rocks are very soft, sometimes the valve is removed. And they drill only with the pipe itself, raising it 2-3 meters above the bottom and dropping it.
Gelonding scheme with pump
It is very difficult to remove the bailer to clean the well, even with the help of a winch. A significant amount of time is spent not on working in the well, but on raising, cleaning and lowering the bailer. A small upgrade will optimize the operation of the device. The reverse side of the pipe body should be tightly welded.
An outlet is made from it and a special fitting intended for the outlet hose is placed there. A pump is connected to the hose, which is designed to pump liquids with significant mechanical contamination.
This scheme allows you to avoid constantly raising the bailer to the surface and lowering it again.
In this case, contaminants from the bailer chamber will be removed using a pump. The bailer, equipped with a pump, simply needs to be raised and lowered to loosen and move the contaminated liquid into the chamber.
This cleaning method is effective in cases of heavy siltation or sand accumulation. For regular well cleaning, a bailer without a pump is suitable.
Image gallery
Photo from
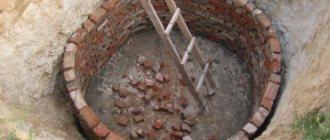
Digging a pit before drilling
Drilling the first meters with a bailer
Homemade drilling rig
Winch in bailer drilling
Pipe for making the body
The basis of the tool is a metal pipe. Its diameter depends on the internal size of the casing, since the space between their walls must be at least 2 cm. A wide gap will affect drilling productivity, and if the gap is tight, the cylinder will damage the well. To calculate the outer diameter of the bailer, it is necessary to subtract 40 mm from the internal cross-section of the casing structure.
The length of the drilling tool can range from 60 to 150 cm. The most acceptable value is 80 cm. A short pipe will scratch the lining of the shaft, and a long product will be difficult to move when the chamber is full.
The weight of the bailer is determined by the thickness of the pipe walls, which can be about 2-4 mm.
Useful recommendations from experts
If the depth of the water exceeds the length of the drill, then it can be extended by joining another pipe on top. They can be joined using a threaded coupling or a welding connection. When using small diameter pipes, bolts or cotter pins can be used. However, such a connection is not very reliable, and with a large rotational force, the bolt can be sheared and the rods will become disconnected. Getting the drill remaining in the well can be very problematic.
Before starting to design the device, it is recommended to draw up a drawing of the drill for the well. This will give you the opportunity to have a visual example of what should come out in the end. Attempting to create a drilling mechanism using the “scientific poke” method is more exciting for some home craftsmen, but takes too much time and effort.
An easier manual version of drilling a well is using a bailer bit. Raising and releasing the impact tool requires less force than rotating a buried drill. In addition, even one person can drill using the percussion method. True, this method is very long, and the work can drag on for several days.
If you cannot lift the auger drill out of the well yourself, you can make the task easier by building a device for the lever. For example, placing a barrel next to it and throwing a block over it. Tie one edge of the block to the drill, and apply physical force to the other edge.
Helpful2Not Helpful
Well cleaning with this unit
Do-it-yourself cleaning of a well with a bailer is carried out as follows. The body of the product is attached to a cord of sufficient strength or to a steel cable and slowly lowers to the bottom of the well. After this, you need to pull the cable to lift the tool above the bottom by 50 cm. Then everything sharply drops down to the very bottom. Due to the water hammer, the ball inside the tool rises up the pipe and opens the hole at the bottom of the structure. Through this hole, water, silt and sand enter the instrument. You will have to lower and raise the working tool several times. After this, the device slowly rises out without jerking and is thoroughly cleaned.
Well cleaning is repeated until the silt and sand are completely removed. The sand is removed through a specially made window in the side wall of the device. It also removes rust residues from the pipe walls and small stones from the bottom.
Plastic bottle valve
A suitable plate can be made using a plastic container.
- To do this, you need to cut an ellipse from its wall with sides of, for example, 90 and 70 mm. The smaller number must be equal to the internal diameter of the projectile.
- Then insert two wire rings - 6-8 mm - into the middle part of the oval.
- Next, drill a couple of parallel holes in the pipe.
- Well, then slightly bend the petal, carefully push it inside the body and secure it with a bolt with the appropriate double radius, passing it through the seats.