A well at the dacha will provide the owners with water. However, ordering production from a drilling organization, frankly speaking, is not affordable for everyone. Owners of country plots who want to minimize the costs of developing their own source have a choice - hydrodrilling. Not everyone is familiar with this technology, do you agree? Those who are interested in it should first understand the methodology.
We will tell interested home craftsmen in detail how to do hydraulic drilling of wells with your own hands. We thoroughly outline the technological subtleties and list the nuances of preparing and carrying out work. Using the information we have carefully checked and presented, you will cope with the difficult drilling process without the slightest difficulty.
In addition to a scrupulous presentation of hydraulic drilling technology, the author of the article describes the specifics of arranging a site for carrying out independent drilling operations. Provides data on the required drilling rig, tools and accessories. Informative photos and video tutorials will provide significant assistance in mastering a complex issue.
How to make hydroponics from pipes?
Homemade hydroponic installations can come in completely different modifications. It can be:
- multi-stage structures designed for several dozen pots;
- looped, allowing you to grow plants around the perimeter of the greenhouse or create small flower beds for 4-6 sprouts;
- straight-line installations, the easiest to assemble and operate. The length of such beds depends solely on the capabilities of the room.
Depending on the goals set and the selected modification of the hydroponic installation, the set of parts will vary. For example, when assembling a looped structure, you cannot do without tees and corners. Whereas for a linear installation, the necessary parts are limited to a straight sewer pipe of suitable diameter and a pair of plugs.
Preparation of materials
After choosing a model, you can begin searching for materials. Let's consider the assembly of the second and most universal option. If desired, this type of hydroponic installation can be converted into a multi-tiered one or simplified to a linear one by removing the corner joints. For this modification you will need the following elements:
- PVC corners 900 – 4 pcs;
- PVC tees – 4 pcs;
- Plastic sewer pipes:
- Gaskets (seals);
- Stub;
- Plastic pots for indoor flowers;
- Aquarium compressor;
- Tubes for an aquarium compressor;
- Air spray nozzles;
- Tees for oxygen tubes.
The seals do their job well, but in some situations you may need a sealant (silicone) to seal the joints. It is also useful for attaching tubes. In addition, for assembly you need a drill (if you don’t have one, you can make holes in the plastic with a hardened nail), and a hacksaw.
Assembly of the structure
If you have all the necessary materials, assembling the structure will take no more than an hour. Let's look at it step by step:
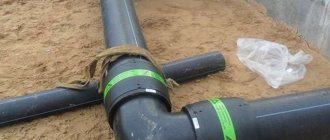
- First you need to saw off the middle drain from 3 of the 4 tees. These are future holes for pots of seedlings. In our version there will be three of them. If it is necessary to increase the number of plants, straight sections are inserted between the tees, in which round holes of the appropriate diameter are cut out.
- Seals are inserted into individual parts of the structure. Then all the parts are closed using corners.
- The side of the flower pots is perforated and inserted into the prepared holes. The pots should be the same size as the holes in the pipe and fit snugly into place.
The basis of the hydroponic installation is now ready. To prevent water from stagnating and the root system from rotting, the assembled installation must be equipped with a pump, which will drive water through the pipes, saturating it with oxygen. Or design a special aeration. The second option is no less effective, and at the same time more accessible for home use. Let's start installation:
- We cover the remaining 4 tees with a plug and make two holes in it: one for the air tube, the second for the float.
- We pass a transparent tube into the hole and stretch it along the entire length of the structure.
- Near the holes for the pots in the tube we make a small cut and attach the tee.
- We put a small piece of tube on the tee, at the other end of which a foam sprayer is installed.
- We fix the sprayer with silicone as close to the pots as possible.
- We put the free end of the tube on the outlet of the compressor.
All that remains is to make a float that will indicate the water level. It is made from improvised materials. To do this you will need a piece of foam and a long thin rod. Marks are applied to the rod and it is brought out into the second hole of the plug.
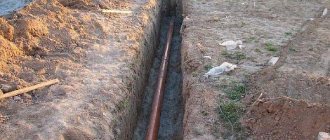
Site preparation
Preparing a site for a future well begins with leveling it. Then a supply of water is provided. This will require large volume containers (up to 20 m³) or a specially dug pit. To strengthen its walls, a clay solution or a moisture-resistant membrane is used, which must be carefully spread and secured. The amount of water required is determined by the composition of the soil, the required drilling depth and other indicators.
Small-sized installations must be installed strictly vertically. Its installation is not particularly difficult. In this case, be sure to follow the instructions. This will ensure trouble-free operation of the entire structure.
At a distance of 150 cm from the location of the future well, it is necessary to equip 2 pits - the main and filter. The first is located at a short distance from the MDR, the second is in close proximity to the drilling device. The pits are connected by a tray, groove or trench to move water. The main pit should have a volume of about 1 m³. The filter pit is slightly smaller.
The inlet hose from the hydraulic pump should be placed in the main pit. Another hose connects its outlet and the swivel. This will ensure the supply of drilling fluid to the well.
Drilling fluid is a solution for drilling made from water and clay with additional impurities. The specific composition of the liquid and its other properties are determined by the composition of the soil at the drilling site. Since the composition of the soil changes as the well gets deeper, the consistency and other technological characteristics of the drilling fluid must be periodically adjusted.
Do-it-yourself caisson for a well
As already mentioned, it is better to place pumping equipment for wells in a special pit rather than on the surface of the earth. To do this, the pit is concreted and insulated, or a caisson is installed in it.
This name refers to a special container made of metal or plastic in which the upper part of the well and the pipe that drains water to buildings are connected. At the same time, pumping equipment, a pressure tank (not always), electrical equipment and control devices are also located there.
Access to the caisson is provided by a hatch. Insulation of the structure is not necessary, but to prevent freezing in winter, the upper part (lid and “ceiling”) is provided with a layer of thermal insulation 50...100 mm thick. Additionally, the walls of the caisson can be insulated.
You can independently build a structure from concrete, brick, blocks (with careful waterproofing), or weld it from sheet metal. Plastic products are produced industrially.
Necessary equipment for work
The standard type of hydraulic drilling work is carried out using small-sized installations. For your own plot, this is a great solution and the best way to get water on your own.
It is necessary to supply working fluid into the wellbore with significant pressure, and for this a pump or motor pump for contaminated liquids is needed.
Sometimes, to increase the breakdown force, shot or coarse sand is added to the working solution. To crush large pebbles that may be found in sandy layers, roller-cone and cutter bits are useful.
If, when drilling wells or constructing wells, boulders or large pebbles were encountered in neighboring areas, the starting rod must be equipped with a reinforced drill bit. The tool must be secured to the rod so that it does not interfere with the supply of water to the barrel
Special small-sized MDU installations are most in demand among consumers for hydraulic drilling purposes. This is a unit with a height of 3 m and a diameter of 1 m.
This prefabricated structure includes:
- collapsible metal frame;
- drilling tool;
- winch;
- a motor that transmits force to the drill;
- swivel, part of the circuit for sliding fastening of parts;
- water motor pump to ensure pressure in the system;
- exploration or flap drill;
- drill rods for forming a column;
- hoses for supplying water to the swivel from the motor pump;
- Control block.
Among the necessary equipment, it is also desirable to have a current converter. It is needed to ensure that the energy supply to the process is stable. You also definitely need a winch for raising/lowering casing and set-up pipes.
When choosing a motor pump, it is better to choose a more powerful device, since heavy loads are expected. For hydraulic drilling, you will also need such plumbing tools as a pipe wrench, a hand clamp, and a transfer fork.
From the very beginning to the end of the work, the hydraulic drilling process involves a constant circulation of the working fluid. With the help of a pump, an aqueous suspension with eroded soil comes out of the well, enters directly into the pit and, after sedimentation of the suspension, is again supplied to the well.
In addition to this procedure, it is possible to carry out hydraulic drilling of shallow wells for water without using a pit. This method does not require a recess to settle the working solution, saves time and makes it possible to drill a well even in garages and basements.
If there is an abandoned pond near the site, then you can also do without installing sumps - pits. There are no special requirements for the quality of water supplied to the well.
For hydraulic drilling, a motor pump is selected that is capable of pumping heavily contaminated water. It is advisable to buy a unit with a head of 26 m, a pressure of 2.6 atm and a productivity of 20 m3/h.
A more powerful pump guarantees fast, trouble-free drilling and better well flushing
For quality drilling, it is important that there is always a good flow of water from the well.
The essence of technology
The soil-destroying device is a core drill (drill bit) - a special tool with carbide cutting parts or diamond inserts.
With its help, professional drillers quickly create holes of the required depth and diameter in the ground.
Core drilling of wells is carried out by craftsmen at high speeds of the main part, so the installation is subject to heavy load. To construct a crown - a durable and comfortable ring made of a steel billet - a hollow cylindrical piece with sharp cutters - hard alloys are used: tungsten, steel or diamonds will also win.
The crown moves strictly along the edge, and the rock from the inside remains untouched. After the working shaft is filled with soil, samples are periodically removed for examination from the core receiver and determining the geological section of the site.
The small diameter of the drill, up to 160 mm, allows you to overcome up to several hundred meters per shift, it all depends on the hardness of the rock.
After performing core drilling and studying the results, it is easy to begin auger drilling with complete extraction of the well contents.
What and how to do, work order
Now let's look at how to properly prepare everything for work. The first thing to do is to determine the place where the work will be carried out, calculate the approximate depth of the work, and then prepare the appropriate tool.
To create an Abyssinian well, you will have to go 15-20 m deep, and this is only possible in the absence of hard rocks and stones. You can carry out reconnaissance work and drill a place next to the future well with a special nozzle to make sure that the work can be carried out.
After the stage of choosing a location and preparing the equipment, the MDU is installed. A solution for flushing is made, and the casing pipe is prepared. Drilling is carried out, during which the casing is introduced. The technology allows this to be done without stopping work to extract waste soil.
As soon as the water layer has been detected, work stops and you can begin installing the well and disassembling the installation.
Types of water intake workings and soils
Before starting drilling work, you should study the composition of the soil on the site in order to at least roughly imagine your future well.
Depending on the characteristics of the aquifer, three types of wells are distinguished:
- Abyssinian well;
- filter well;
- artesian well.
The Abyssinian well (or needle well) can be installed almost everywhere. They break it where the aquifer lies relatively close to the surface and is confined to sand.
To drill it, they use driving technology, which is not suitable for constructing other types of wells. All work can usually be completed within one business day.
This diagram allows you to study the design features of various wells in order to better understand their drilling technology and choose the appropriate method (click to enlarge)
But the flow rate of such wells is small. To provide the house and site with enough water, sometimes it makes sense to make two such wells on the site. The compact dimensions of the equipment make it possible to install such a well directly in the basement without any problems.
Filter wells, which are also called “sand” wells, are created on soils where the aquifer lies relatively shallow - up to 35 meters.
These are usually sandy soils that lend themselves well to drilling. The depth of the filter well usually varies between 20-30 meters.
This diagram clearly shows the structure of a filter well. A filter must be installed at the bottom of the water to prevent sand and silt from entering the water.
In a good situation, the work will take two to three days. The filter well needs good maintenance, since the constant presence of sand and silt particles in the water can cause siltation or sandiness.
The typical lifespan of such a well can be 10-20 years. The period may be longer or shorter depending on the quality of well drilling and its further maintenance.
Artesian wells, also known as limestone wells, are the most reliable, since the aquifer is confined to bedrock deposits. Numerous cracks in the rock contain water.
Such a well is usually not at risk of silting, and the flow rate can reach approximately 100 cubic meters per hour. But the depth to which drilling is to be carried out usually turns out to be more than respectable - from 20 to 120 meters.
Of course, drilling such wells is more difficult, and the work will take much more time and materials. A professional team can complete the work in 5-10 days. But if we drill a well on the site with our own hands, it may take several weeks, or even a month or two.
But the effort is worth it, because artesian wells can last for half a century, or even more, without problems. And the flow rate of such a well makes it possible to supply water not only to one house, but also to a small village. Only manual drilling methods are not suitable for constructing such a mine.
The physical and mechanical properties of soils are also of great importance when choosing a drilling method.
During the work, you may need to go through a variety of layers, for example:
- wet sand, which can be drilled relatively easily by almost any method;
- water-saturated sand, which can only be removed from the trunk using a bailer;
- coarse rocks (gravel and pebble deposits with sand and clay aggregates), which are drilled with a bailer or a glass, depending on the aggregate;
- quicksand, which is fine sand supersaturated with water; it can only be scooped out with a bailer;
- loam, i.e. sand with abundant inclusions of clay, plastic soil that can be easily drilled with an auger or core glass;
- clay, plastic rock, which can be drilled with an auger or glass.
How do you find out what soils lie beneath the surface and at what depth is the aquifer? Of course, you can order geological soil surveys, but this procedure is not free of charge.
Almost everyone chooses a simpler and cheaper option - asking neighbors who have already drilled a well or built a well. The water level in your future water source will be approximately the same depth.
Drilling a new well a short distance from an existing structure may not follow exactly the same scenario, but it will most likely be very similar.
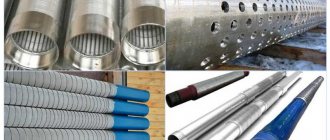
Filter
A well filter is the main device that ensures the quality of water from it. And at the same time, it is the component most susceptible to wear, so the choice of a well filter must be taken with full responsibility.
Artesian water is taken without filtration. For a well on limestone, most often a simple lattice filter in the form of perforation on the lower bend of the casing is sufficient; it will also serve as the basis for a sand well filter. The perforation requirements are:
- The diameter of the holes is 15-20 mm, up to 30 mm depending on the ground.
- The filter duty cycle (the ratio of the total area of the holes to the surface area they occupy) is 0.25-0.30, for which the distance between the centers of the holes is taken to be 2-3 times greater than their diameter.
- The location of the holes is in transverse rows in a checkerboard pattern.
- The total area of all holes is not less than the cross-sectional area of the casing pipe lumen.
Installation of well filters for sand
For a sand well, firstly, gravel backfill is necessary; in this case, it is precisely this that ensures long-term water quality, as in a well. In view of this, well filters with a layer of gravel included in the design are available for sale. There is no harm in them, but the wellbore needs a larger diameter, which makes drilling difficult, and without external backfilling, the well still quickly silts up.
Next, if you follow the flow of water, there is the same perforated pipe, but now it will be a load-bearing element that absorbs rock pressure. To prevent sand, which gravel does not retain well, from spoiling the entire water supply tract, you also need a sand filter. It can be external or external (on the left in the figure) or internal (on the right in the same place). External filters have three advantages: minimal diameter and siltation of the well and pump installation depth. But they are easily damaged during casing installation, are unrepairable and expensive, because... due to the latter circumstance, they must be made of very high-quality materials: alloys for the mesh and wire of external well filters are more expensive than silver.
When installing a pump in a well with an internal filter, its bottom is considered to be its upper edge, so the volume of one-time water withdrawal is seriously reduced. The problem with all internal filters is increased silting of the well due to water seeping into the gap between the filter and the casing. Also, as a result, the service life of the filter is reduced, and pump wear increases, because sand gets into it. Often, therefore, the pump is placed in a separate pipe mounted on the outlet of the filter, which again requires an increase in the diameter of the well.
Homemade sand filter
The best option is to connect the pump directly to the filter outlet, then both silting and sanding will stop. But this requires a centrifugal pump with an intake pipe on the bottom, which makes it much more complicated and expensive, and the vibration pressure is often low for sand wells.
The filter elements of sand filters are sometimes made independently from PVC pipes, stainless springs and polymer mesh, see fig. on the left, but they filter poorly and do not last long. It’s better to take a good store-bought filter; its operating conditions are too difficult, and taking it out, as they say, is quite a task. In this case, there are basically 3 options, see fig:
Modern well filters
- Polymer stacked ring filter. Cheaper than others, but lasts less and is prone to silting, but it is repairable: you can lift it and sort it out, replacing bad rings. Requires an increased well diameter;
- Tubular-wire with a winding of profiled wire. A little more expensive than polymer, but it lasts a long time and does not silt. Repairs do not require a bulkhead; just wash the top. It would be optimal if not for one “but”: cases of fraud by manufacturers, traders, and drillers have been repeatedly noted - how completely stainless filters are supplied, in which the longitudinal rods are made of ordinary galvanized wire. It is impossible to check without breaking the filter, but harmful impurities soon appear in the water, and then the rods completely rust, the winding slips, and the entire filter has to be replaced.
- Support-free welded filters, wire and slotted. They would be ideal (the latter can withstand settling into the barrel from the outside on the pipe), if not for the price: they are made from the same profiled stainless wire that costs about the same as silver.
Advantages of hydrodrilling wells
The technology of hydraulic drilling for water has gained popularity among the people relatively recently, and therefore has many misinterpretations. Firstly, it is a misconception that the method is only suitable for small wells. This is wrong.
If desired and with appropriate technical support, hydraulic drilling can be used to drill wells longer than 250 meters. But the most common depth of domestic wells is 15-35 meters.
The opinion about the high cost of the method is also not confirmed by calculations. Good work speed reduces financial costs.
The obvious advantages of the method also include:
- compactness of equipment;
- the possibility of drilling in an extremely limited area;
- minimum technological operations;
- high speed of work, up to 10 m per day;
- safety for the landscape and ecological balance;
- possibility of manual drilling;
- minimum cost.
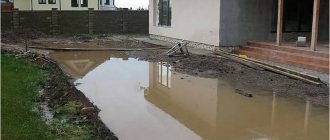
Perhaps the most significant advantage of hydraulic drilling is the ability to drill in landscaped areas without significant aesthetic troubles.
The technology of hydraulic drilling on an MBU machine makes it possible to carry out a cycle of work on a small site and does not disturb the landscaping of the site
The advantages of hydraulic drilling also become very clear if we compare it with dry drilling technology, where it is necessary to constantly remove the working tool from the shaft for cleaning and load it again.
This technology is best suited for working with fine-clastic sedimentary soils, which are most easily removed from the well using a bailer. And the drilling fluid allows you to do without gelling.
Of course, for a good result of the enterprise, it is necessary to purchase appropriate means of mechanization, because one homemade drill, even at shallow depths, is not enough.
Rocking up
A drilled well will not yet provide water in the required quantity and quality. To do this, it is necessary to either open the aquifer or pump the well. Opening up the formation allows you to get drinking water within 24 hours. It requires large amounts of clean water and complex and expensive equipment. Please note: autopsy is carried out using direct and reverse methods. In direct drilling, water is pumped under pressure into the casing and drilling fluid is pumped out of the annulus. When reversed, water is fed by gravity “behind the pipe” and the solution is pumped out of the trunk. Direct opening is faster, but it disrupts the structure of the formation more strongly and the well lasts less. The opposite is the opposite. Keep this in mind when negotiating with drillers if you order a well.
Bore pumping takes several days, but can be done with an ordinary household submersible centrifugal pump; vibration is not suitable for the reasons stated above. To pump, first remove silt from the well using a bailer; You can see how to use a bailer in the video below:
Video: cleaning (swinging) a well with a homemade bailer
The rest is not difficult: the water is completely pumped out every time there is enough of it to cover the pump. It is useful to raise and lower it on the cable rope several times before turning it on to stir up the residual sludge. The swing can be done with a manner, but scooping will take a lot of work, and it will take about two weeks.
Note: As the rocking progresses, the gravel backfill will settle; it must be replenished by adding more.
The pumping of the well is considered complete when the transparency of the water rises to 70 cm. It is checked with a white enamel or earthenware disk with a diameter of 15 cm (saucer, saucepan lid) in an opaque vessel, for example. clean barrel. When the edges of the disk begin to blur during immersion, stop, it’s already opaque. You need to look at the disk strictly vertically. Once transparency is achieved, the water sample is submitted for analysis and, if everything is OK, the annulus is concreted or closed with clay, and a filter is installed.
Manufacturing of drilling tools
As mentioned earlier, drilling devices can be made independently, borrowed from friends, or purchased industrially produced products.
Sometimes a drilling rig can be rented. However, the goal of do-it-yourself drilling is usually to keep costs as low as possible. The easiest way to drill cheaply is to make tools from scrap materials.
The diagram shows the structure of various drilling tools. Using a chisel, particularly hard soil can be loosened, and then it is removed with a drill, bailer or other device
Option #1 - spiral and spoon drill
Hand drilling can be done with a twist or spoon drill. To make a spiral model, take a thick, pointed rod to which knives are welded. They can be made from a steel disk cut in half. The edge of the disk is sharpened, and then the knives are welded to the base at a distance of about 200 mm from its edge.
A self-made auger drill can be of different designs. Its mandatory elements are knives with pointed edges and a chisel installed at the bottom.
Knives should be positioned at an angle to the horizontal. An angle of about 20 degrees is considered optimal. Both knives are placed opposite each other. Of course, the diameter of the drill should not exceed the diameter of the casing pipe. Typically a disc with a diameter of about 100 mm is suitable. The knives of the finished drill should be sharpened sharply, this will make drilling easier and faster.
Another version of the twist drill can be made from a rod and a strip of tool steel. The width of the strip can vary between 100-150 mm.
The steel should be heated and coiled, hardened, and then welded to the base. In this case, the distance between the turns of the spiral should be equal to the width of the strip from which it is made. The edge of the spiral is carefully sharpened. It is worth noting that it is not easy to make such a drill at home.
A spiral auger for drilling can be made from a pipe and a steel strip, however, it is not always easy to correctly roll the tape into a spiral, weld and harden the tool at home
To make a spoon drill you will need a metal cylinder. In self-production conditions, the easiest way is to use a pipe of a suitable diameter, for example a 108 mm steel pipe.
The length of the product should be about 70 cm; a longer device will be difficult to work with. A long and narrow slot, vertical or spiral-shaped, should be made on this body.
The easiest way to make a homemade spoon drill is from a piece of pipe of a suitable diameter. The bottom edge is folded and sharpened, and a hole is made along the body for cleaning the drill
Two spoon-shaped knives are mounted in the lower part of the body, the cutting edge of which is sharpened. As a result, the soil is destroyed by both the horizontal and vertical edges of the drill.
The loosened rock enters the drill cavity. It is then removed and cleaned through the slot. In addition to the knives, a drill is welded at the bottom of the drill along the axis of the device. The diameter of the hole made by such a drill will be slightly larger than the device itself.
Option #2 - bailer and glass
To make a bailer, the easiest way is to also take a metal pipe of a suitable diameter. The thickness of the pipe walls can reach 10 mm, and the length is usually 2-3 meters. This makes the tool heavy enough to effectively loosen it when it hits the ground.
A shoe with a petal valve is attached to the bottom of the bailer. The valve looks like a round plate that tightly closes the lower section of the pipe and is pressed by a fairly powerful spring.
However, a spring that is too tight is not needed here, otherwise the soil simply will not get into the bailer. When pulling out the bailer, the valve will be pressed not only by the spring, but also by the soil collected inside.
The lower edge of the bailer is sharpened inward. Sometimes sharp pieces of reinforcement or sharpened pieces of triangular-shaped metal are welded at the edge.
A protective mesh is made from thick wire on top and a handle is welded to which a metal cable is attached. The glass is made in a similar way, only a valve is not needed here, and a slot should be made in the body to clean the device.
Homemade MGBU
This diagram shows the main working units of the MGBU, which you can manufacture according to our drawings.
Drilling rig drawing
Assembly of the drilling rig begins with the frame. The frame stands for the drilling rig are made from DN40 pipe, wall thickness 4mm. “Wings” for the slider carriage are made of DN50, thickness 4mm. If not with a 4mm wall, take 3.5mm.
You can download drawings for a small-sized drilling rig using the links below:
- Upper frame: chertyozh_1_verhnyaya_rama
- Bottom frame: chertyozh_2_nizhnyaya_rama
- Drilling ram: chertyozh_3_polzun
- Slider sleeve: chertyozh_4_gilza_polzun
- Frame assembly: chertyozh_5_rama_v_sbore
- Engine and slider: chertyozh_6_dvigatel_i_polzun
- Node A MGBU: chertyozh_7_uzel_a
Drilling swivel, rods and locks
At first, we recommend purchasing ready-made drill swivels and drill rods. In the manufacture of these parts, processing accuracy is very important, since the loads on these units are large.
We do not recommend making a swivel from improvised means. One slightest inaccuracy and it will fail.
If you decide to order a swivel, you will need to find a turner with a CNC machine.
For the swivel and locks you will need steel:
- Locks – 45 steel.
- Swivel – 40X.
You can download a drawing of a homemade drill swivel here: DIY swivel for drilling swivel
You can save money by purchasing ready-made units, but it will take a lot of time to find a specialist. But it's worth it - homemade parts are much cheaper than purchased ones. To get started, purchase parts for samples. Turners work better when they have drawings and templates on hand.
If you have factory samples, it will be much easier to check the quality of work. For example, if a turner made drill rods and locks, then you take factory-made and home-made parts and screw them to each other - check the quality of the thread. The match must be 100%!
Do not buy spare parts by delivery. This is necessary so as not to buy a marriage - this, unfortunately, happens. And most importantly, if you order delivery from afar, you can wait more than one month.
DIY drawings of locks at Moscow State Budgetary Institution
We recommend making threads on drill rods in a trapezoid - it is no worse than a conical one. But if you then order it from a turner, it will be more difficult to make a tapered thread. If you make or buy locks for drill rods separately, then take simple suture pipes for the rods if you are drilling no deeper than 30 meters (3.5 mm thick and an internal diameter of at least 40 mm). But a welder must weld the locks to the pipes! In vertical drilling, the loads are high.
To drill deeper than 30 meters, you need to take only thick-walled pipes with a wall of 5-6 mm. Thin rods are not suitable for great depths - they will tear.
- Download bar lock No. 1: chertyozh_zamok_na_shtangu_1
- Bar lock 2: chertyozh_zamok_na_shtangu_2
Drill head
It’s not difficult to make a simple drill yourself. The drill is made from ordinary steel. If you decide to make it from alloy, then keep in mind that it is difficult to weld! Need a welder.
Drill head drawing for download: chertyozh_bur
If there are a lot of stones at the drilling site, then buy drills from companies that are adapted for strong soils. The higher the price, the harder the alloys on the drills and the stronger the drills themselves.
Homemade winch and gear motor
When manufacturing a mini drilling rig, a “RA-1000” winch is used. You can take another one, but preferably one with a carrying capacity of at least 1 ton (or better yet, more). Some drillers install two winches, one electric and the other mechanical. In the case of a drill string wedge, it is very helpful.
To make the work easier, it is better to buy and connect two remote controls: one for reverse and engine speed, the other for the winch. This will save a lot of effort.
A motor-gearbox for drilling wells for a homemade mini drilling rig will require 60-70 revolutions per minute, with a power of 2.2 kW. Weaker will not do.
If you use a more powerful one, you will need a generator, since it will not be possible to connect to a voltage of 220 Volts. If you make a hydraulic drill with your own hands, take a motor-gearbox of the following models: 3MP 31.5/3MP 40/3MP 50.
Advantages of the hydro drilling method
Most land owners prefer to have their own well to obtain technical or clean drinking water. There are several types of drilling: rotary-auger, percussion-rope, cable-rotary and hydraulic. And if a number of conditions are met, such as loose soil, the absence of rocks, shallow aquifers or the presence of similar wells in neighboring areas, then you can drill the soil to a water source yourself, without the help of specialists.
Of the listed methods, the most suitable for independent implementation is the hydraulic drilling method. The main advantages of the method are:
- small size of the drilling rig;
- no need to use heavy special equipment;
- preservation of the landscape of the adjacent territory;
- The drilling fluid serves as a natural coolant for the elements of the drill string, and also performs the function of grinding the walls of the well, further strengthening them.
Industrial drilling methods
The auger method is used when working in areas with sand and gravel soil. Aquifers can be located at a depth of several tens of meters. With this method, the soil is pushed outward by the blades of a rotating device. This production method is considered quite fast. But it is more often used in the construction of small-sized structures.
In the percussion-rope method, a powerful pointed chisel is used to excavate soil rocks. It produces forward-return movements, destroying the soil. For more efficient production, a special weighting rod is used. It is attached to the drilling structure.
The most productive method of excavating soil during the construction of water intake devices is considered to be the rotary method. Its efficiency is several times higher than the rope-impact method. This is achieved due to certain design features of the installation:
- during the work, a roller bit is used as part of the drill string;
- its rotation is carried out using a rotor;
- To increase productivity, a heavy duty drill pipe is used;
- the well walls are treated with a special flushing solution;
- For the final construction of the well, casing pipes, filtration devices and pumping units are used.
Advantages of hydrodrilling a water well
The main advantage of the principle is the ability to carry out work on a landscaped site. As the video shows, the infield area will not resemble a battlefield with craters, but will remain aesthetically pleasing. The technology is best suited for clay or loam soils, but if necessary, it can also be used on sandy soils.
As for the features of the method, the advantages over all others are obvious:
- Availability in terms of price;
- Efficiency;
- Drilling does not destroy, but strengthens the body (barrel) of the well;
- Carrying out work independently;
- Compact installation and easy transportation of the structure.
Types of insulation materials
When deciding how to insulate a water pipe in a private house, you can consider a variety of insulation materials, but the most common and effective are:
- Glass wool (fiberglass insulation)
. As practice shows, this insulation material is best suited for protecting metal-plastic pipes. The main advantage of glass wool is its low density, due to which the light weight of the material is achieved - and therefore relatively simple installation. The main disadvantage is its high hygroscopicity, so fiberglass insulation must be covered with a layer of waterproofing material. - Basalt insulation
. This material externally resembles a cylindrical shell. For maximum protection, the basalt is covered with roofing felt, glassine or a material with similar properties. The most striking quality of basalt insulation is its ease of installation, for which you have to pay in the most literal sense - the price of such a shell is very high. - Polystyrene foam (expanded polystyrene)
. It is polystyrene foam that is most often used to insulate water pipes. In addition to high performance indicators, it is valued for the possibility of repeated installation and installation both indoors and outdoors, and even deep into the soil. There are products on the market with and without additional coating.