We welcome our regular reader and bring to your attention an article about what welding of polyethylene pipes is - a very reliable method of connecting polyethylene pipelines.
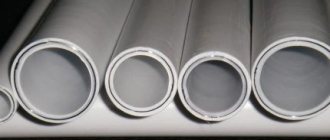
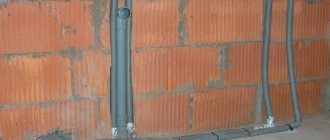
When installing engineering systems in a house, connecting an estate to a cold water main, or laying a pressure sewer, inexpensive and practical polyethylene pipes are simply irreplaceable. For installation of pipelines in the ground and basements, polyethylene pipes are the best option in terms of price and technological qualities.
Polyethylene as a material for engineering systems is underestimated, although the advantages of PE pipelines are undeniable. Polyethylene products are absolutely harmless to humans, the material is chemically inert, durable and at the same time plastic, frost-resistant (withstands freezing with water). The disadvantages of polyethylene - instability to ultraviolet radiation and elevated temperatures - limit its use in the open air and for heating and hot water systems, but for laying in the ground polyethylene communications are almost ideal.
The flexibility of polyethylene pipes allows them to be laid without fittings at turns; the possibility of laying a single piece from the main to the metering unit in the house is also a big plus, because the financial savings are quite significant, and installation is much easier. The reliability and tightness of the seams make it possible to close and fill communications with a screed or false wall. A permanent connection does not require maintenance and regular inspections, like a detachable connection using collet couplings.
Methods for joining PE pipes
Polyethylene pipelines are installed in two ways: using fittings and flanges or several types of welding.
The connection requires special fittings (couplings and sockets) and without them. For pipes with a wall thickness less than 4.5 (diameters 50-110 mm), welding using fittings is used; for larger pipes with a thicker wall, butt welding and extruder welding are acceptable.
Diffusion
The diffusion method involves heating the ends to a viscous flow state. The prepared ends of the workpieces are joined and slightly compressed. Movable polymer molecules, under the influence of pressure, move into the parts being connected, mix, freeze in a new position when cooled, form new chemical bonds and ensure reliable adhesion of the pipes to each other.
It is incorrect to single out any welding method as diffusion. In fact, any welding of polyethylene is based on the process of diffusion of heated molecules.
Bell method
Not the most typical way. There are two options for implementation: using socket pipes and couplings. The method itself is reminiscent of welding polypropylene pipelines: the socket or coupling and the workpiece are heated using a soldering iron with a special nozzle. Then the workpiece is inserted into the socket of another pipe or coupling, fixed, pressed and held. Welding time – 20 seconds. If couplings are used, then the second pipe is soldered into the coupling in the same way. The cost of couplings is low; products with a socket are rarely found in stores. The connection is reliable and durable; small diameters can be welded.
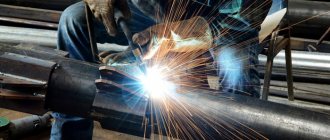
Butt welding
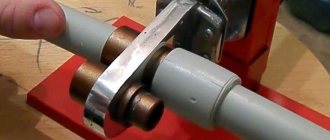
This method is applicable to pipes with a wall thickness of more than 4.5–5 mm and a diameter of more than 50 mm.
Before carrying out work, cut off the polyethylene pipe strictly perpendicularly and thoroughly clean the ends. Then fix the pipe in the welding machine and carefully center it. A heater is inserted between the ends of the heating pipes, the pipes are pressed against it and heated until the ends soften. Then the heater is quickly removed, the ends are compressed in such a way that a small annular bead is formed at the junction - a flash. Cool the joint, then remove the machine. The work has its own subtleties; it requires two people.
Extruder welding
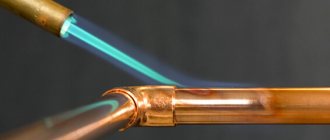
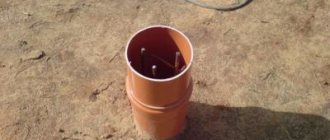
Extrusion - welding using a small apparatus from which molten polyethylene is extruded under pressure. Raw materials in the form of rods or granules are loaded into the extruder. Extrusion is used on pressure communications with a wall thickness of more than 6 mm, but it can also be used to patch non-pressure sewer pipelines with a thinner wall. The connection point is heated by a stream of hot air. It is advisable to chamfer the ends.
The quality of the seam is very high. The advantage of the method is that it is possible to weld an already laid polyethylene pipe without dismantling the pipeline.
Electrofusion welding
This is the most reliable, convenient and universal connection method. It can be used even in hard-to-reach places. But, unfortunately, it is also the most expensive - electric welding fittings are not cheap, and a welding machine also costs a lot. Welding with thermistor couplings is used from small to large diameter polyethylene pipelines.
During thermistor welding, polyethylene blanks are cut strictly perpendicular, carefully cleaned of burrs and dust, inserted into the coupling, and centered using special devices. The coupling has a heating element. It is connected to a special welding machine, current is supplied, the element heats up the coupling and the ends of the pipes, and they are welded.
With this type of welding, it is extremely important to keep the joint motionless until it cools completely.
Which way is better
Before choosing the best connection method, it is necessary to determine which one is applicable in a particular case, depending on the diameter of the pipeline.
The most reliable and universal method is welding using thermistor couplings. But couplings, especially large diameters, are expensive, expensive, and a welding machine (but you can rent one). Therefore, such welding is not very common when arranging a private home.
More often they are butt welded or using solder couplings. Butt welding is used on polyethylene pipes with large wall thicknesses; these are usually not used in private homes. Extrusion welding is not yet very widespread, mainly due to the little known nature of the method.
Socket installation
It should be noted that in domestic documents you will not find any standards for flared soldering. It is described only in European standards DVS 2207-15. Step-by-step instructions on how to weld HDPE pipes with couplings :
- Before starting work, you will need to prepare communication. To do this, the outer surface is cleaned of various contaminants: dust, grease. This can be done with a damp cloth and an alcohol solution or a special mixture. It is sold in plumbing stores;
- Afterwards the joint is put in order. The tightness of the fastening depends on the smoothness of the cut. You should walk along the end of the pipe with sandpaper or clean it with crumpled newspaper. After the joint of the HDPE pipes is trimmed to form a chamfer of 1 mm at 45 degrees, this is very important for tight fastening; Photo - docking
- Next, you need to install the bends into the coupling. It is divided into two halves: the first is put on the pipe (this is the mandrel), and the second section is inserted into the second (this is the sleeve). It should be noted that putting on the coupling should only begin after the tool has warmed up;
Photo - connection - The preheated nozzle is inserted onto the communication as quickly as possible, after which the second outlet is inserted into it;
- You need to move the segments very carefully, but quickly, otherwise you can overheat the polyethylene. If everything is done correctly, liquid plastic will begin to come out from under the coupling.
After heating and welding is completed, you need to remove the coupling and fix the pipes on a solid surface.
Flanges are even easier to work with. They are threaded connections for installation. Accordingly, a thread is cut at one end of the communication, into which the element is screwed, and a pipe is put on it. The joint is heated with a hairdryer or coupling.
Photo - HDPE flange
Features of working with LDPE and HDPE
These two types of polyethylene differ slightly in their technical characteristics and parameters. The information is summarized in a table.
| Characteristic | PVD (PNP) | HDPE (PVP) |
| Melting point, °C | 103-110 | 125-132 |
| Softening temperature, °C | 100 | 120-125 |
| Rigidity | small | big |
| Flexibility | big | small |
| Fragility | small | more than PVD |
| Strength | average | high |
When welding, it should be taken into account that LDPE requires a lower temperature to melt than HDPE. HDPE has greater strength than LDPE.
Installation instructions for polyethylene pipes
To connect polyethylene pipes to water supply elements, the following connections can be used:
- one-piece;
- detachable.
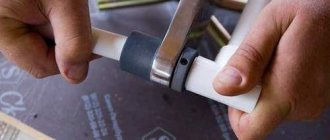
Permanent connections are obtained by soldering pipes to each other or to special welded fittings. This method is cheap, but the resulting structures are often bulky. The use of permanent connections is justified when installing underground stationary water pipelines.
To assemble temporary systems from polyethylene pipes, as well as in the absence of welding equipment, you can use threaded compression fittings, the installation of which will be discussed below.
Attaching a Pipe to a Compression Fitting
Compression fittings are more expensive than welded models, but are dismountable and easy to use. Recommendations for their installation are discussed in the step-by-step instructions below.
Step one - external inspection and trimming
Assembling a system from a polyethylene pipe and a plastic compression fitting begins with inspecting them for cracks and deep scratches. It is better to cut off the defective section of the pipe immediately.
You can cut a polyethylene pipe with a knife or a special pipe cutter. The result should be a perfectly perpendicular cut without snags or waves. To remove uneven edges, you can purchase a manual trimmer.
There are many types of pipe cutters, but they all have a wide base, which ensures a strictly perpendicular position of the pipe relative to the cutting element
Step two - putting the fitting elements on the pipe
First, a clamping nut is put on the hose, then a collet, then a clamping ring, and finally a rubber gasket is tightened.
The complete set of the fitting may be different, so it is important to remember the sequence of its elements when unwinding in order to put them on correctly when assembling the connection
The end of the pipe is inserted into the fitting body until it stops, and the elements put on the hose are pushed into the threads. After this, the clamping nut is tightened tightly by hand. If you have a chain wrench, you can tighten the connection with it.
There is no need to rush to tighten the clamping nut - it may become warped. If the movement is tight, it is better to unscrew the connection once again and repeat the assembly process.
After installing the fitting, it is worth checking the tightness of the connection. In case of leakage, you can easily tighten the nut by adjusting the structural elements.
Inserting a saddle into a pipe
If you need to make a branch from a polyethylene pipe, it is not necessary to buy a tee. It will be enough to drill a hole in it and install a saddle. How to do this will be explained in step-by-step instructions.
Step one - preparation
Initially, you need to inspect the products being joined for scratches and cracks and wipe their surface with a damp cloth.
Step two - assembling the clamp
Place both parts of the clamp on the pipe and tighten the nuts with a wrench. The purpose of the procedure is to firmly fix the saddle.
There are saddles that can be installed under a running water supply. They have a built-in mechanism that drills a hole without depressurizing the structure
Step three - drilling
Mark a point in the center of the saddle hole, and make stripes along the edges of the fitting to remember its position. Unscrew the saddle and remove its parts. Drill the polyethylene pipe in the intended location using a drill of the required diameter.
There are sheathed drills that allow you to make holes in pipes and recesses without the risk of damaging the surrounding walls
Step four - assembling the saddle
Clean the inside of the PE pipe from chips and remove possible snags from the edges of the drilled hole. Attach parts of the fitting to the pipe according to the previously drawn marks and firmly tighten the fixing nuts.
Simple nurses may not be equipped with a clamping mechanism for attaching the pipe. In this case, it is recommended to wrap the threads of the attached fitting or pipe with fum tape
When screwing a pipe or fitting into the seat, you can wrap several layers of fum tape.
The part of the saddle with the outlet hole may have a groove on the pipe side for a rubber sealing ring. Therefore, if there is a sealant, it is necessary to place it between the pipe and the fitting.
If you need to bend a pipe on a certain section of the pipeline, we recommend doing this according to the instructions given here.
Do-it-yourself welding of PE pipes
Welding polyethylene pipes at home is not too difficult and can be done with your own hands. The main problem is expensive equipment. In any case, it is worth renting rather than buying.
Before manipulation, it is necessary to cut the workpieces evenly and thoroughly clean and degrease the ends.
Required tools and materials
To weld polyethylene communications you will need pipes and possibly couplings.
List of required equipment:
- Pipe cutter is a device for cutting.
- It’s a good idea to use an electric trimmer to accurately align the ends of the pipes.
- For larger diameters it would be a good idea to use a chamfer.
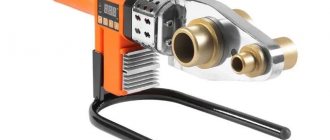
- Socket welding machine. Structurally, it resembles a soldering machine for polypropylene.
- Corresponding nozzles.
- For end connections, a special centering machine and a heating element are used.
Stages of work
First, the pipes are cut at an angle of 90°, burrs are cleared, dust and chips are removed, and degreasing is carried out. It is more convenient to do this work with an electric trimmer.
Socket (socket) welding technology
Put the desired nozzle on the soldering iron and heat it for the time specified in the instructions. Then heat the coupling and pipe until the polyethylene softens and connect them. They give time for diffusion and polymerization - for about 20 seconds the compound cannot be touched. Then the second workpiece is connected to the coupling in the same way.
Butt connection
The workpieces are installed in the joining machine, fixed and carefully centered. Before soldering, you need to make sure that the longitudinal axes of the workpieces completely coincide. A heating element is inserted between the polyethylene blanks and held until the material softens. The heater is removed, the workpieces are quickly connected, and pressed with force until an annular bead is formed at the seam site. Stand until cooled.
Butt welding is not as simple as it seems at first glance and requires some experience.
Seam quality control
The reliability of the connection depends on the quality of the seam. The height of the burr bead during a butt connection must correspond to the table data.
There should be no cracks, pores or cavities near the rollers. The rollers must be the same around the entire circumference, the same height. The recess in the center should not fall below the surface of the pipes. The parts should not be offset from each other. If you solder a defect, the connection will have to be cut and redone.
Photos of defective butt joints:
Electric socket welding
This option is used to form joints with increased strength. When working, they use a special electric coupling, complete with heating (embedded) parts. During welding, use fittings equipped with heating coils. Partial melting makes it possible to obtain a monolithic structure.
The main advantage of electrofusion welding is the absence of burr formation. Parts can be welded in the most difficult to reach places - no need to install large welding machines.
Technological process of electric sleeve welding
- Pipe blanks are cut with special scissors (maintained to a certain size).
- The electrofusion coupling, as well as the surface of the workpieces, are thoroughly cleaned. Remove grease, accumulated dirt and dust.
- To control the desired depth of insertion of the workpiece into the coupling, it is necessary to apply a bright mark to it.
- Holes in pipes that cannot be welded are closed with plugs. This avoids cooling.
- Using cables, the electrofusion coupling is connected to the welding machine.
- To start the welding process, you must press the “Start” button. The device turns off automatically after welding is completed.
- In order for the welded joint to begin operation, it is necessary to wait one hour until the parts have completely hardened.
To achieve high quality welding, the parts must remain motionless, both during operation and during subsequent cooling.
An indicator of the quality of the resulting welded joint is the thickness of the bead. It should be 1/3 of half the size of the pipe thickness. The burr must cover the mark previously applied to the surface of the workpiece.
The permissible displacement of the welded areas should be no more than 10% of the wall thickness of the part.
Algorithm of electrofusion welding technology
This method assumes that the worker has a simple transformer and the electric coupling itself, in which the heating element is initially installed. The welding process is quite simple: both pipes are connected to the coupling, and electric current is supplied to it.
The work is performed as follows:
- The pipes are prepared in the same way as in all previous methods, starting with cutting at right angles and ending with stripping.
- The pipes are inserted into an electrical coupling and current is supplied to it from the transformer.
- When the connected pipes have cooled down, you can disconnect the wiring, but the coupling will remain as an element integral with the pipeline.
In fact, electrofusion welding of pipes is quite simple, but requires significant financial investments, since the coupling is a disposable product with a rather expensive filling in the form of heating plates.
Purchase of HDPE pipes and equipment at wholesale prices
Each connection technology has advantages and limitations or recommendations for use. In any case, pipelines made from HDPE pipes are a cost-effective solution. Polyethylene products are characterized by strength, wear resistance, plasticity, versatility, safety, and therefore are in demand for the construction of household and industrial, pressure and non-pressure pipelines for transporting drinking and process water, gas and technical media.
Our online store offers a wide selection of polyethylene pipes of different diameters, structural elements, fittings, tools, equipment for installation and welding of HDPE pipelines. Certificates of conformity are presented for review in the appropriate section on the website. Order quantities are not limited. Prices are wholesale!
Call us at the numbers listed on the website to consult with our managers regarding the range, quality and purpose of goods, and terms of cooperation.
Work process
We must not forget that welding work on polymer materials must be carried out under the condition of sufficient ventilation of the room. When heated and melted, polymers release toxic substances that, when concentrated, have a strong effect on the human body.
Before soldering a polyethylene pipe, you need to perform the following preparatory procedures:
- It is necessary to place blanks of the required size on the heating element plateau.
- Afterwards, the temperature sensor must be set to 250ºС.
- Then it is necessary to prepare the parts to be joined (treat with a degreasing compound, remove the chamfer).
- Connect soldering equipment.
- Wait until the welding machine reaches the required temperature (the green indicator should light up).
Afterwards, the parts to be connected (pipe-coupling) are simultaneously placed on the soldering iron blanks. Moreover, the pipe must be inserted into the inner part of one blank, and the coupling onto the outer surface of the second.
As a rule, the ends of the pipe are installed at the boundary of the previously marked line, and the coupling is inserted until it stops. We must not forget about the holding time of parts.
If the holding time is insufficient, it is possible to obtain an insufficient degree of diffusion of the parts being joined, which will affect the quality of the soldering. If you exceed the melting time, this can lead to disruption of the structure of the parts being connected and also does not guarantee high-quality soldering. That is, it is necessary to use special tables that indicate the optimal time for pipes with different technical characteristics.
After the required conditioning of the joined elements on the blanks, the parts are removed and connected to each other by heated sections. The joining process must be carried out quickly and accurately, maintaining the alignment of the elements being connected. It is allowed to make small adjustments along the axes (for 2-3 seconds), but it is prohibited to rotate the connected parts relative to each other.
It must be said that the indicated soldering time for any pipes may differ depending on the work conditions and the characteristics of the material. For example, if soldering is performed at subzero temperatures, then the specified standards can increase to 60%, taking into account the nominal value. For all individual conditions, the heating time is selected using test soldering.
Recommendations from professionals
Experienced specialists recommend that when performing welding work, be extremely attentive to the accuracy of the seam, the quality of which determines the tightness of the joint and the durability of the pipeline.
It is important that:
- Before starting welding work, the ends of the pipes were carefully leveled, cleaned of dust, dirt and degreased.
- The pipes in the section did not form an ellipse, the connection of which would reduce the quality of the seams.
- The connected plastic pipes were held in a fixed, motionless position until the molten edges completely solidified.
- The seam looked like a uniform bead protruding above the surface of the pipe (without recesses!) to the height indicated in the standards.
- The fasteners used with clamping nuts were tightened to the design limit, but no more, as excessive force could result in pipe damage.
- Before starting work, the instructions for welding HDPE pipes with specific parameters (material quality, wall thickness, diameter) were studied.