You have a private house or cottage, you want to improve it, but the central sewerage system is not available.
In this case, the question of a cesspool arises.
What material is best to make it from? Round or square? What depth, etc.
Let's figure out what a brick cesspool is.
Basic information
If a cesspool was built without taking into account all sanitary and technical standards (according to SNiP), sewage can seep into the soil, and then into groundwater, which can lead to severe poisoning of the body. If you are making a drainage hole with your own hands, do not forget to take into account all the requirements for the work.
This type of sewage system can most often be found in dachas, as well as in private houses where two or three people live temporarily. Such a number of residents use water evenly, so systematic cleaning of the cesspool is not necessary.
Permits
To begin with, it is worth saying a few words about the legal issues associated with the construction of a cesspool, septic tank, and other local treatment facilities on the site. The fact is that you cannot create such objects without regard to anything.
In order not to cause problems for yourself, and the autonomous sewer system has been legalized, before starting work, it is necessary to obtain a SES permit for construction. This is due to the fact that any waste entering sewer containers is almost always a favorable environment for the development of a large number of harmful microorganisms. Therefore, sanitary and epidemiological supervision monitors the construction and operation of such structures in order to protect groundwater from biological or chemical contamination that can lead to the spread of various diseases.
In order to obtain permission to build a local sewer system, you will have to collect a package of documents. The list of necessities includes the following:
- Documents confirming ownership of the site and the main building located on it.
- A technical passport with a site plan showing all buildings without exception.
- A copy of the plan on which it is necessary to determine the probable location of the drainage pit or septic tank.
- Design of a septic tank or pit. They will help you develop it in the design organization.
- Project (plan) of a residential building with the location of the bathroom in it.
Example of topographic survey of a site
- Topographic survey of the site, which is carried out by specialists from geodetic organizations. The survey plan displays not only all the buildings and boundaries of the site, its topography, hydrological resources, the presence of vegetation, soil type, and other necessary data.
- Agreement with organizations involved in the removal of various household waste.
The collected documents and application are submitted to the regional SES or to the organization carrying out environmental protection activities. You will have to wait about a month for a building permit. The organization issuing the permit has the right to monitor the correct operation of the local sewage system, timely cleaning, and compliance with environmental standards.
Types of structures
The safest, but most expensive, are sealed ones . This design has no bottom and is only suitable for certain conditions. The choice of this structure directly depends on the type of soil foundation.
Concrete or brick are considered more complex structures . In turn, such a construction eliminates the possibility of wastewater entering the ground. The volume of the sump will depend solely on the needs of the user.
Note : They can be calculated based on daily water use and treatment options.
Simple tank design
Operation of sealed tanks is possible with the use of specialized biological activators. They will help eliminate unpleasant odors and make the cleaning process much easier. In areas where sandy soil predominates, you can get by with the simplest option.
When constructing a structure without a bottom, a completely different technology is used. Instead of a concrete or brick bottom, ordinary crushed stone is used.
Note : In this way, you can get a natural filter for all liquid coming from the house.
This design provides for nuances related to the amount of incoming water.
Local sewerage system with wastewater treatment
In this case, ready-made septic tanks are used. They are installed in prepared pits. The main function of such structures is to collect and purify contaminated water.
Septic tanks can be one-, two- and three-chamber. Each of the compartments solves different problems.
The wastewater passing through them is first purified naturally (sediment sinks to the bottom), then goes through the stage of biological treatment, then ends up in a drainage well or filtration fields (equipped according to the principle of drainage). Here the water is purified to 90-97% and can be reused.
How and where to place it correctly?
The ease of use and safety for the health of others depends on where the sump is located.
When choosing the location of the pit, it is worth considering several important aspects:
- this is initially the distance from the well to the cesspool and from the residential building;
- its distance from the nearest water intake point;
- opportunity to freely drive up for cleaning.
Taking into account sanitary standards, the wastewater tank is located at a distance of approximately seven meters from the house. However, these calculations should also include the type of drive that will be used.
Thus, a sealed pit in a private house should be located at a distance of 5-7 meters, while a sump without a bottom should be made as far as possible. This will minimize the appearance of any unpleasant odors indoors and not violate sanitary standards.
If the site is equipped with a well or well, the sump should be placed 25-50 meters from them. By adhering to such standards, it will be possible to avoid harmful microorganisms getting into the water.
Advice . Due to the constant operation of the drive, frequent maintenance will be required. Therefore, it is worth taking care in advance about convenient access for the vacuum truck.
Sanitary standards
To avoid problems later, it is necessary to comply with sanitary standards:
- The drainage pit must be located at least 35 meters from the well.
- You cannot use a storage system without a bottom if there is excess waste (more than 1 cubic meter).
- The lid should cover the pit tightly, especially in winter, to avoid freezing of the tank. And it’s best if the lid has additional insulation.
Basic standards
The device provides, first of all, the optimal location. It should be borne in mind that when installing a sewer system, the pipes should not pass near the house, but a long distance will not work either.
List of basic requirements in a private house:
| Distance | The distance from neighbors should be at least 5 m, the distance to groundwater and the fence should be no less than 1 m each |
| According to the rules, there should not be a drinking water well near the septic tank | If the soil is clayey, a distance between them should be at least 20 m. For loam and sandy loam, other minimum values are provided - 30 and 50 m, respectively |
| Calculation of volume, depending on the number of people living | For each person, you must allocate at least 0.5 m 3 of the total volume of the pit. If this rule is followed, it is possible to significantly extend the life of the sump. For example, when using clay soil, the filtration rate is the lowest, because for one year the purification ability remains at a sufficient level, and then is gradually impaired |
| Pipe slope | When laying pipes, they should be placed at a slope of 2-3%. That is, the angle should be 2-3 cm per linear meter of pipe |
Advice . Calling a sewage disposal truck is paid regardless of the filling level of the tank, therefore, when creating a drainage pit at your dacha, it makes sense to provide a reserve volume. For example, if three people live in a house, the optimal volume of the sump is 6 cubic meters.
For work you will need tools:
- gloves or tops;
- buckets and shovels;
- cable or rope;
- wheelbarrow;
- level and tape measure;
- ladder; Follow safety precautions and, if possible, do not work alone.
Preparation for construction
Recommendations for choosing a location for all types of pits are the same:
- Away from all buildings;
- Downstream groundwater;
- Where the sewer truck can arrive.
Choosing a place for a cesspool
Pit shape
We strongly recommend making a round brick pit. It's much stronger. At the slightest violation of integrity, when the brick becomes brittle, square and rectangular holes will collapse.
Types of drainage pits
If, due to some circumstances, you need to make a square pit, then at least make its walls slightly convex outward. The arched effect will give them strength.
Dimensions
Everything is individual here. Of course, the larger the hole, the less often you will have to pump it out. But the depth is limited by the groundwater level. As a rule, you need to stop when there is about 30 cm left to the water.
If it turns out too shallow, you should think about expanding the hole in length, or making a series of interconnected holes (see “Drainage hole”) You should not dig deeper than three meters, even if the soil is dry.
For a house in which 4-5 people live, a hole 3 m deep and 3 m in diameter is suitable.
Brick selection
Cinder blocks and sand-lime bricks are definitely not suitable for construction. They will quickly get wet. You need to take ceramic (red) brick.
Burnt brick
Ideally, the brick will be burnt. It has a glossy surface and a browner tint than regular ceramic. Such a brick will significantly increase the service life of the pit. Usually it is rejected because it is irregular in shape and difficult to process, but for our case it is what we need.
Features of recesses for which there is no bottom
Stages of work:
- First, they dig a pit. 1.5 m 3 of soil is used for thermal insulation above the ceiling; the top layer and the rest of the soil are distributed throughout the site.
- Then they make a cushion at the bottom (crushed stone, sand), through which the sewage will escape.
- At the same time, pipes are laid at an angle, which avoids stagnation of liquid, and walls are erected, which can be either concrete rings or brick.
- After laying the second ring, a pipe leading to the well is installed in its upper part.
- When the pipeline is laid, rings and covers are installed, proceed to the installation of hatches.
- If the masonry is brick, make a trench, and the dimensions of the cesspool must be observed (the width is 30 cm, the height corresponds to the level of the walls).
- Don't forget to treat for moisture.
In this case, the concrete slab will lie not only on the walls of the well, but also on the soil layer, access to the hatch is left open.
The nuances of operating cesspools
In addition to the above measures, it is recommended to make a compost pit. Its walls are protected with a layer of clay (thickness up to 300 mm), then they are concreted. Brick laying is done on top. The walls of the compost pit should rise above ground level. They are subject to ironing. Sludge is dumped here when cleaning a septic tank.
This measure is used to disinfect sewage and convert it into compost. To do this, the sewage is laid out in layers: first peat or soil, then sediment from the septic tank, earth again on top, etc.
DIY installation methods
There are several methods for the device, much depends on the size and level of complexity.
How to make an absorbing model?
The absorption drain pit is suitable for owners of small country houses. Simple device, easy maintenance and choice of location.
Wall coverings can be made from several materials, but the simplest option is from tires or concrete products:
- A hole is dug with a diameter of 800 mm: please note, it must be larger than the size of the ring.
- A concrete screed is made around the perimeter of the pit, which will be a reliable base for the rings.
- In the lowest ring, holes are made every 100 mm to allow water to escape.
- The diameter of the filter holes is 50 mm.
Advice . The depth of the sedimentation tank should not exceed 300 cm so that it is not difficult to remove the sediment.
- The constructed pit must be filled with broken bricks, gravel or crushed stone to a depth of 100 cm. The pit is filled with exactly the same material from the outside.
- Before backfilling, it is necessary to carry out all waterproofing work that can block the external aggressive environment.
At the final stage of the work, a plate with several holes is installed (for the ventilation pipe and hatch).
How to build a sealed model?
In general, it is no different from the previous method, but there are still minor differences:
- The bottom needs to be concreted.
- No infiltration holes required.
External pipeline
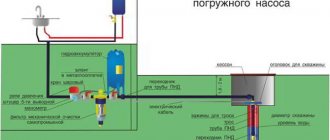
How to make a sewer outside with your own hands? The pipe from the exit point to the drainage pit is led straight, along the shortest path, without bends or branches. The laying depth is below the soil freezing level (the collection container should be located at the same depth).
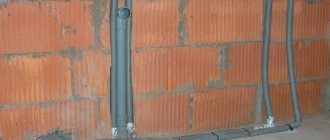
Since this is not always possible (for example, on rocky soil), the outer pipeline is insulated: wrapped with rolled mineral wool and heat-reflecting foil, or ready-made thermal insulating casings for pipes are used.
In some cases, a heating cable is installed on the pipeline, but this is more expensive: both the cable itself and electricity. A sewer pump helps solve the problem: it pumps wastewater under pressure and does not allow it to stagnate and freeze. The pump is installed where the pipe exits the house.