The gutter helps protect the roof and walls of the house from excess moisture. Nowadays it’s easy to purchase your favorite drainage system in a store. Well-known brands offer protection from moisture, and specialized companies offer installation guarantees.
The costs for this are considerable, the amount comes out to be large. You can purchase a drainage system in a store and save on installation. Better yet, make such a device yourself with a little effort and knowledge.
Materials for homemade gutters:
- plastic bottles;
- sewerage pipes;
- tree;
- galvanized metal sheets;
- copper metal sheets;
- profiles for drywall;
- ceramic drainage.
Purpose and functions of drainpipes
An external drain is a structure made of open gutters that collects water from the roof and discharges it into vertical drain pipes. In places where the system ends, liquid collection vessels are installed or storm drains are equipped.
Main functions of gutters:
- Protective . Drains water from the base and walls of the house.
- Cumulative . Stormwater can be collected in a container for irrigation.
- Decorative . A homemade beautiful drain will decorate a gazebo or cottage.
Industrial drains are made of galvanized steel and special plastic. Their cost is high. Plus elbows, corners, funnels, plugs, the price will increase several times. Finished products have one advantage - they are assembled like a construction set. Knowing how to install gutters if the roof is already covered with roofing can save a lot of money. Homemade drains are made from scrap materials, and their service life does not differ from ready-made structures.
On a note! If you approach the matter correctly, select the material and components, then a self-made drainage system can replace the main drainage system.
Types of brackets
A bracket is an element designed to fasten a drainage pipe system. The standard option is a long product, which is used if there is no sheathing on the roof. Short products are necessary for installation on the front board or wall of the house. But this option is not the most convenient, since the screws will not be screwed in securely.
In traditional systems, the flow speed is determined only by the angle of inclination of the gutter; in more complex gravity-vacuum systems, when the level of precipitation is high, the siphon is turned on and significantly increases the intensity of drainage
A roof drip line is a strip that is fixed to the gable or eaves of a building and protects the facade of the house from moisture. The principle of operation of the drip is that water from the roof falls onto the plate and then into the gutter. The sediment then goes through the drainage system and ends up in the sewer system.
When installed correctly, the drip line protects the rafters and the entire roof overhang from getting wet.
Unorganized drainage
An unorganized type of drain is just a roof with the correct slope, which allows moisture to flow down freely without affecting the facade of the building. In this case, water falls in close proximity to the foundation, which increases the risk of rotting of the foundation. This drainage option is suitable for pitched roofs with a slope towards the courtyard.
In the absence of a set of gutters, water can fall on the surface of the walls and on the foundation, and in winter form large icicles
Unorganized drainage is not suitable for residential buildings, as it does not provide effective water drainage. When creating this option on other buildings, the features of SNiP should be taken into account:
- unorganized drains are allowed on buildings no higher than 5 floors;
- annual precipitation in the region should not exceed 300 mm/year;
- on the side of the building where the roof slope faces, there should not be balconies, buildings, or a road or pedestrian road;
- The size of the roofing canopy should not be less than 60 cm.
An unorganized type of drain is suitable for outbuildings, as it cannot provide good protection for residential buildings.
Materials used for homemade drains
To make a drainage system for a shed or a country cottage, you can use simple materials that you have on hand.
Drainage protects the building from the destructive effects of moisture Source diy.obi.ru
To make a drainage system you can use:
- galvanized steel;
- sewer pipes;
- PVC;
- tree;
- plastic bottles.
It is more convenient to make a tin drain using a bending machine. Cut galvanized steel sheets with allowance for seams. Bend the edges to join. Roll out the parts, make seams by hand, or use a seaming machine. Narrow the pipe at one end and install a riser.
PVC pipes are easier to assemble. The joints are connected as in a sewer system. For the gutter, the whole part is divided into several identical parts. You can give the riser the desired configuration using shaped elements.
A plastic spillway is a budget and simplest option. Connect 1.5-2 liter bottles into a pipeline of the required length, first cutting off the bottom and neck. Seal with sealant. For the gutter, make trays, fasten them with wire or a stapler through the holes made with an awl.
Do-it-yourself drainage installation from scrap materials Source onduline.ru
A wooden drain is mounted from boards that are attached at an angle of 90 degrees. They are connected with an overlap into the gutter so that water does not flow through the holes. The bottom is covered with construction film. Installed on brackets with a slope. The water drainage pipe can be made of PVC, tin corner, or wood. For wastewater, make a ditch at a distance of 150 cm from the wall and fill it with broken bricks and crushed stone.
Attention! It is necessary to give the gutter a slope of at least 2 mm per 100 mm and cover the joints, treat the wood with a special agent that prevents rotting. Such a drainage system will serve the home owner for a long time.
A homemade drain for a cottage is a good option used when installing storm drains. Gutters can turn out not just beautiful, but also original. Any imagination can be realized when creating a design for reliable protection of households from wastewater.
Material for gutters
The selected material must be strong, durable and resistant to environmental influences - precipitation, temperature changes and ultraviolet rays.
To one degree or another, these requirements are met by:
- Galvanized sheet steel is a budget option, actively used to create gutters for drainage systems. Its disadvantage is that it is not very strong; the structure can be damaged with a crowbar when cleaning ice.
- Metal with polymer coating. They are excellent for buildings whose roofs are covered with metal tiles, since it is easy to choose a material that matches the color. Resistance to low temperatures and corrosion make steel gutters with a protective polymer film a good choice. The only negative is the noticeable noise that occurs when water passes through the gutters.
- Painted sheet steel. Such structures will require periodic renewal of the coating. Not a very good choice for houses covered with a soft roof - abrasive particles falling into the gutters along with rainwater will gradually destroy the metal.
- Plastic. Durable and corrosion-resistant material, products from which are quite easy to assemble. The design is resistant to ultraviolet radiation and is not destroyed by abrasive particles or acid precipitation. Doesn't make noise.
- Copper and zinc-titanium alloy. They are distinguished by durability, strength and reliability, but are very expensive.
Drainage design for a private house
The drainage system consists of different functional elements, each of which serves its purpose.
Drainage design for a cottage or household Source krasivydom.info
To understand how to make a roof drain in a private house, you need to know what parts it consists of :
- A gutter is a semicircular pipe mounted along the roof of a building. It is used to collect wastewater and is installed at an angle to the drain funnels.
- Couplings - used to connect corner and long gutter parts.
- A funnel for receiving water is mounted on a gutter for discharging waste into the drain pipe. A grill is installed in the funnel to protect it from debris.
- The drain is installed vertically to the gutter and collects water coming from the funnel. It must reach the sewer system and end with a hole for the waste to exit.
- The elbow or outlet has a bend so that there is a small distance between the flowing water and the building.
- Clamps or brackets hold the east pipe and gutter in place.
Attention! Components are selected and calculated individually, taking into account the size of the roof and climate conditions.
Strengths of a flat roof
If you live in a big city, then you are probably familiar with flat roofs.
They can be found on almost every high-rise building. High-rise buildings, as a rule, are equipped with internal drainage so that water falling from above cannot harm the surrounding buildings. Until recently, such roofs could only be found on industrial and multi-story buildings, but with the advent of new roofing products, they began to be erected in private construction.
What is it that attracts developers so much? Most likely, people are simply tired of the image of a standard pitched system. Of course, there is no doubt about its practicality, but such roofs are found absolutely everywhere in private buildings. Therefore, if you want to stand out from the rest, then you still have a chance to do it.
Residents of Western countries have long been using buildings with flat roofs and describe them exclusively in positive terms. And this is no wonder, because for a small price you get additional living space, which you can use at your discretion, the main thing is to create all the conditions for this. The flat surface is reliably protected by modern roofing materials, so you don’t have to think about repairs.
So let's look at the positive qualities of a flat surface:
- Compared to pitched roofs, flat roofs have a smaller area, so the installation will require much less materials. From an economic point of view, this is very profitable.
- You can also save some money by refusing the services of a roofing crew and doing all the work yourself. True, it will be a little difficult without a partner, so invite someone you know.
- It is much more convenient to carry out installation work on a flat surface than in a suspended state, so it will proceed not only easily, but also quickly.
- By servicing your roof at any time of the year, you can be sure that you will not harm your health in any way.
- The additional space created as a result of installation can be used at your discretion. On it you can place a recreation area, place a playground, a workshop, grow a garden and much more.
Often, as I list these properties of a flat roof, many developers have a desire to start construction right away, but it is not as easy as it seems. The whole difficulty lies in designing such a roof, and if any element is installed incorrectly, then such a surface will soon fail.
The drainage system of a flat roof is one of its most important components.
As you already know, it can be equipped with both internal and external methods. If we consider the first, then it represents the installation of a complex system of pipes inside a building, which in a certain way drain precipitation from the surface into the storm sewer. This system allows you to improve the appearance of your comfort and make it more attractive and mysterious. As for the second method, these are the familiar pipes that are visible from the outside of the building. As a rule, external drainage from a flat roof is installed only if your finances are limited or your region experiences harsh winters.
This is interesting: Treating walls before wallpapering: the whole point
Rules for installing a drainage system
Not only a professional can perform a high-quality drain installation. Understanding how to make a drain and following some recommendations, you can do the work yourself:
- The heavier the pipe, the closer the hooks should be located . Plugs, hooks and drain funnels are installed in advance, before installing the gutter. When arranging drainage for the roof of a house, it is better to use gutters made of copper; they are the most durable. The only drawback is the high cost. For a small country house you should not use expensive components.
Features of installing a house drainage system Source peredelka.tv
- The method of connecting the pipes depends on what the gutter is made of . For PVC products, cold welding is used.
- Steel gutters are cut with a metal cutting tool . A hacksaw is the most practical option.
- The gutter and additional parts are assembled on the ground before installation . The installation of drainage systems should be carried out by several people to help secure the structure to the roof.
On a note! When designing a drainage system for a building with your own hands, take into account the diameter of the pipes and gutters, the location of the water intake and drainage elements, and the amount of materials.
From metal profiles for plasterboard
The lightweight and durable metal profile is perfect for draining water. We find the required amount of material based on the perimeter of the roof of the house.
Profiles around the entire perimeter of the house can be attached to:
- brackets;
- wire;
- bars.
To protect against water pouring out of the gutters, it is cut into 2 parts, the end is left above the funnel and bent to make a semicircle barrier at the corner. The drain pipes and funnel will have to be made from other materials.
Drainage from plastic sewer pipes
You can make drainage with your own hands from different materials. The most popular option is plastic sewer pipes. This material has a number of advantages :
- relatively low cost;
- a large selection of adapters and pipes, various parts for fastening;
- the ability to cut pipes yourself;
- light weight, which facilitates transportation and installation;
- long service life.
The positive characteristics of plastic sewer pipes attract many owners of private houses and country cottages and dachas. The main condition is to properly design the drainage system.
Installation of a drainage system from sewer pipes Source fasad150.ru
See also: Catalog of companies that specialize in sewerage, water supply and drainage systems
When considering the question of how to make a roof drain with your own hands from plastic pipes, you should not forget about preliminary calculations. To determine the size of the gutter taking into account the expected rain flows, you need to calculate the effective parameters of the roof. If such calculations cause some difficulties, average values can be used. To do this, you need to prepare the following components of the drainage structure :
- PVC pipe 50 mm for the drainage system;
- cylindrical product 100-110 mm for gutters;
- adapters for connecting the listed parts - outlet diameter 50 mm, inlet diameter 110 mm.
For plastic sewer pipes, you will need to split them into several pieces of equal size. You can cut the product using a hand saw, electric jigsaw or grinder. The last option is preferable, but a number of features of the work must be taken into account.
On a note! When cutting a pipe with a grinder, the plastic will stick to the casing, you need to remove the protection. It is better to use a special mask. Or purchase a disc for working with PVC products. To connect tees and gutters, the pipes do not need to be opened completely: leave 150 mm at the edges.
Some features of polymer systems
Compared to metal drainage structures, polymer systems are attractive due to their cost-effective installation and simplified assembly.
Meanwhile, plastic has the properties of changing structure under conditions of fluctuations in ambient temperature. Therefore, for anyone who decides to make a drain for the roof of a private house with their own hands, these properties of the material should be kept in mind and an installation technique that compensates for thermal expansion should be used.
Compensation for thermal expansion/contraction is achieved, for example, by incomplete insertion of the smooth ends of the pipes into the socket parts. Also, loose tightening of the rim of the fastening clamps releases the axial displacement of the parts as a result of thermal expansion.
It is advisable to limit the use of glue when installing drainpipes; use it only on one part of the connections. Installation of socket connections should be carried out in the socket position with the “up” direction.
The design of the mounting element, which provides compensation for thermal expansion. Used in the assembly of gutters. Similar design solutions are used on other parts
Almost all manufacturers of modern drainage systems have taken into account the properties of plastic and produce shaped parts (expansion elements) adapted to temperature changes. The body of such parts indicates the temperature scale according to which they are mounted in the system.
The influence of temperature may cause deformation of the plastic. Therefore, it is necessary to comply with installation standards and the distance between fasteners. Compliance with the rules is a guarantee of installing a high-quality roof drainage system.
In this material you can familiarize yourself with all the advantages and disadvantages of plastic and metal gutters.
Drainage system made from plastic containers
The simplest and most budget-friendly option for making a roof drain with your own hands from scrap materials is straight-shaped plastic 1.5 liter bottles. It is easy to accumulate the required amount of material. You will also need brackets and wire.
Drainage from plastic containers can be installed quickly and is inexpensive Source yandex.net
For work you will need the following materials and tools:
- stapler for furniture and staples 10-10 mm;
- screwdriver or drill;
- construction and installation knife;
- wire;
- thin drill;
- plastic containers.
Detailed instructions on how to make drainage systems from plastic containers :
- Determine the length of the drainage system. For convenience, you can design a drain. The main part of the container is 15-20 cm. Such bottles are not suitable for structures longer than 5 meters.
- Clear containers of labels and stickers.
- Cut off the throat and bottom. For the gutter, cut the bottle into two parts.
- The gutter is mounted in plastic containers using a furniture stapler. The container is joined with an overlap of 150 mm and secured with 2-3 brackets. With a rotating system, the bottoms serve as plugs.
- The gutter is attached to the roof. Drill holes in the lid at a distance of 20 cm. Make holes in the gutter with an awl. Thread a wire through them to secure the drain to the roof.
- Drainage is also made from plastic containers. Cut off the throat of one, and make cylinders from the others. A container without a neck is an adapter in which a hole is made for attaching the gutter.
Ready drainage system from plastic containers Source legkovmeste.ru
Types of gutters: how to choose them for your project
It is important to choose the optimal dimensions so that the gutter and the dimensions of its pipe cope with their functions most effectively. The concept of choice is that elements that are too narrow will not cope with water flows, and elements that are too wide will cost much more.
Therefore, it is worth considering the following factors:
- Precipitation amount for your area.
- The area and slope of the roof.
- Individual features of the house architecture.
Let's select the sizes
The diameter of modern grooves and pipes ranges from 60 to 216 mm. Most products comply with DIN EN standards; some manufacturers continue to produce products in accordance with GOST 7623-84.
Homeowners who prefer to make their own gutter should note that it should be slightly wider than the pipe. The height of the side should be at least 10-12 mm. The most common ratios of the elements of the groove/pipe system are as follows:
- 100/75 mm.
- 125/87 mm.
- 125/100 mm.
- 150/100 mm.
- 200/150 mm.
As an example, consider a practical example with a roof area of 60 m². A 100 mm groove and a pipe with a diameter of 80 mm are suitable here. For an area of 100 m² you will already need a 100 mm pipe and a 150 mm groove. The parameters are averaged; the individual characteristics of the building influence them directly. The length of the grooves is usually 2-3 meters.
Drainage system made of polyethylene and wood
The starting material for this design is a thin board, the length of which is equal to 2 perimeters of the roof overhang. Then you can proceed to the manufacture of the drainage system.
Instructions on how to make a gutter for a drain with your own hands from wood :
- Connect the boards in pairs at an angle of 90 degrees using nails. Make gutters that match the length of the walls of the building (connect the parts with an overlap).
- Make fasteners for installing the gutter using wire rod or boards. The best option is not wire - but a piece of lumber. For them, you will need to cut out the triangular grooves necessary to fix the gutter.
- Install brackets at the corners of the wall and secure with nails . Install narrow channels to drain drains from the roof of a private household, ensuring that their edges are overlapped.
- Adjust the gutter - tilt it and lay down a polyethylene film, securing it with nails, tape or buttons.
Arrangement of a wooden drainage system Source krysha-expert.ru
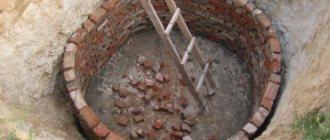
A wooden gutter is suitable for drainage. The length of the structure should be 250 cm. The purpose of installing a drainage system is to discharge wastewater into a drain or ditch 0.3 meters deep. Be sure to fill it with crushed stone or crushed brick.
Attention! When digging a ditch, an appropriate slope is made, due to which precipitation is diverted from the surface of the wall of a private household to a distance of at least 150 cm.
A drainage system for a wooden cottage will last a long time if you use a silicone sealant rather than polyethylene for reliable sealing. Before this, the wood is treated with a preservative.
How to make a mount for a homemade drain?
To secure your homemade drain you will need brackets. You can buy them ready-made or make them yourself. The only difference will be that many types of ready-made brackets are designed for the same ready-made drainpipes.
See how their edges are curved so that the bracket can easily snap onto them. But if you are simply attaching a cut sewer pipe, it does not have such a rim on the side. Therefore, it is better to purchase one bracket for testing and try on the pipe - will it hold? That is why, when making a homemade drain, many craftsmen make the brackets themselves - these are more suitable and often turn out to be even more reliable.
Ready-made brackets for drainage systems
Finished metal brackets must be bent using a special device so as not to damage the polymer coating. After all, if small microcracks appear, water can easily get into them and corrosion will begin. And this already significantly reduces the reliability of the entire drainage system!
And here are the finished plastic hooks on a homemade drainage system:
This mount is well suited for organizing gazebo drainage:
Homemade fasteners: selecting and manufacturing
And the durable fasteners that come with sewer pipes are quite suitable for drainage pipes. Moreover, they are designed to withstand the weight of water, and therefore are more durable, and go well with the color of the pipes themselves:
If you make the fastener yourself, you’d better get a special hook bender, or at least a small vice. Once you have driven in one hook, present it to the overhang and check the angle of the hook. The gutter mounted on it should then be positioned strictly perpendicular to the ground. It is important to bend the bracket so that the front edge of the gutters is only 2mm lower than the rear. This is the only way that water, if it overflows the gutter, will come out through the external screens, and not flow along the walls of the house.
Bending hooks using a regular vice is an exhausting task. The fact is that the clicks of the vice do not clamp the holder completely. Therefore, experienced craftsmen prefer to make tools for bending metal gutter holders themselves. Here are the simplest instructions:
- Step 1. Take a regular metal corner with a wall thickness of at least 6 mm, or a channel of the same parameters.
- Step 2. In the channel with a grinder, cut a slot of such length that it is equal to the width of the gutter holder.
- Step 3. Take a square pipe in which the inner walls are slightly larger than the width of the gutter holder.
- Step 4. Now mark the bend points on all holders. After this, we insert the holder into the square pipe, take a wooden block and forcefully insert it inside the pipe.
- Step 5. Set the required bend angle.
- Step 6. Now insert the holder into the slot and align it to the marked bend.
- Step 7. Now we knock out the block with another piece of wood from the opposite end of the pipe.
- Step 8. If there was already paint on the handle, it will also crack a little, but it can be touched up. But in the final result, the quality of the joke will be much higher than that bent with a vice.
By the way, here is a wonderful master class on how to make such hooks even faster and easier:
Another interesting option to bend the hook:
- Step 1. Using an angle grinder, we make a very small mark with a depth of 1 to 2 millimeters.
- Step 2. We nail one nail or one self-tapping screw through the hook into the rafter and bend the hook itself. It will bend exactly along the sawed line and will not break over time.
Once all the fasteners are ready, walk around your home and see how best you can secure it all.
Of course, it is advisable to install the gutter before you even cover the roof. The following illustration will help you understand how to install the mount:
DIY gutter made of galvanized steel
Setting up a metal wastewater drainage system requires certain experience and knowledge. For the manufacture of drains, sheet roofing steel 0.5-0.7 mm is used. It cannot be less than 270 g per square meter.
To construct a drain you will need the following tools :
- marker for marking;
- scissors for working with metal;
- pliers;
- mallet and hammer.
Tin pipes are a simple part of the drain structure; making them yourself is very simple. To do this, you will need thin tin or galvanized steel sheets.
Practical and reliable drainage systems made of galvanized steel Source stroy-podskazka.ru
General tips for installing metal gutters
When installing a metal drain, you need to follow some rules:
- cut elements with metal scissors or a hacksaw with fine teeth;
- remove protective films before installation;
- Place the end caps on the smooth part of the gutter;
- use profiles and fasteners recommended by the manufacturer;
- set the number of funnels corresponding to the calculation;
- maintain the distance between the brackets and clamps;
- leave a gap of 50-100 mm between the pipe and the facade;
- The junctions of the gutters should be reinforced with brackets; the distance from the joint to the fasteners should not exceed 150 mm on both sides.
Installing gutters yourself will help save the budget allocated for building a house. With proper selection of elements and installation, the system will last at least 10 years.
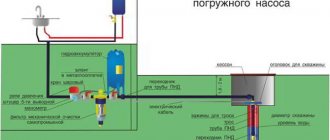
Installation of a do-it-yourself drainage system
When all the details of the drainage structure have already been prepared, proceed to assembling the drain. Installation of rainwater drainage systems can be carried out using different methods; the choice of method depends on the fasteners and the season when the installation work is carried out. It is advisable to do drains before covering the roof.
Do-it-yourself drainage system installation Source sip-roof.ru
The most successful and reliable option is installation on an external crossbar or rafter. This way you can protect the fasteners from rain using a cornice strip. If there is already a roof, use another method of arranging drainage.
Detailed instructions on how to make a drain from sewer pipes with your own hands and other materials :
- First, brackets are installed to support the gutters. They are mounted at a distance of 55-60 cm, and the level should decrease towards the release of precipitation.
- The holders are mounted so that the roof overhang extends to 1/3 of the semicircle. The other 2/3 will collect water draining from the roof.
- Brackets are mounted on the eaves strip at a slope. Install the holder located higher. Mount the bracket located at the very bottom (the slope is increased by 5 mm every meter). If you do not maintain the slope, the water will not drain well and leaks may form.
- The installed brackets are fastened with rope, and a line is drawn on the surface of the facade along the twine. Other supporting parts are mounted at the required distance, placing them along the line.
- Install the gutter and place a plug on the top edge. At the joints of the pipe and the gutter, make a hole for the funnel and install it.
Upon completion of the above work, they proceed to the installation of drains. Clamps are used for fastening to the façade surface. If there is a sewer pit on the site for precipitation, the pipe is led to it. When draining wastewater into the ground, the pipe is placed at a distance of 30-35 cm above the soil.
Design and calculation of drains
When laying any utility lines, a project is drawn up and calculations of the system elements are performed. The main goal is to select a design with a pipe cross-section of such capacity that during heavy rainfall or melting snow, the gutters do not overflow and water does not overflow over the edge of the gutters.
It is required to find the total amount of precipitation falling on the drainage area using the formula:
Q=Sхq/10000, where Q is the desired value, l/s;
S—slope area, m², q—precipitation intensity in the region, l/s per 1 Ha (tabular value).
The next step is to select a specific system based on the calculated value of Q. Manufacturers of drains provide information in the form of tables, which indicate the throughput qn of recommended types of structures.
The first design stage is determining the position of the risers
Now you can find the number of risers using the formula:
N= Q/ qn and start designing. It is performed according to the algorithm:
- Determination of the number of gutters. Metal products are produced with a length of 2 m, plastic - 3 or 4 m. Based on the manufacturer’s data, you need to select the number of elements so that during installation there is as little waste as possible.
- To connect the gutters you will need couplings. You need one less of them than joining trays.
- The number of brackets is determined by the formula: (length of the cornice - 0.3 m)/0.6 m +1. In this case, 0.6 m is the fastener installation step, 0.3 is the distance from the edge of the cornice on both sides.
- The number of plugs is equal to the number of open ends.
- When installing a drain with turns, you will need corner profiles. Their number depends on the roof configuration.
- The number of funnels corresponds to the number of drain risers.
- The length of the vertical pipe is equal to the height of the wall without taking into account the elbows, which are installed under the eaves and next to the ground.
After calculating the components, you need to choose the right fasteners for gutters and downpipes, the designs of which depend on the installation option. Long holders are fixed before laying the sheathing, short ones - on the finished roof. In both cases, you can use universal collapsible hooks.
Brackets for fixing gutters
Let's prepare the tool
Before starting installation, you need to think about what tool you will need at each stage of the work and prepare it. This will significantly reduce the installation time of the drainage structure.
When using mains powered equipment, prepare an extension cord of the required length.
Mounting equipment:
- scaffolding or ladder for carrying out work at the edge of the roof;
- marking equipment: pencil, marker, level, tapping cord, tape measure;
- power tools (you can get by with a manual equivalent): grinder (hacksaw), screwdriver (screwdriver);
- additional equipment: metal scissors, hammer, straight and corner pliers, clamps or holders;
- personal protective equipment: gloves and goggles are required, a protective suit and special shoes are optional.
Useful tips and tricks
To prevent the drainage structure from clogging, nets are installed on the gutters. They do not interfere with the collection of precipitation, but protect the pipes from leaves.
Correct installation of drainage systems is the key to proper operation of the system Source sense-life.com
In ready-made drainage systems, such protection is included in the kit, but when making drains yourself, you need to do it yourself:
- you will need a metal mesh;
- Having cut it into strips slightly wider than the dimensions of the gutter, it is attached to the drainage elements using clamps.
The drainage system must be constantly cleaned of dirt and debris. Even a mesh will not provide reliable protection. Accumulated debris can make it difficult to remove precipitation, causing blockages to appear in the pipes. Water will begin to flow onto the facade of the building and wash away the foundation.
Installation of drainage from pitched roofs
A building that is not provided with high-quality drainage during construction will, in a very short time, acquire a rather unpresentable appearance under the influence of precipitation. And most importantly, the general condition of the structure will also be negatively affected, which is why mold and an unpleasant odor may appear in many places.
A drain is needed to prevent water from accumulating on the roof and falling on the walls and foundation
And if this problem is not approached with all seriousness, the following problems will arise that will require constant financial expenses:
- high humidity will cause weakening and gradual destruction of the foundation and base of the house;
- undiverted water will penetrate into the basement and constantly fill it;
- mold and high humidity will affect the health of residents;
- the noise from flowing water will interfere with a comfortable rest.
The drainage system is used everywhere to remove precipitation from the surface of roofs: flowing water from the roof enters a special gutter and then flows through drainpipes to the ground away from the building. The purpose of the gutter is precisely to collect water from the roof surface. The drainpipe provides water drainage to a specially designated place. But to install a drain, you will need not only a pipeline and a gutter, but also elbows, clamps, fasteners and other elements.
The drain consists of horizontal gutters and vertical pipes
Gutter system configurations: closed and open
The type of roof determines the design of the drainage system. For example, for a house in a suburban area that has an ordinary gable roof with a straight eaves, a simple system with two gutters and a small number of drainpipes is best suited.
But when the roof slopes have a complex configuration, the design of the drainage system becomes more complicated. In this case, to ensure the aesthetic appearance of the building, you have to resort to various tricks to ensure reliable drainage.
Closed drainage system
A closed drain is installed if the house has a hip roof. The gutters are of a single design located along the perimeter of the slopes and do not have any plugs. It is worth paying attention to the fact that water drainage from a hip roof occurs in all directions, so drainpipes are best placed in the corners of the house.
Calculation of drainpipes in a closed system is carried out taking into account the entire roof area with values rounded up.
The choice of gutter type depends on the shape and configuration of the roof
Open drainage system
An ordinary roof with two slopes will have its own gutter with drainpipes for each slope, which means the presence of two open systems.
Drainage pipes in open systems must be installed at the corners of the building and exactly in the center of the wall.
Drainage system for pitched roofs
The simplest drainage design has a pitched roof. Sediment will flow from it in one direction, so it will not be difficult to collect it.
A pitched roof gutter consists of a small line of gutters and a downspout
In houses with only one floor, a fairly common solution is to use a rain chain instead of pipes, which is less noticeable.
The chain as a drain has become very popular on the Japanese islands, as it is also an element of facade decoration. It is often made from copper. Alas, currently manufacturers of drainage system elements for the Russian market do not produce decorative elements for drainage chains.
But if you want to make such a system yourself, be sure to comply with the following requirements:
- The chain must be tensioned to prevent it from oscillating from side to side, for which purpose the lower end must be secured in any possible way.
- To avoid water getting on the finishing materials of the building, the chain must be installed at a distance of at least 0.5 meters from the wall.
The implementation of such an idea is quite simple, the main thing is to have the desire.
The drainage chain is an excellent decorative element of the building facade
Drainage system for gable roofs
A standard gable roof has gutters that are located at the corners of the house. This arrangement is most appropriate from both an aesthetic and a technical point of view.
The installation location of gutters is directly influenced by the roof structure.
The location of the drains must be selected based on the roof plan. The installation must ensure the aesthetics and reliability of the drain, but the priority is still reliability. The length of the drain pipes is determined taking into account the distance from the gutter to the drain point (plinth area or sewer well).
The installation location of the drain pipe is also determined by the length of the roof slopes. With a length of less than 12 meters, the pipe can be located at any point on the wall, except in cases where there is a window, balcony or bay window nearby. With a length of more than 12 meters - near the center of the cornice. The main thing is that there should be no more than 24 meters between the pipes.
On gable roofs with small slopes, drainpipes can be installed in any convenient places
Gutters on roofs of complex shapes
It is difficult to design drainage for a multi-slope roof, since each slope requires its own drainage system. It is these difficulties that will be discussed in detail.
The influence of the number of slopes on the design of the drainage system
In the case where the roof has a large number of slopes, and the drainage system is built at minimal cost, a large volume of water entering the gutter sharply reduces its flow rate due to the insufficient volume of the gutter itself. This causes a large load on the system design and leads to rapid freezing of water at subzero temperatures. Therefore, when designing a drainage system, it is imperative to take into account the increase in load associated with a large area of roof slopes.
Superstructures and hatches
The next difficulty is to ensure drainage on towers or balconies, since it is in these places that moisture is most likely to penetrate into the structure and freeze. That is why building minimalism is currently fashionable.
Ensuring drainage from the tower is a non-trivial task, since it is necessary to install a gutter in the form of a circle. It is almost impossible to make a metal gutter of the required diameter by bending a single piece of material. Such a gutter is made from small segments soldered together and painted in the color of the roof to hide the junctions of the segments.
And for a roof window and skylight, a gutter is not required. The main thing is to know the direction of water flow and the place of its accumulation. In the case of lucarnes, a gutter is installed only when it has a large area and multidirectional slopes.
It is not necessary to install a drain to drain water from the hatch
Video: DIY drainage system installation
Briefly about the main thing
Do-it-yourself roof gutters can replace a finished structure. The main thing is to follow the technology for installing the drainage system. The reliability and proper operation of drainage systems depends on the accuracy of measurements. A drain made according to all the rules will cope with the task and will last for a long time.
Different materials are used to make roof gutters: PVC, sewer pipes, galvanized steel, wood, plastic bottles. The process of installing the structure is similar in each case. Detailed instructions for installing drainage systems will help you complete the work without the involvement of a specialist.
Ratings 0
Rules for installing external and internal gutters
If you do not follow the rules for installing a drainage system, you can end up with flooded walls, foundations and basements. To avoid this, you need to follow the simplest instructions:
- The external gutter is installed with a slope of 1%.
- The outer chute should be interrupted no more than three times. If this rule cannot be fulfilled due to the complex geometry of the roof, it is necessary to install another drainpipe. But it is better to install it on the outer corners of the walls.
The main thing in a drainage system is the correct organization of the direction of water flow. It should not drain at the locations of the entrance doors and near the main paths, as in winter this will lead to the formation of a decent layer of ice, which can lead to serious injuries.
It is also important to ensure the required slope of the external gutters, which depends on the size of the slope. If the length of the roof slope is more than 12 meters, then the slope must be made in both directions and two drainage systems must be installed.
It often happens that the cornice is not located in a horizontal plane, and the slope of the gutter must be done taking this fact into account.
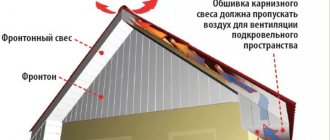
Compared to a flat roof, a pitched roof has another weak point - the so-called valley. This is the internal joint of the roof slopes, which is most susceptible to the pressure of water flow, which increases the likelihood of its penetration under the roof in this place. Therefore, it is necessary to pay special attention to drainage from valleys and install internal gutters there that will retain moisture, remove it outside, and therefore prevent water from getting under the roof. It is attached to the boardwalk (which should protrude 40 cm beyond the axis of the internal gutter) or sheathing. The process itself occurs in several stages:
- Two bars need to be nailed onto the sheathing or plank flooring in increments of 5–10 cm. There should be a small gap between the bars and the sheathing to ensure ventilation.
- Nail the sheathing, bring the ends of the wooden blocks to the axes of the gutter.
- Strengthen the main sheathing in the valley area by nailing a few more bars.
- Drive two wooden blocks between the sheathing in the place where there is free space.
The bend angle of the inner gutter must be greater than the bend angle of the valley - Bring the ends of the bars into the middle of the inner groove and clamp them.
- Bend the gutter so that the bend angle is slightly greater than the bend angle of the valley.
To secure the internal gutter it is necessary to install additional bars - Lay the gutter from the eaves overhang from top to bottom.
- Secure using metal staples.
Methods for attaching gutters
To attach gutters, you can use brackets that are combined with clamps.
Bracket mounting methods:
- Fastening to a front board is the simplest method, used when the roof is already laid. This type of bracket is used for plastic drainage. And to ensure strength, the brackets are equipped with power ribs.
- Fastening to rafters - this method is used for large areas of slopes to the roof deck with a rafter pitch of no more than 60 cm. In this case, brackets with an extension are used, with which the bracket is attached to the rafters.
- Wall mounting - in the absence of a frontal board and access to the rafters, the gutters are attached to the walls using crutches and studs.
If it is not possible to secure the brackets in a standard way, they are screwed to the wall - Fastening to the sheathing - when the rafter pitch exceeds 60 cm, the gutter is fastened using long brackets if the roof is made of metal tiles or ondulin. Or use combined brackets in the case of using bitumen tiles.
Methods for connecting drainage gutters to each other
There are 3 types:
- Glue. The area where the gutter is fastened with a coupling with a lock and a gasket is treated with adhesive-sealant. Recommended for use in areas that will not be exposed to direct sunlight.
- Glueless. Suitable for both metal and plastic elements. The connection is made using couplings with a durable gasket that does not require sealing.
- Soldering. Suitable for steel or copper gutters. Used by craftsmen. Not suitable for joining by beginners at home - high precision is required when processing edges.
You need to choose the connection option based on the recommendations of the manufacturer of the drainage elements. In the corners, it is recommended to use adapters with high-quality seals.
What function should the drain perform?
Regardless of what material the drain is made of, it must protect the foundation and base of the house from rain and melt water.
A drainage system is necessary for collecting and discharging rain and melt water
Waterlogged soil can cause premature deterioration of building masonry materials or subsidence of the foundation. Reducing the load-bearing characteristics of the foundation is a very big problem. It can only be noticed when cracks appear on the facade walls of the house. Restoring the strength of the foundation is very difficult and expensive; such work can only be performed by professionals. But they are not able to give a 100% guarantee that the measures taken will achieve the goal. All other functions of drainage (collection of rainwater into a container, decorative decoration of the facade of a building) are considered secondary and do not have any impact on the duration and safety of operation of the building.
Option for organizing drainage
Prices for gutters
Gutters
Common installation mistakes
In the absence of experience, the following mistakes are most often made:
- Failure to comply with the slope of the gutters. The recommended rate is from 3 to 5 mm per 1 linear meter. If the indicator is higher, water simply will not get there; if it is lower, areas of stagnant water and debris will form, and unscheduled drainage cleaning will have to be carried out. To correct such a defect, you have to break part of the roof.
- Saving on the number of brackets. The consequence is that an overly flexible structure becomes less resistant to wind loads, with a high risk of damage and breakage. For drainage from plastic, fasteners are carried out in increments of 50 cm, from iron and other metal - every 60 cm.
- The couplings are not connected correctly. The consequence is that leaks occur in such areas. Do not neglect the use of rubber seals and you need to seal the joints with sealant. It is recommended to double fasten the brackets (on both sides).
Craftsmen do not recommend purchasing materials for drainage from different manufacturers, since the installation process may reveal inconsistencies between elements and lack of tightness of the structure.
Gutters for drainage structures
Depending on the throughput, different markings are produced. The marking shows the ratio of the diameter of the pipe to the gutter.
The following options are considered:
- 100/75;
- 125/90;
- 150/110.
Gutters are divided into:
- semicircular;
- rectangular;
- corner.
If the first two types are responsible for collecting water from the roof, then the corner gutter changes the direction of flow.
Fixation is carried out on the outer and inner corners of the roof.
Plastic gutters can be used to make both sharp and obtuse angles. To do this, you need to cut out a part and mount the halves at the required angle. The fasteners are cold welded.
The average gutter length is from 3 to 4 linear meters. Sold individually.
They are attached to the roof with brackets and hooks in increments of 60–90 cm, maintaining a slope of 1 cm every 3–4 meters. The fewer connections there are, the faster and cheaper the installation will be.
Roof mounting technology
Involves installing gutters on brackets:
- to the rafters;
- on the front board;
- to the edge of the roofing material;
- using additional brackets.
Let us examine in what cases it is advisable to use different types of installation.
To the rafters
Fixing the drainage to the rafters is carried out when the sheathing has already been covered with roofing material, but it is also allowed before laying corrugated sheets, slate and various soft flooring.
The fastening element is brackets with a long leg bent at a right angle.
When the roof is covered, you will have to tear off or unscrew the last row, if it is slate or metal tiles, in order to secure the drainage system to the last row of the sheathing, the rafters. When using soft tiles or ondulin, simply lift the last row to tighten the bracket.
This method is used if the cross-section of wooden rafters is from 180*50 mm.
When fastening, the roofing material must cover the gutters.
On the front board
The front board is mounted at the ends of the rafters. Width may vary.
Fastening is carried out with long brackets or hooks made of a guide metal profile and a bracket.
Special long planks with a groove are also produced. The plank is screwed to the board with self-tapping screws, and brackets fit into the grooves.
To the edge of the roof covering
In this way, the drainage system runs along the eaves of the roof. Used when a rigid material such as corrugated sheeting has been selected for the flooring.
To fasten the brackets (plastic or metal), you will need special clamps.
There are times when you cannot do without holes in the roof. Then it is recommended to put rubber gaskets under the metal clamps (if any). This way there will be less chance of damage to the roof.
Using an additional bracket
Installation is carried out when the roofing is completed. The risk of material damage is minimized. Also, additional brackets will be required if the main brackets for fastening the gutters are short.
Take a long bracket and simply bend it to the required length, fix it with a self-tapping screw to the wooden sheathing.
It is important to maintain the required distance from the center of the holder to the edge of the overhang. The recommended value is 30–40 mm. This will allow water from the roof to flow into the center of the gutter. Otherwise, water will overflow over the edges.
Which metal is preferable
The choice of material for a metal drainage system is relatively small: galvanized steel, copper, zinc-titanium alloy. The first material is economical and the most popular of the entire group, but, from the point of view of durability, it is not suitable in any range. For example, the thickness of the zinc coating on a class 2 metal sheet is 5-10 microns. This protection will be enough for no more than 10 years of operation.
Metals traditionally used as the main materials for drains are galvanized steel and copper. Less commonly used is a zinc-titanium alloy and aluminum. Galvanization is much cheaper than copper
Galvanized steel with polymer coating is a completely different matter. This material is not inferior to red copper in terms of durability. But making parts from such sheets yourself without damaging the polymer layer is problematic. Again, all that remains is to buy finished products or choose copper sheet as the material. And metal gutters made of copper, and especially zinc-titanium, require substantial capital investments.