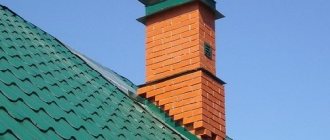
Roofs made of corrugated sheets have earned the trust of private developers due to their light weight, long service life and appearance that imitates the relief of traditional ceramic tiles. Corrugated sheets are a thin, durable, corrosion-resistant metal that is coated with a layer of paint and pressed to give the surface the desired shape. To heat the house, wood stoves, gas boilers and solid fuel stoves are installed in it. Since the installation of such equipment is technically complex, it is trusted to professionals. However, ensuring the pipe passes through metal tiles and corrugated sheets is the homeowner’s task.
Scheme of a chimney system made of metal pipes
How to route a pipe through a roof from corrugated sheets - avoid mistakes
The smoke exhaust structure is an element that is characterized by an increased fire hazard, so solving the problem of how to make a hole in the roof for a pipe should be approached responsibly. It is also important to protect the roof from moisture penetration, otherwise its service life will be significantly reduced.
Roofs made of corrugated sheets deservedly enjoy the trust of owners of private houses, since they have:
- a light weight;
- long operational period;
- appearance reminiscent of the relief of ceramic tiles.
Corrugated sheets are thin, durable and corrosion-resistant sheets of metal that are coated with paint and pressed into the required shape. After installing stoves or heating boilers, it is necessary to make a passage for the chimney through the roof structure.
Every homeowner should understand how to route a pipe through a corrugated roof. Even if this work is done by professionals, it won’t hurt to check the result.
Materials for decorating pipes in the house
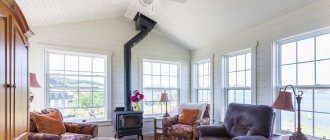
The chimney is indispensable for structures such as a stove or fireplace, which are often located in the living room. There are smoke exhaust systems that run through the entire house, so it becomes an integral part of the interior. So that it can become a harmonious detail of the room design, experts adhere to the following algorithm:
- A frame is created from a metal profile, which is subsequently covered with fire-resistant plasterboard sheets (it is marked with the abbreviation GKLO).
- Thermal insulation is achieved through fiberglass or mineral wool. This allows you to decorate the chimney inside the house with any material.
- At the end of the finish, it is best to use gypsum stucco or ceramic tiles.
Ceramic tiles for chimney decoration Source bestor.ee
Types of chimney structures
The chimney pipe serves to remove smoke and combustion products into the atmosphere. It is a hollow cylinder.
To organize this process, stove makers build:
- Brick chimneys . The smoke exhaust system is created from heat-resistant bricks, which are produced using a special technology specifically for the installation of stoves. The pipe has a rectangular or square cross-section. This method of getting rid of smoke is expensive, but it is more durable and safe. Its main disadvantage is the porous inner surface - for this reason, large amounts of soot and dust settle on it. If the pipe is not regularly cleaned, layers of soot can completely or partially clog it, reducing draft force and increasing the risk of fire. The process of how to remove a chimney through a roof from corrugated sheets is complex and therefore it is better not to do this work with your own hands - it should be done by experienced stove-makers.
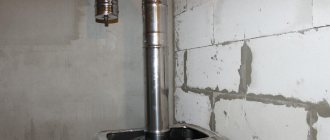
- Metal chimney systems . To assemble a structure of the required configuration, you need to purchase stainless steel pipes with the addition of zinc or molybdenum. Then insert the segments one into the other - you will need straight pipe products, clamps and bends. Thanks to the presence of a slippery inner surface, soot cannot accumulate, which means that smoke can freely move upward, outside the house. The disadvantage of this method is that metal does not retain heat well enough compared to brick, as a result of which condensation collects on it, since there is a temperature difference between the pipe and the air outside. The metal chimney structure can be easily brought to the roof, because it consists of separate elements.
Chimney outlet location - how to cut a hole
Before cutting a hole for a pipe in a profiled sheet, you should choose a convenient place for this. The decisive factor in this case is the location of the furnace unit.
According to professionals, the chimney should be placed strictly vertically, taking into account some nuances:
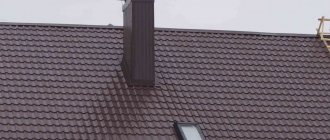
- It is advisable to make a hole for the exit of the chimney pipe at the highest point of the roof, and therefore closer to the ridge. The optimal distance from it to the chimney is considered to be 50–80 centimeters.
- Before you make a hole for the pipe in the corrugated sheet, you should make sure that it does not fall on the elements of the rafter system. To bypass them, bends are used, with the help of which a rotation of 45 or 90 degrees is set.
- The length of the chimney segments is selected so that the joints between them are below or above the intersection of the roof and ceilings, otherwise a high-quality connection will not work.
- It will be possible to achieve the required level of draft if the height of the chimney structure exceeds this parameter at the ridge by 1–1.5 meters.
- To ensure that the hatch location is correct, mark it on the roof with a marker and check the temperature at the end of the day. The pipe must remain in the cold zone at all times.
Strengthening the rafter system
In the simplest case, the opening is limited by two spacers installed between the rafters. Thus, a square is formed in the roofing pie, the walls of which are spaced at a distance no less than the standard one. Light metal roofs are characterized by a sparse rafter pitch, so usually the horizontal dimension of the opening turns out to be excessively large. It can be shortened by inserting a couple more vertical struts between the horizontal struts. This is desirable not only from the point of view of reducing the gap in thermal insulation: even in a cold roof, an opening of the minimum permissible size will cause fewer difficulties with the installation of non-combustible sheathing and fastening the metal tiles in place.
In difficult cases, the rafter leg has to be cut. Depending on the height of the passage, a tightening, a crossbar, or several purlins are also dismantled. The general method of strengthening the rafter system is as follows: at the cut site, the rafter leg at the top and bottom is fastened to its neighbors by means of horizontal struts. Next, vertical beams are inserted between these spacers, replacing the rafter leg at the passage point. The same method can be applied to other elements of the supporting system located in parallel: purlins or, for example, high puffs.
Reinforcement with the help of supporting posts is rarely practiced. This is mainly advisable when the slope is above 35°, when it is necessary to cut out fairly long fragments of the rafter system. In such cases, the opening is equipped with its own supporting system, often of a hanging type. To ensure sufficient strength, it is customary to connect the opposite legs with ties on which the racks will rest.
Preparatory measures for venting the chimney through the roof
There is the following technology for making a hole in a profiled sheet for a pipe:
- First, use a permanent marker to mark the location where it will be placed on the roof.
- The cross-sectional size of the chimney elements is selected taking into account the recommendations of the heating unit manufacturer. The thicker and higher the pipe, the easier the smoke comes out of the stove. The main thing is that there is no gap between the elements when connecting.
- Cut a hole with a grinder with a thin blade for metal work, stepping back a few centimeters inward from the drawn line. The corrugated sheeting must be cut carefully and slowly so that the edge of the cut is without jagged edges.
- Short cuts are made in the corners of the hole so that the edges of the corrugated sheet are bent upward.
- A similar passage is made in the ceiling. Then a metal box is installed to connect the pipe to the rafters. The chimney is laid through a hole inside the box.
- Hydro- and vapor barrier material, as well as insulation, are removed from the exit cut out in the roof.
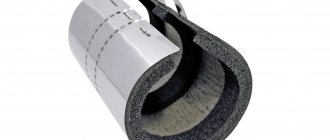
For cold areas, where the thickness of the thermal insulation material is more than 15 centimeters, you need to use sandwich pipes that have two layers of metal and a layer of insulation between them.
Sealing by arranging a box
There is a method of sealing by arranging a box.
- Leave a distance between the edge of the cut roof and the pipe in accordance with fire safety standards.
- Treat the adjacent edge of the roof to the chimney and the chimney itself with heat-protective material.
- A box made of galvanized steel or corrugated sheeting is installed in this area. Cut strips up to 40 cm must be sheathed around the perimeter and the angle of inclination of the slope.
- The elements of the box (collar) are overlapped and soldered.
- When the roof slopes at an angle of more than 30 degrees, a metal outlet is installed to drain rainwater around the chimney.
- Fill the space between the pipe and the box with thermal insulation material. You can use basalt wool.
The principle of arranging a passage with thermal insulation materials is applicable to a chimney on a slope and a ridge with minor differences. The installation of a chimney along the ridge involves changes to the design of the rafter system.
The roofing deck is covered with roofing felt, overlapping the pipe walls, and the apron is installed, followed by filling the gaps between the apron and the wall with polymer sealants.
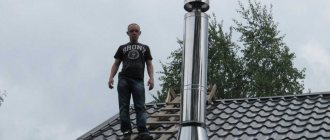
How to remove a pipe on a roof from corrugated sheets
When preparation for how to remove the chimney pipe through the corrugated sheeting has been completed, it should be correctly connected and the chimney put into operation, for which:
- You need to insert a pipe through the hole in the box and direct it towards the roof, and secure the edges of the waterproofing material with adhesive tape to the surface of the chimney.
- Expanded clay is densely poured into the box or mineral wool is used.
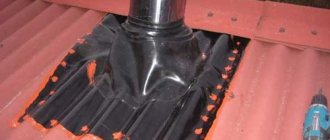
- A rubber or silicone seal is placed on the pipe to protect the outlet from water seepage. To improve waterproofing, glue the seal to the corrugated sheet using a fire-resistant sealant.
- The smoke exhaust structure is raised in segments to the required height, while the joints are tightened with galvanized steel clamps.
- Install an outer apron, the color of the roofing, which will cover the box and rubber seal.
When installing a chimney pipe onto the roof, you must remember that negligence in such work can result in a fire and material losses.
Pipe passage through a roof made of corrugated sheets and metal tiles
Roofs made of corrugated sheets have earned the trust of private developers due to their light weight, long service life and appearance that imitates the relief of traditional ceramic tiles. Corrugated sheets are a thin, durable, corrosion-resistant metal that is coated with a layer of paint and pressed to give the surface the desired shape. To heat the house, wood stoves, gas boilers and solid fuel stoves are installed in it. Since the installation of such equipment is technically complex, it is trusted to professionals. However, ensuring the pipe passes through metal tiles and corrugated sheets is the homeowner’s task.
Sealing
Sealing the joints of a roof with a brick chimney is a responsible and complex process.
As a result of the temperature difference between the working pipe and the air temperature during combustion, condensation forms in it, which causes destruction. Therefore, it is very important to insulate the protruding part of the pipe with finishing materials, taking into account their stability and appearance when choosing.
First, insulation is carried out using clinker bricks. You can cover the pipe with plaster or cover it with cement-fiber boards. Finishing with corrugated sheets the same as the roof is covered will look aesthetically pleasing.
To seal the gaps between the pipe and the roof deck, a cement collar with an increased moisture resistance coefficient is used, followed by the organization of the collar. To cement the crack, a metal profile frame is installed. A decorative collar made of sheet steel is put on and then fastened.
You can put a rubber seal on the round pipe with glue. Cement mortar is poured into the gap and allowed to dry for a day. A metal canopy is arranged to drain water, followed by fastening with self-tapping screws.
There are important nuances here:
- Gaps less than 5 mm wide can be sealed with heat-resistant silicone-based sealant.
- A gap whose width is more than 1 cm is cemented with mortar and covered with an apron.
Types of chimneys
The chimney pipe is a hollow cylinder through which smoke and combustion products are discharged into the atmosphere. Stove makers use the following options for organizing this process:
- Using a brick chimney. The chimney system is made of heat-resistant bricks, designed specifically for laying stoves, and has a square or rectangular cross-section. This is an expensive way to get rid of smoke, however, it is safer and more durable. The only disadvantage of a brick chimney is the porous, textured surface on which soot and dust settle. If you do not regularly clean the pipe, soot deposits will completely clog it, reduce draft and increase the risk of fire. Bring a brick chimney through the roof, so it’s better not to do this yourself.
- Using a metal chimney. Metal pipes made of stainless steel with the addition of molybdenum or zinc are sold in hardware stores. Having purchased straight sections, bends and clamps, you can assemble a chimney of the required configuration by inserting pipe segments into one another. The slippery inner surface of the chimney prevents soot from accumulating, allowing air to move freely to the roof. The disadvantage of this method is that metal does not retain heat as well as brick, so due to the difference in temperatures outside and inside the pipe, condensation settles on it. The metal chimney is made of a round cross-section, and due to the fact that it consists of individual parts, it is quite easy to remove it through the roof.
Answer
To design the junction of the chimney (and other, by the way, communications extending beyond the roof plane, the same ventilation ducts, sewer “firecrackers” - fan pipes), there is a decent number of different nodes. For pitched roofs, a so-called “collar” made of roofing steel is usually installed. The rabbit is placed on top of the collar, and in turn, the rabbit itself must rest with its lower part on the roof to ensure normal drainage of rainwater. In turn, during the laying process, a so-called “otter” is installed on brick pipes, i.e. a certain type of brick laying that forms an overhang above the roof plane. The bent edges of the collar are inserted into this otter.
This is all to say that simply cutting a hole and removing the pipe will not work. The collar has a rather complex shape, made of at least two parts in which the metal is bent in a certain way, and then, during the installation of the roof covering itself, it is mounted on the roof, ensuring normal water drainage. There are many photographs, drawings and diagrams of this unit on the Internet; I think there will be no problems finding it for various types of roofing.
Leave your tips and comments below. Subscribe to our newsletter. Good luck to you and good luck to your family!
Selecting an output location
Choosing a convenient place to make a hole in the roof from corrugated sheets for the chimney pipe is half the success. Naturally, the decisive factor in this matter is the location of the stove. Professional stove makers recommend positioning the chimney strictly vertically, but there are more subtle nuances:
- It is best to place the hole for the chimney outlet at the highest point of the roof, that is, closer to the ridge. The optimal distance from the ridge to the pipe is 50-80 cm.
- It is advisable that the hole in the corrugated roof for the pipe does not fall on the elements of the rafter system. To bypass them, use bends and corner sections of the chimney. Using them, you can set the rotation to 90 or 45 degrees.
- The length of the chimney pipe segments is calculated so that the joints are located above or below the places where the ceilings and corrugated roofing pass. Otherwise, making a quality connection will be problematic.
- To ensure good draft, the height of the chimney system should be 1-1.5 more than the roof ridge. If the pipe is too high, the flow of smoke will have time to cool while passing through it, which leads to the appearance of condensation.
To check whether you have correctly identified the exit location of the future chimney, draw a mark on the corrugated roof with a marker and check its temperature at the end of the day - the pipe should be located in the “cold zone”, that is, remain in the shade for almost the entire day.
Preparatory stage of work
To avoid any difficulties during the pipe installation process, you need to prepare the work site and tools in advance. A hole from corrugated sheeting is cut according to the following technology:
- After determining the configuration of the chimney, they plan where the exit to the roof will be located. Let us remind you that it is better to place the pipe vertically.
- The cross-sectional size of the chimney pipes is selected based on the recommendations of the heating device manufacturer. The thicker and higher the pipe, the better the smoke is removed from the stove. It is important that all segments are of the same cross-section and fit each other, and are inserted without creating a gap.
- On a corrugated roof, mark the outline of the pipe using a permanent marker.
- Using a grinder with a thin metal cutter, cut out a hole, moving a couple of centimeters inward from the intended line. You should work with corrugated sheeting carefully and slowly so that the edge of the cut is smooth, without jagged edges that could cause injury during the pipe removal process.
- You need to make short cuts in the corners of the hole to bend the edges of the corrugated board upward.
- They cut out the same weight in the ceiling. A metal box is installed that will connect the pipe to the rafters. The chimney will pass through the hole inside the box; the distance between their walls should be at least 15 cm.
For northern regions, where the insulation layer exceeds 150 mm, sandwich pipes are recommended, which consist of two layers of metal and a heat-insulating material between them.
Exiting the chimney pipe to the roof
All the preparatory work has been done, all that remains is to correctly connect the pipe and put the chimney into operation. To bring the chimney to the roof you need to:
- Insert a chimney pipe through the hole in the box and direct it to the roof. Using adhesive tape, the edges of the waterproofing film and vapor barrier membrane are securely fixed to the surface of the chimney.
- Fill the box tightly with expanded clay or lay mineral wool. These types of insulation are not subject to fire, so they thermally insulate the pipe and protect against sudden ignition of the wooden elements of the rafter system and sheathing.
- Place a rubber or silicone seal on the pipe, which protects against moisture seepage at the outlet. To ensure better waterproofing, the seal is glued to the corrugated sheet with a fire-resistant sealant.
Do not be afraid of overheating of the waterproofing film from the surface of the chimney; it is reliably protected from fire by mineral wool or expanded clay placed in the box.
Even a novice craftsman can carry out the installation of a chimney pipe on the roof; the main thing is not to forget that a negligent attitude to this issue can lead to a fire and loss of your property.
Strengthening the rafter system
Often when installing a chimney, the question arises about strengthening and strengthening the rafter system, because it is necessary to form a hole in the roof pie for the pipe. That is, you will need to install a couple of spacers. When creating a roof made of metal tiles, the pitch between the rafters is rare, and the formed opening or the distance between the rafters may be too large. Therefore, it is necessary to install vertical spacers.
Pipe outlet box arrangement
Sometimes you have to break the integrity of the rafter leg, that is, cut it. Then, in certain situations, purlins or crossbars are also sawn. In this case, at the place where the rafter leg was cut, it must be fastened to adjacent, undamaged ones. For this, additional spacers are also used, between which bars are inserted vertically. Their function is to replace the rafter leg at the chimney passage.
Where is the best place to take it out?
The rules for the installation of chimneys are indicated in SNiP 41-01-2003 “Heating, ventilation and air conditioning”. So in SNiP there are clear recommendations regarding the height of the pipe, which depends on its location:
- If the chimney is located within 1.5 meters of the ridge, it should be 30 cm higher than the roof.
- If the chimney is located within 1.5-3 meters from the ridge, its height should correspond to the height of the roof.
- If the chimney is located within 3-10 meters from the ridge, the height of the pipe should be 12 degrees below the ridge.
It is very important to follow these recommendations.
If the height of the chimney is underestimated, the draft may be insufficient; if it is too high, the risk of condensation will increase, and it is very harmful, as it contains acids that destroy stove bricks.
But SNiP does not indicate where it is preferable to locate the pipe passage through a corrugated roof. At the same time, experts advise placing it on the ridge, or as close to it as possible.
- First, it will prevent smoke from entering the attic.
- Secondly, the smallest part of the chimney will remain in the cold zone, which will prevent the formation of condensation.
Installation of an abutment to a rectangular chimney
To ensure that no leakage occurs at the chimney outlet, the connection must be made correctly. For this purpose, a so-called apron is made. Its main task is to collect and drain water that can get into the gap between the pipe and the corrugated sheet. As a rule, lower (main) and upper (decorative) connections are made.
For the bottom connection you will need a sheet of galvanized steel, and standard strips of the same steel 150 by 230 mm. These strips have a 20 mm bend at the top and a 16 mm bend at the bottom to protect against leakage. The installation procedure is as follows:
- Installing a sheet of galvanized steel from the bottom edge of the chimney to the eaves. A tie may be used instead.
- Chimney gating. To do this, the junction strips are tightly attached to the pipe, and a line along the edge of the bend for the groove is marked with a construction pencil or marker. The groove itself is convenient to do with a grinder using a stone circle.
- It is very important to correctly bend the sheets one under the other. Therefore, the first abutment strip is installed from below.
- Next, the side strips are installed.
- The top bar is installed last.
Before installing the corrugated sheet, it is necessary to resolve the issue of waterproofing the pipes on the roof made of corrugated sheets. There are two popular ways:
- Use only standard waterproofing film. To do this, when installing it, a cut is made with an envelope at the place where the chimney passes. After installation, the excess part must be removed, leaving a margin of 5-10 cm, after which you can glue the waterproofing to the pipe. But there is a risk of moisture getting directly onto the membrane.
- Additional waterproofing. It is best to use self-adhesive waterproofing tape. It is installed under the decorative junction. The installation sequence is the same as for the bottom connection: starting from the bottom, move to the sides, and then to the top.
The next stage of work is the installation of corrugated sheets, after which decorative abutment strips are installed. The procedure here is the same as described above, with the exception of the need for gating.
The process of arranging waterproofing
Let's consider the sequence of the technological process of arranging waterproofing.
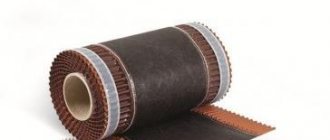
For a round chimney made of galvanized steel, the space between the pipe and the roof covering is much easier to seal. In this option, factory-made elastic penetrations are used, which are as close as possible to the profiled sheet.
The gaskets are an aluminum flange with a connecting part made of silicone or EPDM rubber. They can be of different sizes from 3 to 600 mm and designed at different angles, solid and split. Their service life is long. Such devices can be used for flat roofs and at an angle.
Sealing with such penetrations is the simplest method of insulation at the junction of the roof and the outlet.
So how does the process work?
- First, determine the size of the hole on the roof and cut the rubber corrugation according to these parameters. When organizing a chimney outlet on pitched roofs, a hole of 2-5 centimeters in diameter is required.
- Then they put on a pad.
- For the flange, select the desired shape.
- The grooves on the underside of the flange are filled with sealant and pressed tightly against the roof deck, and additionally secured with self-tapping screws with rubber heads, which are flattened during the tightening process. They are used for roofing work to prevent water from getting inside. When working with conventional self-tapping screws, rubber gaskets are used.
Important: the surface of the penetration and roof must be dry and clean.
Features of installation of the connection when the chimney is discharged through the ridge
The chimney outlet through the ridge is the most convenient option for subsequent installation of the junction.
This also minimizes the risk of leakage and eliminates the possibility of snow and debris being trapped on the roof.
At the same time, to implement this idea it will be necessary to violate the integrity of the ridge beam. This problem can be solved by installing additional supports.
If the chimney exits exactly in the center, an apron made of smooth metal of the same color as the entire roof is used to remove precipitation. The base of the apron must be sealed.
The most suitable material would be butyl rubber self-adhesive tape. The upper part must be protected from leakage with a decorative joint.
Installation of an abutment to a round pipe
Often, instead of a rectangular brick chimney, a round pipe is used. To waterproof such a pipe, roll waterproofing based on bitumen or foil tape made from modified bitumen is used. Moreover, the foil will protect the tape itself from overheating, which will significantly extend its service life.
To protect the chimney outlet, there is no need to install two stages of connection.
Instead, an apron-cap, or, as it is also called, a roof passage, is put on the round pipe.
Attach it directly to the sheathing and seal it with sealant.
When using a roof passage, it is important to consider one nuance.
Rubber heated by the pipe will melt.
To prevent this from happening, a clamp with a heat-resistant gasket is attached to the chimney at the junction between the pipe and the apron.
Fire safety precautions when using MASTER FLASH
MASTER FLASH made of silicone can withstand temperatures up to +300 degrees Celsius. This is quite enough to seal a sandwich pipe and, in many cases, a chimney made of asbestos-cement pipe.
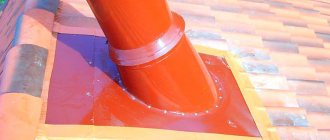
The passage through the metal tile is sealed using a Master Flash penetration. Additionally used bitumen tape
As for the metal mono-pipe, in these cases it is possible to use MASTER FLASH in cases where the length of the chimney from the stove to the passage through the roof is at least 3 meters. As a rule, in this situation the temperatures will not be critical, but if not, then thermal insulation of the area that passes through the roofing pie is necessary.
How to vent a chimney through an existing roof
We have already answered the question of how to bypass a pipe on the roof with corrugated sheeting. Now let's consider a situation where it is necessary to remove the chimney through an existing roof.
First, the following preliminary work is carried out:
- Determining the diameter of the future chimney.
- The cutting line is indicated on the corrugated sheet with a construction marker. It is worth leaving a few centimeters of margin on the smaller side. For example, if you need a hole of 40 by 80 cm, then you need to mark 38 by 78 cm.
- It is best to cut out the hole using a grinder with a thin metal circle. To avoid the formation of burrs, work is carried out as carefully as possible.
- Make small cuts at the corners of the hole and bend outward those few centimeters of corrugated sheet that we left in reserve.
- In the place where the pipe passes, it is necessary to make a continuous sheathing so that it is possible to secure the lower junction strip and the corrugated sheet.
- Cuts are made in the insulation and waterproofing. In order not to throw away excess, the waterproofing can be cut with an envelope and temporarily secure the edges with staples. This cannot be done with insulation.
- A box is constructed between the chimney and the two rafters located on either side of it. The gap between it and the chimney itself is around 150 mm.
- The edges of the waterproofing film are glued to it.
- Before running the pipe through the roof, it is necessary to resolve the issue of thermal insulation to avoid a fire. Stone wool is best suited for these purposes. This is exactly why we left a gap in the box.
After the pipe has been thermally insulated, you can begin its direct installation.
- We install the chimney in the box. It is important that there is at least 5 centimeters of clearance between the open parts of the pipe and the tree.
- To prevent the pipe from collapsing, steel clamps are used that are attached to the rafter system and sheathing boards.
The next stage is external work. Now we will look at how to seal a pipe on a roof made of corrugated sheets.
- If there is just a round pipe leading outside, without a duct, it is necessary to waterproof it using foil tape or roll waterproofing, and install a roof passage, attaching it to the sheathing we created and treating the contact areas with sealant.
- If a rectangular box is installed outside, you will have to install a lower junction bar to prevent leakage.
Installation work
Having opened the roofing pie, you can proceed to preparing the point for the pipe to pass through the roof.
This operation is performed as follows:
- The roofing material, cut diagonally, is bent outward, and the vapor film is folded into the inside of the box. Moreover, the vapor film is attached to the walls of the box with ordinary staples.
- The chimney pipe is inserted into the box from the attic side and, lifted, mounted on the hose.
- A heat-insulating belt is put on the chimney over the free end of the pipe, from the roof side.
- Next, the pipe is fixed to two collapsible clamps with legs in the form of a self-tapping screw, which is screwed into the beam or rafter.
- After fixing the chimney, before sealing the pipe on the roof, the box is covered with a metal or asbestos sheet from the attic side.
- At the final stage, moisture-resistant, non-flammable insulation (expanded clay) is poured into the box.
After this, the pipe begins to be prepared for sealing the joints between the chimney and the roof.