Why is ventilation needed? Let's give some illustrative examples.
Lack of ventilation in the under-roof space will lead to increased humidity. The wooden substructure and thermal insulation will become damp. Wet insulation will no longer retain heat and will begin to deteriorate. The sheathing and rafter system will mold and rot.
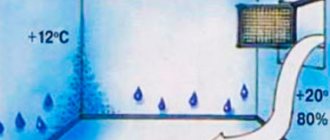
If we mean a living space, due to insufficient ventilation the air will stagnate. The house will be too humid. Because of this, the wallpaper will begin to peel off and mold will appear in the corners. The fungus can trigger allergies or asthma in the residents of the house.
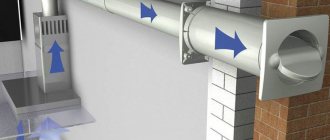
If the pressure in the sewer system is not balanced, unpleasant odors will not be removed. There will be a specific “aroma” in the house. To avoid this, natural ventilation must be provided.
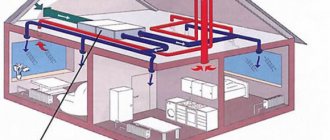
High-quality ventilation is the key to a comfortable microclimate in the house. The air must actively circulate and be renewed. In this case, excess moisture and unpleasant odors will be eliminated in time.
We will tell you how to ensure ventilation in the living room and under-roof space. We recommend using the following items from the range:
- Ridge ventilation tape.
- Ridge valve (deflector).
- Ventilation outlet.
- Roof valves KTV and P-KTV.
- MP MAXI hood output.
- The output is universal.
- Hood outlet.
- Sewer outlet.
Let's consider their functions and features. We will also learn how to attach ventilation elements to corrugated sheets and metal tiles.
Ventilation ridge tape
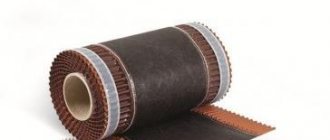
The ventilation tape protects the under-roof space from dust, debris, snow, rain, insects, birds and does not interfere with air circulation. With its help you will ensure ventilation of the roof made of corrugated sheets or metal tiles.
The central part of the tape consists of polypropylene fibers and geotextiles. Polypropylene has water-repellent properties and does not allow moisture to penetrate into the under-roof space. At the same time, the tape breathes.
The tape has corrugated edges. They are made of profiled aluminum. During installation, the edges are straightened and the tape takes the shape of any roofing material.
On the reverse side of the tape there are strips of butyl adhesive-sealant. They ensure reliable fixation of the tape on the roof.
Length - 5000 mm. Width - 250 or 300 mm.
For which profiles it is suitable : for all profiles of metal tiles and corrugated sheets.
How to install : the ridge tape is laid before installing the ridge strip.
Roll the tape along the ridge, pressing it tightly against the roofing. The corrugated edges will straighten out, the tape will adapt to the relief of the metal tile or corrugated sheet. The tape has an adhesive layer, so it will stick straight into place.
Soft roof
The main feature of ventilation is laid down at the stage of roof installation. And it lies in the ventilation gap, which is arranged using a beam with a cross-section of 50 mm. Additionally, ventilation gaps are left at the bottom of the slope for air flow. Gaps are made in the sheathing to allow free movement of air. Roofs made of flexible tiles are often equipped with a forced ventilation system. For this purpose, aerators are installed.
Rules for installing aerators
- If several aerators are installed, the distance between them should be 12 meters or more.
- Aerators are installed at the highest level of the roof. In this case, the heights on different slopes should be the same.
- To install aerators, dowels or anchor bolts are used.
- All joints must be sealed.
Ridge valve (deflector)
Ridge valve (deflector) is a ventilation element for a roof made of corrugated sheets or metal tiles. It creates air flow on the skate. Thanks to this, the under-roof space is actively ventilated.
Manufacturer: Vilpe company.
How to mount:
- Install the ridge strip.
- Calculate the number of ridge valves. To do this, measure the length of the skate. Subtract 3 meters from it - the deflectors are mounted at a distance of 1.5 meters from the ends. And divide by 3 - valves are installed every 3 meters. You will find out approximately how many deflectors you will need.
- Mark the installation locations of the valves. The first 2 deflectors are mounted at a distance of 1.5 meters from the ends of the ridge. The remaining valves are at a distance of 3 meters from each other. Attention: if ventilation shafts and other structures that interfere with air circulation go to the ridge, valves are installed on both sides of them.
- Remove the ridge vent cover.
- Check whether the shape of the valve frame (base) matches the shape of the ridge strip. If the strip is round, there is no need to trim the frame; if it is triangular or U-shaped, trim the base of the valve. The frame has grooves for cutting.
- Attach the valve frame to the ridge strip and trace its outline.
- Cut a hole in the strip that matches the contour of the valve frame.
- Glue the end seals to the base of the valve.
- Fix the valve frame to the ridge strip with self-tapping screws.
- Place the valve cover onto the frame. Press until it clicks.
- Check if the valve cover moves. It should move along the ridge by 5 mm.
Ventilation outlet
The ventilation outlet ensures air circulation in the under-roof space. This element is characterized by high throughput. One ventilation outlet passes 200 cm2 of air.
Resistant to shocks and other mechanical influences. Does not rust because it is made from polystyrene. It looks aesthetically pleasing - the paint with which polystyrene is coated does not fade. The ventilation outlet can be ordered in the color of the roof - there are 9 shades to choose from.
The ventilation outlet is fully equipped and ready for installation. A sealant is applied to its base.
Products are made to order.
For which profiles it is suitable : for Lamonterra® and Lamonterra®X metal tiles. A ventilation outlet for a flat roof can be made to order.
The ventilation outlet is mounted on a roof with a slope of 15-45 degrees.
How to install : the ventilation outlet is installed on the slopes. The distance from the ridge to the valve is less than 60 cm.
Attention: in order for air to circulate freely from the eaves to the ridge, ventilation outlets must be installed in each rafter span.
- The vent kit includes a paper template. It shows the outline of the hole that needs to be cut in the roofing material. Attach the template to the roof and trace it with a marker.
- Along the contour of the template, cut a hole in the corrugated sheet or metal tile.
- Attach the ventilation outlet to the roof and secure its base. To do this, use 4.8x28 (35) mm self-tapping screws.
- There is no need to additionally seal the installation site. The ventilation outlet is hermetically connected to the roofing material, leaks are excluded.
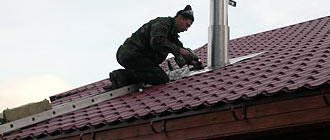
Installation
Installation of ventilation outlets on a metal roof is carried out after completion of roofing work. For installation you will need a hacksaw or metal scissors, a marker, a drill, a screwdriver, and silicone-based sealant. Work is carried out according to the instructions in the following order:
Important! The cost of installing each ventilation outlet on a metal roof is 70-10% of the cost of materials. Therefore, it is more rational to carry out the installation yourself, paying special attention to sealing the seams, as well as the vertical position of the pipe.
Roof valves KTV and P-KTV
Roof valves KTV and P-KTV perform the same function as the ventilation outlet. They are needed for ventilation of the under-roof space. Mounted on slopes.
Made from impact-resistant polypropylene, they are resistant to mechanical stress.
Manufacturer: Vilpe company.
Which profiles are suitable for : KTV and P-KTV differ in the shape of the base, therefore they are suitable for different materials.
The KTV roofing valve is optimal for Lamonterra®, Lamonterra®X metal tiles. The P-KTV roofing valve is universal, it is suitable for any metal tile profiles and corrugated sheets no higher than 38 mm.
How to mount:
- Take the paper template that came with the roof vent. Place it on the roofing material and outline it with a marker.
- Cut a hole in the corrugated sheet or metal tile along the contour of the template.
- Apply silicone sealant along the contour of the hole (for reliable protection against moisture). Unlike the vent outlet, there is no sealant at the base of the roof vent.
- Place the roof vent over the cut hole. Secure the base of the element with 4.8x28 (35) mm self-tapping screws.
MP MAXI hood output
MP MAXI output is used as:
- exhaust outlet (provides ventilation of the living space);
- sewer outlet (eliminates unpleasant odors and normalizes pressure in sewer systems).
Differs in increased sizes. The total height is 770 mm, the diameter of the inner pipe is 125 mm.
MP MAXI is made of impact-resistant polystyrene and is resistant to mechanical stress. Even when the “snow cap” comes off the roof like an avalanche, it does not damage the hood outlet. Therefore, MP MAXI is in demand in the northern regions.
An insulated (insulated) pipe with a built-in cap and a passage element are supplied with the MAXI MP.
- The insulated pipe does not freeze. This is especially important for the harsh northern climate.
- The hood with wide ventilation gaps allows air to pass through, even if the hood outlet is covered with snow. It also protects the pipe from precipitation and debris. No ice forms on the hood, which could block the air flow.
- The upper part of the passage element rotates around its axis by 180⁰. Therefore, MP MAXI can be used on roofs with different slopes - 30-45o or 45-60o. You don't need any additional items.
MP MAXI does not fade and looks aesthetically pleasing. It is made in 10 shades, you can choose it to match the color of the roofing material.
Products are made to order.
For which profiles is it suitable : for metal tiles Lamonterra®, Lamonterra®X, Moncatta®, Tramontana®, Monterrosa®, Montecristo®, for profiled sheets S-21, MP-20, NS-35. Can be used on flexible tiles and standing seam roofing.
The permissible slope of the slopes is 30-60 degrees.
How to mount:
- Find out where the duct “exits” onto the roof. This is where you will install the MAXI MP.
- Trace the paper template that comes with the kit with a marker.
- Cut a hole in the metal tile or corrugated sheet according to the template.
- Connect the bottom of the insulated pipe and the duct. If the insulated pipe does not reach the duct, use corrugated pipe of the appropriate diameter.
- Seal the junction of the hydro-, vapor barrier and the outlet of the MP MAXI. Use connecting tape.
Duct passage assembly
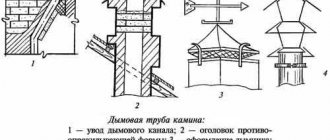
In order to bring the ventilation pipe to the roof, similar units are also used.
But their design is completely different than for chimneys.
Because the air in the ventilation pipe is at room temperature and there is no need to insulate the structures from a fire safety point of view. Nowadays, the industry has mastered the production of a wide range of passage units for air ducts.
And all that remains is to choose the one that fully matches your ventilation parameters.
Most models have a special ring for collecting condensate.
A valve may also be located in the penetration design.
Although most models do not have a valve.
It all depends on the diameter of the air duct.
If the diameter is large, then it is better to use a design with an automatic valve.
Universal output
The universal output can be used in two cases:
- to ensure ventilation of the under-roof space;
- to eliminate odors and normalize pressure in sewer systems.
Made from polystyrene, resistant to mechanical damage. Doesn't fade. Available in 13 colors, among them you will find an option for your roof. Equipped with a cap that protects from precipitation and debris.
The height of the universal outlet is 200 mm. The internal diameter of the element is 110 mm.
Products are made to order.
For which profiles is it suitable: for metal tiles Lamonterra®, Lamonterra®X, Moncatta®, Tramontana®, Monterrosa®, Montecristo®, for profiled sheets S-21, MP-20, NS-35. Can be used on flexible tiles and standing seam roofing.
How to mount:
- Find out where the duct “exits” onto the roof. This is where you will install the universal output.
- Trace the paper template with a marker.
- Cut a hole in the roof that matches the template.
- Secure the base of the universal outlet with self-tapping screws.
- Install a pipe - corrugated or insulated - under the outlet hood. Attention: if you are using a universal outlet as a sewer outlet, choose an insulated pipe. If you use a universal outlet for ventilation of the under-roof space , choose a corrugated pipe.
- Connect the bottom of the insulated or corrugated pipe to the duct.
- Apply connecting tape to the junction of the universal outlet and the hydro- and vapor barrier.
We bring out the wire
It may be necessary to bring the wire to the roof only in one case: if there is an antenna installed on the roof to which the cable fits.
This problem can be solved simply.
Companies that manufacture roofing materials also produce special kits for antennas and wires.
This kit consists of an antenna rod and a passage tile.
It is enough to place such tiles on the roof to obtain a sealed passage for the cable.
Hood outlet
The hood outlet helps remove fumes and odors from the living space.
Made from impact-resistant polypropylene, not subject to mechanical stress.
Equipped with a cap and insulated pipe. The pass-through element must be purchased separately.
Available in 11 standard colors, choose any to match the color of your roof.
Height - 500 or 700 mm. External diameter - 160 mm, internal - 125 mm.
Manufacturer: Vilpe company.
For which profiles it is suitable: it depends on the type of passage element. The range includes options for metal tiles Lamonterra®, Lamonterra®X, for flexible and seam roofing. There is also a universal passage element Pelti, it is suitable for any profiles of metal tiles and corrugated sheets with a height of no more than 38 mm.
How to mount:
- Mark the installation location for the hood outlet - drill a hole in the roofing material and waterproofing.
- Trace the paper template that comes with the passage element and cut a hole in the metal tile or corrugated sheet.
- Remove the sheet of roofing material.
- Cut a hole in the waterproofing according to the seal template.
- Apply sealant to the seal.
- Apply the sealant to the waterproofing material. Press firmly.
- Secure the seal to the sheathing using self-tapping screws.
- Reinstall the removed sheet of roofing material.
- Apply sealant to the base of the feedthrough.
- Fix the passage element to the roofing material. Use self-tapping screws.
- Insert the base of the hood outlet into the passage element.
- Connect the insulated pipe to the duct. You can use a corrugated pipe for this.
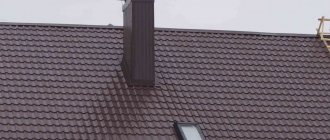
Key points when installing a ventilation pipe onto the roof
During the installation process, when making a passage through the roof, it is necessary to ensure that the joint is sealed (for more details: “How to make a pipe passage through a metal roof - proven options”). If the seal is broken, water will get under the roofing and also flow down the pipe itself into the room. When installing a ventilation pipe on the roof yourself, the sealant can be purchased at any building materials store.
The top of the pipe is protected with a special cap, the purpose of which is to cover the system from precipitation in the form of rain and snow. A modern method of solving this problem is to install a deflector at the end of the pipe.
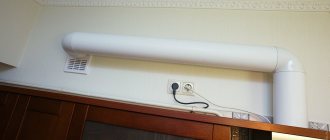
The connection of the air duct to the ventilation pipe on the roof is made using connecting flanges. For better sealing, the terminal is equipped with a support ring. To regulate the air, a special valve is installed in the pipe.
Installation of a ventilation pipe on the roof is carried out using auxiliary elements; their choice is simply huge. If you find it difficult to choose one or another element, you can get advice from specialists who will give advice on what you need to purchase to simplify the work.
Sewage outlet (regular and isolated)
The sewer outlet helps normalize the pressure in the sewer system and eliminate unpleasant odors. Made from impact-resistant polypropylene, resistant to mechanical stress.
It can be insulated (insulated) or non-insulated. The first is used in regions with sharp changes in day and night temperatures. When it is warm during the day and the temperature drops significantly at night, condensation forms at the sewer outlet. At low temperatures it freezes, which can negatively affect the ventilation element. If the sewer outlet is insulated, the temperature drop will be smooth. This will avoid condensation.
The insulated sewer outlet is equipped with an insulated pipe. The pass-through element and cap are not included in the kit; they must be ordered separately.
The sewer outlet is available in 10 standard colors.
Height - 500 mm, internal diameter - 110 mm.
Manufacturer: Vilpe company.
How to install : the sewer outlet is mounted in the same way as the Vilpe hood outlet. But they connect it not to the air duct, but to the sewer pipe.
Bottom line
We learned how to ventilate a roof made of corrugated sheets or metal tiles, what elements are required and how to install them.
Ventilation elements “Metal Profile” are equipped with everything except self-tapping screws. You do not need to choose caps, passage elements, or insulated pipes. Vilpe products will have to be “assembled” like a construction set: you will have to order passage elements and caps separately. But self-tapping screws and other necessary accessories (sealant, template, water seal ring) will be included in the kit.
Choose ventilation elements from the Metal Profile catalog. You will purchase high-quality products that will delight you with a long service life. You only need to select the required product and color.
Now you know how to ensure high-quality ventilation of a roof made of corrugated sheets or steel tiles!