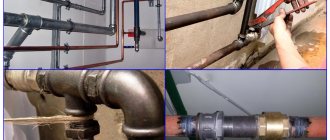
Heating is an important component of comfort and coziness in any private house or apartment, especially in regions with harsh climates. Technologies for the construction of heating systems are constantly being improved, offering consumers more and more economical and convenient solutions. Installation of a heated floor involves laying a pipeline on the floor surface and pouring it over a concrete screed. The room is heated by circulating hot water through pipes in the floor from a centralized system or from a heating boiler.
Features of fastening heating pipes under the floor
The technology for installing and fastening the heating pipeline in the floor depends on the type of pipes chosen, their wall thickness and diameter.
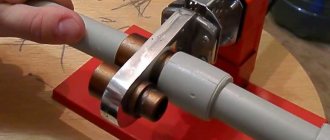
After all, during the installation of a hidden heating system, they try to avoid cut-ins, joints and other areas connected using fittings. In other words, the pipeline must be laid in a screed or in a wall in one section, and it is advisable to create all bends, corners and roundings with your own hands or using pipe benders. Naturally, such a pipe laying scheme is only suitable for flexible structural materials such as cross-linked polyethylene, metal-plastic and copper.
You need to know that the heating distribution in the floor must be carried out according to a pre-designed diagram. If you cannot work it out yourself, then you should use an alternative solution - a pipe system layout diagram marked on a heat insulator or waterproofing substrate.
The pipes are attached to the floor using special strips, inside of which there are landing slots for the required diameter. In addition, you can use single clips or paper clips. The best option is to lay heating pipes in the floor or screed, certainly in grooves cut in the panel insulation.
As a mandatory heat-insulating material, special slabs of extruded polystyrene foam are used, in which holes are pre-equipped for laying pipes of the required diameter. These slabs are installed on a bitumen waterproofing mastic. The pipes themselves are placed in grooves and bent if necessary.
Correct placement of heating pipes on the floor
Having decided to lay heating pipes in the floor under a screed, you need to decide what type of pipes will work reliably for a long period. This decision at first glance seems quite simple, but practice shows that it depends on many factors.
We also suggest that you read the article - how to choose a heated floor for tiles, where we will look in detail at what types of heated floors there are, their pros and cons, and how to install them.
Principle of operation
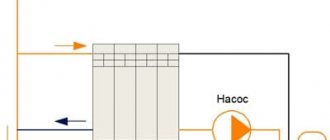
The principle of operation of a water heated floor system: a system of pipelines through which the coolant is supplied is laid in the screed. Warm pipelines heat the screed, the screed transfers heat to the floor covering, and the covering transfers heat to the room. The floor under the furniture is not heated.
Such a heating system creates a favorable temperature distribution over height and helps save the amount of heat consumed (and finances) compared to a radiator system.
With a conventional heating scheme, warm air from the radiators rises to the ceiling, heats it, and only then heats the room - with the convection method, the energy loss for heating the ceiling, walls and windows (batteries are installed under them) is quite large.
It is especially effective to use lower heating in a house if there is second light or high ceilings - in this case, savings increase, according to some data, even up to 50%.
The principle of operation of “warm floor”
Why is laying heating pipes in a screed called the right choice? After all, there is an easier way out - replacing the batteries.
Yes, this is easier to do, but it does not mean it is more effective than this installation, because no one has yet canceled the laws of physics. The operating principle of heating systems is completely different. Traditional heating radiators give off heat.
It then passes along the walls to the ceiling area. It turns out that it is the ceiling zone that warms up first.
Afterwards, the air moves to the lower region, but it gets here already cold. Thus, the following situation arises - in the ceiling area it is warmer, but below the temperature is much lower. The same applies to the convection principle.
But installing underfloor heating changes everything. The maximum heat is located at the bottom, and then, when it cools, it moves to the top. This principle of heat distribution greatly increases the comfort of housing. Accordingly, such a system seems to be the most effective.
Why do pipes in the floor need to be insulated?
Pipes in the floor must first of all be isolated from dynamic mechanical influences when people move and static loads from furniture standing on top.
Although heating wiring is not installed under the furniture, there will still be chairs, dining tables, tables, ottomans, flowers and other easily movable pieces of furniture on top.
Communications in the screed must be thermally insulated from below so that heat is not wasted on useless heating of the floor structures.
It is necessary to distinguish between the laying of a low-temperature underfloor heating pipeline in the floor and the laying of heating pipelines. Heating has a temperature of 70-80-90°C, communications with this temperature strongly heat the floor and screed, causing a temperature difference - this can cause cracking of the screed and concrete structures. Therefore, heating with high temperatures should be insulated.
Connecting a heated floor to a riser
Another technical solution in choosing the connection point is to tap directly into the heating risers (one-pipe and two-pipe schemes). Connection is carried out in 4 ways:
- Parallel;
- Consistently;
- With and without bypass organization;
- With and without installing a valve on the bypass.
It is recommended to always install a bypass line, regardless of the connection type. The bypass will allow you to easily turn off the floors during depressurization, without disrupting the operating mode of the heating riser.
Taps and valves on bypasses are prohibited by management companies. In case of illegal installation, it still makes sense to install the faucet - this will allow for a small adjustment in the amount of coolant passing through the riser pipeline and through the contours of the floors.
Advantages of closed installation
There are many advantages to a closed floor heating system:
- The main advantage is that a correctly installed and well-functioning system creates ideally comfortable conditions in the room: the air above the floor is very warm, the air near the head is warm, and cooler near the ceiling. Parents of small children will especially appreciate this method of heating their homes.
- The second advantage is efficiency - the coolant temperature is lower, heat is consumed more efficiently, the living area of the room is heated - windows, walls, ceilings, air under the ceiling, and the floor under the furniture do not heat up. With a ceiling height of 2.5 m, the savings are about 15-20%, with higher ceilings or second light – sometimes reaching 50%. Quite expensive installation of pipelines pays for itself in several years.
- Durability - a water heated floor system will last about 30-40-50 years (depending on the material. Copper structures will last 100 years). Floor heating operates at a low temperature and low pressure - therefore, all pipelines and collectors operate in a gentle mode and wear out less.
- Easy to install. The only difficulty is in the design work.
- Easy to use.
- The screed has a high thermal inertia - the room slowly cools down when the heating is turned off.
- Saves space indoors.
- Saves the housewife's cleaning efforts.
- The warm floor is not noticeable - and radiators with wiring usually disrupt the design of the room.
- The system is quite easy to combine with an existing radiator system.
- You can only heat floors in separate rooms - children's rooms, bathrooms.
- In the presence of radiators and constant convection, there is quite a lot of suspended dust in the air; when heated from below, such strong convection does not occur, there is less dust in the air - this is especially important for allergy sufferers and asthmatics.
Types of floor pipes
Which pipes are best for heating Pipes for heating a private house - reviews, price
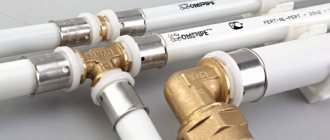
Four types of pipes are used for laying heating: cross-linked polyethylene, metal-plastic polypropylene, corrugated steel, copper (and copper in a plastic sheath). Copper is very expensive, difficult to install, and requires equipment and a welding specialist. Therefore, despite their strength and durability, they are very rarely used in underfloor heating systems.
Metal-plastic polypropylene
Polypropylene is the most popular heating material. It is resistant to corrosion, quite durable, somewhat fragile (compared to other plastics), quite plastic, chemically inert, and can withstand hydraulic shocks. The big advantage is the low price and easy installation.
Can operate at high temperatures, but has a high coefficient of thermal expansion and elongates greatly as the temperature rises. Reinforcement with aluminum foil reduces this disadvantage. A pipe, especially a reinforced one, does not bend well - it is mounted using soldering/welding. Therefore, this is a budget and reliable, but not ideal material option for installing heated floors.
Corrugated stainless steel
Corrugated stainless steel pipes are also produced. The advantages of such a pipe:
- Strength.
- Long service life.
- Corrosion resistance.
- Chemical inertness - they practically do not become overgrown with calcium and magnesium salts from the inside.
- Flexibility over a very wide range.
- High resistance to mechanical loads.
- High temperature resistance.
The disadvantage of metal corrugation is its rather high cost. This variety has not become widespread only because of low consumer awareness.
RE-X pipes
Cross-linked polyethylene has cross-links between its molecules, resulting in the formation of a three-dimensional cellular network with cross-linked molecules. Cross-linked polyethylene (PE-X) has significantly greater strength than low- and high-density polyethylenes, and greater strength compared to metal-plastic. The durability of cross-linked polyethylene is about 50 years.
PE-X is resistant to high temperatures - can withstand heating up to +95°C (for a short time - up to +110°C); has other advantages of plastics: not subject to corrosion, resistant to hydraulic shocks, plastic, not fragile, chemically inert, not overgrown with salts from the inside. Compared to polypropylene, it has a lower coefficient of thermal expansion.
The disadvantage of RE-X is its relatively high cost.
Electric heated floor installation
There are several types of heated floor installation in a private home:
- cable;
- heating mats;
- infrared film floors.
In cable heated floors, heating is carried out using a cable in a screed . For this, a single-core cable is used, which is less expensive, but more difficult to install, or a two-core cable. The latter is easier to install, since the connection is only needed on one side, while the single-core one is connected on both sides. Cable flooring is well suited for any room: the cable can be easily laid in various shapes, it is only important to determine the laying step.
Heating mats are heating wires attached to a coarse mesh . This type of electric heated floor is more convenient, since the installation step has already been calculated and the layout and fastenings have been planned. In addition, the cables in such a system are thinner, so they can be laid in tile adhesive rather than in screed. This simplifies installation and does not make the floor too high.
The installation of the mats itself is simple: the roll is rolled out onto the floor surface, then the power is connected.
Infrared film floors create a microclimate in the room by exposing furniture and interior components to infrared radiation . Next, these objects heat the air, so it does not dry out. This flooring consists of a thin film containing conductive carbon strips. Instead, there may be a continuous layer of carbon. The advantage of the system is its instant heating, but the system cools down just as quickly after switching off.
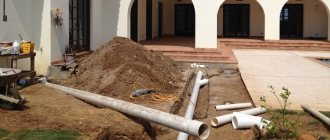
Installing a sewer pipeline in the bathroom
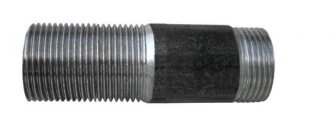
Technical characteristics of polypropylene pipes for heating
Laying sewer pipes in the bathroom floor is carried out in several stages. First you need to draw up a project for the future sewer system and prepare materials. It is recommended to use plastic pipes with a compacted structure. Don't skimp on quality, as repairing piping hidden in the floor can be very expensive.
Cast iron products today are quite rarely used for installing internal pipelines. This is explained by their high cost and heaviness. You should also prepare your tools. If you still use cast iron pipes, you will need a grinder. When working with plastic products, you need a hacksaw. During the installation process, you cannot do without a hammer and screwdriver.
If a sewer pipeline is being replaced, you first need to dismantle the old pipes, then you should clear the room of foreign objects, clean the pipes, connect them, seal them, and connect plumbing fixtures.
Methods for installing heating pipes in the floor
Do-it-yourself heating installation in a private house from polypropylene pipes
In this block we will look at two options:
- installation for pouring;
- installation under wooden covering.
Pouring installation
The method is suitable for both apartments and houses, even with wooden floors. The screed can also be poured onto a wooden subfloor. In both cases, the algorithm of actions is the same:
- waterproofing is spread;
- insulation is installed;
- reinforcement mesh is laid;
- pipes are separated and secured;
- damper tape is glued;
- everything is filled with a layer of solution.
Now let's talk about everything in order. Waterproofing is spread on the floor to prevent moisture from entering from below, and also to avoid contact of wet mortar with the wooden subfloor. Then the working surface is insulated. The best insulation option is polystyrene foam and its derivatives, such as penoflex. A steel mesh is laid on the insulation, which will distribute the load in the layer of hardened mortar. Without reinforcement, the screed will crack.
There are special foam mats that have bumps on the surface. They are arranged in rows at regular intervals, like grid cells. Such mats are simply placed on the floor, routing is carried out along them and the whole thing is filled with mortar. Easy, fast and high quality. New technologies, however.
Layout diagram of heating pipes in the “snail” floor
The distribution of heating pipes in the floor is carried out according to one of two schemes:
- snail;
- snake
The snail pattern involves a circular laying of the contour from the walls to the center of the room. There are no sharp turns in the direction of circulation. The snake passes from one wall to the opposite and at each segment the direction of water movement changes by 180 degrees. Not to say that this is very bad, but the first scheme is more preferable.
The contour must be fixed to the surface, and it must be remembered that it increases in length. Therefore, the fastening should not be rigid; the line should be able to slide in it. Alternatively, you can use plastic clips that are drilled to the floor. It is easier to use ordinary clamps that secure the pipes to the mesh.
In fact, a warm floor is a layer of hardened mortar in which heating pipes are hidden. At the same time, the cement slab does not have a rigid connection either with the subfloor or with the walls. This large rectangular parallelepiped simply lies on the floor, periodically increasing and decreasing in volume.
Under no circumstances should you forget about the damper tape. This is a strip of foamed polymer that is glued along the entire perimeter of the room to the wall. The bottom edge should run along the floor. The damper tape compensates for the expansion of the screed and prevents the mortar from sticking to the walls when pouring. The thickness of the screed above the heating pipes should be at least three centimeters, and in total - about seven centimeters. If the layer thickness is insufficient, it will crack; if it is too thick, the temperature on the surface will be lower than expected.
Installation under wood flooring
Heating pipes in a wooden floor
This method is not as effective as installing pipes in a screed, but is sometimes used. First you need to create a buffer zone for laying heating pipes in a wooden floor. To do this, logs (bars) are laid. Then pipes are laid between the lags. At the intersection of the contour and the bars, grooves are cut out in the wooden logs so that the entire highway is in the same plane. Naturally, it is necessary to provide insulation and waterproofing so that all the heat goes up. The finished floor is carefully pricked onto the joists so as not to pierce the main line.
Now let's summarize. For installation of heating pipes under screed, products made of cross-linked polyethylene reinforced with ethylene vinyl alcohol, marked PEX/EVON/PEX, are best suited. There should be no breaks in the line; everything is done from one piece. The floor must be insulated and waterproofed before pouring. The thickness of the heating pipe screed must be at least three centimeters and no more than seven. Damper tape is glued around the perimeter of the room. The temperature in the heated floor system is about 40 degrees, and on the surface of the finished floor - about 30 degrees.
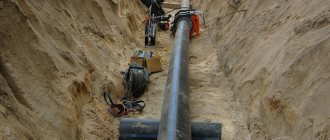
Pipes for heating in the floor (in the interfloor or basement ceiling) are installed either during the hidden installation of the heating system, or during the installation of the “warm floor” structure. It is worth noting that in these cases, pipes are used in principle and various pipeline assembly technologies are used.
Therefore, in this article we will describe the installation of heating pipes in the floor, placing emphasis on all the details of the technological process. In addition, we will say a few words about the “warm floor” technology itself.
Heating system installation methods
In fact, there are two ways to install heating in the floor under a screed: open and hidden. Each of them has its pros and cons.
Open way
With the open method, the pipeline runs along the perimeter of the room, connecting radiators, which, as a rule, are located under window openings. In older houses, metal pipes were more often used; in modern houses, plastic is preferred.
The use of plastic pipes requires a lot of fastenings, which does not always look aesthetically pleasing.
Note! In this case, the collector wiring will have to be abandoned, since it will be virtually impossible to place so many pipes in the open.
Hidden way
The hidden method involves laying a pipeline under the surface of walls or floors, and laying in walls is used relatively rarely. Such a procedure will be unreasonably complicated: you will need to rout the walls and install thermal insulation.
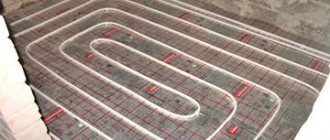
The most popular way to conceal a heating system is to lay pipes in a concrete floor screed.
A layer of waterproofing, insulation and reinforcing mesh are laid on the subfloor. The pipeline is fixed in accordance with the chosen scheme, after which the structure is filled with concrete mixture. Since the floor is poured after the pipes are laid, there is no need for labor-intensive gating.
Another indisputable advantage is the correct principle of heat distribution. In classic heating schemes, radiators give off heat to the walls, along which it moves to the ceiling area, and only then, when very cool, enters the living area.
Here the situation is the opposite. The maximum level of heat is in the floor area, from where the heated air gradually rises to the ceiling, which creates more comfortable conditions for people in the room, but at the same time, the heating system located under the screed also creates its own inconveniences.
We recommend that you read: How to determine the required height of the chimney relative to the roof ridge?
Disadvantages of placing heating pipes in the floor
Disadvantages of the "warm floor" heating system:
- The most serious drawback is the difficulty of repairing communications if they are damaged. The rule of laying only a single piece of pipeline in a screed should be strictly observed.
- Flooding of housing with warm water due to a leak creates considerable problems.
- Significant cost of the entire complex of work on installing the system.
- Significant cost of the pump, manifold with mixing unit.
- It is necessary to allocate space for a manifold cabinet - one cabinet for each floor in the house;
- Design complexity - it is advisable to involve specialists.
- Such a system cannot be installed in apartment buildings in which it was not provided for in the project (and this only happens in new buildings). The large weight of the screed creates a large load on the floor slabs and creates the risk of breaking the load-bearing structures of the house. The law prohibits connecting underfloor heating systems from central heating and hot water supply systems.
- The height of the entire screed + insulation structure reaches 110-120 mm, the weight of the screed is large - this should be taken into account when designing a house (both in terms of the height of the room and the strength of the floor structures).
- The heating system limits the choice of floor covering - carpet, parquet with good thermal insulation properties make the heating ineffective. Preferably tiles, stone, porcelain stoneware, laminate. Only high-quality linoleum can be used - in cheap varieties, when heated, substances with an unpleasant odor will be released.
- Significant thermal inertia - the screed warms up slowly.
- Water heating systems cannot be cooled below zero - it will not be possible to heat a porch, terrace, garage and paths or equip a “weekend” cottage with such a system. You can use antifreeze, but it is expensive, and antifreeze is very poisonous.
Features of installing heated floors
Reflective insulation under underfloor heating
After the materials from which the pipes are made have been determined, it remains to figure out the laying of heating pipes in a wooden house. In this case, you need to make a warm floor so that it has maximum efficiency and is reliable. Stages of laying heating pipes in a screed:
- laying a hydrobarrier and thermal insulation.
A water barrier is needed if moisture can seep in from below. When placing heating pipes in panel houses under a layer of mortar, this is not necessary, but thermal insulation must be present in any case. Polystyrene foam materials are suitable for this purpose. Reflective insulation will not be superfluous;
- laying reinforcement mesh.
A metal mesh with a large mesh is suitable for this. In addition to the fact that it will distribute the load, it will also serve as a marking for laying heating pipes in the floor;
- system wiring.
There are two schemes for hidden installation of heating pipes - “snake” and “snail”. In the “snake” scheme, the circuit runs from one wall to another, while the direction of movement of the coolant changes by 180 degrees. In the “snail” scheme, the contour is laid out in a spiral from the walls to the center of the room, with no sharp turns;
If the heated floor is the main heating, then the distance between the pipes should be 20 cm. If this type of heating is auxiliary, then a distance of 30 cm is allowed, but no more.
- securing the contour.
In order to secure the circuit, you can use plastic clips or ordinary disposable clamps. In the case of clips, they can be pre-fixed to the floor and the wiring can be carried out using them. It is easier to use plastic clamps with which the contour is attached to the reinforcing mesh;
- gluing damper tape.
The damper tape is made of foamed polyester. It is glued around the entire perimeter of the room on the wall. Its bottom edge should be in contact with the floor. During operation, the screed increases and decreases in volume, so it is necessary to leave a gap to the wall so that the warm floor does not crack;
- filling the screed.
Warm floor in a wooden house
There should be approximately 3 cm of solution above the contour. In total, the screed can be from 3 to 7 cm thick, while the recommended thickness should not be less than 5 cm. A layer that is too thin will not be strong enough and may crack. Any covering can be laid on top of the screed.
In wooden houses, heating pipes are sometimes laid under the floor, and the technique is slightly different from laying under a screed. A buffer air zone is created between the subfloor and the finishing. To do this, logs are laid around the perimeter. Grooves are cut into the logs in which the contour will pass. The depth of the grooves should be slightly larger than the diameter of the pipes, so that there is about a centimeter between the system and the finishing coating. At the same time, it is also necessary to take care of insulation
You need to be especially careful when sewing up the joists so that you don’t accidentally break through the outline with a nail or self-tapping screw.
Installation of underfloor heating with liquid coolant
If you live in a country house permanently, you should take advantage of the centralized gas supply and choose water as a coolant. If a country house is used as a summer cottage, for the weekend, it is worth taking a closer look at antifreeze. It will allow you not to flush the water every time you come to the dacha.
Warm water floors in a private house are a closed circuit . It is laid out from pipes and mounted under the floor covering. Coolant water circulates through pipes that are built into the screed. The boiler heats the water, from which it passes into the main collector and enters the distribution unit. From here it is evenly distributed throughout the pipes, transferring heat to the screeds. Having lost temperature, it goes back to the boiler for the next cycle.
A heating system with liquid coolant can be open or closed circuit . The difference between them is the design of the expansion tank.
In an open circuit, the tank communicates with the environment; when heated, liquid can be added to it to compensate for its deficiency.
The closed-type design has special features, in particular the presence of a membrane tank.
The water system is installed in one of three ways:
- on the ground;
- on the base, usually a concrete slab;
- on a wooden floor.
It is quite rare to lay it on a wooden floor. Most often, it is removed, a screed is poured, and then the system is laid. A simpler option is when all elements of the system are laid on the subfloor (base) and filled with self-leveling mixtures. True, this reduces the useful volume of the floor due to an increase in its thickness. This option will not be convenient for rooms with low ceilings.
A warm wooden floor in a private house is usually installed on the ground . A warm floor on the ground is laid as follows: remove the top layer, form a cushion of up to 10 cm from sand and crushed stone, and lay a material with waterproofing properties on top. As a rule, this is roofing felt, a special membrane. A rough screed is laid over all this, and pipes and insulation are placed on it.
The easiest way is with a concrete base. It is leveled, the cracks are sealed, and the base for laying the heated floor is ready.
The system consists of the following components:
- pipes, which are usually made of polypropylene or metal-plastic;
- fasteners;
- thermal insulation materials;
- manifold and fittings with which they are connected.
A double-circuit boiler is used for heating. It also provides hot water to the home.
A water-heated floor does not heat more than 55°; usually the coolant temperature is 35-45° maximum. At the same time, the temperature of the floor surface is 26-31°: 26° in places where people are constantly present, and 31° in rooms where the stay is temporary.
The circulation pump is mounted outside the boiler or built into it. It allows you to withstand one of the requirements for a water floor: the temperature difference between the supply water and the return water should be no more than 10°.
There are a large number of options for connecting a water heated floor to a heating system. Let's look at four schemes for water heated floors in a private house.
- Direct connection diagram.
- Circuit with three-code valve.
- Scheme with a pumping and mixing unit.
- Scheme with a thermostatic kit for one loop.
In this table we will see a small comparative analysis of the advantages and disadvantages of these schemes. This will help you choose the best scheme for a particular home.
Features of installation of water heated floors
Before pouring a heated floor in a private house, it is necessary to lay high-quality waterproofing and provide protection against leaks. When installing a heated floor, you need to cover the screed with a thick layer; this is the only way to hide the pipes well . The system consists of several layers and is a three-dimensional structure.
This is what the structure of a water-heated floor in a country house looks like.
Laying heated floors is carried out in several ways:
- snake;
- double snake;
- corner snake;
- snail or spiral.
You should not do the installation of a water heated floor in a private house yourself; the risk of making a mistake is too great. It is better to leave this matter to specialists with experience working with similar systems.
Stainless steel and copper in the heat supply system
Heating pipes made from stainless steel are characterized by reliability, high corrosion resistance to various environments and coolants, strength, resistance to mechanical damage, durability, hygiene, and most importantly, aesthetics and versatility. The most common grades of metal are 10Х17Н13М2Т and 12Х18Н10Т, the latter grade can withstand temperatures of 1000 degrees. What are the disadvantages, you ask? The disadvantage of such a product is its enormous cost, so stainless steel is most widely used in the technological workshops of industrial enterprises, and not in the apartment.
Heating systems made with copper pipes are durable, resistant to corrosion, and also have high strength.
Heating systems made using copper pipes are durable, resistant to corrosion, and also have high strength. The temperature range for using copper is up to 200-250 degrees. Copper products are universal and have an antibacterial effect. An indisputable argument is that such a circuit can withstand five times defrosting, does not allow oxygen to pass through, and is resistant to ultraviolet radiation. Copper pipes are connected using soldering and press fittings. The disadvantages include: high cost, susceptibility to mechanical action from suspended abrasive particles in the transported medium, inadmissibility of connection with steel and due to undesirable electrochemical processes.
Installation
The technology for installing a “warm floor” system will be clear to anyone after just one instruction. Before installation, you need to prepare tools and consumables:
- fittings for making mesh or finished metal mesh;
- grinder, file;
- pliers, drill;
- pipes, fittings;
- waterproofing material, insulation;
- drill attachment - mixer;
- container for mixing cement;
- trowel, level.
To calculate the number of consumables, you need to select the thickness of the screed. Masters recommend making it about 7 cm.
Before laying waterproofing, it is necessary to prepare the base. To do this, you need to smooth out the unevenness, cracks, and groove the recesses along the edges to ensure better adhesion to the mortar.
Installation:
- Fastening the insulation board made of extruded polystyrene foam.
- Placement of waterproofing film.
- Gluing damper tape.
- Connecting individual elements using fittings. The pipes must be secured with arc-shaped brackets so that they do not float when concrete is poured.
- Fastening the reinforcing mesh. You can use clamps or staples for this.
- Launch of the pipeline. You need to carefully inspect the connection. Water should not leak anywhere.
The seams are checked over several hours. During this time, you need to gradually increase the pressure in the system. It is enough to raise it to 0.6 MPa. It is better to check within 24 hours. During this time you will need to bleed the air three times.
How to select correctly?
When purchasing, first of all, pay attention to the power of one section in order to calculate the required amount to heat a certain area. You should also take into account the type of radiator with and without forced convection.
The following factors should also be taken into account:
- The required pressure in the heating system so that the water circulates well and distributes heat relatively evenly throughout all rooms. This is especially true for housing in apartment buildings. You should look at the water pressure in the pipes supplying it to your apartment. Taking this into account, decide whether such pressure will be enough or not. Information about this can be obtained from the Housing Office. And only after making sure that the pressure is sufficient, you can begin to select a specific model of heating radiators. Often, a radiator that can withstand pressure of up to 15 atmospheres is suitable for heating an apartment.
- Type of energy carrier with certain parameters. For this type of radiator installed in a private home, any type of coolant can be used. This is because the owners independently monitor its condition and temperature level. For people living in apartments, the type of energy carrier is important. For this reason, you need to pay special attention to the design and quality of the device that will be installed in your home. It is also necessary to take into account the Ph level of the liquid with which the battery built into the floor can work, its characteristics, and temperature conditions.
- Size of pipes, their number (1 or 2).
Underfloor heating installation
Heating in the floor allows you to forget about the usual radiators forever, since the system transfers a larger volume of heat to the room. There are certain rules and algorithm of actions according to which underfloor heating should be installed.
- Surface leveling;
- Waterproofing.
- Installation of thermal insulation. Extruded polystyrene foam can serve as a guide frame for pipes.
- Proper pipe installation. Products should not have large gaps or joints.
- Reinforcing screed device.
In order to simplify installation as much as possible, you should use a raster grid. If you follow this scheme, you can easily create a heating system that will evenly heat the floor surface
Before the installation process, you need to pay special attention to insulation. This is especially important for homes where the floor is located above a cold surface
In this case, it is necessary to supplement the insulating layer with additional panels. Uniform heating can be achieved using a heating device in the form of a snake. It is also necessary to leave expansion joints that allow the pipes to expand when heated. Only after this can you begin the final pouring of the concrete screed.
The modern world places high demands on the level of comfort of housing. Therefore, new materials and methods for performing installation work are appearing. This leads to the fact that heated floors are becoming more popular and more affordable. They can be inexpensively ordered online, or purchased directly on the construction market.
Features of floor-mounted radiators
With the help of built-in heating devices, heating of country houses, offices, shopping centers and other objects is organized. Such radiators effectively cope with the task of heating places of permanent residence of people, workplaces, as well as rooms in which it is necessary to ensure a certain temperature regime (for example, for plants).
So in this case convection currents move
In-floor radiators operate on the convector principle. This method of heating the air helps maintain the desired temperature level and also significantly reduces heating costs. Savings occur due to more intense air circulation compared to conventional batteries that are mounted on the walls.
Underfloor heating radiators
heating radiators built into the floor
System installation
Work always begins with a plan, purchasing materials, and finding tools. Warm floors are no exception.
Wisdom of pipe selection
Which pipes are the most reliable for heating installations? You are free to choose copper, but it is very expensive. It is better to focus on polymer products consisting of polyethylene and polybutylene. This “duet” is resistant to pressure - both external and internal: it does not cause any trouble if everything is installed correctly. Polypropylene pipes must function in a floor screed, since their only drawback is low hardness. Composite structures made from metal-plastic are no less good.
As for the installation of metal elements, in this case the risk will be unjustified. Water from the mains is sometimes replete with “chemicals”, and the material may not withstand such aggressive influence - as a result, rust will appear, and then leak. Hard water also has a detrimental effect on metal. Therefore, polymer pipes are a wise solution, and at an affordable price.
Preparing the premises
The network installation is carried out after the connection points for other communications have been installed, as well as after the installation of windows and doors. The room should be cleared of furniture, the old heating network should be dismantled or left if you want double heating of the room. Allowable surface unevenness is up to 1 cm. If they are larger, the base will have to be leveled.
Task No. 1 – level the floor surface
The rooms located above the cold zone (basement) need to be separated with insulating panels - so that you warm the house, not the cellar.
The final stage of preparation is cleaning. An industrial vacuum cleaner will cope with this task perfectly. All that remains is to ask your family not to interfere and proceed with the installation.
Intermediate stage of work
Installation of the structure
Work begins on the installation of heated floors with thermal insulation. You already understand that the hot air should be at the top, not at the bottom. To insulate the network, you can use materials in the form of sheets or rolls. The main thing is to make sure that there are no gaps between the joints of the heat insulator; if you see gaps, cover them with special tape. Polystyrene or basalt fiber coated with reflective foil is ideal for this task.
How to lay pipes? Uniform heating is important, so use elements such as a snake or a spiral.
The main thing when laying the network is to adhere to the same step between zigzags or turns. Step size matters too. For rooms up to 20 m², a distance of 20 cm is sufficient. If you are installing a network in large rooms, it is recommended to install several spirals/snakes.
Laying is done wet or dry. If you choose the first one - the more common one, in which heat transfer is maximum, then you will have to install reinforcing mesh. You are free to purchase a factory kit or build a reinforcement structure on your own. The size of the cells depends on the pitch, but the side of the cell should not exceed the pitch distance. The fittings are fixed using clips, but if special heat insulators with bosses are used, then fastenings will not be needed.
A reinforcing mesh is also installed on top of the pipe network as a safety net so that the elements do not deform under the weight of the screed. Next, the mesh is filled with a solution (gypsum, cement or other building mixture). The thickness of the screed varies between 3-7 cm.
This is important to know! Before pouring the screed, check the pipeline for leaks. .
They also practice the dry method of “masking” the network.
How to hide pipes in a dry screed? Use chipboards. The technology differs only in that instead of mortar, chipboard sheets are installed on top of the structure. The technique is simple; you don’t have to wait for the screed to dry. However, dry installation cannot be called popular, since it has a disadvantage - the voids slow down the heat transfer of the network.
The shape of the structure is at your discretion
Using pipes in a floor screed for heating is not a luxury at all, right?!
Laying heating pipes on the floor
| Type of work | Unit. | Cost, rub |
| Laying out water supply/heating pipes (metal plastic) | Water socket | From 950 rub. |
| Dismantling of water supply/heating pipes (plastic metal) | Water socket | From 450 rub. |
| Replacement of water supply/heating pipes (plastic metal) | Water socket | From 1400 rub. |
| Layout of water supply/heating pipes (polypropylene) | Water socket | From 850 rub. |
| Dismantling of water supply/heating pipes (polypropylene) | Water socket | From 350 rub. |
| Replacement of water supply/heating pipes (polypropylene) | Water socket | From 1200 rub. |
| Layout of water supply/heating pipes Rehau (Rehay) | Water socket | From 1900 rub. |
| Dismantling of water supply/heating pipes Rehay (Rehay) | Water socket | From 900 rub. |
| Replacing water supply/heating pipes Rehau (Rehay) | Water socket | From 2800 rub. |
| Installation of water supply/heating pipes (copper) | Water socket | From 2300 rub. |
| Dismantling of water supply/heating pipes (copper) | Water socket | From 1100 rub. |
| Replacement of water supply/heating pipes (copper) | Water socket | From 3400 rub. |
| Layout of sewer pipes (depending on diameter) | M.p. | From 750 rub. |
| Dismantling sewer pipes (depending on diameter) | M.p. | From 350 rub. |
| Replacement of sewer pipes (depending on diameter) | M.p. | From 1100 rub. |
| Connection of sewer pipe with riser | From 650 rub. | |
| Installation of a drain pipe bed D=50mm | M.p. | 650 rub. |
| Dismantling the drain pipe bed D=50mm | M.p. | 250 rub. |
| Replacing the drain pipe bed D=50mm | M.p. | 900 rub. |
| Installation of a drain pipe bed D=100mm | M.p. | 750 rub. |
| Dismantling the drain pipe bed D=100mm | M.p. | 350 rub. |
| Replacement of a drain pipe bed D=100mm | M.p. | From 1100 rub. |
| Installation of a drain pipe bed D=110mm | M.p. | 850 rub. |
| Dismantling the drain pipe bed D=110mm | M.p. | 450 rub. |
| Replacing the drain pipe bed D=110mm | M.p. | 1300 rub. |
| Installation of a drain pipe bed D=150mm | M.p. | 950 rub. |
| Dismantling the drain pipe bed D=150mm | M.p. | 550 rub. |
| Replacing the drain pipe bed D=150mm | M.p. | 1500 rub. |
| Installation of a drain pipe riser D=110mm | M.p. | 1250 rub. |
| Dismantling the drain pipe riser D=110mm | M.p. | 650 rub. |
| Replacing the drain pipe riser D=110mm | M.p. | 1900 rub. |
| Installation of a fan tee D=110mm | M.p | 1150 rub. |
| Dismantling the drain tee D=110 | M.p. | 550 rub. |
| Replacing the fan tee D=110 | M.p. | 1700 rub. |
| Thread cutting (D=1/2) | PC. | 500 rub. |
| Thread cutting (D=3/4) | PC. | 600 rub. |
| Thread cutting (D=1 or more) | PC. | From 700 rub. |
| Installation of shut-off valve (dismantling/installation) | PC. | 500/1000 rub. |
Laying heating pipes in an apartment along the floor is a modern wiring scheme that is gradually gaining popularity. The San-Remo company provides this service on favorable terms, and our clients are not only owners of apartments in new buildings, but also those people who are renovating their old apartment.
Features of the distribution of heating pipes on the floor
Today, not everyone realizes the advantages of laying pipes in the floor screed going to the radiators from the boiler or central pipeline. In fact, this installation option has its advantages:
- Simplifying the task of installing a heat meter. When heating is implemented through risers, this is not always possible.
- If necessary, you can turn off the heating at any time or adjust it to achieve a comfortable microclimate.
- Pipelines laid in a concrete screed in the floor last longer.
- Pipes laid in the floor warm it up a little, creating additional comfort.
- Important advantages include the absence of unflattering boners.
The main thing with such a distribution of heating pipes in the floor is to be careful when installing thresholds or drilling screeds to solve other problems (for example, installing built-in cabinets or installing a toilet).
How to order a service?
You can find out the cost of services for laying heating pipes on the floor and immediately call a specialist at the San-Remo company. Our employees have extensive experience and the necessary equipment to solve this problem.
The surveyor travels to any address to inspect the facility, assess the scope of work and calculate the cost of wiring and the cost of materials. The specialist draws up a suitable scheme taking into account specific conditions, and also advises the customer on any issues. Each of our clients is satisfied with the end result.
We provide our clients with good discounts:
- 5% when ordering services up to RUB 15,000.
- 8% when ordering work with a total cost of 15,000 to 20,000 rubles.
- 10% when ordering services in the amount of 20,000 rubles.
- 10% for pensioners, disabled people, WWII or Labor Veterans.
- 5% when submitting an application through the online form.